788T User Guide and Technical Information
7
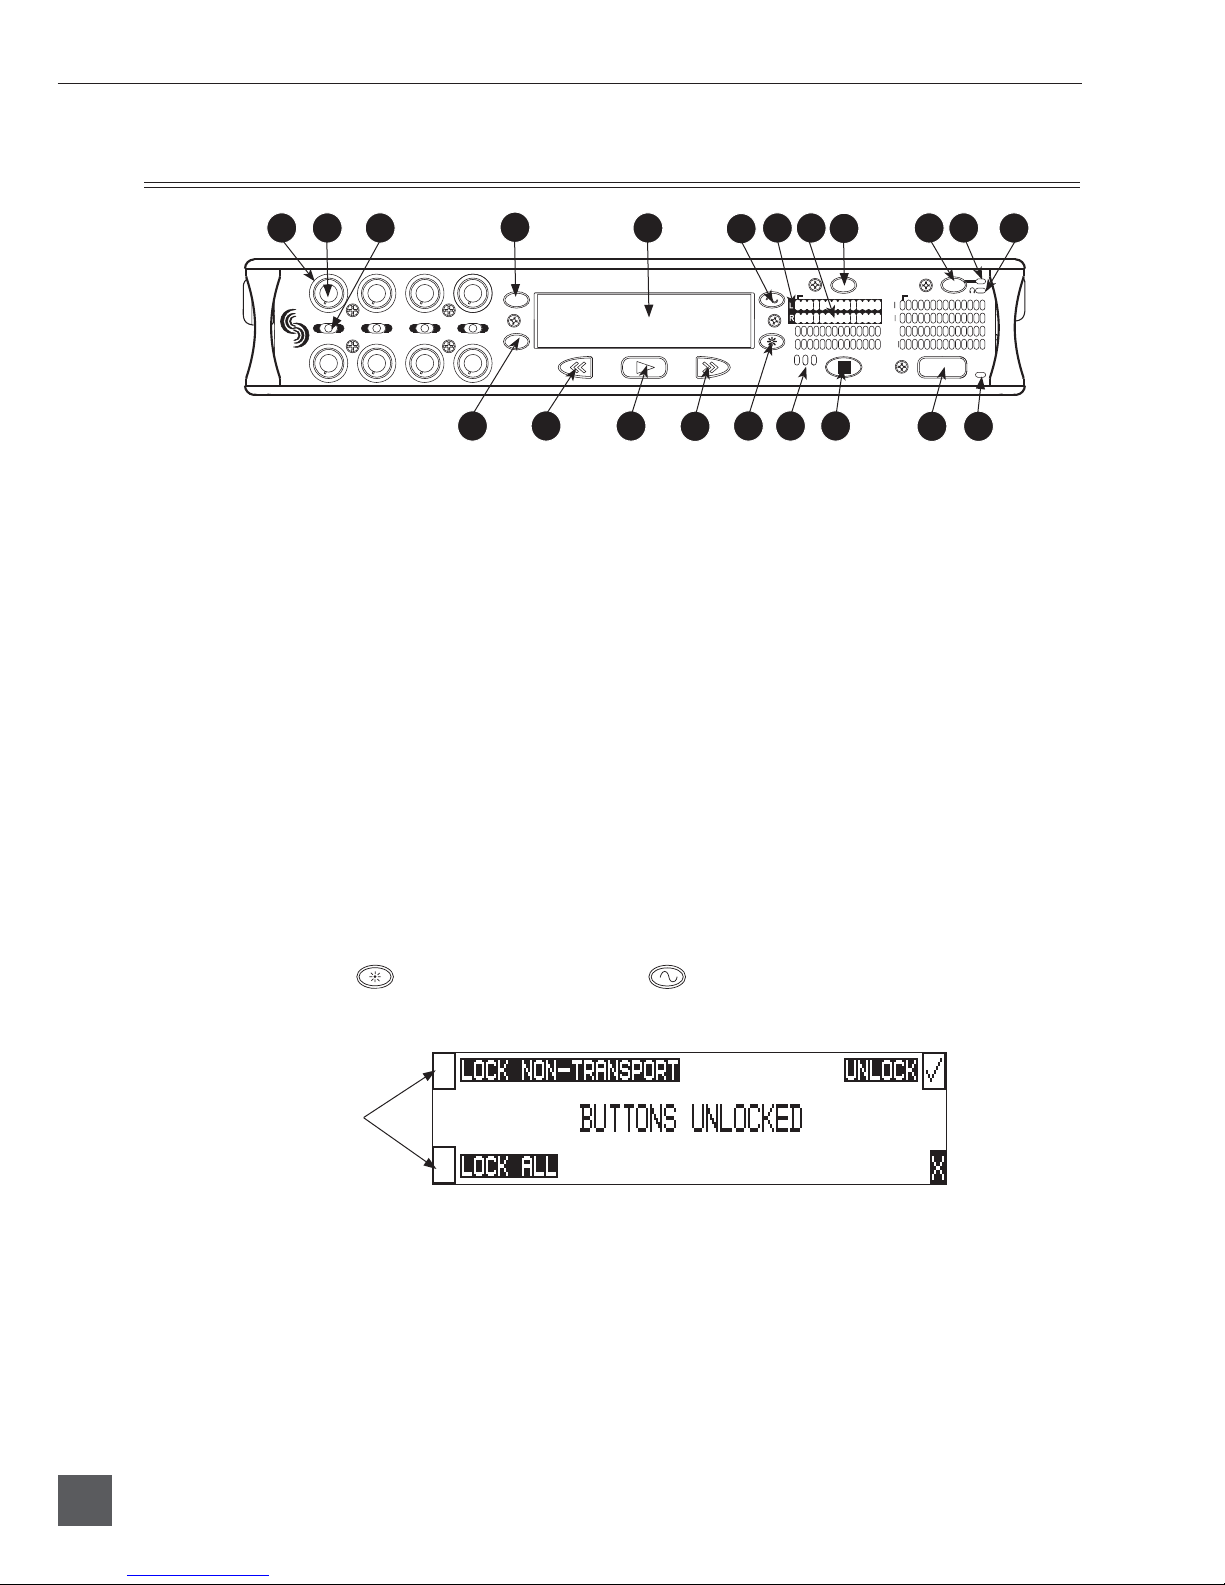
8) Level Meter LEDs
Eight, 13-segment track level-meters
indicate level in dBFS. Metering bal-
listics and peak hold times are selected
in the Setup Menu. Tracks C, D, E, F can
be used to view Tracks G, H, X1, X2. See
Metering and Display.
9) INPUT Key
Press to access the Track Setup Menu,
from which the user can arm/disarm
record tracks and view meter activity for
all 12 tracks. Press and hold the STOP
key then press the Input key to access
the Input: Track Routing Setup Menu.
Cycle through factory and custom rout-
ings by pressing the Input key while
holding the STOP key. See Input-to-Track
Routing
10) Power Key
To power up the unit, press and hold the
Power (PWR) Key for about one second.
To power the unit down, press and hold
the Power Key for about one second.
11) Power/Charge LED
Indicates the 788T is powered and avail-
able for operation. Indicates the charge
status of the onboard battery charger.
12) Headphone Output Peak LED
Indicates overload of the headphone
amplifier. When lit, the headphone cir-
cuit is overloading. Reduce headphone
level.
13) HDD Key
Press to enter the Take List and Drive
Directory. From the Take List, view and
edit metadata across all storage medi-
ums. From the Drive Directory navigate
between storage media, folders, and
files. View folder and file properties and
select files for playback.
The media that is selected for playback
is shown on the left hand side of the
main screen. Press and hold the HDD
key to toggle between available media.
If only one media is present, media
toggle is disabled. When in the Setup
Menu use the HDD key to move down
through the options and parameters.
14) Rewind Key
Performs reverse (REW) scrubbing
through the played file when pressed in
playback and play-pause mode. Play-
pause indicated by flashing A-time on
LCD. Reverse playback rate increases
the longer the key is held. In play-stop
mode (indicated by flashing filename
on LCD) selects the previous file in the
record folder (either daily folder or main
folder).
15) Play Key
Plays back the file displayed in the LCD.
If pressed immediately after recording is
stopped, the most recently recorded file
is played back.
16) Fast-Forward Key
Performs fast-forward (FF) scrubbing
through the played file when pressed in
playback and play-pause mode. Play-
pause indicated by flashing A-time on
LCD. Fast forward rate increases the lon-
ger the key is held. In play-stop mode
(indicated by flashing filename on LCD)
selects the next file in the record folder
(either daily folder or main folder).
17) LCD Backlight Key
Press to toggle between Level Meter
LEDs to View 1 (Tracks C - F) and View
2 (Tracks G, H, X1, X2). Press and hold
then Press the Multifunction Rotary
Switch to toggle the LCD and Front
Panel soft key backlighting. Hold the
LCD Backlight key and turn the Multi-
Function Rotary Switch to adjust the
brightness of LEDs. In the Setup Menu
the LCD Backlight key functions as the
cancel and exit key.
18) Media Activity LEDs
Indicates storage media activity. IN (in-
ternal hard drive), CF (CompactFlash),
EX (external FireWire device). The LED
illuminates green when the storage
media is ready, illuminates yellow when
the storage media is writing/reading
and while connected to a computer, and
illuminates red when the storage media
has encountered an error, if the drive
has less than one minute of recording
time left, or when running the Drive
Repair utility.