Solwise interNAS/USB Manuel utilisateur

U
Us
se
er
r’
’s
s
G
Gu
ui
id
de
e

Table of Contents
Table of Contents ............................................................................................................. 1
Introduction....................................................................................................................... 3
The interNAS/USB Server.......................................................................................................................3
Getting Familiar with your interNAS/USB......................................................................... 5
LEDs .......................................................................................................................................................5
Rear Panel ..............................................................................................................................................6
Audible Warnings ...................................................................................................................................7
Basic Installation & Setup................................................................................................. 8
Installation..............................................................................................................................................8
Changing USB Storage Devices ...........................................................................................................11
Configuring Your interNAS/USB..........................................................................................................13
Client PC Setup.............................................................................................................. 18
Overview...............................................................................................................................................18
Network Logon (Windows 95/98/ME only)...........................................................................................19
Using the interNAS/USB Server's Storage............................................................................................20
Using the Web File Sharing..................................................................................................................24
Changing your Password......................................................................................................................26
Administration.................................................................................................................29
Overview...............................................................................................................................................29
The Web-based Administrative Interface..............................................................................................29
Advanced Menu.....................................................................................................................................44
interNAS/USB via the Internet........................................................................................ 60
Overview...............................................................................................................................................60
Page 1

Making the interNAS/USB available via the Internet...........................................................................60
Using your Web Browser from the Internet..........................................................................................62
Remote Management.............................................................................................................................63
Troubleshooting.............................................................................................................. 64
Appendix A - Licenses.................................................................................................... 67
Overview...............................................................................................................................................67
BSD License..........................................................................................................................................69
GNU General Public License ...............................................................................................................70
P/N: 9560GB1002
Copyright 2004. All Rights Reserved.
Document Version: 1.3
All trademarks and trade names are the properties of their respective owners.
Page 2

Introduction
The interNAS/USB Server
Congratulations on the purchase of an interNAS/USB. The interNAS/USB provides a method a making
both a USB flash drive and a USB disk available to users on your network. It provides solid data transfer
performance for multiple client connections via the USB 2.0 connection. And you can add as many inter-
NAS/USBs to your network as you like.
Windows utility software is provided for the interNAS/USB Administrator. Also, the Web-based Admini-
stration interface offers a wide array of management options.
Web-based file system
WEB-based file sharing allows access and downloading of files from any PC on the network, including
non-Windows PCs.
Windows users can also use Microsoft networking features to make interNAS/USB folders appear as drive
letters on their PC.
interNAS/USB Features
• Supports standard USB 2.0 Hard Disk Drives.
• Share data on a USB Flash Drive (USB Key).
• Provided with a Windows utility program for speedy configuration.
• WEB-based configuration and diagnostic interface is accessible from any PC on the network.
• High performance file system automatically maintains itself to provide file system integrity.
Page 3

• The LAN Administrator can limit the amount of available disk space available to individual users.
• Compact size and low power consumption.
• Additional interNAS/USB Servers can be added to the network at any time.
Package Contents
The following items should be included in the interNAS/USB packaging.
If any of these items are damaged or missing, please contact your
dealer for replacements.
• InterNAS/USB
• Quick Installation Guide
• Setup CD
• Ethernet Cable
• Power Adapter
System Requirements
• Windows 95, Windows 98, Windows NT 4.0, XP, 2000 and ME.
• Ethernet Network employing 10BaseT or 100BaseTX.
• TCP/IP protocol.
Disclaimer
We highly recommend that you regularly backup the files on your interNAS/USB.
Page 4

Getting Familiar with your interNAS/USB
LEDs
Note: The "Ready/Status" LED has 2 colors - Green (Ready) and Amber (Status). These are listed
separately.
LED Function
HDD • ON - USB HDD (Hard Disk Drive) connected to the HDD USB port is
available.
• OFF - No USB HDD installed.
• Fast Blinking - Data being transferred to or from the USB HDD.
Flash • ON - Flash drive in the USB port is available.
• OFF - No Flash drive installed.
• Slow Blinking - Flash drive can be removed safely.
• Fast Blinking - Data is being transferred to or from the flash drive.
LAN • ON - Link established.
• OFF - No LAN connection.
• Blinking - Data is transmitted or received via the LAN.
Ready LED
(Green)
• ON - normal operation.
• OFF - no power.
• Blinking - This LED blinks during startup and shutdown.
Page 5
Status LED
(Amber)
• ON - This LED will be On during the Startup self-test; it will turn Off once
the self-test is completed. If it stays ON, there is a hardware error.
• OFF - normal operation.
• Blinking - During a software upgrade, both the Status and Ready LEDs will
blink.
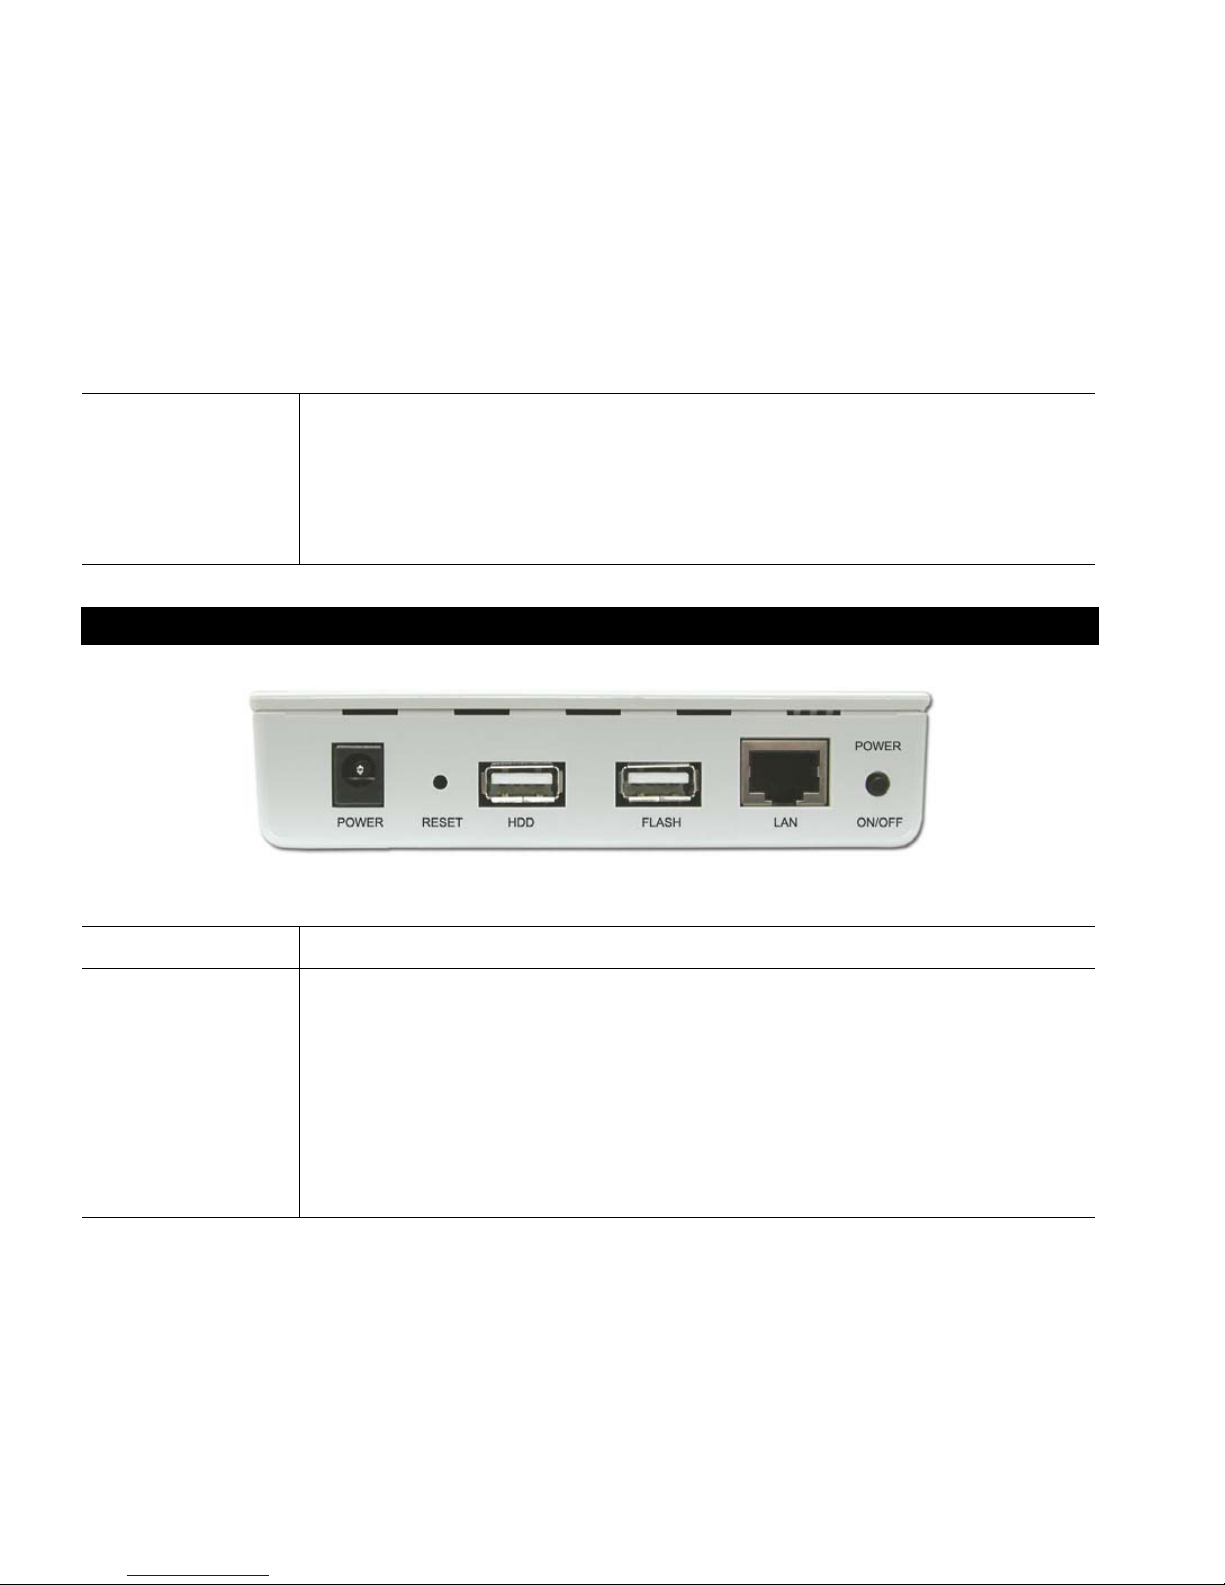
Rear Panel
Figure 1: Read Panel
Power Input Connect the supplied power adapter here.
Reset Button
(IP/Password) This button has 2 functions:
• If the interNAS/USB's IP Address is lost, press and hold this button for 2
seconds. The IP Address will be set to the default value of 192.168.0.100
(Network Mask of 255.255.255.0) and it will beep once to indicate the reset
has occurred
• If the interNAS/USB's password is lost, press and hold this button for 10
seconds. The password will then be cleared (no password), and the Inter-
NAS/USB will beep again.
Page 6

HDD USB Port Connect your USB Hard Disk Drive here. (Do NOT connect a Flash Drive here;
it will not be recognized.)
Flash USB Port Connect your USB Flash Drive (USB key) here. (Do NOT connect a HDD here;
it will not be recognized.)
LAN connector Use this to connect the interNAS/USB to your 10BaseT or 100BaseT hub.
Power Switch This is a spring-loaded "Soft Switch".
• If power is Off, press once to turn On.
• If power is On, this switch has 2 functions:
• Press and release to prepare the Flash Drive for removal. When the
Flash LED starts blinking slowly, it is safe to remove the Flash Drive.
• Press and hold for 3 seconds to start the Shutdown sequence. During
Shutdown, the Ready LED will blink. When the Shutdown is completed,
all LEDs will turn off.
Audible Warnings
Audible warnings are given by the following signals.
1 Beep Reset button or power switch is pressed.
2 Beeps
Repeated every 5 seconds
for 1 minute.
interNAS/USB is a DHCP client, but no DHCP Server responded to the
DHCP client request. This means that the interNAS/USB could not
obtain a valid IP address.
Page 7

Basic Installation & Setup
The following section instructs you on how to physically connect the interNAS/USB to the network, and
how to configure the interNAS/USB for basic operation in your Windows environment. Everything you
need to do to get your interNAS/USB up and running is covered here.
Installation
Requirements
• Windows 95, 98, ME, NT 4.0, 2000 or XP.
• Ethernet Network employing 10BaseT or 100BaseTX.
• TCP/IP protocol.
Page 8

Procedure
Figure 2: Installation
1. Connect the network cable to the interNAS/USB.
Connect the supplied network cable to the LAN port on the rear of the interNAS/USB. Connect the
other end to your hub or switch.
2. Connect the USB storage devices:
• A USB Hard Disk Drive (HDD) can be connected only to the HDD port.
The HDD must be formatted before use. The Windows utility can perform this task. See the later
section Configuring Your interNAS/USB for details.
Page 9
Table des matières


