10 11
Rinse Aid and Detergent
The rinse aid is released during the final rinse to prevent
water from forming droplets on your dishes, which can
leave spots and streaks. It also improves drying by allowing
water to roll off the dishes. Your dishwasher is designed to
use liquid rinse aids.
Warning
Only use branded rinse aid for dishwasher. Never fill the
rinse aid dispenser with any other substances such as
dishwasher cleaning agent or liquid detergent as they may
damage the appliance.
When to refill the rinse aid dispenser
Unless the rinse-aid warning light ( ) on the control panel
is lit, you can always estimate the amount from the color of
the optical level indicator located next to the cap.
When the rinse-aid container is full, the indicator will be
fully dark. The size of the dark dot decreases as the rinse
aid diminishes. You should never let the rinse aid level be
less than ¼ full.
As the rinse aid diminishes, the size of the black dot on the
rinse aid level indicator changes, as illustrated below:
Function of detergent
The chemical ingredients that compose the detergent are
necessary to remove, crush and dispense all dirt out of the
dishwasher. Most of the commercial quality detergents are
suitable for this purpose.
Warning
Use only detergent specifically made for dishwashers use.
Keep your detergent fresh and dry.
Don’t put powdered detergent into the dispenser until you
are ready to wash dishes.
Dishwasher detergent is corrosive!
Keep dishwasher detergent out of the reach
of children.
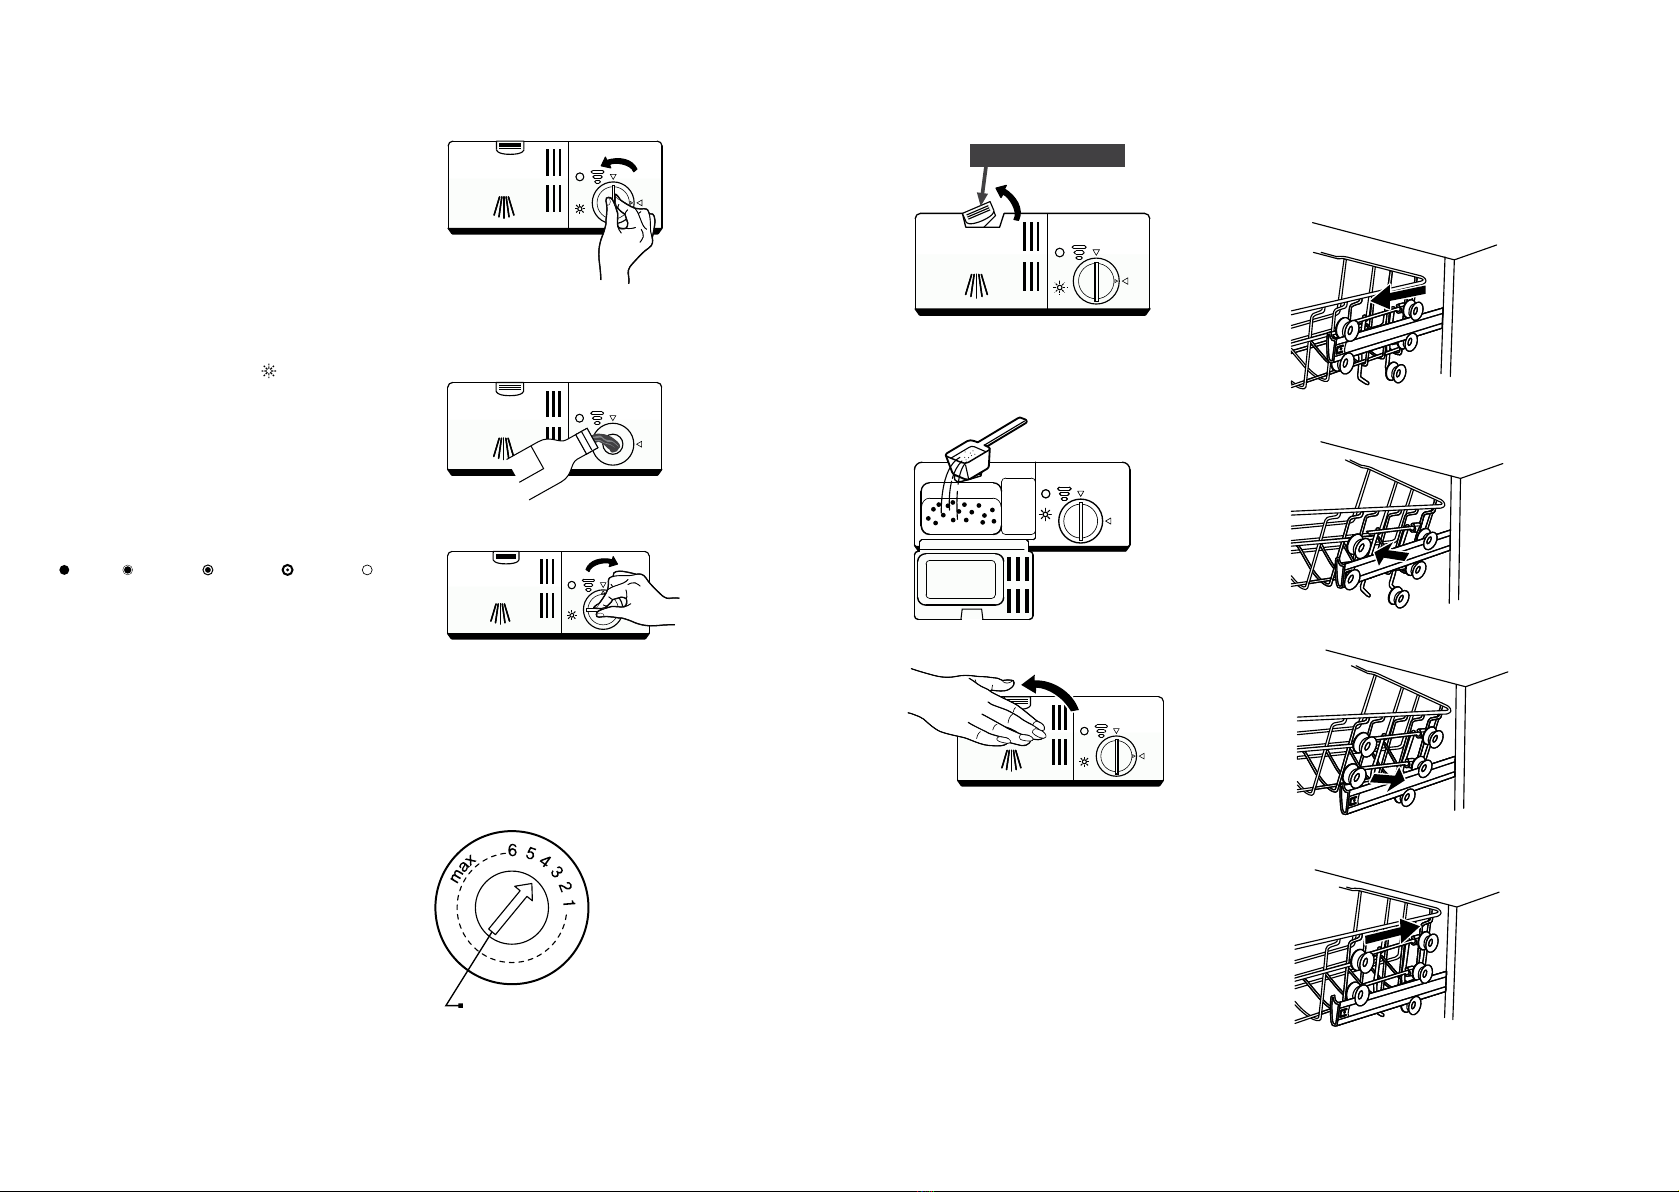
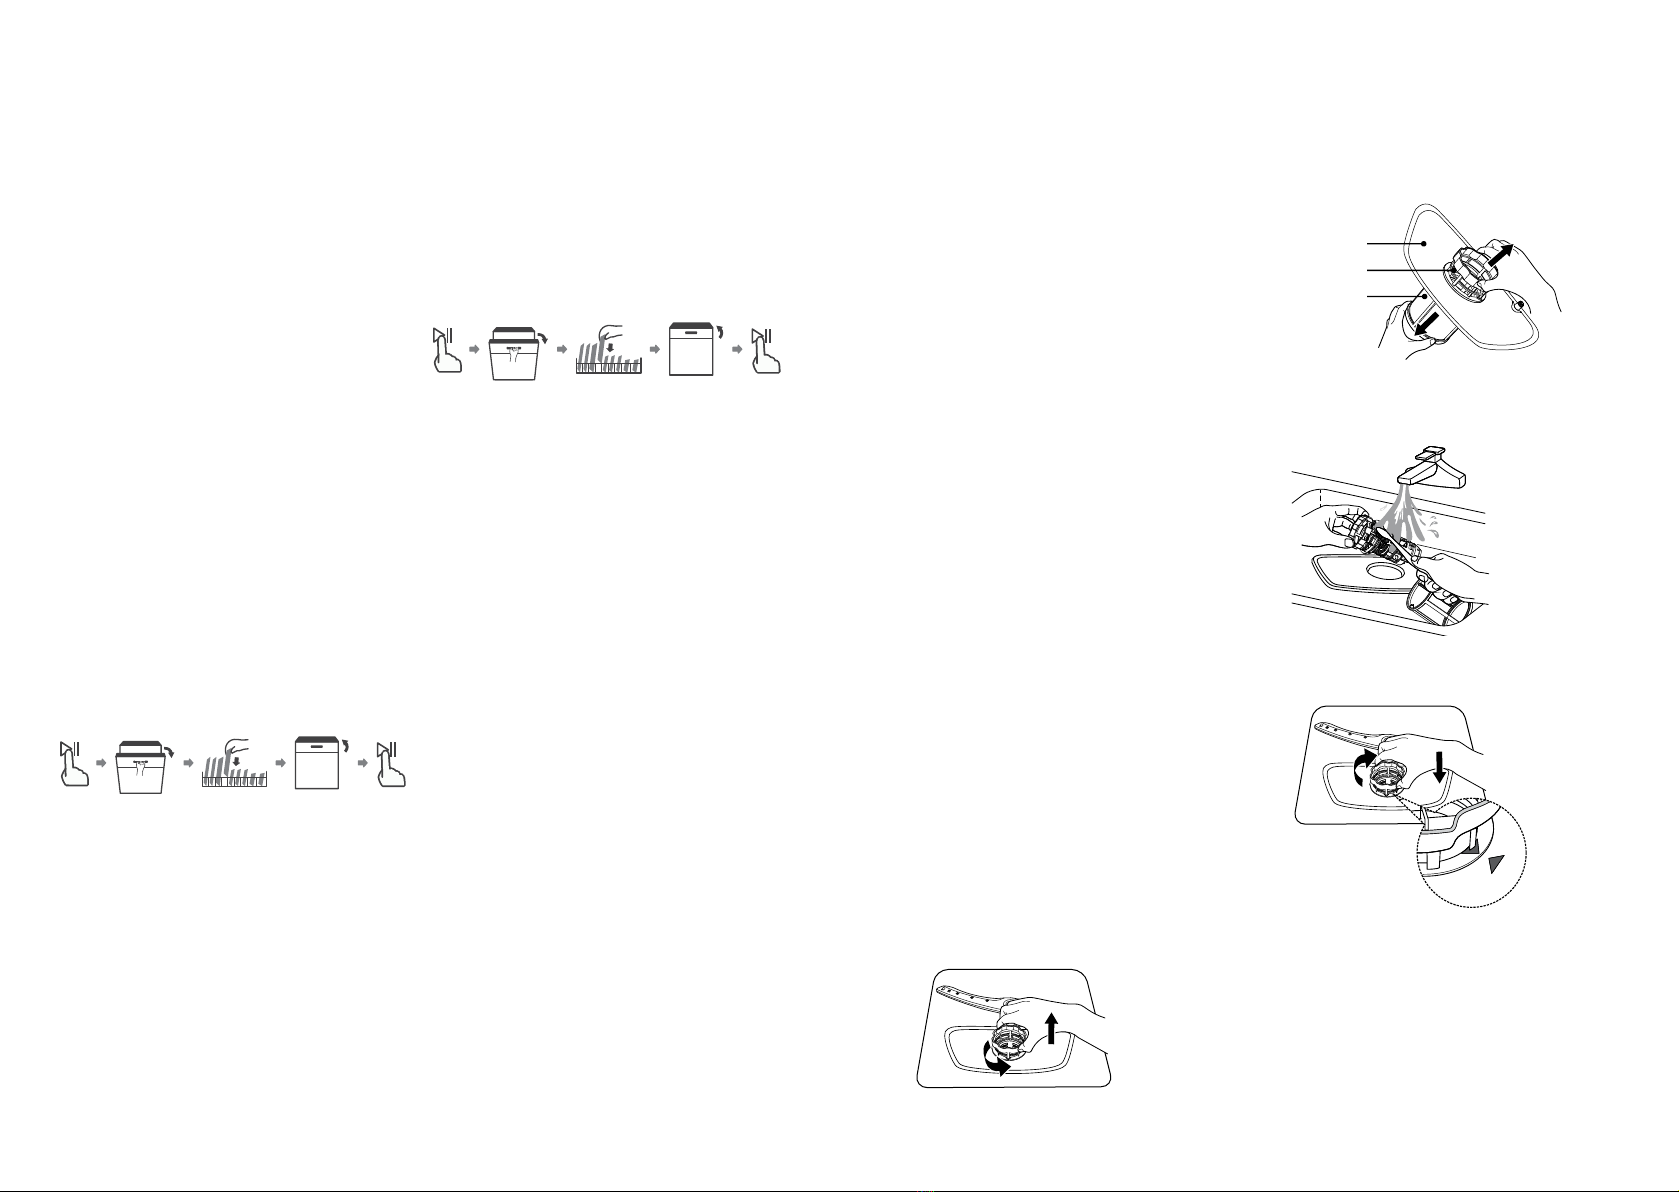
Filling the Rinse Aid Reservoir
1Remove the rinse aid reservoir cap by rotating it
counterclockwise.
2Carefully pour in the rinse-aid into its dispenser, whilst
avoiding it to overflow.
Clean up any spilled rinse aid with an absorbent cloth
to avoid excessive foaming during the next wash.
3Close the rinse aid reservoir cap by rotating it clockwise.
Adjusting the rinse aid reservoir
Turn the rinse aid indicator dial to a number between
1 and 6. The higher the number, the more rinse aid the
dishwasher uses. If the dishes are not drying properly or are
spotted, adjust the dial to the next higher number until your
dishes are spot-free. Reduce it if there are sticky white stains
on your dishes or a bluish film on glassware or knife blades.
Filling the Detergent Dispenser
1Press the release catch on the detergent dispenser to
open the cover.
2Add detergent into the larger cavity (A) for the main
wash cycle. For more heavily soiled wash loads, also
add some detergent into the smaller cavity (B) for the
pre-wash cycle.
3Close the cover and press on it until it locks into place.
Note
• Be aware that depending on the soiling of water, setting
may be different.
• Please observe the manufacturer’s recommendations on
the detergent packaging.
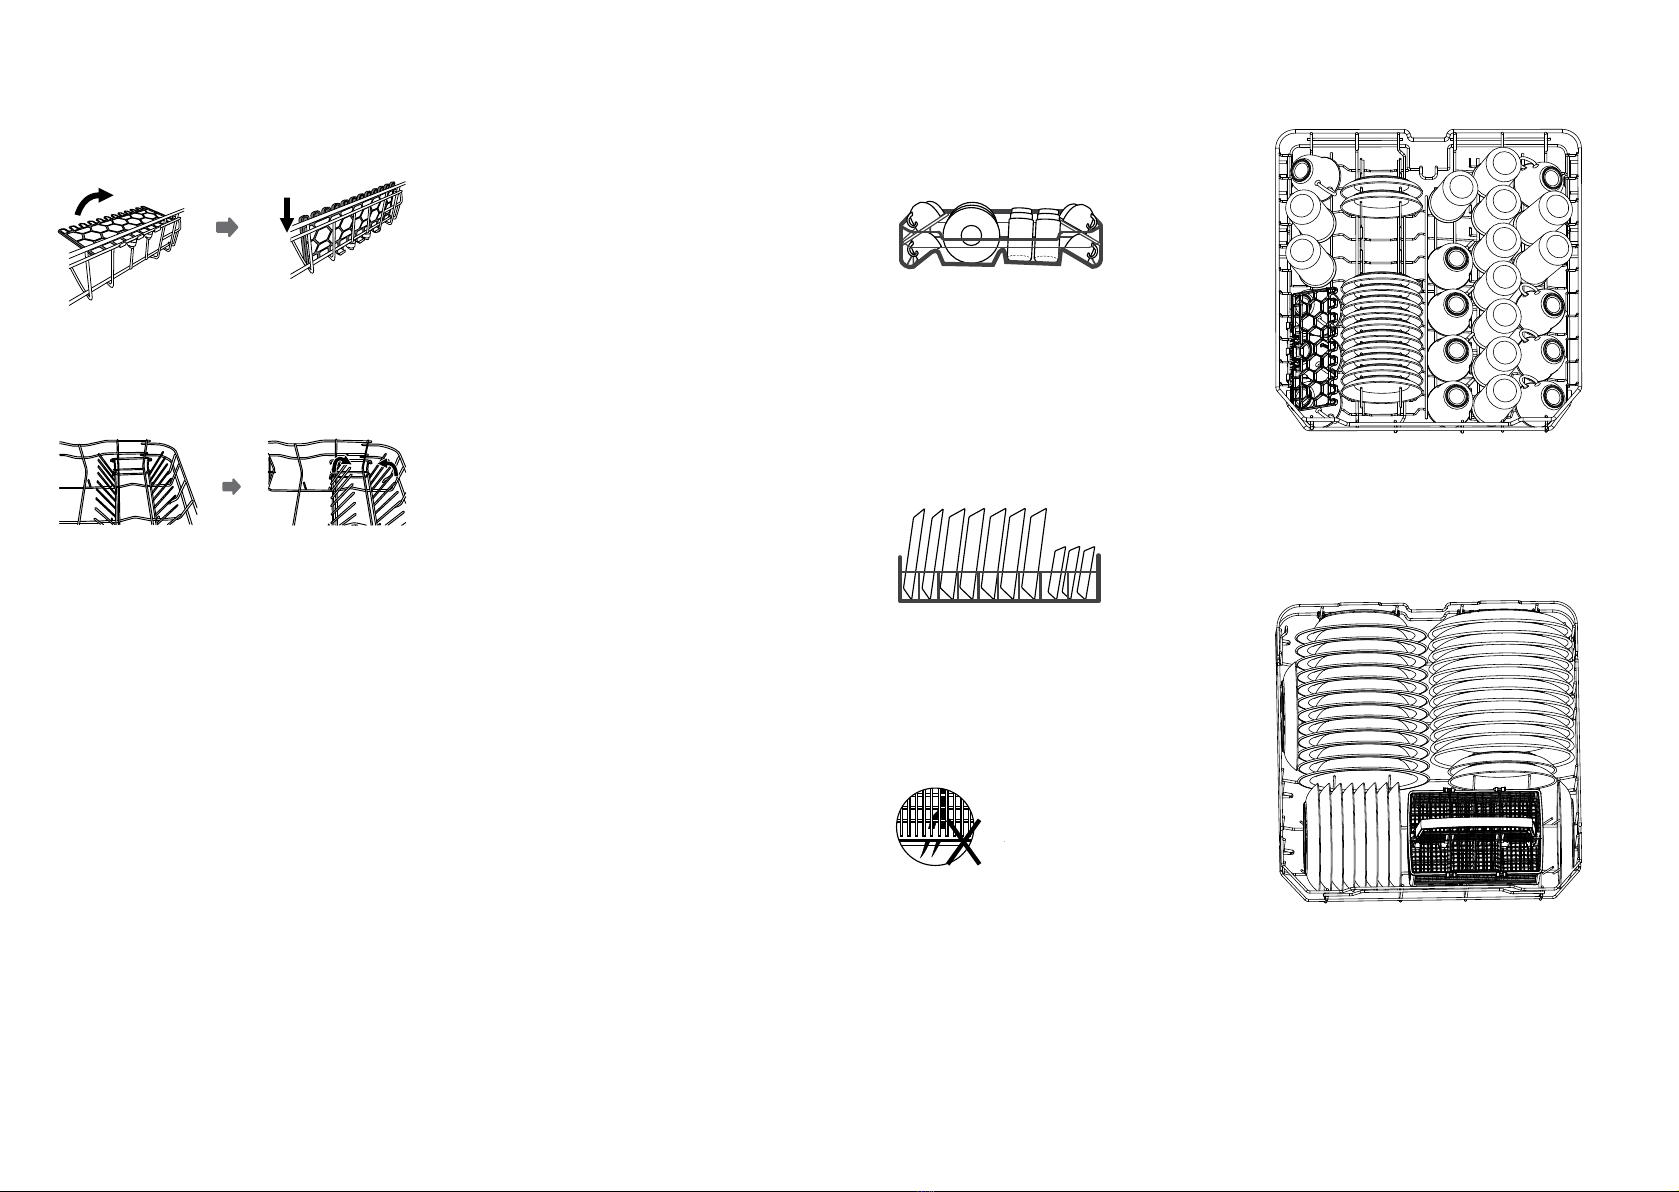
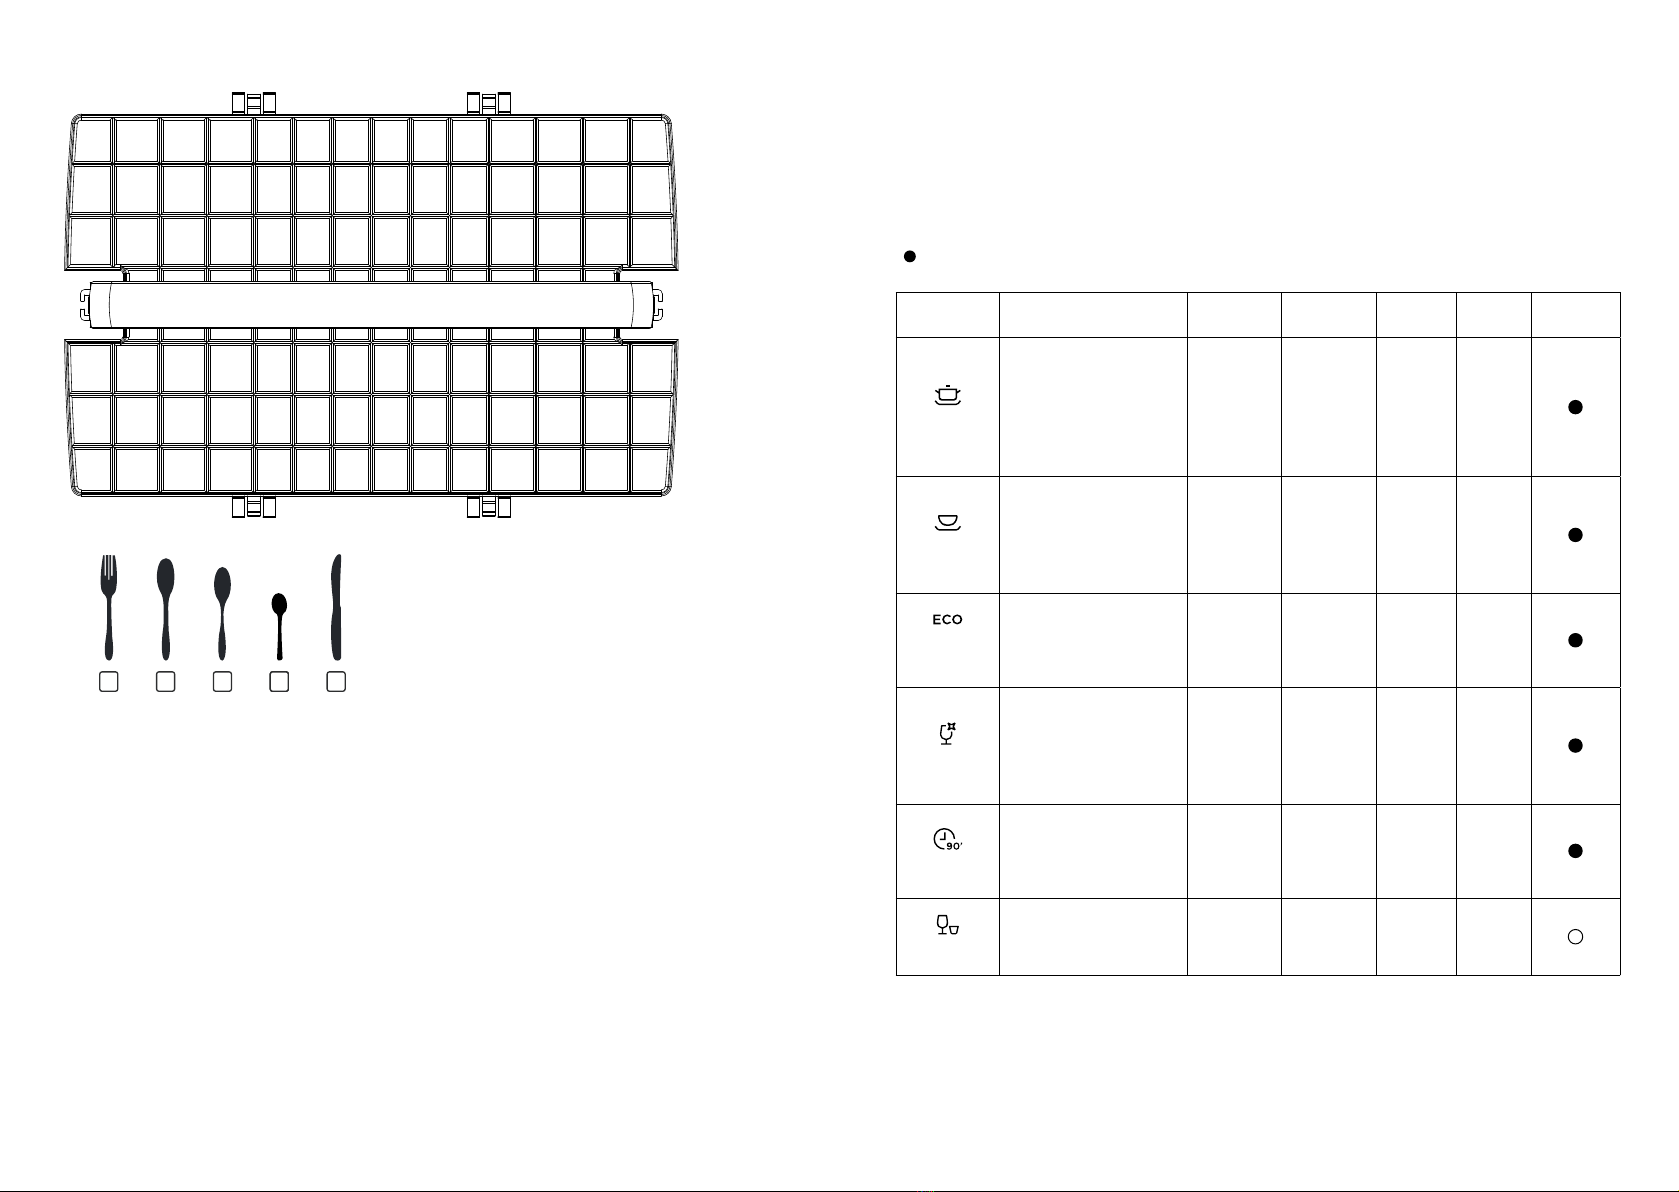
Tips for using the Basket
Adjusting the upper basket
The height of the upper basket can be easily adjusted to
accommodate taller dishes in either the upper or lower
basket.
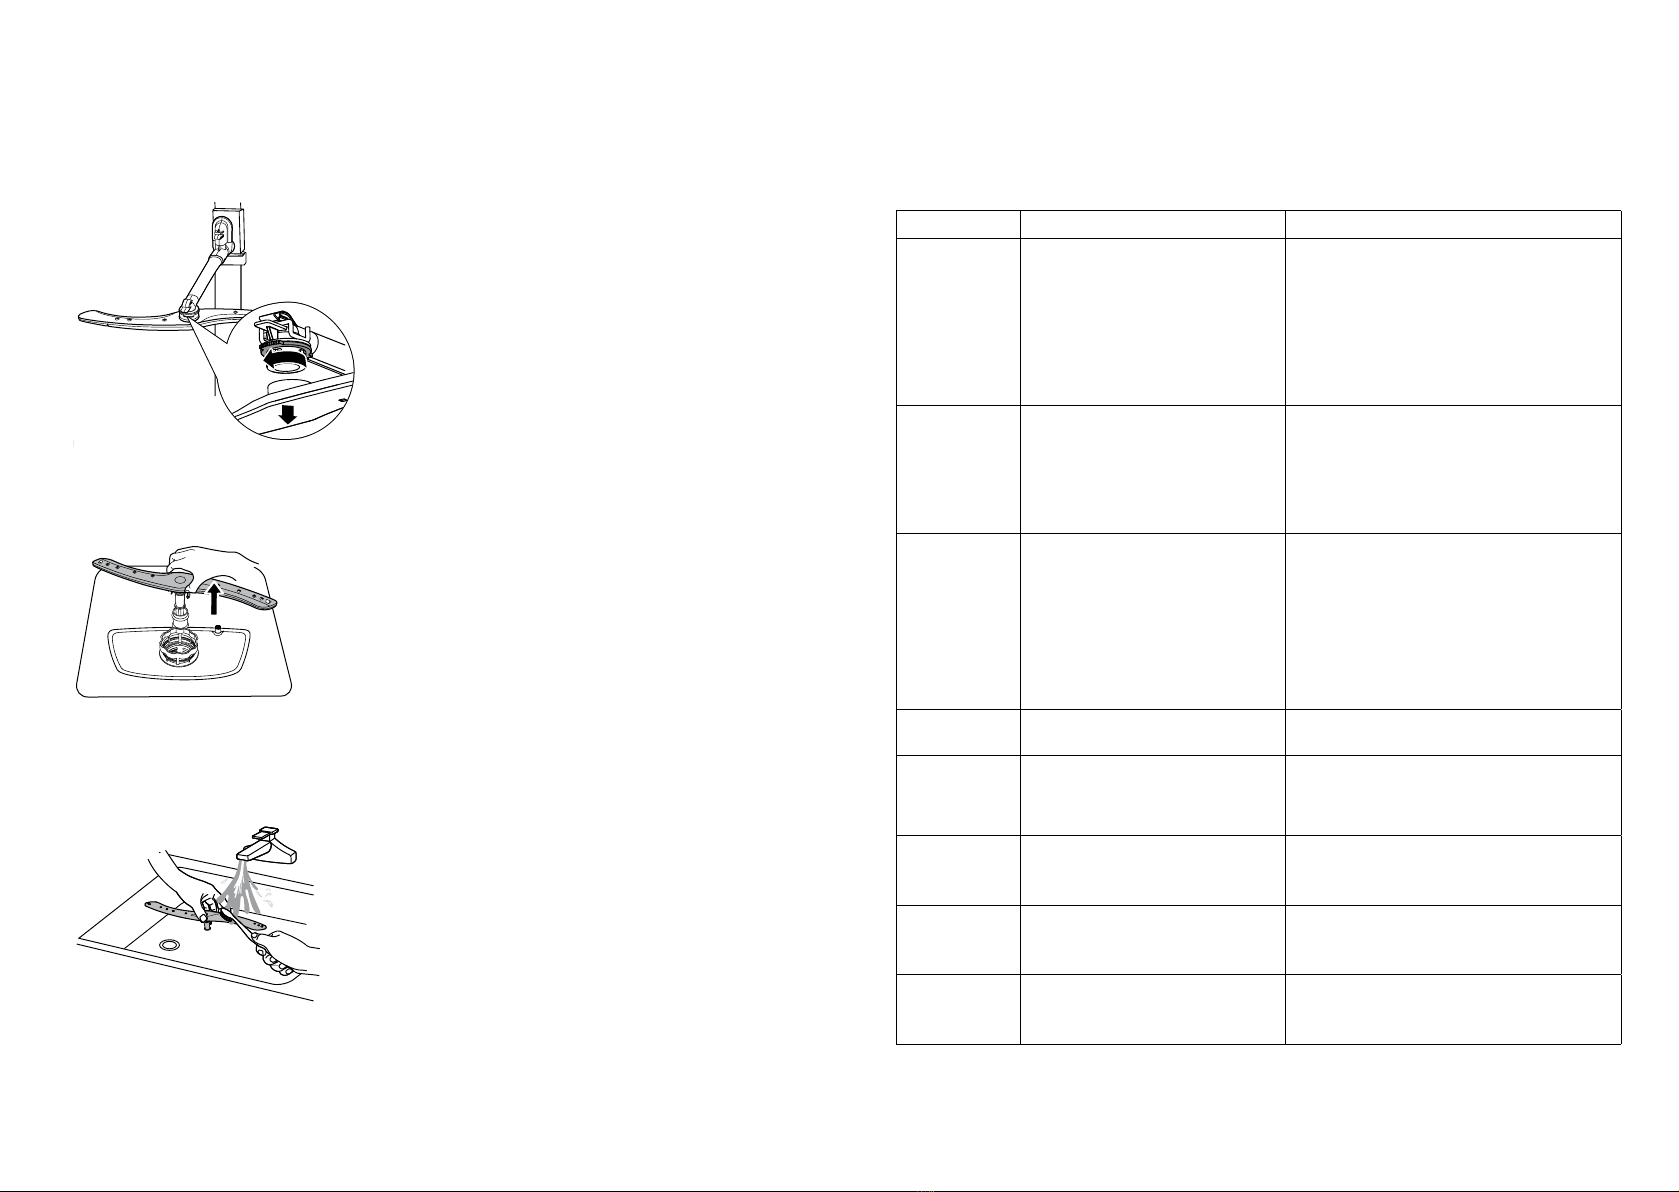
To adjust the height of the upper rack, follow these steps:
1Pull out the upper basket.
2Remove the upper basket.
3Re-attach the upper basket to upper or lower roller.
4Push in the upper basket.
The rinse aid is released during the final rinse to prevent water from forming droplets
on your dishes, which can leave spots and streaks. It also improves drying by allowing
water to roll off the dishes. Your dishwasher is designed to use liquid rinse aids.
WARNING
Only use branded rinse aid for dishwasher. Never fill the rinse aid dispenser
with any other substances (e.g. Dishwasher cleaning agent, liquid detergent).
This would damage the appliance.
Function Of The Rinse Aid And Detergent
When to refill the rinse aid dispenser
Unless the rinse-aid warning light ( ) on the control
panel is on, you can always estimate the amount from the
color of the optical level indicator located next to the cap.
When the rinse-aid container is full, the indicator will be
fully dark. The size of the dark dot decreases as the rinse-
aid diminishes. You should never let the rinse aid level be
less than 1/4 full.
Full 3/4 full 1/2 full 1/4 full Empty
Optical level indicator
As the rinse aid diminishes, the size of the black dot on the rinse aid level indicator
changes, as illustrated below.
Function of detergent
The chemical ingredients that compose the detergent are necessary to remove, crush and
dispense all dirt out of the dishwasher. Most of the commercial quality detergents are
suitable for this purpose.
12
WARNING
Proper Use of Detergent
Use only detergent specifically made for dishwashers use. Keep your detergent
fresh and dry.
Don't put powdered detergent into the dispenser until you are ready to wash
dishes.
Dishwasher detergent is corrosive! Keep dishwasher
detergent out of the reach of children.
13
3Close the rinse aid reservoir cap by
rotating it clockwise.
NOTE:
Clean up any spilled rinse aid with
an absorbent cloth to avoid
excessive foaming during the next
wash.
1 2
Remove the rinse aid reservoir cap
by rotating it counterclockwise.
Carefully pour in the rinse-aid into
its dispenser, whilst avoiding it to
overflow.
Filling The Rinse Aid Reservoir
Adjusting the rinse aid reservoir
AAddjjuusstt lleevveerr((RRiinnssee))
Turn the rinse aid indicator dial to a number between 1 and 6.
The higher the number, the more rinse aid the dishwasher uses.
If the dishes are not drying properly or are spotted, adjust the
dial to the next higher number until your dishes are spot-free.
Reduce it if there are sticky whitish stains on your dishes or a
bluish film on glassware or knife blades.
14
Filling The Detergent Dispenser
1 2
Press the release catch on the detergent
dispenser to open the cover.
Push latch to open
AAB
Add detergent into the larger cavity
(A) for the main wash cycle .
For more heavily soiled wash loads,
also add some detergent into the
smaller cavity (B) for the pre-wash
cycle .
3Close the cover and press on it until
it locks into place.
NOTE:
Be aware that depending on the soiling of water, setting may be different.
Please observe the manufacturer's recommendations on the detergent packaging.
14
Filling The Detergent Dispenser
1 2
Press the release catch on the detergent
dispenser to open the cover.
Push latch to open
A
AB
Add detergent into the larger cavity
(A) for the main wash cycle .
For more heavily soiled wash loads,
also add some detergent into the
smaller cavity (B) for the pre-wash
cycle .
3Close the cover and press on it until
it locks into place.
NOTE:
Be aware that depending on the soiling of water, setting may be different.
Please observe the manufacturer's recommendations on the detergent packaging.
Adjusting the upper basket
The height of the upper basket can be easily adjusted to accommodate taller dishes
in either the upper or lower basket.
To adjust the height of the upper rack, follow these steps:
4
1Pull out the upper basket. 2Remove the upper basket.
3Re-attach the upper basket to upper
or lower rollers.
Push in the upper basket.
lower position
upper position
Basket Used Tips
Folding back the cup shelves
To make room for taller items in the upper basket, raise the cup rack upwards.
You can then lean the tall glasses against it. You can also remove it when it is not
required for use.
15