
SOLAREG II Energy HE Manuel utilisateur

Controller unit for solar thermal systems
Energy HE
Installation and operating instructions
English version of original German installation and operating instructions
Version: 1.0
April 201

Terminology
In order to facilitate the use of the assembly and operating instructions, the
following terminology will be used:
•These installation and operating instructions will hereinafter be designated as
"Instructions".
•The Energy HE controller will hereinafter be designated as "Controller".
•The thermal solar power plant will hereinafter be designated as "Solar power
plant".
•Freely definable Prozeda function modules, complete with selectable inputs
and outputs, will hereinafter be designated as "Multi-function controllers"
(MFC).
•Prozeda GmbH will hereinafter be designated as the "Manufacturer".
Declaration of conformity
The product complies with the regulatory requirements and standards on CE
conformity and therefore carries the CE mark.

This manual is designed to help you use the controller properly, safely and economically.
This manual represents only a part of the installation and operating instructions.
Read the document Menus and controller functions before making any settings on
the controller.
Target group
This manual is addressed to all persons who carry out any of the following tasks:
Installing the controller
Connecting the controller
Putting the controller into operation
Setting the controller
aintaining the solar power system
Eliminating faults on the controller and the solar power system
Disposing of the controller
These persons must have the following knowledge and skills:
Knowledge about establishing electrical connections
Knowledge about the hydraulic operation of solar power systems
Knowledge of the applicable regulations at the point of use and the ability to apply them
These persons must have read and understood the contents of this manual.
Availability
This manual is part of the controller. Always keep it in an easily accessible location. Include
this manual with the controller should the controller change hands.
If this manual gets lost or becomes unusable, you can contact the manufacturer for a new
copy.

Style conventions used in the text
Specific style conventions are assigned to different elements in the manual. This makes it
easy to recognise the type of text concerned:
Standard text,
" enu", " enu item", "Button designations",
lists and
actions.
Notes accompanied by this symbol contain information about how to operate the
controller economically.
Style conventions for hazard warnings
This manual makes reference to the following categories of hazard warnings:
DANGER
Information or instructions accompanied by the word DANGER provide a
warning about a hazardous situation that will lead to fatal or serious
injuries.
ARNING
Information or instructions accompanied by the word WARNING provide a
warning about a hazardous situation that may possibly lead to fatal or
serious injuries.
CAUTION
Information or instructions accompanied by the word CAUTION provide a
warning about a situation that can lead to minor or moderate injuries.
Style conventions for warnings of damage to property or
the environment
ATTENTION
Information and instructions of this kind provide a warning about a
situation that can lead to damage to property or the environment.

Table of contents
1
Safety ........................................................................................................................ 7
1.1
Proper use .............................................................................................................................................. 7
1.2
Basic safety information .................................................................................................................... 7
2
Description of the controller ................................................................................... 9
2.1
Overview ................................................................................................................................................. 9
3
Installing the controller ......................................................................................... 10
3.1
Opening the device ........................................................................................................................... 11
3.2
Fastening the controller .................................................................................................................. 11
4
Connecting the controller ..................................................................................... 12
4.1
Connecting cables to the controller ............................................................................................ 12
4.2
Connecting the controller to the power supply....................................................................... 14
4.3
Connecting temperature sensors ................................................................................................. 14
5
Operating the controller........................................................................................ 16
5.1
Description of the display elements ............................................................................................ 16
5.2
Using the operating buttons .......................................................................................................... 18
6
Menus and controller functions ............................................................................ 19
6.1
Displaying values in the "Info" menu ........................................................................................... 19
6.2
Displaying and changing values in the "Program" menu ..................................................... 21
6.3
Controlling switching outputs in the " anual mode" menu ............................................... 22
6.4
Displaying and changing values in the "Basic settings" menu ............................................ 23
7
Setting the general controller functions .............................................................. 25
7.1
inimum collector temperature................................................................................................... 25
7.2
Setting the pump control system ................................................................................................. 25
7.3
Setting the "Tube collector" function .......................................................................................... 27
8
Setting the multi-function controller (MFC) ......................................................... 27
8.1
Setting the "Cooling" function ....................................................................................................... 27
8.2
Setting the "Heating" function ...................................................................................................... 27
9
Setting protective functions ................................................................................. 28
9.1
Setting the "Collector protection" function ............................................................................... 28
9.2
"System protection" function ......................................................................................................... 28
9.3
Setting the "Recooling" function .................................................................................................. 29
10
Measuring the energy yield ................................................................................... 29
10.1
DFG (flow sensor) ............................................................................................................................... 29
11
Faults ...................................................................................................................... 30
11.1
Faults with fault message ................................................................................................................ 30
11.2
Faults without fault message ......................................................................................................... 32

12
Technical data ........................................................................................................ 34
13
Accessories ............................................................................................................. 35
14
Disposing of the controller .................................................................................... 35

Safety
7
1Safety
This chapter contains information on:
•the proper use of the controller and
•the safe use of the controller.
Read this chapter through carefully before you install, connect or operate the controller.
1.1 Proper use
The controller is used for monitoring and controlling a solar thermal system.
Appropriate use of the controller includes the following requirements:
•Use the controller exclusively in dry rooms in residential, commercial and/or industrial
environments.
•Use only sensor connection boxes supplied by the manufacturer.
The definition of proper use also encompasses observing and complying with all of the
information contained in this manual - in particular compliance with all safety information
and instructions.
Any other use, or any use exceeding the specifications, will be deemed to be improper use
and may lead to personal injury or damage to property and shall render the warranty void.
Use of the controller in the following situations in particular is considered to be improper
use:
•If you modify the controller independently and without prior authorisation
•If you operate the controller in a humid or wet environment
The manufacturer shall not be liable for damages arising from inappropriate use.
1.2 Basic safety information
This section contains basic safety information relating to working with the controller. You
will find additional safety information relating to specific actions and workflows at the
beginning of the section concerned.
Preventing risks of explosion
•Never use the unit in areas where there is a risk of explosion.

Safety
8
Preventing risks of fatal injury from electric shocks
•ake sure that all regulations applicable at the point of use are complied with.
•Always make sure that the controller is disconnected from the power supply before
carrying out any work on it.
•ake sure that the connections of the protective extra-low voltage areas do not get
mixed up with the power supply connections.
•On completion of installation work, refit the terminal cover and tighten the locking
screw using a screwdriver.
•ake sure that the electrical connection of the controller can be disconnected from
the mains externally if required.
•ake sure that all cables are secured by strain relief devices.
•Use the device only if it is in a fault-free condition.
Preventing risks of fire
•Install the controller on a non-flammable subsurface.
Preventing risks of injury from burns
•Carry out installation work on the solar power system only when it has cooled down.
•The process water can reach very high temperatures. Exercise particular care when
configuring settings on the controller.
•Take water samples after completion of the settings and check them using a suitable
thermometer.
Preventing damage to property
•A damaged controller may cause malfunctions in the system as well as damage to its
components. Use the controller only if it is in a fault-free condition.
•Install the controller with due observance of its protection class. Information about
this can be found in the chapter Technical Data from page 34 onwards.
•ake sure that no moisture gets into the controller.
•If any moisture gets into the controller, disconnect the controller from the power
supply.
•ake sure that the maximum permissible ambient temperature is not exceeded.
Information about this can be found in the chapter Technical Data from page 34
onwards.
•ake sure that all components to be connected to the switching outputs are suitable
for an operating voltage of 230 V/50 Hz.
Description of the controller
9
•When in "manual mode", the system must only ever be operated for a short time and
only for test purposes.
•Install sensor lines separately from 230 V lines.
•Use only sensor connection boxes supplied by the manufacturer.
2Description of the controller
The controller is used for monitoring and controlling a solar thermal system. The
controller allows the system to be configured in accordance with the local situation at the
place of use and with the requirements of the user. In addition, the controller can be used
to carry out system protection functions.
2.1 Overview
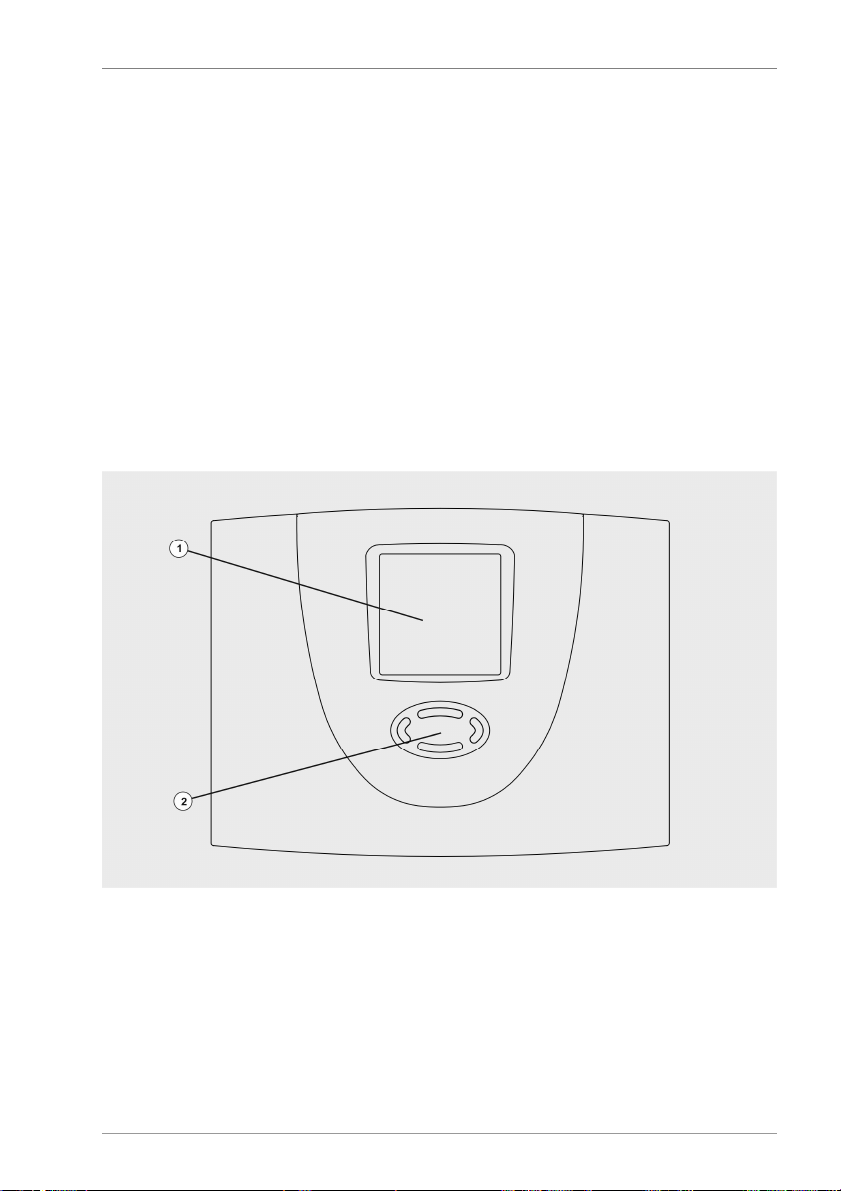
Display
Operating buttons
The display (1) shows the menus for monitoring and controlling the solar power system.
The operating buttons (2) allow you to display and change the parameters.
Installing the controller
10
3Installing the controller
DANGER
Risk of fatal injuries due to explosions or fire.
Never use the controller in areas where there is a risk of explosion.
Install the controller on a non-flammable subsurface.
D
ANGER
Risk of fatal electric shock when working on the opened controller.
ake sure that the controller is disconnected from the mains voltage
before removing the terminal cover.
ake sure that the power supply has been secured to prevent it from
being switched on again.
Check that the controller is free from voltage.
Screw the terminal cover securely back in place when work has been
completed.
ATTENTION
Risk of damage and malfunctions due to improper storage before
connection.
Store the controller at room temperature for at least four hours before
connecting it.
Select an installation location which meets the following requirements:
•The installation location must be at eye level.
•The installation location must be close to the storage tank and the solar circuit pump.
•It must have access to the power supply.
•There must be sufficient space in front of the controller to allow it to be operated.
•If you wish to lead cables and lines through the back of the controller, there must be
sufficient space for the cable gland.
Table des matières


