SmartMow Series-1 Manuel utilisateur

SmartMow Series-1
The smarter way to mow your lawn! ©
User Manual

Safety Instructions
Please read the following instructions carefully before use.
WARNINGS:
1. Do not modify the shape, dismantle or reconfigure the de ice, or you
may run the risk of causing a fire, mechanical fault or personal injury.
2. Do not start your SmartMow on a wet lawn, as it may damage the lawn.
3. Keep SmartMow dry to reduce the risks of fire and electric shock.
4. To a oid electric shock do not remo e the surface of the charger.
5. SmartMow is not a toy. Do not sit or stand on the appliance. Small
children and pets should be kept away from the appliance when in use.
6. SmartMow is for outdoor use only.
7. Please follow the instructions and only use appro ed SmartMow
accessories.
8. Do not use SmartMow with a damaged cord or plug.
9. Do not use if the de ice or other parts ha e been dropped, or
damaged. To reduce the risk of electric shock, do not attempt to
dissemble or repair the SmartMow.
10.Return SmartMow to your retail or to an authorized ser ice center to
check and/or repair it. If the appliance is repaired or assembled
improperly it may cause electric shock or personal injury.
11. To unplug, grasp the plug, not the cord.
12.Ne er handle plug or the de ice with wet hands.

13.Only the battery pro ided or appro ed by RoboLabs, Inc..
14.Only use the electrical power indicated on the label.
15.Only use the SmartMow charger and base station.
16.The waste battery should be handled in a professional way.
17.Before using the SmartMow, pick up objects like branches, stones and
equipment to a oid damages to the SmartMow and personal injury.
18.It is recommended that the height of cutting be less than 7cm..
19.Do not cut at the lawn with a slope more than 30 degree.
20.Do not turn the machine around when in use.
21.The remote control should be used in effecti e range of 10 meters.
22.Turn the power switch off before cleaning the machine.
23.Keep the SmartMow in a safe place when not in use.
24.Using improper oltage may result in damage to your SmartMow and
possible injury to the user. Correct oltage is listed on the label.
25.Carefully follow all warnings on the SmartMow, battery, battery charger
and user manual.
26.Follow all operation and user instructions.
27.Keep the safety and operation instructions for future reference.
Battery disposal
The machine uses en ironmental-friendly Li-batteries. Please handle it in a
proper way and contact the nearest Waste Treatment Center for suggestions
of cycling use.
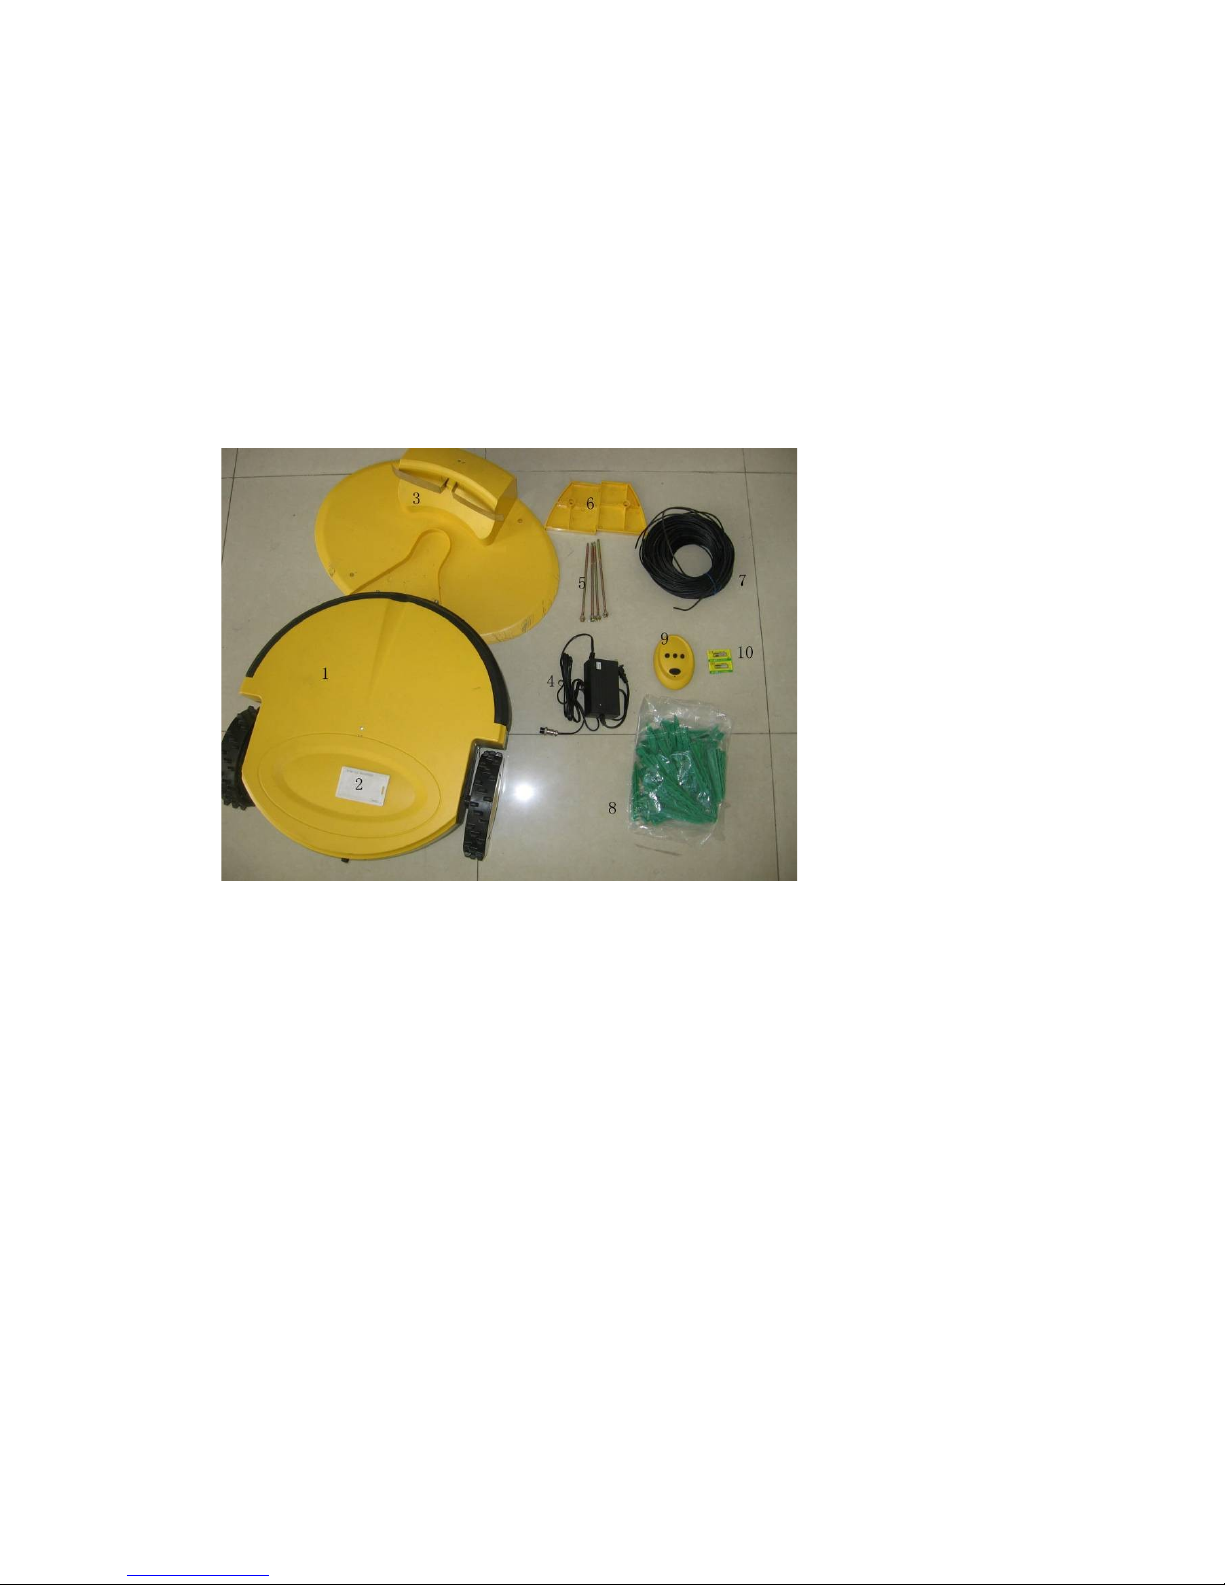
Product Description
1. The robot mower( SmartMow Series-1 )
2. IC card
3. Base station
4. Power supply
5. Base station stakes
6. Height adjuster
7. Perimeter wire
8. Pegs
9. Remote control
10. Batteries for remote control
ptional accessories:
Perimeter wire (100 m)
Pegs (100 pcs)
Blades (11 cm* 3 pcs)
Hex key
Power supply

Technical specifications
Power Supply: Input: 100-240V 50/60Hz
Output: 30V 2000mA
Mower Battery: 24V 8Ah
A erage Power: 70W
Brief introduction of SmartMow Series-1
The SmartMow uses ad anced en ironmental-friendly rechargeable Li-
batteries. SmartMow mainly adapts to lawn care of family and public lawns.
It mo es automatically in circles and lines with high efficiency in a short time.
The SmartMow adopts Magnetic Field Induction to make the realization of
automatic na igation. It searches for the base station automatically when the
power is low, and continues cutting when it is fully charged.
The SmartMow has an automoti e anti-collision system and an Infrared
Sensor System that helps to change direction before hitting obstacles.
The SmartMow also ad anced rain induction system. When the rain sensor
senses the rain, the machine goes back to the base station automatically.
The SmartMow is safely designed. After switching the unit to the “On”
position you ha e to use the IC card that makes the mower start to work.
The blades will stop rotating if the mower is lifted up and the automatic
security protection and check system will turn off the power automatically
when it is o erloaded.
Starting your SmartMow
Open the box and check all the components there should be. The plastic and
the metal objects should be out of children's reach.
Perimeter wire setup
Start with placing the perimeter wire pro ided on the ground according to your
plan.
If the area outside the immediate perimeter has obstacles or differences in the
height along the perimeter edge, then the minimum distance from the wire to
the obstacles is 30cm.
If the area outside the immediate perimeter is free of obstacles and is the
same relati e height as the perimeter edge or lower, you can fix the wire at the
edge of the lawn.
Circle the tree or other obstacles in the lawn with the perimeter wire.
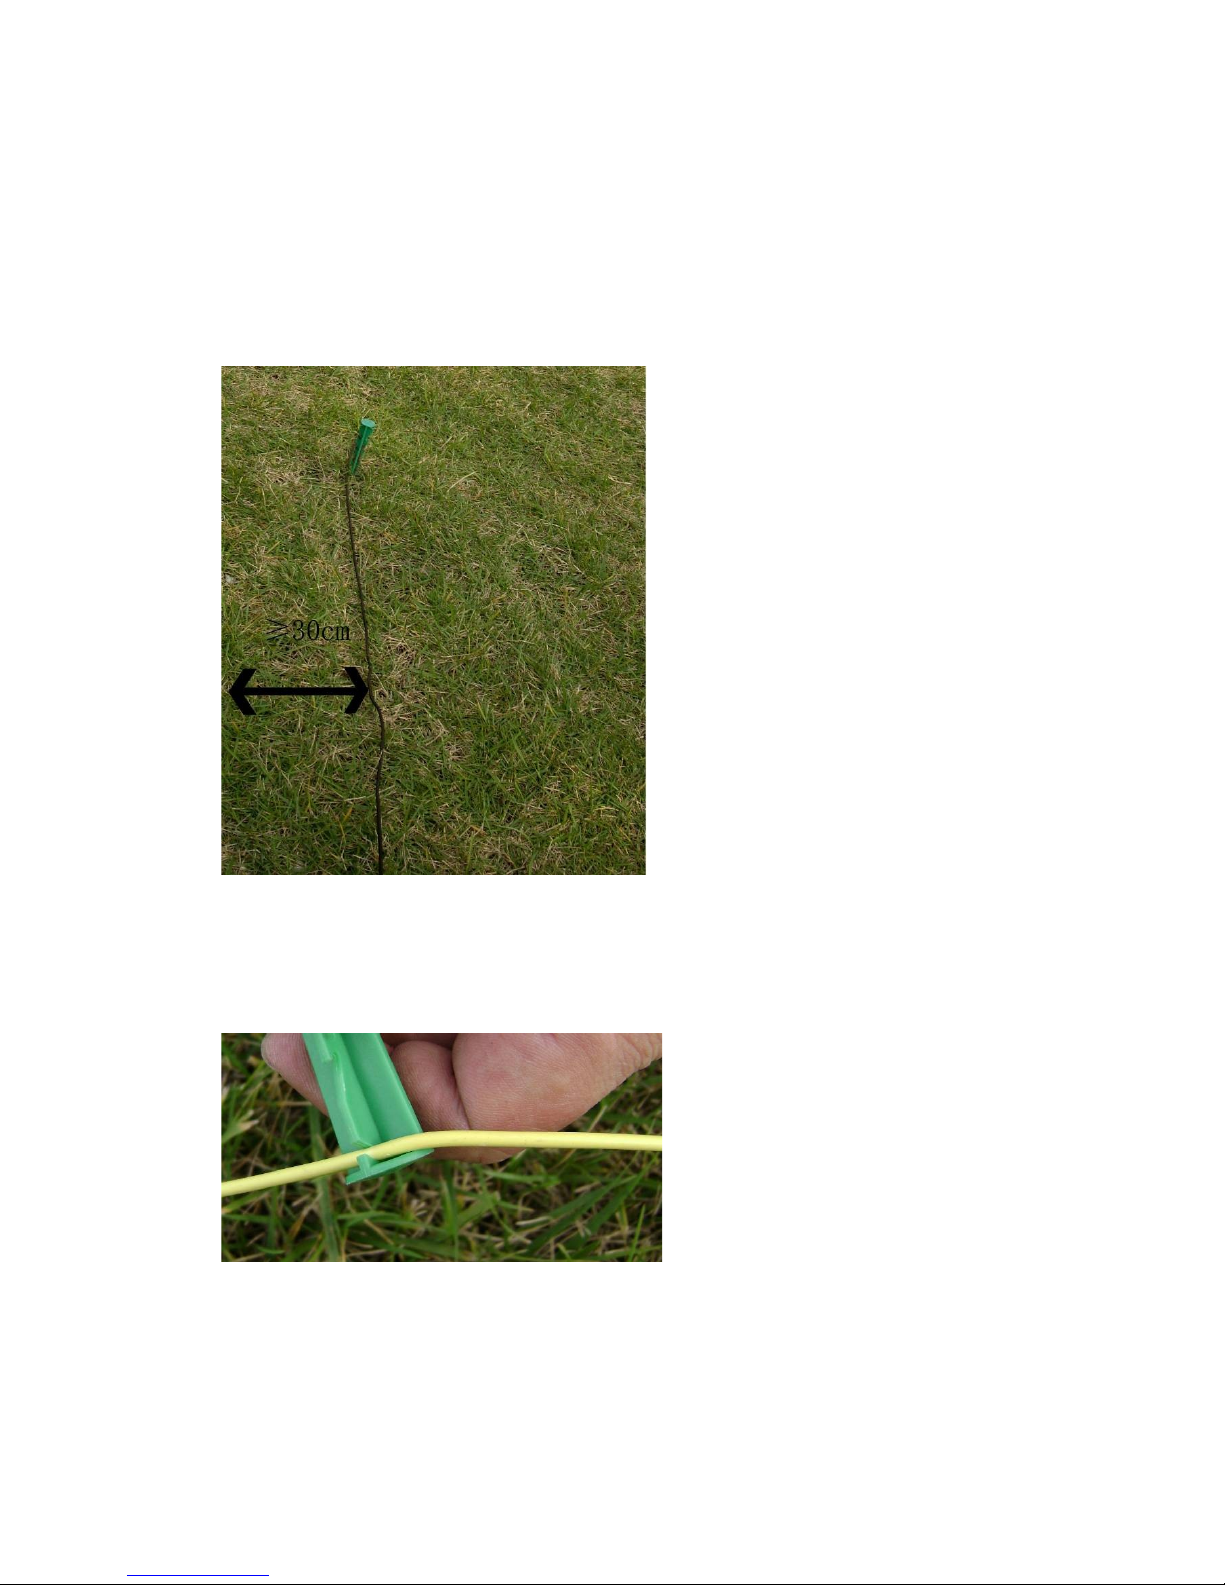
Important
Ensure the minimum distance: 30cm (from the perimeter wire to the
obstacles besides the lawn)
Ensure the bending angle of the wire at least 100 degree
Pull the perimeter wire as straight as possible.
Do the following:
Fasten and hold the perimeter wire to the ground, below the grass le el (we
recommend the pegs be used e ery 1 meter). Please hide the wire in the
grass as close to the grass roots as possible to a oid the wire being cut by the
mower.
Upon hammering the peg to its final depth in the ground, pull the wire tight

The base station
Important
Ensure that the base station is put at the open area where is also easy
to connect to the electricity outlets.
Ensure that the base station is placed in clockwise direction along the
perimeter wire
Connect the ends of the perimeter wire to holes of the base station.
There must be no obstacles right ahead of the base station.
Place the base station at least 3m from corners to ensure that the
mower can successfully go back to the station for charging, or it may
fail to charge automatically.
Do the following:
Please make sure the perimeter wire is buried as indicated:
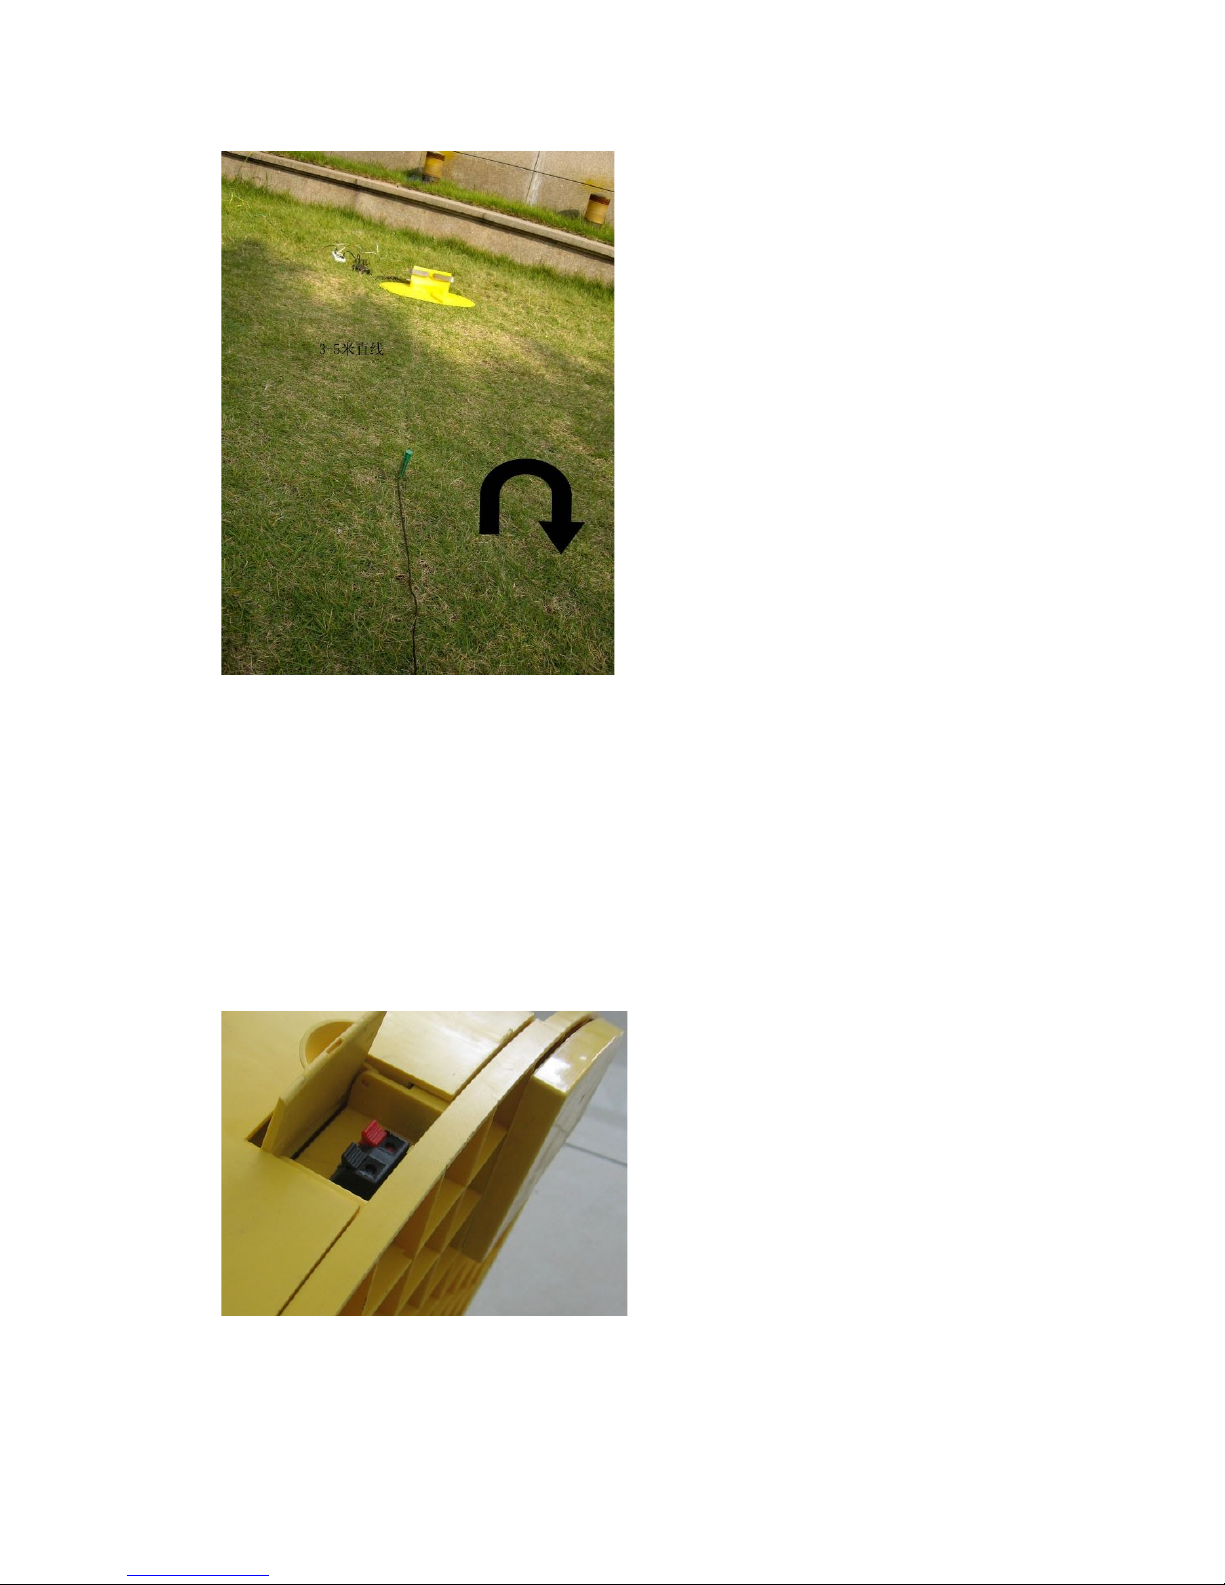
Put two pieces of height adjusters at the bottom of the base station.
Connect the ends of the perimeter wire to holes of the base station.
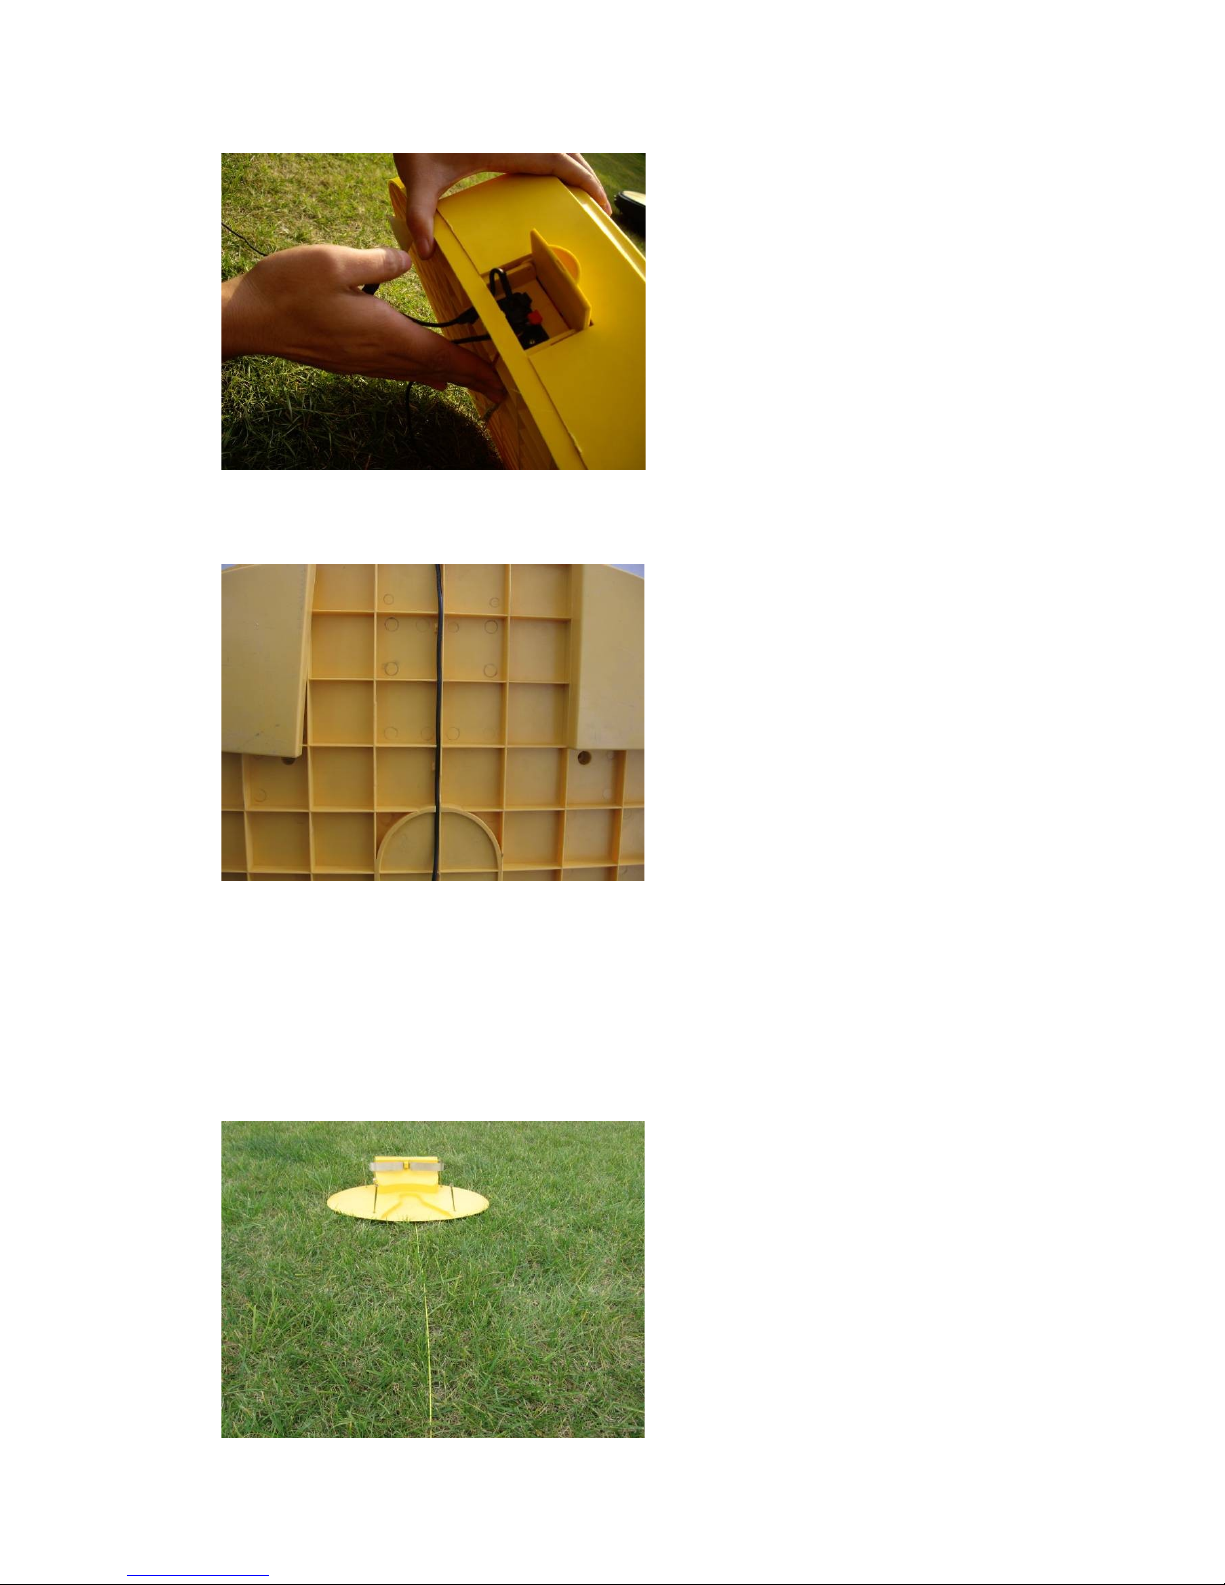
The perimeter wire goes along the wireways and through the center of the
bottom.
Fix the base station with the stakes.

Then after, the base station looks as follows:
▲ The power supply connects to the base station and the electricity outlets
respecti ely.
▲ Use the electrical power indicated on the label only. If you are not sure
about the power type, please inquire the located Electricity Generating Board.
▲ Use the batteries pro ided by the manufacturer only.
▲ Use the charger and base station pro ided by the manufacturer only.
▲ Do not use the charger with damaged cord or plug.
▲ It can charge outside.
▲ Do not touch the cord and plug with wet hands.
▲ Power the base station on, the led turning green shows it is in motion;
during the process of charging, the led is red, and when the machine is fully
charged, the led turns red and green in alternation. The other led is red. When
it is on, it shows the perimeter wire might be loose; when it is off, then the
whole is in normal work.
Charging of the SmartMow
The SmartMow can be charged automatically and manually.
Automatic charging means that when the machine is in work, it self can
inspect the electricity power, and go back to the base station for
charging automatically if the power is low.
Manual charging is that when the power is off; put the plug of the
charger to the mower, the other to the electricity outlets. Remember to
take off the rubber-isolator first.
Do the following:
Automatic charging: The machine automatically goes back to the base station
along the perimeter wire. Now the led of the charger is red, and the led of the
base station is red. After it is fully charged, it will go back to mowing the lawn.
Table des matières
Manuels Tondeuse à gazon populaires d'autres marques

RHINO
RHINO 1958 Manuel utilisateur

Wolf Garten
Wolf Garten Compact plus 40 B Manuel utilisateur

Cub Cadet
Cub Cadet LTX 1045 Manuel utilisateur

Craftsman
Craftsman 917.378461 Manuel utilisateur

GGP ITALY SPA
GGP ITALY SPA CR/CS 434 SERIES Manuel utilisateur

Challenge
Challenge CH18V2 Instructions de fonctionnement

TALEN TOOLS
TALEN TOOLS AVR HGM30 Manuel utilisateur

DEWEZE
DEWEZE ATM-725 Manuel d'utilisation

Weed Eater
Weed Eater 180083 Manuel utilisateur

Husqvarna
Husqvarna Poulan Pro PP185A42 Manuel utilisateur

Better Outdoor Products
Better Outdoor Products Quick Series Manuel utilisateur

Cub Cadet
Cub Cadet 23HP Z-Force 60 Manuel d'utilisation


