Smartenit IoTeMtr 3017 Manuel utilisateur
© 2020 Compacta International, Ltd.—Rev 0.1 05/28/2020
IoTeMtr and Smartenit are trademarks of Compacta International, Ltd
Zigbee is a registered trademark of the zigbee alliance
Quick Start Guide
Technical Support
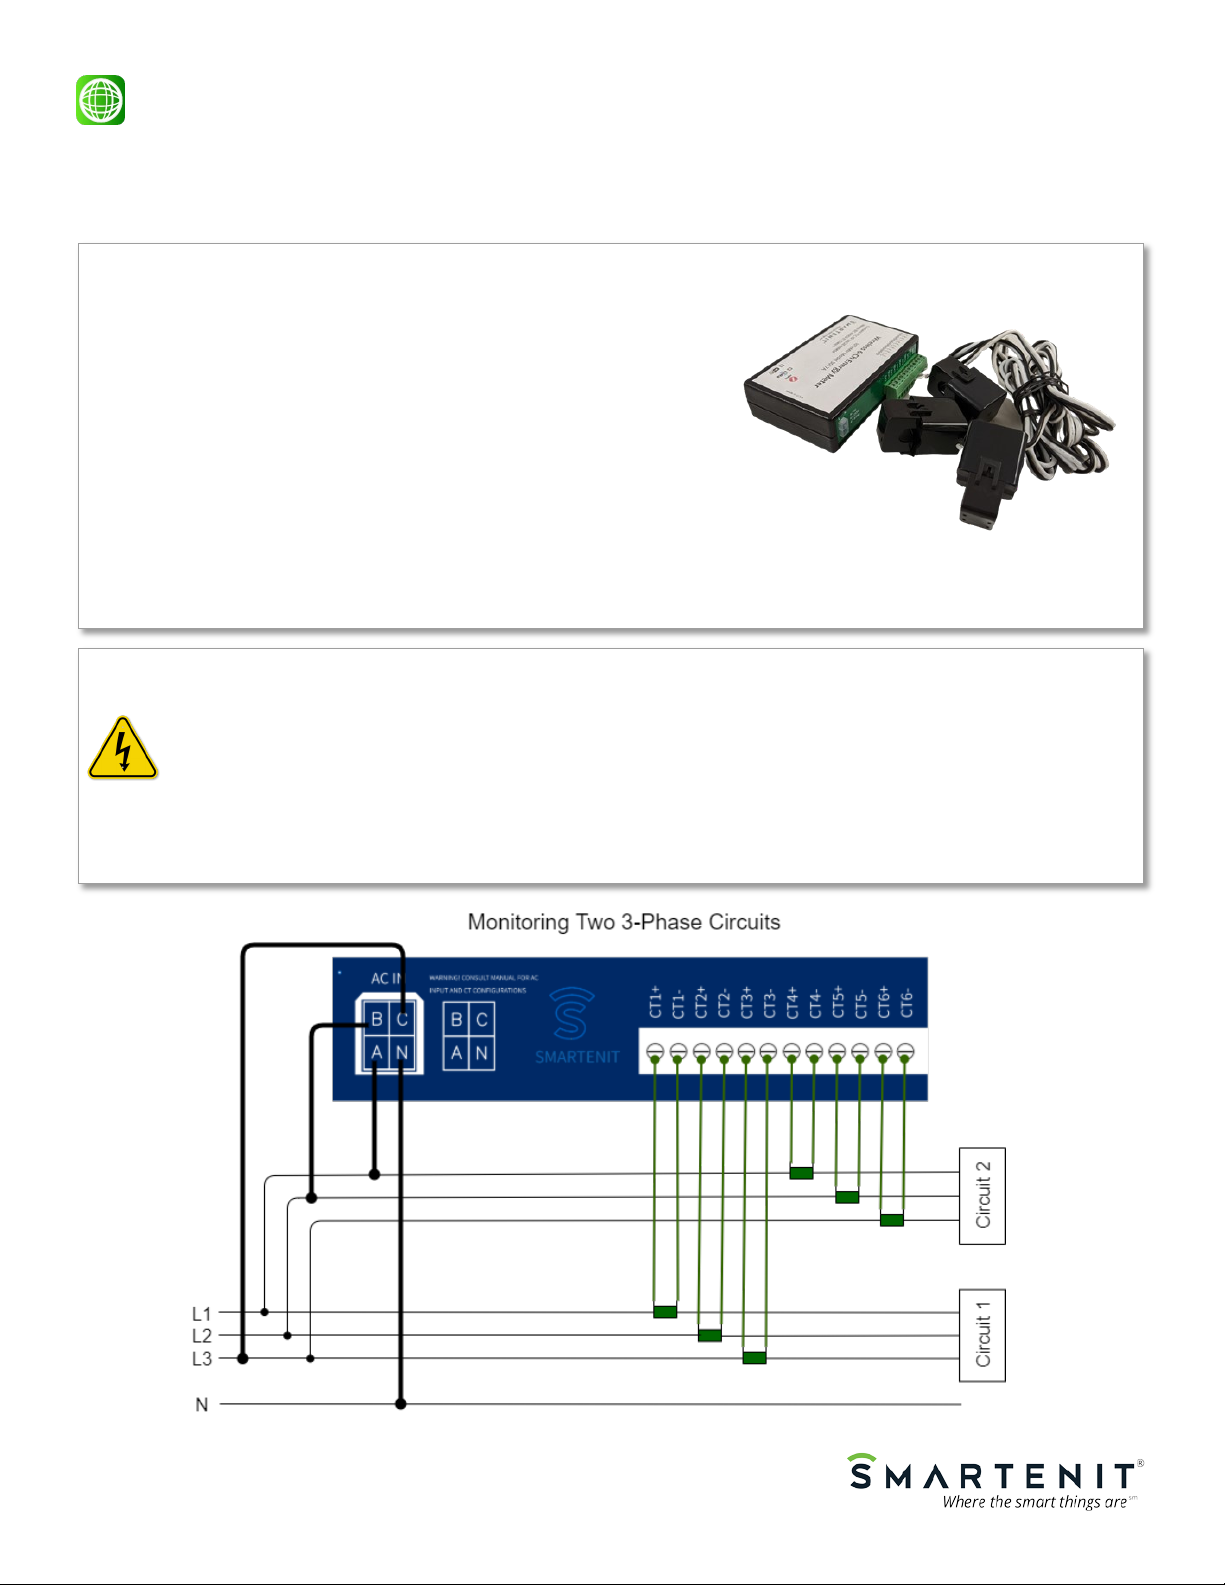
Wireless Six-Channel Energy Meter
IoTeMtr Models #3017, 3017W and 3017L
About this Product
Use the IoTeMtr to measure the characteristics of two 3-phase cir-
cuits or six single or split phase circuits, including voltage, frequency,
current, power and active/reactive energy imported or exported.
The device interfaces wirelessly within IoT/Home Automation net-
works where it can be controlled and monitored by automation
hubs or cloud services.
In order to measure energy, the device requires voltage and current
inputs plus the supply voltage to power the unit itself. This guide
shows how to connect the input voltage and current measurement
transformers (CTs).
Install with the tips and suggestions below to get the benets of the Internet of Things through your automation
controller.
Electrical Installation
For indoor installation only as supplied. When installing outdoors, it is imperative to use a suitable enclo-
sure, and to observe all water-tight precautions to ensure the life and safety of the device.
When wiring the AC voltage input connector, use a suitable breaker and beware of the dangerous voltages
present. Installation recommended to be done by trained personnel only.
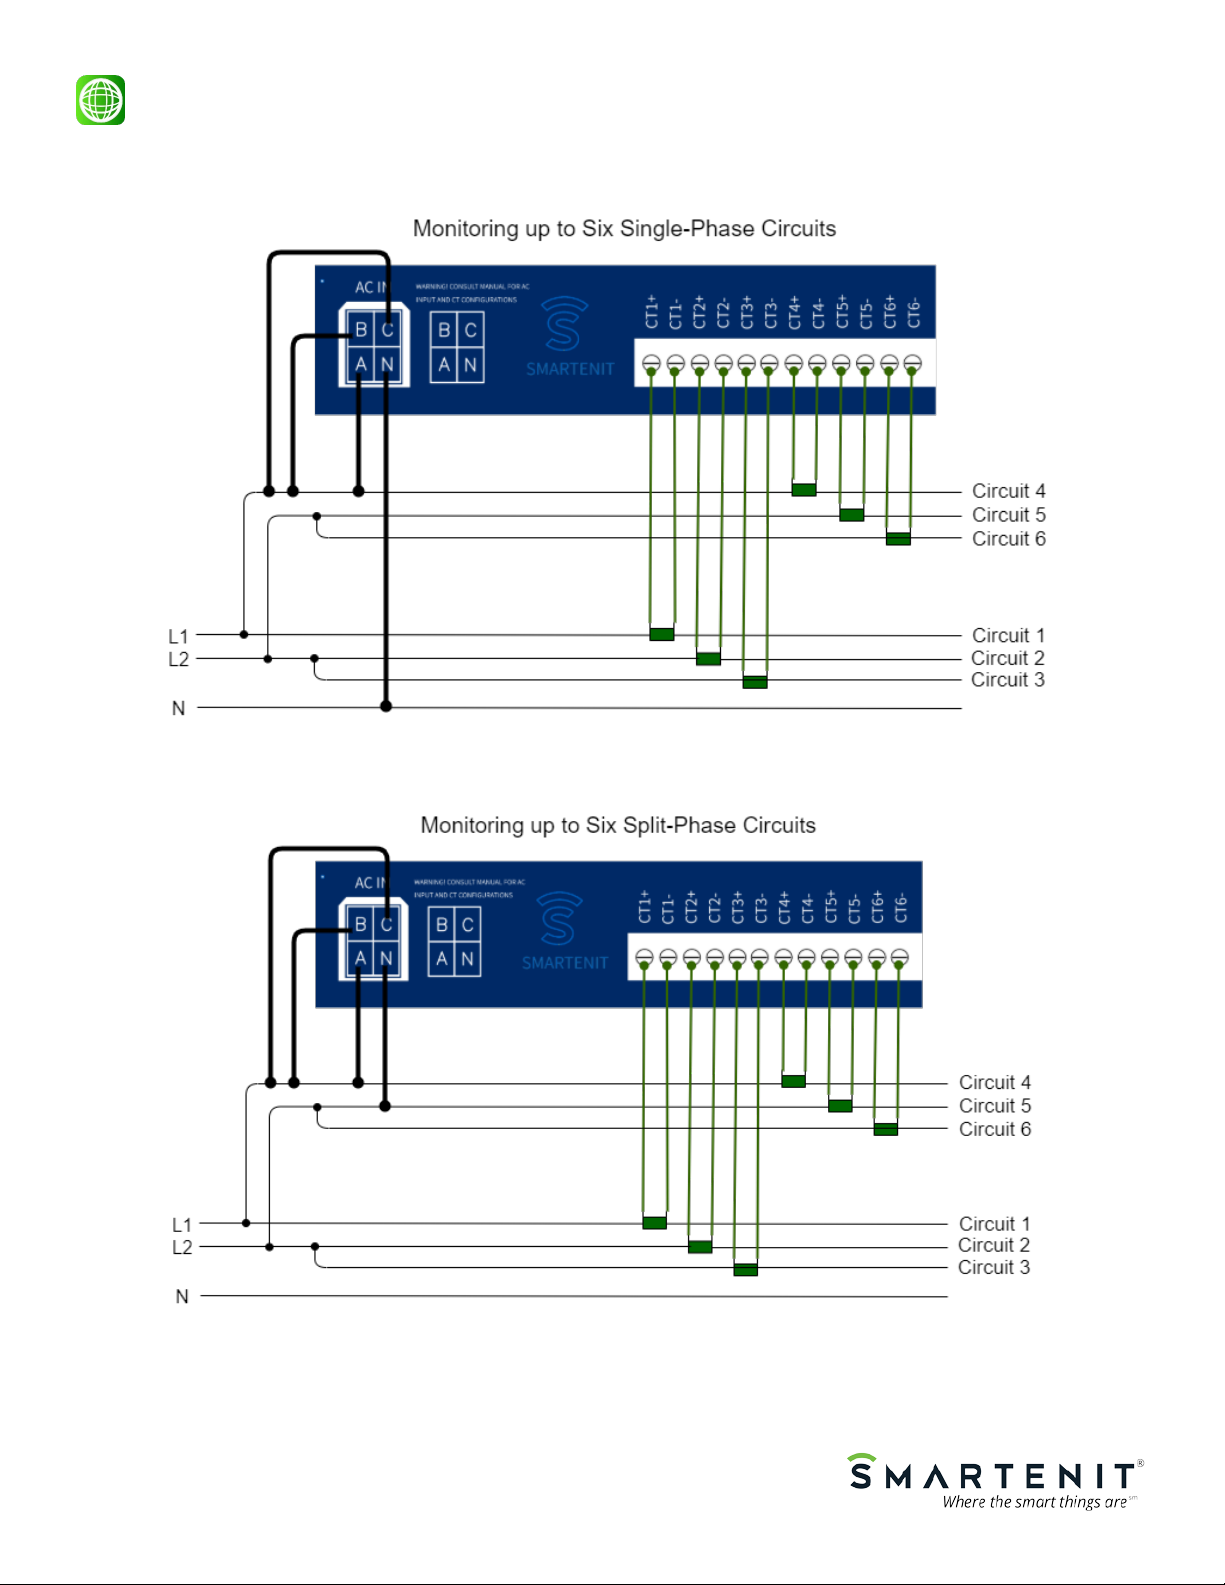
Follow the diagrams below to connect the device to the electrical panel based on the type of circuits to be moni-
tored.
The 3 CTs for
each circuit MUST
be the same cur-
rent rang (e.g.
30A, 50A, 100A)
© 2020 Compacta International, Ltd.—Rev 0.1 05/28/2020
IoTeMtr and Smartenit are trademarks of Compacta International, Ltd
Zigbee is a registered trademark of the zigbee alliance
Quick Start Guide
Technical Support
© 2020 Compacta International, Ltd.—Rev 0.1 05/28/2020
IoTeMtr and Smartenit are trademarks of Compacta International, Ltd
Zigbee is a registered trademark of the zigbee alliance
Quick Start Guide
Technical Support
Setup
1) Setup Operation Mode
1. Tap pushbutton two times then hold it for 3 seconds. LED will
go o indicating device is now in Mode conguration
2. Now tap the number of times to select the desired mode using
the table on the right. The LED will then blink the number of
times tapped to conrm the selection.
2) Setup CT connected to each channel
1. Tap four times then hold pushbutton for 3 seconds. LED will
turn o indicating device is in CT conguration
2. Use the table on the right to select the channel(s) to be cong-
ured. The LED will then blink the number of times tapped to
conrm the selection
3. Use the table below to select the type of CT connected to the
selected channel. LED will then blink the number of tapped
times to conrm selection.
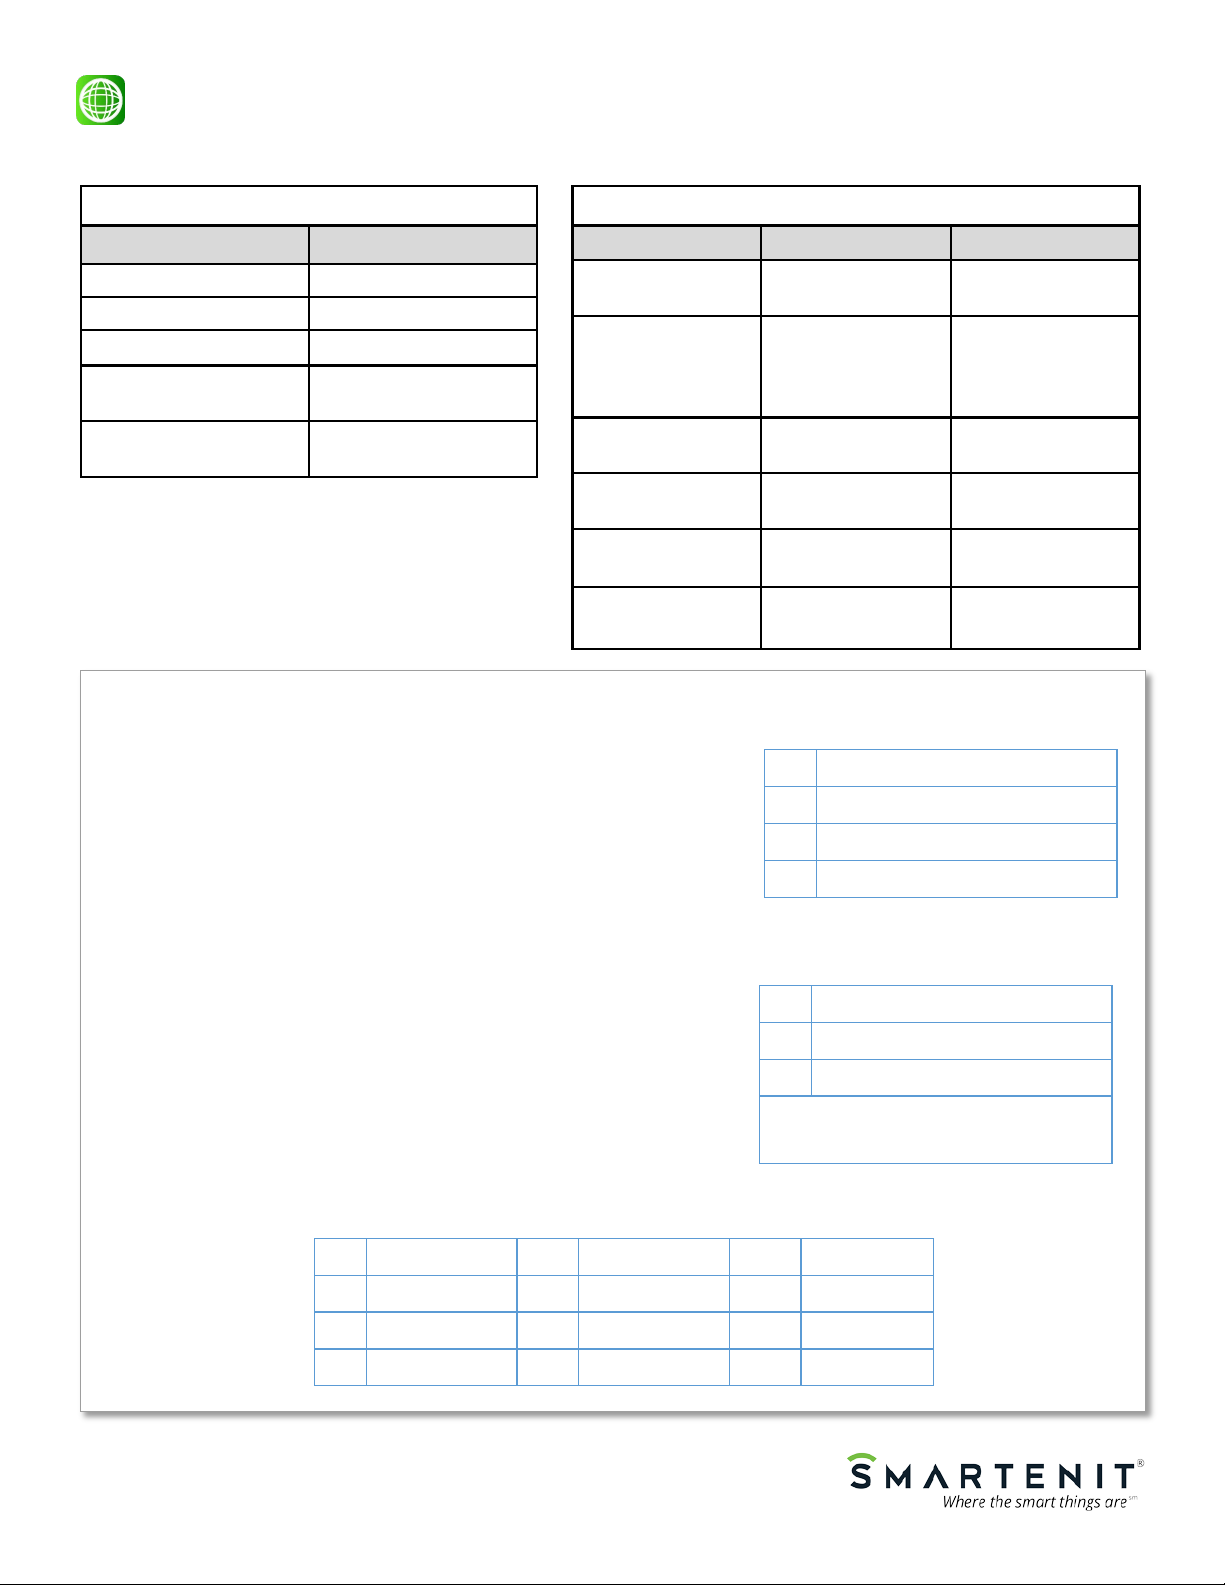
SET Pushbutton Functionality
Operation Pushbutton Device Behavior
Leave Network Tap 13 times Status LED will begin
fast blinking
Close Permit Join Press and hold for 3
seconds when de-
vice is in open per-
mit join
Status LED will stop
ashing
Soft Reset (Reboot
Device)
Tap 10 times
Request Firmware
Update (OTA)
Tap 6 times
Restore Factory Set-
tings
Tap 9 times
Setup Operation
Mode and CT gain
See below See below
Status LED Indications
Pattern Indication
Fast Flashing Searching for network
Solid Joined to network
Flash once per second Open permit join
Short blip, pause-0.5 secs Binding to Endpoint 1
(On/O)
2 blips per second Disconnected from net-
work
Taps Mode
1Single-Phase—6 Channels (default)
2Split Phase—6 Channels
33 Phase—2 Channels
Taps Channel Selected
1-6Select channel 1-6*
7Select all channels
* If device is in 3-Phase mode, select cha-
nel 1 or 2, or 7 for both channels
Taps CT Selected Taps CT Selected Taps CT Selected
110A 440A 7100A
220A 550A 8200A
330A (Default) 660A 9400A

© 2020 Compacta International, Ltd.—Rev 0.1 05/28/2020
IoTeMtr and Smartenit are trademarks of Compacta International, Ltd
Zigbee is a registered trademark of the zigbee alliance
Quick Start Guide
Technical Support
Setup (Cont.)
1) Factory Reset (Restore Factory Settings)
While powering the device, press the SET button and release it once the device powers up. Alternatively, if
the device is already joined to a Zigbee network, quickly tap the SET button 13 times. The Status LED will go
out for 1 second and then begin ashing rapidly. The IoTeMtr will then search for an open Zigbee network
to join.
2) Joining device to a Zigbee network
1. Set network controller to discover devices (Open Permit Join)
2. As the IoTeMtr joins, the Status LED blinking rate will slow until it stays solid, indicating it has fully joined
the Zigbee network.
3) Binding to be controlled by other devices
To allow On/O control by another device, tap the SET button once quickly and within 1/2 second press
and hold it for 3 seconds. The Status LED will blink per the pattern described in the Status LED Indications
table above.
4) Allowing other devices to join Zigbee network (Open Permit Join)
As a Zigbee “Router”, the IoTeMtr can also be put in discovery mode to permit other devices to join the
Zigbee network. Do note that ultimately the network manager device will decide whether to allow the new
device to fully join. Assuming the IoTeMtr is already in a Zigbee network, it can open the network for other
devices to join as follows:
1. Press and hold the SET button for 6 seconds. The STATUS LED will blink once per second and the net-
work will be open for joining for up to 4 minutes
2. Permit-join can be stopped by pressing and holding the SET button for 3 seconds. The LED will stop
blinking.
Ce manuel convient aux modèles suivants
2
Autres manuels Smartenit Domotique


