Slugger 72905361120 Manuel utilisateur

Slugger order number: 7 29 05 361 12 0
14" (335mm) SLUGGER METAL CUTTING SAW
Instruction Manual
Metal

2
TABLE OF CONTENTS
Safety Rules .................................................................................................................... 2
Additional Safety Rules for Metal Cutting Saw ................................................................ 6
Assembly & Adjustment Instruction ................................................................................. 7
Installing a New Saw Blade ............................................................................................. 9
Cutting Depth Adjustment ...............................................................................................11
Operation ........................................................................................................................11
Guide Ruler ....................................................................................................................12
Chip Removal .................................................................................................................13
Replacing Carbon Brushes ............................................................................................13
Maintenance and Lubrication .........................................................................................13
Troubleshooting ............................................................................................................. 14
Specications ................................................................................................................. 14
Parts Diagram ................................................................................................................15
Replacement Parts .........................................................................................................16
Key/Manufacturer ...........................................................................................................19
Intended Use
The metal cutting saw is powerful enough to cut steel sheet metal as thick as ¼” (6mm). Metal
cutting saws are designed to rapidly cut lengths or pieces of zinc coated, steel sheet metal and
various metals without heating up either the blade or the material.
WARNING!: To reduce the risk of injury, read the instruction manual.
WARNING!: Read all safety warnings and all instructions. Failure to follow the warnings
and instructions may result in electric shock, re and/or serious injury.
SAVE ALL WARNINGS AND INSTRUCTIONS
FOR FUTURE REFERENCE
1. WORK AREA SAFETY
a) Keep work area clean and well lit. Cluttered or dark areas invite accidents.
b) Do not operate power tools in explosive atmospheres, such as in the presence of
ammable liquids, gases or dust. Power tools create sparks which may ignite the dust
or fumes.
c) Keep children and bystanders away while operating a power tool. Distractions can
cause you to lose control.
2. ELECTRICAL SAFETY
a) Power tool plugs must match the outlet. Never modify the plug in any way. Do not
use any adapter plugs with earthed (grounded) power tools. Unmodied plugs and
matching outlets will reduce risk of electric shock.
b) Avoid body contact with earthed (grounded) surfaces such as pipes, radiators,
ranges and refrigerators. There is increased risk of electric shock if your body is earthed
or grounded.

3
c) Do not expose power tools to rain or wet conditions. Water entering a power tool will
increase the risk of electric shock.
d) Do not abuse the cord. Never use the cord for carrying, pulling or unplugging the
power tool. Keep cord away from heat, oil, sharp edges or moving parts.
Damaged or entangled cords increase the risk of electric shock.
e) When operating a power tool outdoors, use an extension cord suitable for outdoor
use. Use of a cord suitable for outdoor use reduces the risk of electric shock.
f) If operating a power tool in a damp location is unavoidable, use a ground fault circuit
interrupter (GFI) protected supply. Use of GFI reduces the risk of electric shock.
3) PERSONAL SAFETY
a) Stay alert, watch what you are doing and use common sense when operating a
powertool.Donotuseapowertoolwhileyouaretiredorundertheinuenceof
drugs, alcohol or medication. A moment of inattention while operating power tools may
result in serious personal injury.
b) Use personal protective equipment. Always wear eye protection. Protective
equipment such as dust mask, nonskid safety shoes, hard hat, or hearing protection used
for appropriate conditions will reduce personal injuries.
c) Prevent unintentional starting. Ensure the switch is in the off position before
connecting to power source and/or battery pack, picking up or carrying the tool.
Carrying power tools with your nger on the switch or energizing power tools that have
the switch on invites accidents. Additional protection can be achieved by padlocking the
master switch.
d) Remove any adjusting key or wrench before turning the power tool on. A wrench or a
key left attached to a rotating part of the power tool may result in personal injury.
e) Do not overreach. Keep proper footing and balance at all times. This enables better
control of the power tool in unexpected situations.
f) Dress properly. Do not wear loose clothing or jewelry. Keep your hair, clothing and
gloves away from moving parts. Loose clothes, jewelry or long hair can be caught in
moving parts.
g) If devices are provided for the connection of dust extraction and collection facilities,
ensure these are connected and properly used. Use of dust collection can reduce dust-
related hazards.
4) POWER TOOL USE AND CARE
a) Do not force the power tool. Use the correct power tool for your application.
The correct power tool will do the job better and safer at the rate for which it was designed.
b) Do not use the power tool if the switch does not turn it on and off. Any power tool that
cannot be controlled with the switch is dangerous and must be repaired.
c) Disconnect the plug from the power source and/or the battery pack from the tool
before making any adjustments, changing accessories, or storing power tools. Such
preventive safety measures reduce the risk of starting the power tool accidentally.
d) Store idle power tools out of the reach of children and do not allow persons
unfamiliar with the power tool or these instructions to operate the power tool. Power
tools are dangerous in the hands of untrained users.
e) Maintain power tools. Check for misalignment or binding of moving parts,
breakage of parts and any other condition that may affect the power tools
operation. If damaged, have the power tool repaired before use. Many accidents are
caused by poorly maintained power tools.
f) Keep cutting tools sharp and clean. Properly maintained cutting tools with sharp cutting
edges are less likely to bind and are easier to control.

4
g) Use the power tool, accessories and tool bits, etc. in accordance with these
instructions, taking into account the working conditions and the work to be
performed. Use of the power tool for operations different from those intended could result
in a hazardous situation.
h) Caution!: The chip collector tray could be very hot while cutting or after cutting.
Don’t touch it by hand!!
5) SERVICE
a) Haveyourpowertoolservicedbyaqualiedrepairpersonusingonlyidentical
replacement parts. This will ensure that the safety of the power tool is maintained.
Safety Instructions for Saw
DANGER:
a) Keep hands away from cutting area and the blade. Keep your second hand on
auxiliary handle. If both hands are holding the saw, they cannot be cut by the blade.
b) Do not reach underneath the workpiece. The guard cannot protect you from the blade
below the workpiece.
c) Never hold piece being cut in your hands or across your leg. Secure the workpiece
with the vice or clamps when necessary. It is important to support the work properly to
minimize body exposure, blade binding, or loss of control.
d) Hold power tool by insulated gripping surfaces when performing an operation
where the cutting tool may contact hidden wiring or its own cord. Contact with a “live”
wire will also make exposed metal parts of the power tool “live” and shock the operator.
e) Always use blades with correct size and shape (diamond versus round) of arbor
holes. Blades that do not match the mounting hardware of the saw will run ineffectively,
causing loss of control.
f) Never use damaged or incorrect blade washers or bolts. The blade washers and bolts
are specially designed for your saw, ensuring optimum performance and safety of operation.
Causes and Operator Prevention of Kickback:
• Kickback is a sudden reaction to a pinched, bound or misaligned saw blade, causing an
uncontrolled saw to lift up and out of the workpiece toward the operator.
• When the blade is pinched or bound tightly by the cut closing down, the blade stalls and the
motor reaction drives the unit rapidly back toward the operator.
• If the blade becomes twisted or misaligned in the cut, the teeth at the back edge of the blade
can dig into the top surface of the metal, causing the blade to climb out of the cut and jump
back toward the operator.
Kickback is the result of saw misuse and/or incorrect operating procedures or conditions and can
be avoided by taking proper precautions as given below:
a)Maintainarmgriponsawhandleandpositionyourarmstoresistkickbackforces.
Position your body to either side of the blade, but not in line with the blade. Kickback
could cause the saw to jump backwards, but kickback forces can be controlled by the

5
operator if proper precautions are taken.
b) When blade is binding or when interrupting a cut for any reason, release the trigger
and hold the saw motionless in the material until the blade comes to a complete
stop. Never attempt to remove the saw from the work or remove the saw blade from
the work piece while in motion or kickback may occur. Investigate and take corrective
actions to eliminate the cause of blade binding.
c) When restarting a saw in the workpiece, center the saw blade in the cut and check
that saw teeth are not engaged into the material. If saw blade is binding, it may walk up
or kickback from the workpiece as the saw is restarted.
d) Support long material lengths to minimize the risk of blade pinching and kickback.
Long length materials tend to sag under their own weight. Supports must be placed
under the material on both sides near the line of cut and near the edge of the material.
e) Do not use dull or damaged blades. Unsharpened or improperly mounted blades
produce narrow cuts causing excessive friction, blade binding and kickback.
f) Blade depth and bevel adjusting locking levers must be tight and secure before
making cut. If blade adjustment shifts while cutting, it may cause binding and kickback.
Guard Safety Instructions
a) Check guards for proper closing before each use. Do not operate the saw if guards don’t
move freely and close instantly. Never clamp or tie the guards into the open position.
If saw is accidentally dropped, guards may be bent.
b) Check the operation of the guards springs. If the guards and the spring are not operating
properly, they must be serviced before use. The guards may operate sluggishly due to
damaged parts, gummy deposits, or a build-up of debris.
c) When the saw blade is lowered, both guards separate to perform cut.
d) Always observe that the guards are covering the blade before leaving the saw. Be aware
of the time it takes for the blade to stop after switch is released.
Additional Safety Instructions
• Use the vice to secure and support the workpiece. Holding the work by hand or against your
body leaves it unstable and may lead to loss of control.
• Keep your body positioned to either side of the blade, but not in line with the saw blade.
KICKBACK could cause material to jump backwards (see Causes and Operator Prevention of
KICKBACK).
• Always make sure nothing interferes with the movement of the blade guards.
• Accessories must be rated for at least the speed recommended on the tool warning label.
Wheels and other accessories running over rated speed can y apart and injure. Accessory
ratings must always be above tool speed as shown on tool nameplate.
• Always make sure the saw is clean before using.
• Stop using this saw and have it properly serviced if any unusual noise or abnormal operation
occcurs.
• Always be sure all components are mounted properly and securely before using tool.
• Always handle the saw blade with care when mounting or removing it or when removing the
diamond knockout.
• Always wait until the motor has reached full speed before starting a cut.

6
• Always keep handles dry, clean and free of oil and grease.
• Always be alert at all times, especially during repetitive monotonous operations. Always be
sure of position of your hands relative to the blade.
• Stay clear of end pieces that may fall after cutting off. They may be sharp and/or heavy.
Serious personal injury may result.
• Replace or repair damaged cords. Make sure your extension cord is in good condition. Use
only 3-wire extension cords that have 3-prong grounding-type plugs and 3-pole receptacles
that accept the tools plug.
ADDITIONAL SAFETY RULES OF
METAL CUTTING SAW
CAREFULLY READ THE FOLLOWING SAFETY WARNINGS PRIOR TO CONNECTING THE
METAL CUTTING SAW TO POWER.
1. Must keep the guards in the xed position, never wedging or binding them. Before using the
metal cutting saw, please ensure the safety guards move freely and close instantly. Don’t force
the operation.
CAUTION!: If the saw is accidentally dropped, the guards could be damaged.
2. Danger!: Remove hands from sawing area when tool is operating.
CAUTION!:The blade will rotate a period of time after turning off the switch.
3. Adjustment. Before sawing, adjust the saw depth.
4. Must select the right blade. Use the suitable saw blade within the range shown on nameplate.
5. Do not use cutting oil while cutting.
6. Do not use blades which are deformed or cracked.
7. Always use safety glasses. Everyday eyeglasses only have impact resistant lenses; they are
not safety glasses.
8. To avoid possible hearing damage, wear ear plugs when using power tool.
9. Before moving the saw, lock the power head in the lower position. Unplug electric cord.
10. To avoid back injury, hold the tool close to your body when lifting. Bend your knees so you
can lift with your legs, not your back. Lift by using the hand hold areas at each side of the base
bottom or by carrying handle.
11. Never carry saw by the power cord or the trigger grip on the plastic handle. Carrying the tool
by the power cord could cause damage to the insulation or the wire connections, resulting in
elctrical shock or re.
12.Placethesawonarm, level surface where there is plenty of room for handling and
supporting the work piece.
13. Bolt or clamp the saw to the level surface.

7
MotorSpecicationsandElectricalRequirements
PowerSupplyandMotorSpecications
The AC motor used in this saw is a universal, nonreversible type, having the following
specications:
Model No. 72905361120
Maximum Developed HP 3
Voltage 120, 60Hz
Amps 15
Hertz (Cycles) 60
Phase Single
RPM 1300
Shaft Rotation Counter-Clockwise
Power Connections
A separate electrical circuit should be used for your tools. This circuit should not be less #12 wire
and should be protected with a 20 Amp fuse. Have a certied electrician replace or repair a worn
cord immediately and connect the motor as nameplate mentions. Running low voltage will damage
the motor.
WARNING: DO NOT EXPOSE THE TOOL TO RAIN OR OPERATE IN DAMP
CONDITIONS.
ASSEMBLY AND ADJUSTMENT INSTRUCTIONS
WARNING:
For your own safety, never connect the plug to a power source outlet until all assembly steps
are complete and you have read and understood the safety and operating instructions. The
safety guards are attached to the saw for your protection. Should the guards become
damaged, do not use the saw until damaged cover has been replaced. If the guards
become dirty, or chips adhere to it, clean the safety guards carefully with a damp cloth.
Unpacking Contents
WARNING:
To avoid injury from unexpected starting or electrical shock, don’t plug the power cord into a
power source outlet duing unpacking and assembly. This cord must remain unplugged
whenever you are working on the saw.
Your saw is shipped complete in one box.
WARNING:
Although compact, this saw is heavy. To avoid back injury, get help whenever you
have to lift the saw.

8
1. Remove the saw from the carton by lifting the saw with the carrying handle.
2. Place the saw on a secure and stationary work surface. Inspect for damage.
Box Contents
Before beginning assembly, check that all parts are included.
A. Blade 1 E. Custom-tted tool case
B. Instruction manual 1 D. Wrench
C. Ear protection 2
D. Safety eyewear 1
Getting to Know Your Saw
1. Warning label.
2. Chain: For easy carrying and storage, the cut-off saw can be
clamped in the down position by means of the hold down chain.
To move the cutting head to the up position, simply unhook the
chain from the handle housing.
3. Quick Vise: Clamp the work piece to this vise by turning the
handle crank of vise. The stationary vise can be moved or the
angle adjusted to accommodate work pieces of many sizes.
4. Retractable Blade: Protects users from cutter contact on
upper portion of blade. Removable for blade change.
5. D Handle: The D handle contains the trigger and switch with
a lock button (*Refer to #8 & #9). The blade can be lowered into
the work piece by pushing down on the handle. The saw will
return to its upright position when the handle is released unless
the hold down (#2) is hooked.
Fig. 1 Fig. 2
Fig. 3
Fig. 4

9
6. Carrying Handle: This handle is built into the unit to move it
from one location to another. Before attempting to pick up the
unit by the carrying handle, attach the chain (#2).
7. Eye Protection Plate: To protect eyes from injury, sparks and
iron lings that occur while cutting material.
8. Trigger/Switch: To turn saw “ON”, rst depress trigger and
then depress switch (9). To turn saw “OFF”, release trigger and
switch.
9. Arbor Lock: Prevents blade from rotating while tightening
or loosening arbor screw during blade replacement or removal.
11. Up stop Screws: Prevents over rotation of the power head
in the upright position.
12. Depth stop: Allows saw to cut desired depths by adjusting
the power head.
13. Top Blade Cover: Protects users from cutter contact on upper portion of blade.
14. Arbor Wrench: Used for blade changing and fence angular adjustments.
Installing a New Saw Blade
WARNING: To prevent an accident or personal injury, always turn off the trigger switch and
disconnect the power plug from the receptacle before removing or installing a blade. Only
use blades designed for metal cutting saws. The use of any abrasive wheels, alternative
purpose wheels or different size blades could void the warranty. Check regularly that the
blade is at, sharp and free of any defect or damage. Ensure the saw is disconnected from
power.
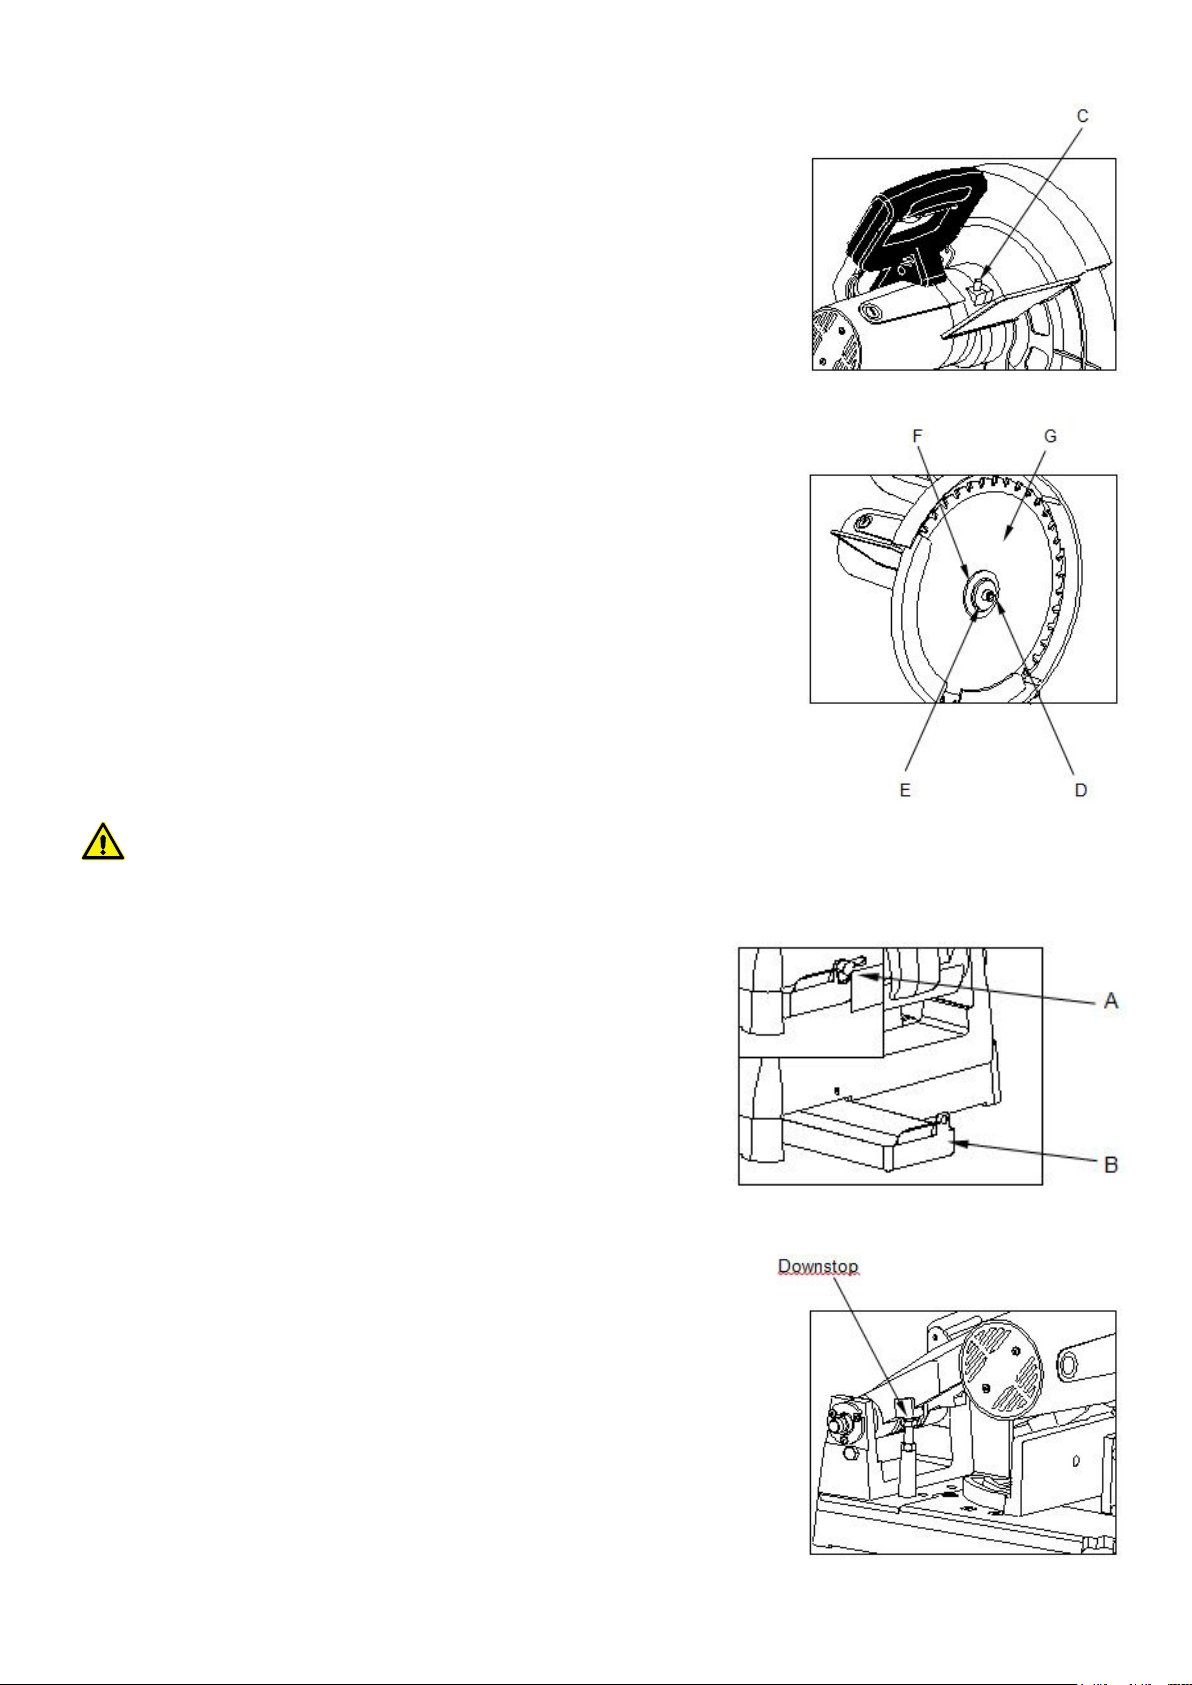
1. Loosen the 3 screws (A), and remove the top blade front
cover (B).
Fig. 5
Fig. 6
Fig. 7

10
2. Press in arbor lock (C) and rotate blade (G) by hand until lock
engages.
3. Using the 8mm HEX wrench, loosen arbor screw (D)
by turning counter clock wise, remove arbor screw (D),
washer (E), outside blade ange (F), and blade (G).
DO NOT REMOVE INSIDE BLADE FLANGE.
4. Ensure inside blade ange surfaces are free from debris.
5. Install new saw blade (G), ensure saw blade arrow is facing
proper direction and is visible. Reinstall ange (F), washer (E),
arbor screw (D) and tighten clockwise.
6. Replace saw blade cover (B) and 3 screws (A).
WARNING: Ensure arbor lock (C) is disengaged and 8mm HEX wrench has been removed
before turning on power.
Clean Chip Tray
Loosen the screw (A), take out the chip tray (B) and clear it.
Put the chip tray (B) back and tighten screw (A).
Down Stop Adjustment
The down stop should be adjusted so that maximum cutting
depth is achieved but it does not penetrate the chip tray.
1. Lower cutter head until the arm hits the down stop.
2. Verify maximum cutting capacity and that there is no contact
between the base or chip tray.
3. If contact occurs, adjust down stop screw and jam nut until
problem is corrected.
NOTE: All other adjustments are described in the
“Basic Saw Operations” section.
Fig. 8
Fig. 10
Fig. 11
Fig. 9
Table des matières
Autres manuels Slugger Scie