SkyTraxx SKYTRAXX 2.0 Manuel utilisateur

_________________________________________________
Page 1
Manual
Skytraxx rev 1.13 Firmware 1.50
Skytraxx GmbH Im Bil stöckle 5 79822 Titisee-Neusta t
info@skytraxx.eu www.skytraxx.eu

TABLE OF CONTENTS
Intro uction
External features
Input keys, turning the unit ON an OFF
Navigating the MENU
First steps
Main screen
Map view
Manually setting the altitu e
DEVICE STATUS - Menu
Viewing files
TRAXX - Menu
USB - Menu
PARAMETER - Menu
AIRSPACE - Menu
WAYPOINT - Menu
GOTO - Menu, Final Leg
TASK - Menu
SIMULATOR - Menu
PILOT DATA - Menu
USER FIELDS - Menu
PLAY MUSIC - Menu, FIRMWARE UPDATE - Menu
Displaying thermal an win information
Battery
Technical ata
Water lan ings
Disposal
Safety information
_________________________________________________
Page 2
3
4
5
6
7
8
9,10
11,12
13
14
15
16
17,18
19
20
21,2
23
24
24
25
26
27
28
29
30
31
32

_________________________________________________
Page 3
Introduction
Thank you for purchasing the SKYTRAXX 2.0 and for placing your trust in us.
The SKKYTRAXX 2.0 uses the most up-to-date componentry a ailable and has
been specifically designed for paragliding and hang gliding. The new technology
has enabled us to produce a much more efficient unit and to offer many new
features which we are certain you will appreciate.
Skytraxx GmbH reser es all rights to the content of this manual and the right to
alter product details without notice.
SKYTRAXX 2.0 is the result of a major product upgrade which includes
many new features and functions. The new high performance 32bit Risc
processor has huge processing power and together with its 4GB of
internal memory offers new features ne er before thought possible.
The SKYTRAXX 2.0 has practically no flight recording limits. It is calpable
of logging thousands of flights each with a track inter al of one second
and can handle 60 000 waypoints together with masses of airspace data.
In addition, the capacity to calculate and analyse maximum alues and
profiles for all recordings in real-time is nothing short of amazing.
Some SKYTRAXX 2.0 features include:
•A preinstalled worldwide database of all launch sites and landing fields.
•Preinstalled airspace information for 31 countries.
•All tracklogs are stored as IGC files and are signed with a G-Record.
•Compatible for use with Windows, MAC and Linux without additional
software or dri er requirements.
•Airspace information can be copied in OpenAir format directly to the
SKYTRAXX.
•Waypoints are copied simply as text files.
_________________________________________________
Page 4
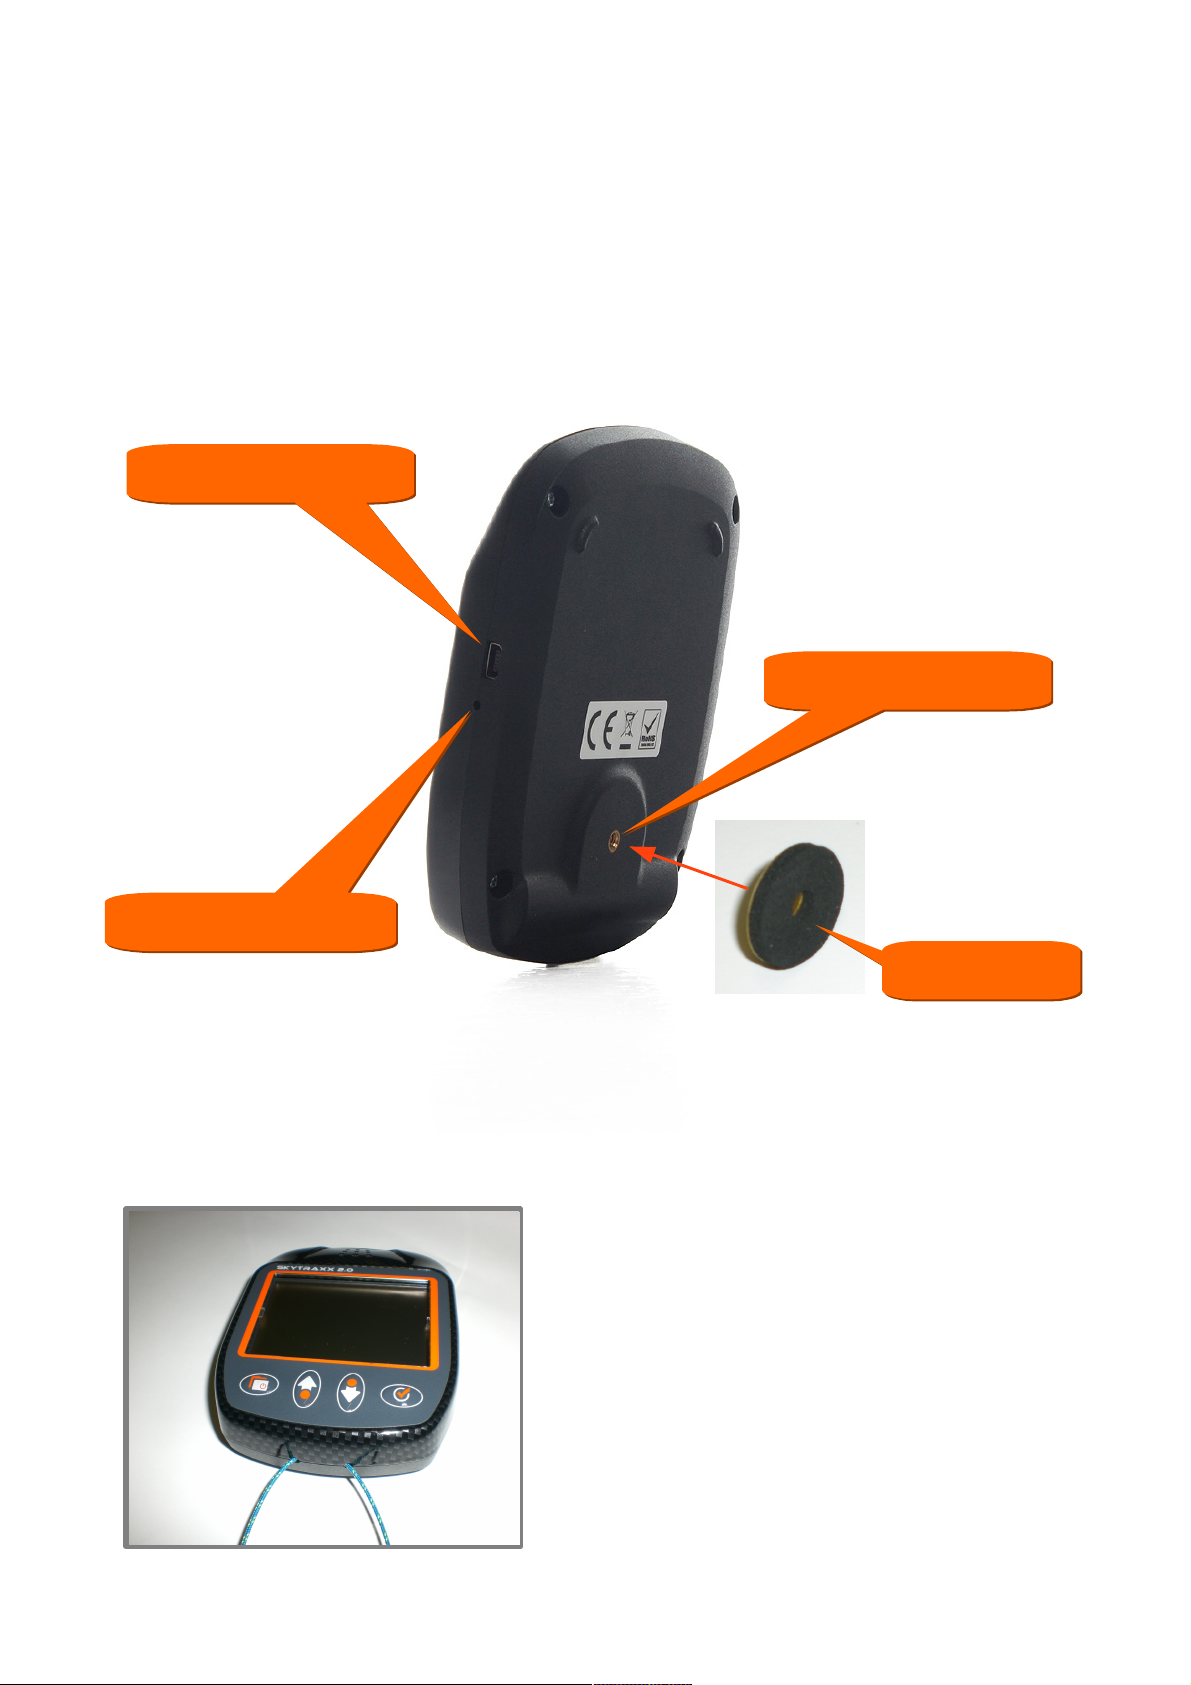
External Features
A Mini-USB port allows ata exchange an battery charging.
A reset button located near the USB port can be actuated by
inserting a thin pencil or a paper clip, and gently pressing.
On the back cover there is an internal M4 threa .
The maximum depth is 6 mm.
If an accessory is attache , the inclu e a hesive pa must also be use .
M4 threa
M4 threa
Mini-USB
Mini-USB
Reset button
Reset button
For in-flight security, a safety line can
be attache using the two holes at
the base of the unit.
pa
pa
_________________________________________________
Page 5
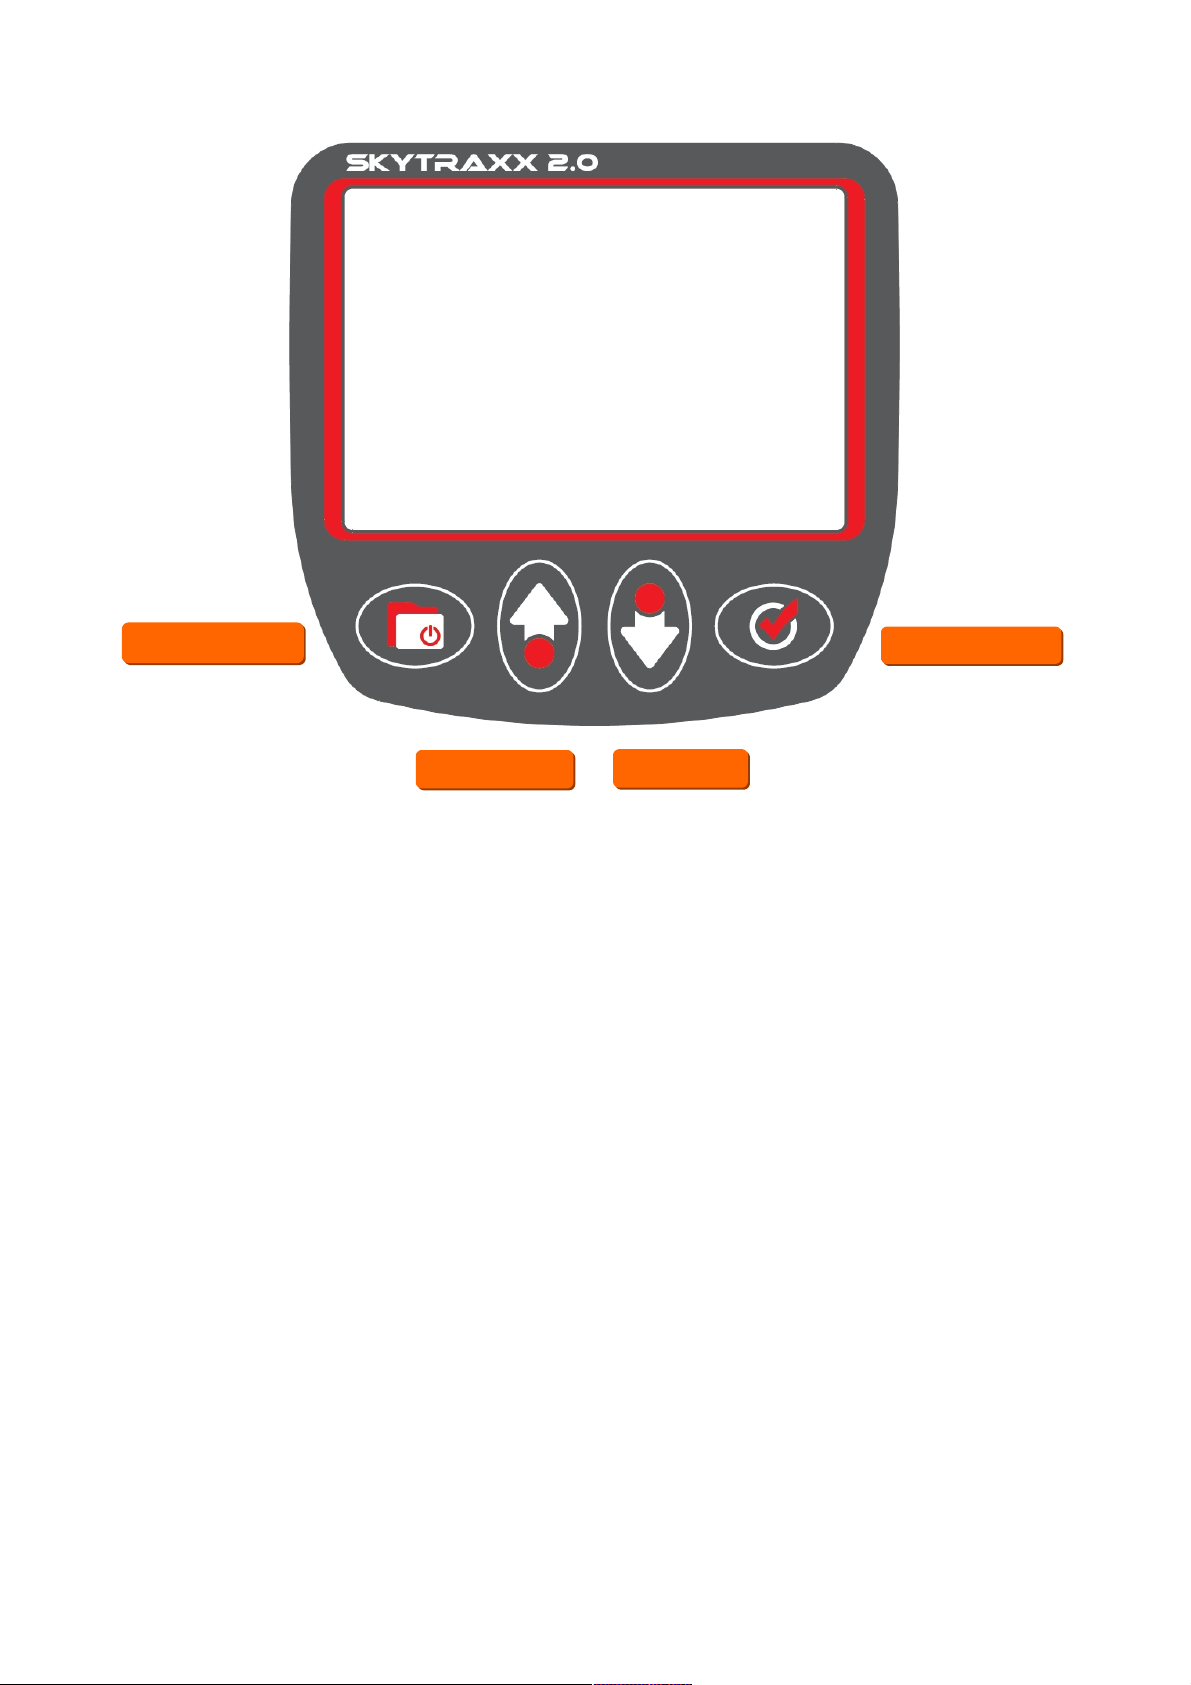
The Menu key toggles to an from the Main Menu.
The Minus/P us keys ecrease an increase values respectively,
as well as facilitating movement up an own within the Menu in the
irection in icate by the arrows on the keys.
Pressing OK facilitates paging through the various views, as well as
confirming an input or making a selection.
Turning the Unit ON and OFF
Connect the Skytraxx to the charger supplie an fully charge the
unit.
To turn the unit ON press an hol the Menu key for 3 secon s an
then press OK. To switch OFF press an hol the Menu key for 3
secon s an then press OK. In either case if confirmation by
pressing OK is omitte , no changes will occur.
Note that when the evice is connecte to a PC it will not switch off.
The Main Screen is the defau t view when the unit is turned on.
Menü
Menü
Minus
Minus P us
P us
OK
OK
Input Keys

_________________________________________________
Page 6
Use the Minus/P us keys to move the in icator up an own the list (2 pages).
Press the Menu key anytime to return to the main screen.
Press OK to open an in icate screen.
Menu Options:
•DEVICE STATUS Date&Time, GPS coor .&height, Satelites
•TRAXX Store flight info an analyses
•USB To connect to PC
•PARAMETER Device settings
•AIRSPACE Airspace options
•WAYPOINT Waypoint management
•GOTO To select a waypoint to navigate to
•TASK Competition task management
•SIMULATOR Simulates GPSreception&hypothetical flight
•PILOT DATA To enter pilot ata for exporting to IGC files
•USER FIELDS Set the 3 user- efinable fiel s in main view
•PLAY MUSIC To play music
•FIRMWARE UPDATE Up ate evice firmware.
•FACORY DEFAULT Return all settings to facory efault
Press the Menu key from any screen to return to Menu list.
DEVICE STATUS
TRAXX
USB
PARAMETER
AIRSPACE
WAYPOINT
GOTO
TASK
Navigating the Menu
After the turning on the evice press the Menu key.
SIMULATOR
PILOT DATA
USER FIELDS
PLAY MUSIC
FIRMWARE UPDATE
FACTORY DEFAULT

_________________________________________________
Page 7
First steps
1. Setting up Pilot etails:
From the Main Menu select PILOT DATA.
Press OK to begin editing an use the keys next to the symbols which
appear on the screen to navigate.
Example:
Your name is Max Mustermann
IGC-ID: MaMu (4 characters)
Pilot: Max Mustermann (max. 22 characters)
Gli er: A vance alpha 3 (max. 22 characters)
Class: Paragli er (sport) (max. 22 characters)
To insert or elete characters, hol own the OK key in edit mo e until
the following symbols appear on the screen. Press the a jacent
Minus/P us key to effect the esire operation.
De ete Insert
The following characters are available by using the Minus/P us keys in
the edit mo e, hol ing own for rapi scanning:
abc efghijklmnopqrstuvwxyz.()-
0123456789ABCDEFGHIJKLMNOPQRSTUVWXYZ
To insert a space, use the full-stop character.
When finishe in one fiel , press Menu. Move fiel s with the
Minus/P us keys, then press OK to e it the next fiel an so on.
Save your entered detai s by pressing the MENU key, then OK to
confirm.
This information becomes the hea er of your IGC-File.
2. Select the country being flown from the AIRSPACE menu. Germany
is the efault setting.
3. Using the PARAMETERS menu it is possible to set personal
parameter preferences. (See „Parameters“ for more etail.)
Ins
_________________________________________________
Page 8
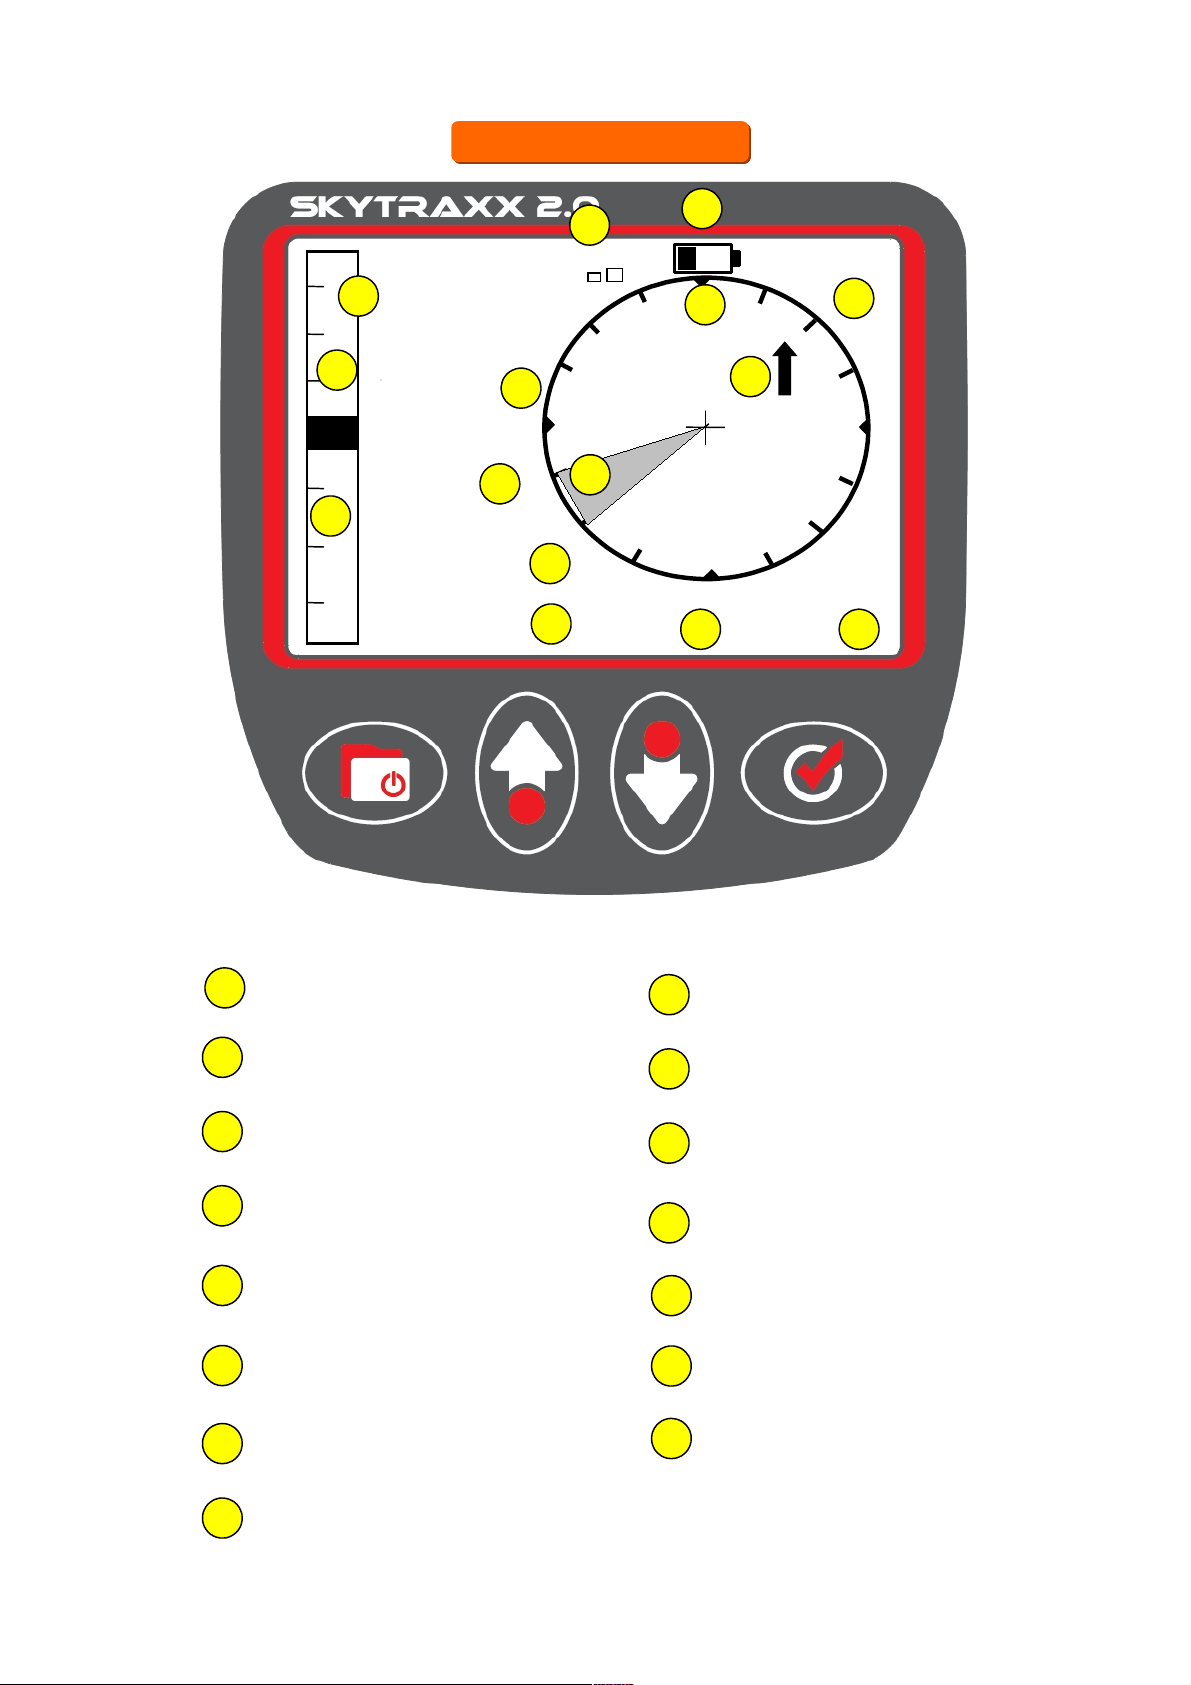
10:35:02
1078
1.5
N
O
S
W
2
3
4
57
8
1
12
1GPS Height AMSL
2Digital vario
3User- efinable fiel
9Win irection
4User- efinable fiel
5User- efinable fiel
10 Position of last Thermal
6Groun spee
11 Track
12 GPS strength
8Temperature
7Win spee
1
2
3
1
2
3
6
Höhe Meter
Vario m/s
Gleitzahl
---
Time
Dist to Airspace
14.2 km
24°C
GndSpd
36 16
WindSpd
11
13
15
14
13 Battery level
14 Analog vario
15 Vario over 30 Secon s
1
Main screen
Main screen
9

_________________________________________________
Page 9
1Airspace within warning istance
2Airspace warning istance
3Win 9Track
4Scale
5Distance to next airspace
10 GPS Height AMSL
6Track og
11 Current position
8Groun spee
7Waypoints
1740 42
7.4 km
5
NW/16
+ Kande
14.2 km
+ Hintereck
7.9 km
+ Tafe büh
19.8 km
WNW
SW
2
3
4
11
1
5
7
8
9
1
6
A short press on the Minus/Plus keys changes the scale. Hol ing either one
own isplays Airspace information. Further pressing scrolls through the
information. Press Menu to exit back to Map. See next page for more etails.
12 Thermal source
12
Map screen
Map screen
480m

_________________________________________________
Page 10
Using the Map Screen
In the Map view the scale can be change by short-pressing the
centre keys (Minus/P us).
Provi e airspace maps have been loa e an there is GPS
reception, hol ing own either of the centre keys will show airspace
info. Whilst viewing the airspace info, the centre keys scroll through
airspace ata files.
A itonally, if the thermal atabase is loa e , thermal points can be
viewe from the secon scale setting upwar s.
Adding therma points
After connecting the Skytraxx to a PC, use the following link to
ownloa the thermal atabase an then copy it into the
WAYPOINTS fol er:
http://xc. hv. e/xc/mo ules/leonar o/ ata/files/ hvxc-thermals.wpt
Then in the Skytraxx, select WAYPOINTS from the menu list an then
select Se ect waypoint fi e.
Choose New File or A File.
+
New File A File
Table des matières


