SKiVE V9 Manuel utilisateur
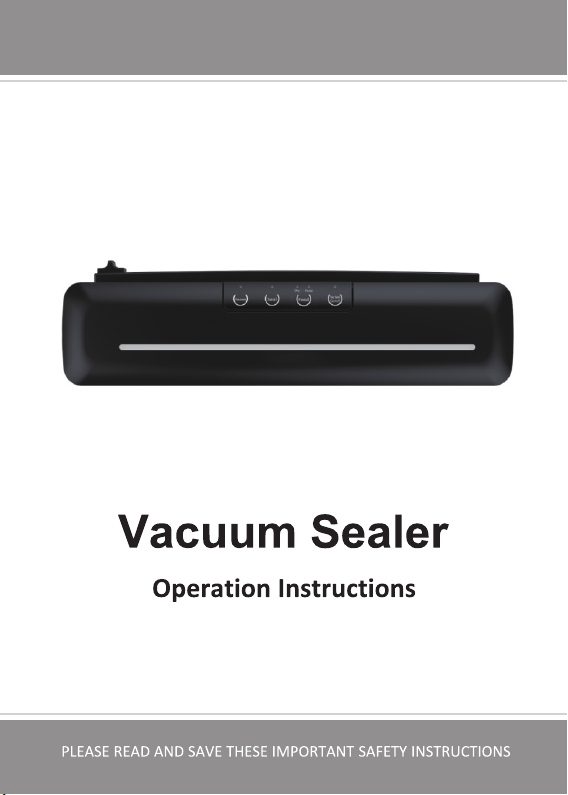
User Manual

Please keep the User Manual in a proper
place for future reference
IMPORTANT SAFETY INSTRUCTIONS ---------------------------1-3
STRUCTURE AND FUNCTION----------------------------------------3-7
OPERATE STEPS--------------------------------------------------------7-10
VACUUM SEALER OPTIMAL OPERATE GUIDELINE--------11-12
TROUBLE SHOOTING------------------------------------------------12-13
REPAIR AND MAINTENANCE-------------------------------------------14
FOOD VACUUM PRESERVATION COMPARISON GUIDE------15
PACKAGING LIST-----------------------------------------------------------15
SPECIFICATIONS-----------------------------------------------------------16
ENVIRONMENT FRIENDLY DISPOSAL------------------------------17
.
CONTENTS

1
IMPORTANT SAFETY INSTRUCTIONS
Read and understand all instructions before using this product,and
follow all warnings and cautions as below.
W
CAUTION
1.This product is designed for household use only.
2.The use of different power sources is prohibited.
3.This product is not suitable for children or people who do not know how
to operate. Please keep it out of reach of children.
4.If there is any damage to the machine body or power line, please stop
using it immediately and replace it with professional personnel.
5.Please do not try to repair the machine by yourself. If you need to
repair it, please send it to the corresponding after-sales service center
and leave it to the professional.
6.Stay away from hot gas, heating oven,electric heater and any high
temperature, do not use in humid or high temperature environment.
7.When using machine to plug power,be sure to be safe and keep your
hands dry.
8.It is recommended that the extension cord should not be used. If not,
please match the extension cord with various technical indicators.
9.When the machine is working,keep it in a flat,firm,and heat-resistant
surface. Please be careful not to tip over.
10.It is not recommended to use non-designated bags or accessories.
It is not recommended to use the device for other purposes other than
functions.
ARNING

11.Do not touch the sealing tape on the machine to prevent scalding.
12.Any part of the machine including the power cord or plug can immerse
in the liquid, the power cord and plug must be kept dry, such as wet in
use, should wear insulating gloves unplug the power supply, it is
prohibited to use before the water is not completely dry.
13.This product does not require any lubricant or lubricating oil, and is
prohibited to use organic solvent for wiping.
14.Users shall not leave the product during the power supply.
15.When the machine is not in use for a long time, disconnect the power
cord and cut off the power supply.
16.It's suggested that customer put the support card back into the
vacuum chamber after using the machine. Please keep the machine
cover unlock to prevent compression deformation to the sealing gaskets.
This will help to keep good vacuum effect.
17.Avoid the following: when transporting machine pulling the power
cord, strong pulling stuck the main power cord, take the power cord
when the handle, the sharp edges on the power cord wrapped around
the object, hold the power cord directly pull off the plug, in the case of
wires or plugs is wet operating the machine.
2
PLACEMENT PROBLEM
When using, be sure to place this product on a flat, stable, heat-resistant
workbench. Do not use it outdoors or near water.
Warning: Do not place the vacuum sealer on a metal tray or metal
surface while it is in use.
3
LIMITATION OF LIABILITY
All technical information, data, and instructions contained in this manual
regarding installation, connection, and operation are consistent with the
latest information we obtain at the time of printing and take into
consideration our previous experience and technology.
The manufacturer assumes no responsibility for damage resulting from
non-compliance with this instruction manual, improper use, unqualified
repairs, unauthorized modification or use of unapproved replacement parts.
Note: When using the product for the first time, remove all internal and
external packaging, protective film and accessories.
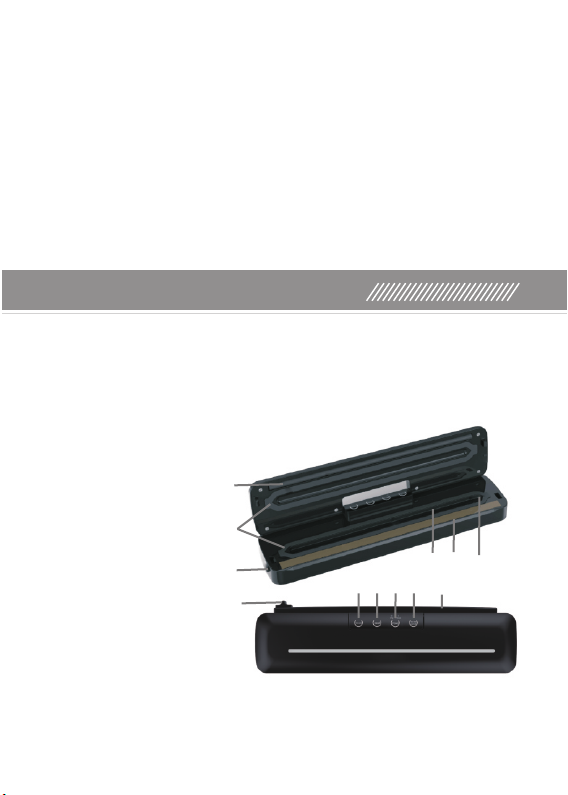
A. Sealing silicone strip
B. Vacuum sealer Gaskets
C. Open button
D. Cutter Button
E.Vacuum key
F. Seal key
G. Food key
H. Vac Seal key/Cancel Key
I. Slide Cutter
J. Vacuum chamber
K. Vacuum sealing strip
L. Vacuum hole
A
B
C
D
E F G I
J K
H
L
STRUCTURE AND FUNCTION
4
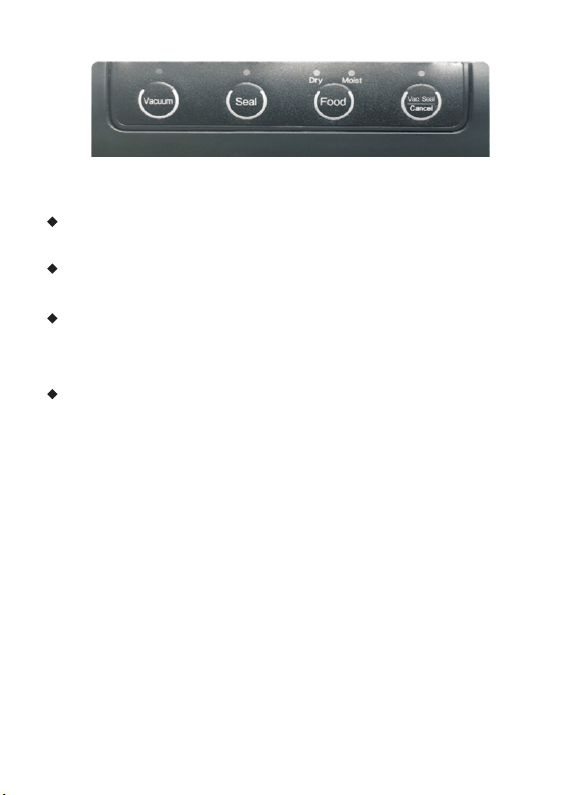
BUTTON
Vacuum
Press to only vacuum package
SEAL
Press this button in standby mode to achieve a separate sealing function.
FOOD
Dry-For vacuum sealing of dry foods, touch this button.
Moist-For vacuum sealing of wet foods, touch this button.
VAC SEAL /CANCEL
Vac Seal-When this button is pressed in the standby mode, the
machine will perform a vacuum and automatically heat seal after this
action is completed.
Cancel-One-touch stop function when any function is performed.
Safety Protection:
When the Vacuum Seal or Seal indicator flashes, it means the appliance
start the Safety Protection and forced to stop for 2 minutes before it can
resume normal use.

5
VACUUM STRUCTURE
Vacuum sealer gaskets
After the upper cover and the base are buckled together, the upper
and lower Vacuum sealer gaskets fit together to form a vacuum
chamber.
If you need to remove the vacuum sealer gaskets for installation and
cleaning, be careful not to distort or damage it.
Vacuum chamber
Place opening end of the vacuum bag into the vacuum chamber,after
the upper and lower Vacuum Sealing strip fit together to form a vacuum
chamber, when the vacuum operation is performed, the air in the bag
is drawn out.
Food residue,dust and other fines will be pumped out and concentrated
at the bottom of the vacuum chamber, please pay attention to cleaning
in time.
Heat sealing strip
When sealing work,this part is in high temperature heat to seals the
vacuum bag together with the sealing silicone strip.
Do not touch it with your hands to avoid burns.
Sealing strip
When the lid is closed,it fits with the heat sealing strip and completes
the function of sealing the bag together with the heat sealing strip.
SEALING STRUCTURE

6
Vacuum pipe
Equipped with one vacuum pipes for external pumping, it is suitable
for most vacuum canister and bags as well as wine bottles on the
market.
After inserting matching end of the outer suction tube to the vacuum
hole, connect it to the container to be evacuated.
Press the vacuum button to start the vacuum.
After the vacuum is completed, it can be automatically stopped or
pressed again to manually stop the evacuation.
External vacuum function
Cutter
Operate: Open one end of the roll cutter,put the vacuum bag roll
between the roll cutter and appliance.Hold the bag with your left hand,
and slide the cutter button from left to right with your right hand to get
a bag with open. Close and lock the lid,please make sure lid is well
closed. Then press seal button,when Seal Indicator Light turns off,
unlock the lid and remove bag.The bag with an open end is
completed.
CUTTER
COVER LOCK
Buckle
For locking the cover and the base, hold the vacuum bag in tight.
Close the upper and lower covers, and use your hands to press down
on the lock position of the cover to lock it.It is advisable to close the
lid only and keep it unlock when not in use.
Vacuum hole and switch
7
Cover open button
Press the buttons on both sides at the same time to unlock the locked
upper and lower covers.
OPERATE STEPS
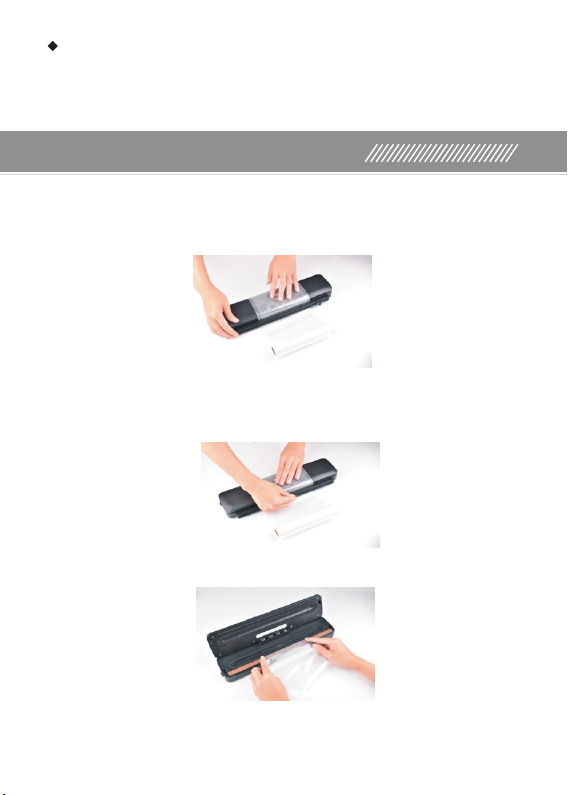
BAG MAKING STEP
1.Open one end of the roll cutter, put the vacuum bag roll between the
roll cutter and appliance.
2.Hold the bag with your left hand, and slide the cutter button from left to
right with your right hand to get a bag with open ends.
3.Open appliance lid and place one end of the bag across sealing strip.
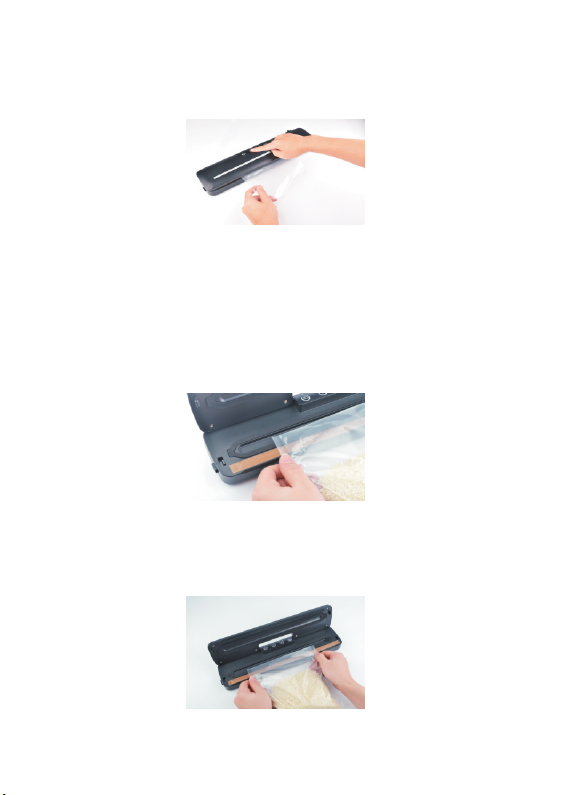
8
4.Close and lock the lid, please make sure lid is well closed. Then press
seal button,when Seal Indicator Light turns off, unlock the lid and remove
bag.Now you are ready to vacuum package with your new bag.
VACUUM & SEALING BAG STEP
1.Take out a piece of bag (or make a piece of bag according to the
method described above), put the food that needs to be packaged into
the bag, and ensure that there is at least 7 cm gap between the food
and the bag mouth.
2.Open the lid, pull the open end of the vacuum bag with both hands,
and place the curling direction downwards in the vacuum chamber.
Note: Keep the bag straight
Table des matières


