Skiddoü Sunt Manuel utilisateur

1
EN
DE
FR
ES
IT
PL
user manual ........................................................................................ 7
bedienungsanleitung ..................................................... 13
guide d’utilisation ................................................................. 19
manual de usario ................................................................. 25
istruzioni per utente ....................................................... 31
instrukcja obsługi ................................................................ 37
2
1
37
4
6
5
2.1 2.2
parts/taile/éléments/componentes/elementi/elementy
3
2
1
AA
BA C
D
A
4
A B
3
4
A
B
5
C
A B
C
point 2D
D
4
5

6
7
Hello,
Thank you for the expression of sympathy.
We are really happy that you have joined the
skiddoü family. Since now we’ve taken care about
the little ones who aren’t able to take care of
themselves yet.
skiddoü was born to smile. We know that when the
child is born, the whole world smiles and so believe
that happy parents raise happy babies.
Our mission is to create safe, comfortable, stylish
and durable products that will accompany your
daily discoveries.
We hope that the skiddoü product you’ve chosen
will simplify your everyday life and reinforce the
bond in the most important time of your journey.
With smile,
skiddoü team
EN user manual

8
IMPORTANT! READ CAREFULLY
AND KEEP FOR FUTURE
REFERENCE
The safety of your child may be impaired if instructions provided herein are not
observed.
WARNING
• Never leave the child unattended.
• High chair: Always use the restraint system.
• Falling hazard: Prevent your child from climbing on the product.
• Do not use the product unless all components are correctly tted and
adjusted.
• Be aware of the risk of open re and other sources of strong heat in
the vicinity of the product.
• Be aware of the risk of tilting when your child can push its feet against
a table or any other structure.
• Not to use the product until the child can sit up unaided.
• Not to use the product if any part is broken, torn or missing.
• High chair: This product is intended for children able to sit up unaided
and up to 3 years or a maximum weight of 15 kg.
• The low chair is intended for children aged 2 to 5, or with the maximum
body weight up to 20 kg.
• High chair: Make sure that safety belts are correctly buckled up and
the straps are correctly tting and adjusted. Safety belts should be
adjusted every time to make sure the child is adequately protected.
• Do not let the child sit on the top of the high chair.
• Do not let the child stand on the high chair and the footrest.
• Keep children away during product assembly and disassembly to
avoid injury.
• Do not move and lift the product with the child seated in it.
• Do not lift the product by the feeding tray.
• Use the high chair only on even surfaces, before use always check if
the chair is stable and all safety devices are locked correctly.
• Do not place the high chair near steps and staircases.
• A high chair placed near a window may be used as a step by the child
and pose a risk of falling out of the window.
• The high chair is not intended for sleep, if the child is asleep, put him/
her into a bed.
• Use only original accessories and spare parts approved by the
manufacturer. Use of unapproved spare parts or accessories may
result in the product becoming unsafe.
• The product must be assembled and adjusted by an adult.
• Do not leave the high chair exposed to sunlight for long periods of
time. Wait until it has cooled down before sitting the child in the chair.
• The feeding chair conform to the EN 14988:2017+A1:2020 standard.
• Keep the package or dispose according to regulations.
• Do not leave parts of the packaging in an accessible location (e.g.
9
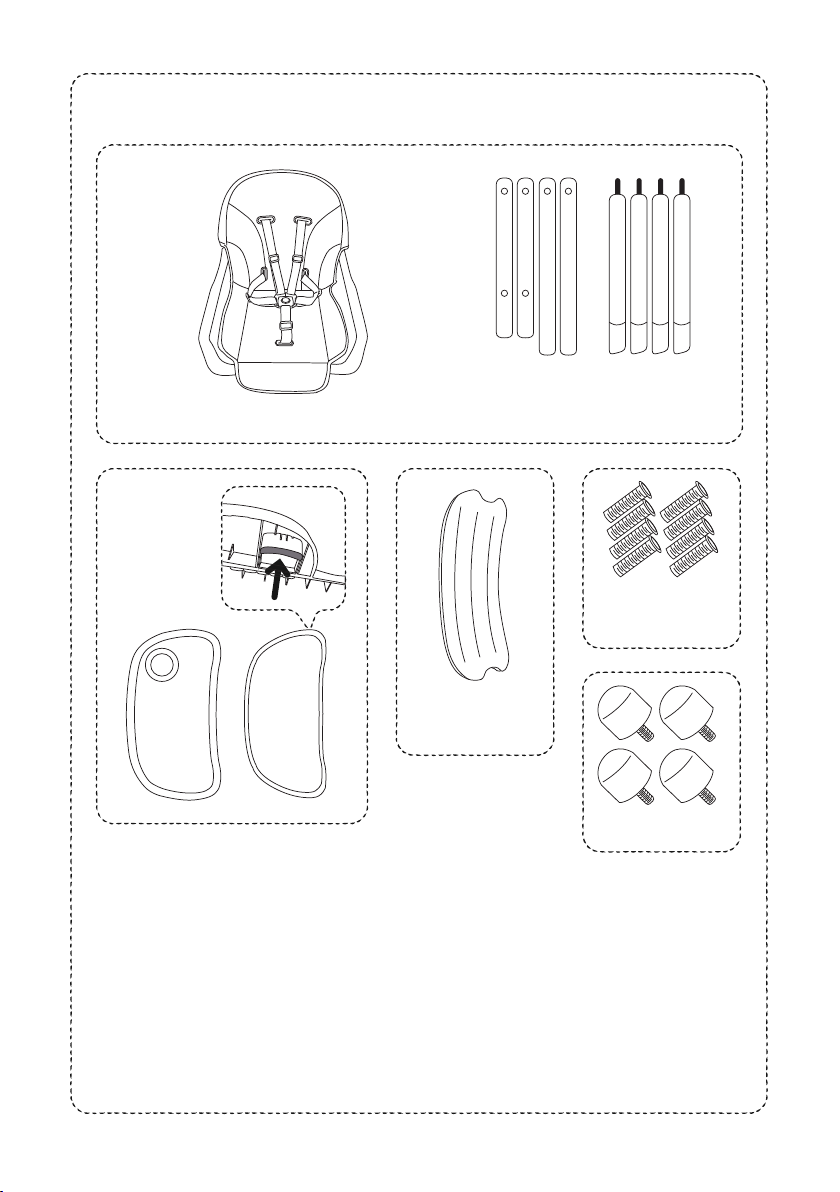
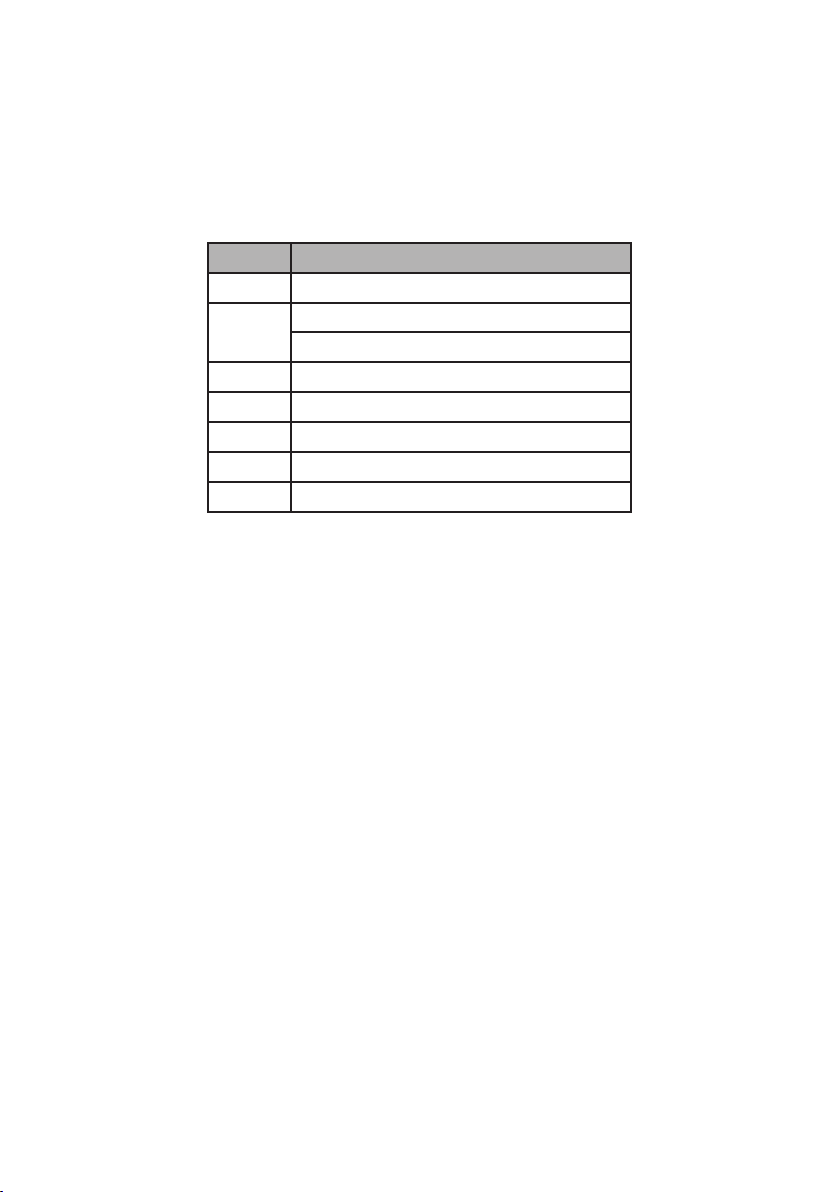
1. List of main parts
2. Assembly and functions
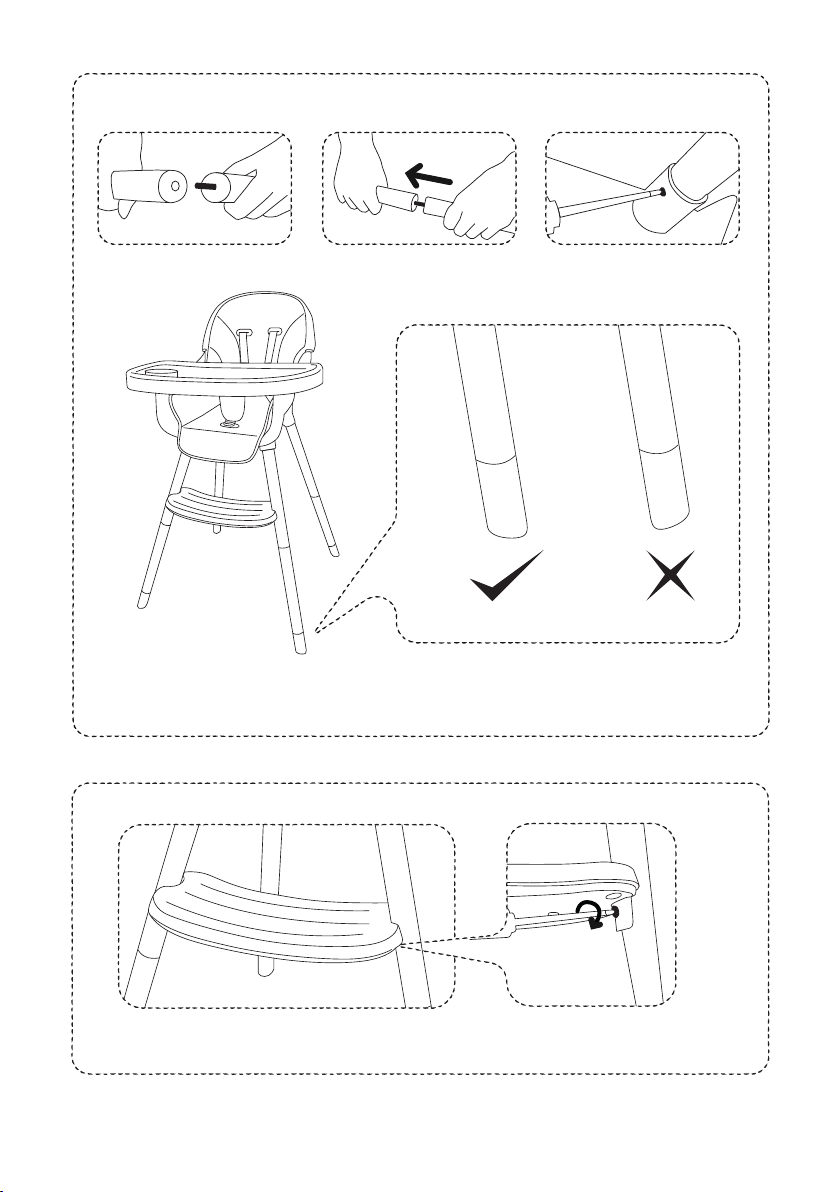
A. Leg assembly:
Start by forming pairs of top and bottom legs (A-A, B-B , C-C, D-D). Next, screw the top and the
bottom leg together, put inside the opening in the seat and x using the screw (5), as shown in Fig.
1C. Repeat the steps for the three other legs. Make sure that the legs with the footrest openings
are installed in the front. Make sure the legs are tightened correctly and the product is stable.
Take note of Figure 1D, presenting correct leg positioning and placement on the ground..
B. Footrest assembly:
Adapt the footrest (4) to the leg openings and tighten using screws (5), as shown in Figure 2A.
NOTE!: Do not let the child stand on the footrest and use it as a step!
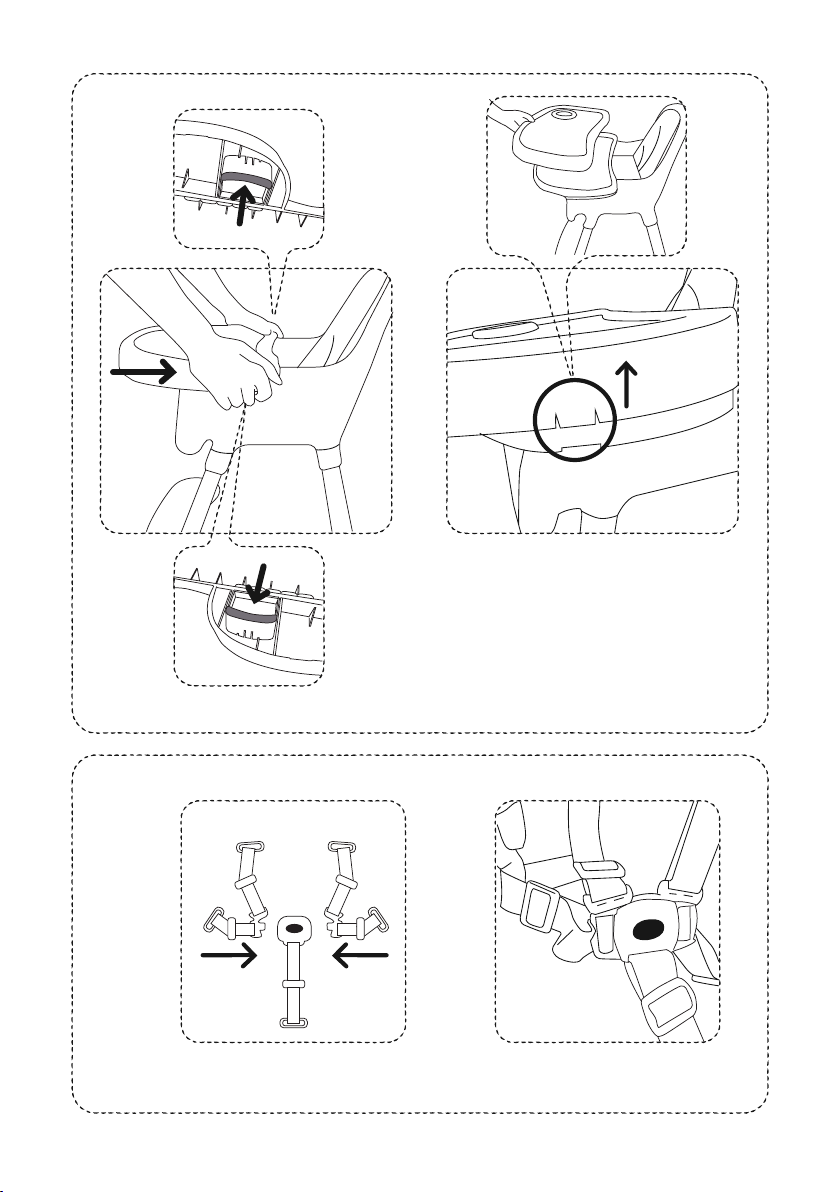
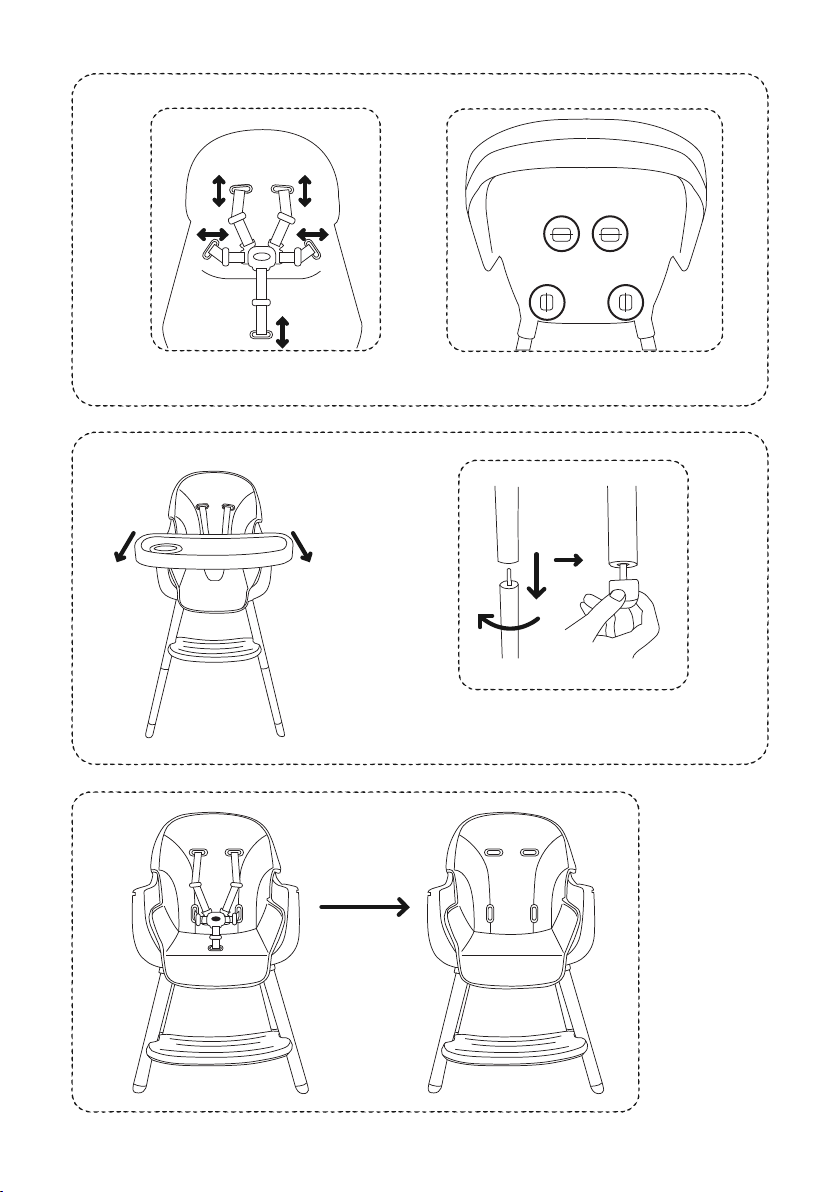
C. Tray assembly:
Pull the buttons (7) and slide the tray as shown by the arrow shown in Figure 3A, until the
characteristic sound of the lock is heard. The tray may be adjusted in one of 3 positions. Once
the tray is assembled, make sure it is placed correctly and precisely. To remove the tray, press
the buttons releasing the latching mechanism (7) and pull the tray. The outer layer of the tray
may be removed for cleaning, by unlocking the two xtures, as shown in Figure 3B. To reassembly
the internal tray, put it above the tray and press the locking buttons until the tray is locked in
position.
D. Use of safety belts:
To secure the child in the high chair, check if the locks of the hip belts and the shoulder straps
are well connected or connect them, if necessary, then slide them into the buckle of the crotch
strap (Fig. 4A), until latched in place. Next, adjust the shoulder strap and the hip belt to the body
size of the child (Fig. 4B). Press the central button to release the belt. Caution! Use of the tray
alone does not protect the child against falling out. Belts should be used to ensure safety of the
No. element
1Seat with a cover and safety belts
2
2.1 Top legs
2.2 Bottom legs
3Double tray
4Footrest
5Assembly screws
6Leg pads in the low chair
7Tray adjustment/assembly button
tinfoil, cardboard, etc.). These elements pose a suocation hazard to
the child.
Table des matières
Langues :


