Sionyx OPSIN DNVM1 Manuel utilisateur

USER MANUAL
TM

SIONYX, LLC
OPSIN
Made in Indonesia
SIONYX.com/patents
NEED HELP?
ONLINE CHAT
SUBMIT A TICKET
24/7 SUPPORT
CALL OR TEXT
sionyx.com
sionyx.com/contact
sionyx.com/support
(866) 827-8237
Register your device and
stay up to date by visiting
the URL or scanning the
QR code below.
SIONYX, LLC
100 Cummings Center
Beverly, MA 01915
U.S.A.
FOLLOW US
Share your SIONYX content and be sure to tag us!

WELCOME TO OPSIN
GETTING STARTED
GETTING CONNECTED
OPERATING THE CAMERA
ADJUSTING THE OPTICS
EVF DISPLAY
USING OPSIN
BUTTON FUNCTIONS
HELMET INSTALLATION
SAFETY AND REGULATORY
ADDITIONAL RESOURCES
02
04
08
13
15
17
18
38
43
46
58
TABLE OF CONTENTS

02 SIONYX OPSIN USER MANUAL
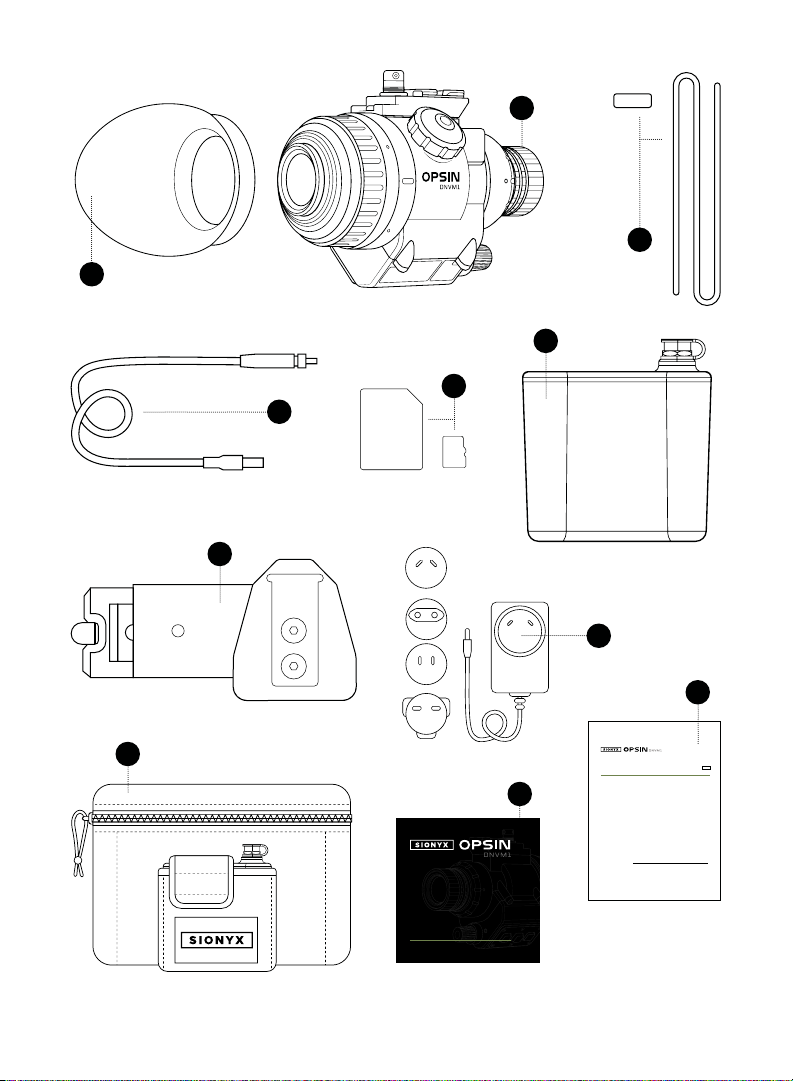
WELCOME TO OPSIN
OPSIN DNVM1
BATTERY PACK
BATTERY CABLE
BATTERY CHARGER
HELMET MOUNT QUICK-RELEASE
SOFT CARRY BAG
EYE CUP
MICRO SD CARD + ADAPTER
BUNGEE + BUNGEE CLIP
QUICK START GUIDE
REGULATORY STATEMENT
BOX INCLUDES:
THIS IS SIONYX. We believe that human endeavor should not be
limited by daylight. In the darkness of night, greatness is possible. Adventure
enabled. And a full sense of all sight achievable, no matter the light.
1
2
3
4
5
6
7
8
9
10
11
03WELCOME TO OPSIN
WELCOME TO OPSIN
* NOT TO SCALE
1
2
3
4
5
6
7
8
10
9
QUICK START GUIDE
IMPORTANT PRODUCT &
SAFETY INSTRUCTIONS
The use of this product is an acknowledgment and agreement to all the product instruction, safety warnings, private policy
and other pertaining documentation outlined or reference in this document.
This document contains important safety and health information that must be read before use.
WARNING Failure to properly set up, use, and care for this product can increase the risk of serious injury, death, property
damage, or damage to the product or related accessories. Exercise caution when using a SIONYX product as part of your
active lifestyle. Always be aware of your surroundings to avoid injury to yourself and others.
1. Product shall be used in accordance with all manufacturing instruction and limits.
2. Read all provided documentation, and keep it for future reference.
3. Follow all instructions and heed all warnings.
4. Properly install, use, and maintain all power and data cable as per manufacturing specification.
5. Only use attachments and accessories specified and/or approved by SIONYX.
6. SIONYX OPSIN is designed to be serviced only by qualified service personal. Visit SIONYX.com for more information.
This equipment generates, uses, and can radiate radio frequency energy and, if not installed and used in accordance with
the instructions, may cause harmful interference to radio communications. However, there is no guarantee that interference
will not occur in a particular installation. If this equipment does cause harmful interference to radio or television reception,
which can be determined by turning the equipment o and on, the user is encouraged to try to correct the interference by
one or more of the following measures:
• Reorient or relocate the receiving antenna.
• Increase the separation between the equipment and the receiver.
• Connect the equipment into a branch circuit dierent from that to which the receiver is connected.
• Consult an experienced marine radio/electronics technician for help.
CAUTION Radio frequency emissions from electronic equipment can negatively aect the operation of other electronic
equipment, causing it to malfunction. The wireless transmitters and electrical circuits in your product may cause interference
in other electronic equipment. When using SIONYX products near another device, read that device’s user guide for any
safety instructions. Power your camera o whenever it is forbidden to use it or when it may cause interference.
UNITED STATES OF AMERICA
FCC STATEMENT This device complies with Part 15 of the FCC Rules. Operation is subject to the following two
conditions: (1) This device may not cause harmful interference; and (2) This device must accept any interference received,
including interference that may cause undesired operation.
NOTE This equipment has been tested and found to comply with the limits for a Class B digital device, pursuant to part 15
of the FCC Rules. These limits are designed to provide reasonable protection against harmful interference in a residential
installation.
The provided power cable must be used with this unit to ensure compliance with the class B FCC limits.
ENG
11

04 SIONYX OPSIN USER MANUAL
BUTTONS
ON/OFF, BRIGHTNESS KNOB
OBJECTIVE LENS
LENS FOCUS RING
EVF DIOPTER ADJUST RING
MICROPHONE PORT
EYE CUP
ELECTRONIC VIEW FINDER (EVF)
EVF DIOPTER ADJUST RING
POWER CABLE CONNECTOR
SD CARD COVER
MINI RAIL
To get started, please review the legends on the following pages.
GETTING STARTED
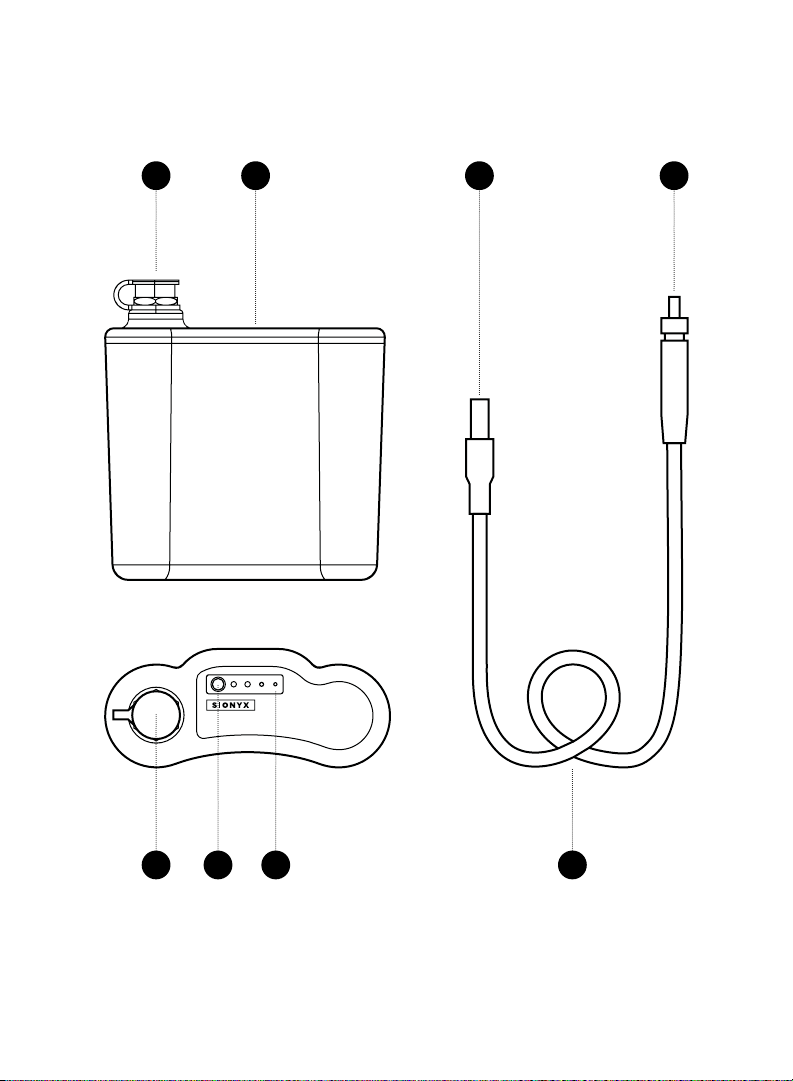
BATTERY
BATTERY LEVEL INDICATOR
BATTERY LEVEL BUTTON
BATTERY TERMINAL
(WATERPROOF)
BATTERY CABLE
CAMERA CABLE CONNECTOR
BATTERY CABLE CONNECTOR
LENS CAP + TETHER
RUBBER BUMPER
OPSIN: BATTERY + ACCESSORIES:
A-C
D
E
F
G
H
I
J
K
L
M
N
O
P
Q
R
S
T
U
V
W
GETTING STARTED

05GETTING STARTED
GETTING STARTED
B C G
I J
W
LK M N V
DHE F A
06 SIONYX OPSIN USER MANUAL
R O T U
R Q P S
07GETTING STARTED
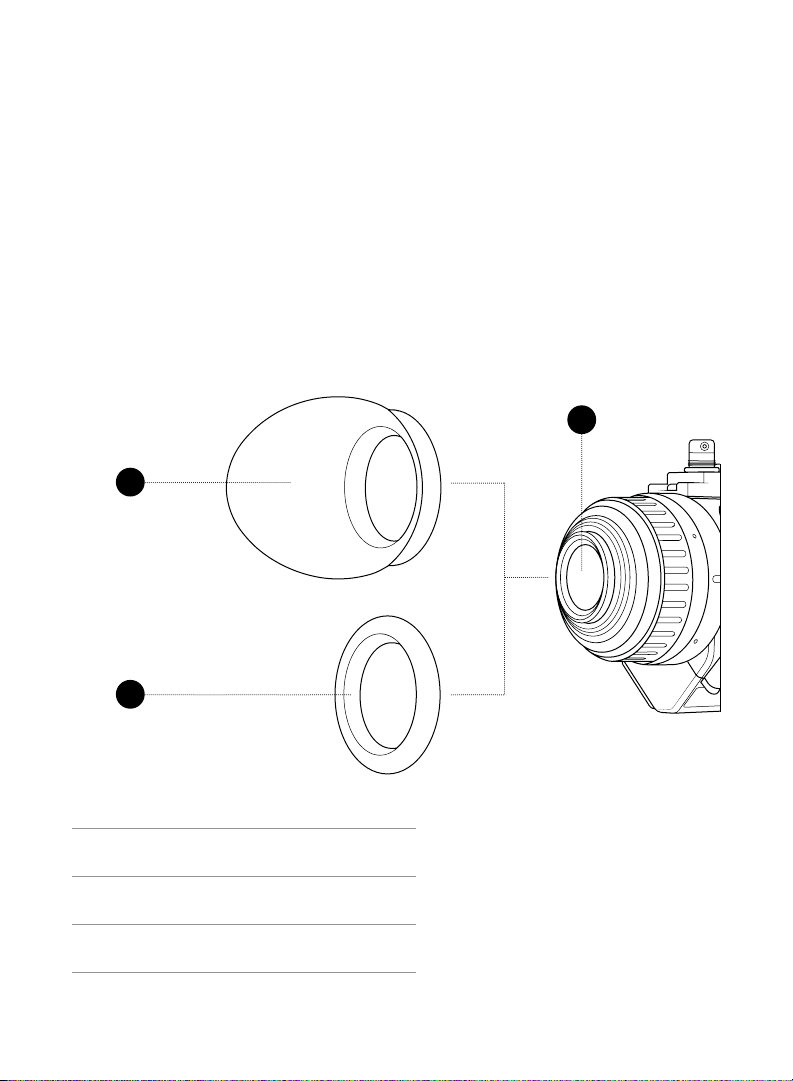
EYECUP + VIEWFINDER BUMPER
1. OPSIN comes supplied with a protective RUBBER EYECUP and an
optional RUBBER BUMPER. See FIGURE 1. NOTE: OPSIN ships with the
Rubber Bumper installed. If using the eye cup, the rubber bumper will need
to be removed prior to installation.
2. Fit either accessory over the end of the viewfinder until the ring grips the
retaining ring on the device.
3. If using the eye cup, rotate until it fits in a comfortable position when looking
through the VIEWFINDER.
RUBBER EYE CUP
RUBBER BUMPER
ELECTRONIC VIEW FINDER (EVF)
FIGURE 1:
I
II
III
I
II
III
GETTING STARTED

08 SIONYX OPSIN USER MANUAL
CHARGING THE BATTERY
1. Refer to FIGURE 2. Press the BATTERY LEVEL BUTTON to determine the
battery’s level of charge. A fully charged battery will display 4 green lights in
the BATTERY LEVEL INDICATOR.
2. To charge the battery, select the correct AC PLUG for your region. (OPSIN
includes plugs for NAM/Japan, EU, UK, S. Korea, and Australia).
3. Install the AC PLUG into the BATTERY CHARGER AC adapter by:
a. Aligning the tabs on the AC plug with the slots on the AC adapter.
b. Rotating the AC plug until it locks (there will be an audible click).
4. Open the BATTERY TERMINAL COVER.
5. Plug the charger cable into the battery connector (making sure it is fully
engaged).
6. Plug the battery charger AC adapter into an AC power outlet.
7. Keep the battery plugged in until it is fully charged.
GETTING CONNECTED
Autres manuels pour OPSIN DNVM1
1
Table des matières
Autres manuels Sionyx Monoculaire

Manuels Monoculaire populaires d'autres marques


Night Vision
Night Vision NOXM50 Manuel utilisateur

ATN
ATN Night Vision Spotting Scope Night Storm-HPT Manuel utilisateur

ATN
ATN Night vision Monocular MO-4 Manuel utilisateur

Leica
Leica Monovid 8x20 Manuel utilisateur

StellaX
StellaX ZoomX X-003 Manuel utilisateur

AGM
AGM ASP-MICRO TM160i Manuel utilisateur


