Simmons SD200 Manuel utilisateur
SimmonsDrums.net
OWNER’S MANUAL
2
OWNER’S MANUAL
SAFETY INSTRUCTIONS
1. Read these instructions.
2. Keep these instructions.
3. Heed all warnings.
4. Follow all instructions.
5. Do not use this apparatus near water.
6. Clean only with dry cloth.
7. Do not block any ventilation openings. Install in accor-
dance with the manufacturer’s instructions.
8. Do not install near the heat sources such as radiators,
heat registers, stoves, or other apparatus (including
9. Do not defeat the safety purpose of the polarized or
grounding-type plug. A polarized plug has two blades
with one wider than the other. A grounding type plug
has two blades and a third grounding prong. The wide
blade or the third prong are provided for your safety, if
an electrician for replacement of the obsolete outlet.
10. Protect the power cord from being walked on or
pinched particularly at plugs convenience receptacles,
and the point where they exit from the apparatus.
the manufacturer.
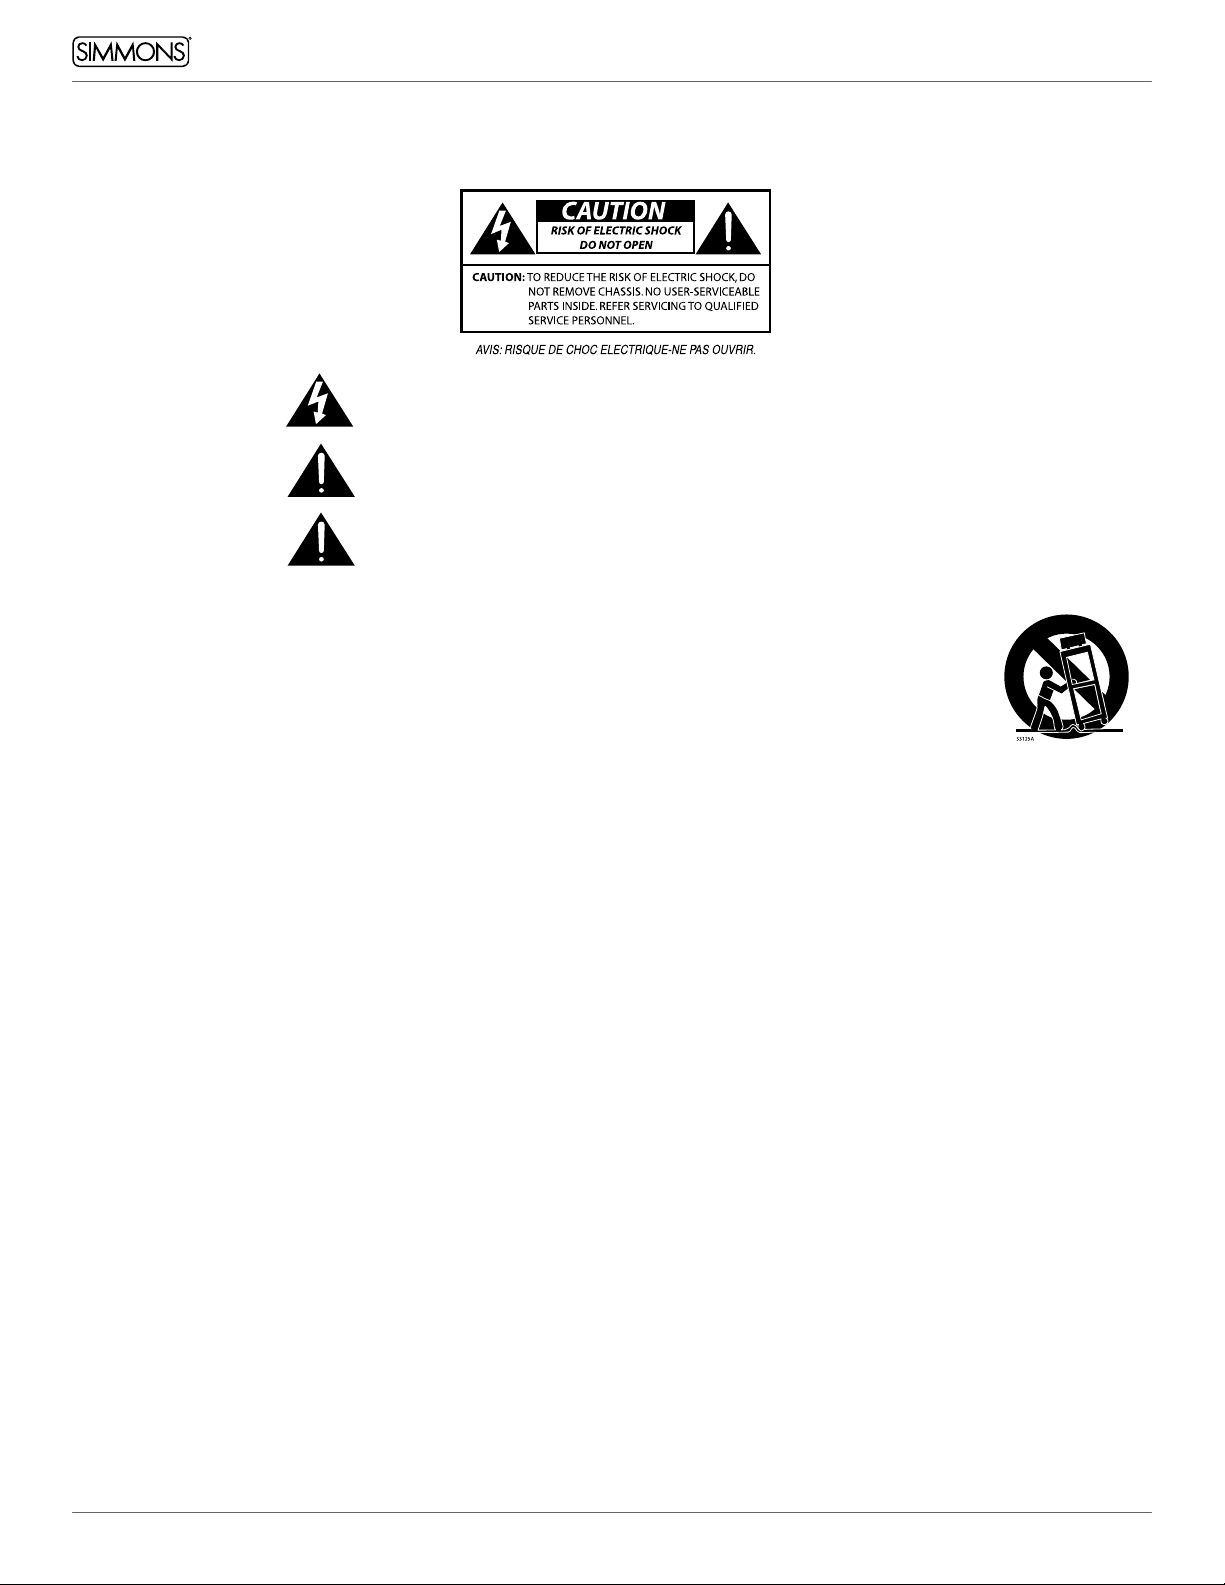
THELIGHTNINGFLASHWITHARROWHEADSYMBOLWITHINANEQUILATERALTRIANGLEIS
INTENDEDTOALERTTHEUSERTOTHEPRESENCEOFUNINSULATEDDANGEROUSVOLTAGE
WITHINTHEPRODUCT’SENCLOSURETHATMAYBEOFSUFFICIENTMAGNITUDETOCONSTITUTE
ARISKOFELECTRICSHOCKTOPERSONS.
APPARATUSSHALLNOTBEEXPOSEDTODRIPPINGORSPLASHINGANDTHATNOOBJECTS
FILLEDWITHLIQUIDS,SUCHASVASES,SHALLBEPLACEDONTHEAPPARATUS.
THEEXCLAMATIONPOINTWITHINANEQUILATERALTRIANGLEISINTENDEDTOALERT
THEUSERTOTHEPRESENCEOFIMPORTANTOPERATINGANDMAINTENANCE(SERVICING)
INSTRUCTIONSINTHELITERATUREACCOMPANYINGTHEPRODUCT.
12. Use only with the cart, stand, tripod,
manufacturer, or sold with the
apparatus. When a cart is used,
use caution when moving the cart/
apparatus combination to avoid injury
13. Unplug this apparatus during lightning storms or
when unused for a long periods of time.
-
vicing is required when the apparatus has been dam-
aged in any way, such as power-supply cord or plug
is damaged, liquid has been spilled or objects have
fallen into the apparatus, the apparatus has been ex-
posed to rain or moisture, does not operate normally,
or has been dropped.
not expose this apparatus to rain or moisture.
CAUTION: Apparatus shall not be exposed to dripping or
shall be placed on the apparatus.
CAUTION: Apparatus shall not be exposed to dripping or
shall be placed on the apparatus.
Figure 1

3
SD
TABLE OF CONTENTS
SAFETY INSTRUCTIONS ...................................2
FEATURES ................................................4
ASSEMBLING YOUR KIT ...................................5
CONNECTIONS
Connecting the Pads...................................8
Connecting the Power Supply .........................9
Connecting External Audio Devices ....................9
Connecting USB MIDI ..................................9
Connecting Headphones ..............................9
SD200 DRUM MODULE OPERATION
Top Panel .............................................10
LED Display ...........................................10
Rear Panel .............................................11
Back Panel .............................................11
GETTING STARTED
Switching the Power On ..............................12
Basic Operations and Navigation .....................12
Listening to the Demo Song ..........................12
Selecting a Kit.........................................13
Selecting a Song ......................................13
Playing a Song ........................................13
Muting the Drum Part ................................13
ADVANCED OPERATIONS
Editing a Kit ...........................................14
Recording a Song .....................................14
....................................15
Utility Mode ...........................................15
Trigger Settings .......................................15
.................................16
MIDI Settings..........................................16
Factory Reset .........................................16
DRUM KIT PRESETS
Preset Drum Kit List ...................................17
Song Style List. . . . . . . . . . . . . . . . . . . . . . . . . . . . . . . . . . . . . . . . . 17
Drum Sound List ......................................17
MIDI IMPLEMENTATION CHART..........................19
SPECIFICATIONS ........................................ 20
WARRANTY ............................................. 20

4
OWNER’S MANUAL
FEATURES
SD200 SOUND MODULE GENERAL FEATURES
POLYPHONY
• Voices - 32
SOUND
• Drum Voices - 93
• Drum Kits - 10 Preset / 1 User
• Songs - 10 Preset / 1 User
EFFECTS
• Reverb - Hall1, Hall2, Room1, Room2, Room3, Stage1, Stage2,
Plate, Delay, Echo.
• Chorus - Chorus1, Chorus2, Chorus3, Chorus4, ChorusFB, Short
Delay, Short Delay FB, Flanger2, Flanger3, Celeste1, Celeste2,
Celeste3.
TRIGGER INPUTS
• 1 x Kick, Single Zone
• 1 x Snare, Single Zone
• 3 x Toms, Single Zone
• 1 x Hi-Hat, Single Zone
• 1 x Ride, Single Zone
• 1 x Crash, Single Zone
HARDWARE
• Drum Rack and Mounts
• Kick pedal / Trigger Module
• Hi-Hat pedal
• 8” Single Zone Mesh Snare Pad
• 8” Single Zone Hi-Hat Cymbal Pad
• 10” Single Zone Crash Cymbal Pad
• 10” Single Zone Ride Cymbal Pad
EXTERNAL CONNECTIONS
• 2 - ¼” Master Outputs
• USB Connection for MIDI via computer
SEQUENCER
• Preset Songs - 10
• User Songs - 1
• Tempo - 20-240 BPM
• Click/Metronome - Click Voice,
• Time Signature, Tempo, Interval, Volume
POWER
• Power: 9v, 600ma
DIMENSIONS
WEIGHT
• 37 lbs / 16.78 kg
5
SD
ASSEMBLING YOUR KIT
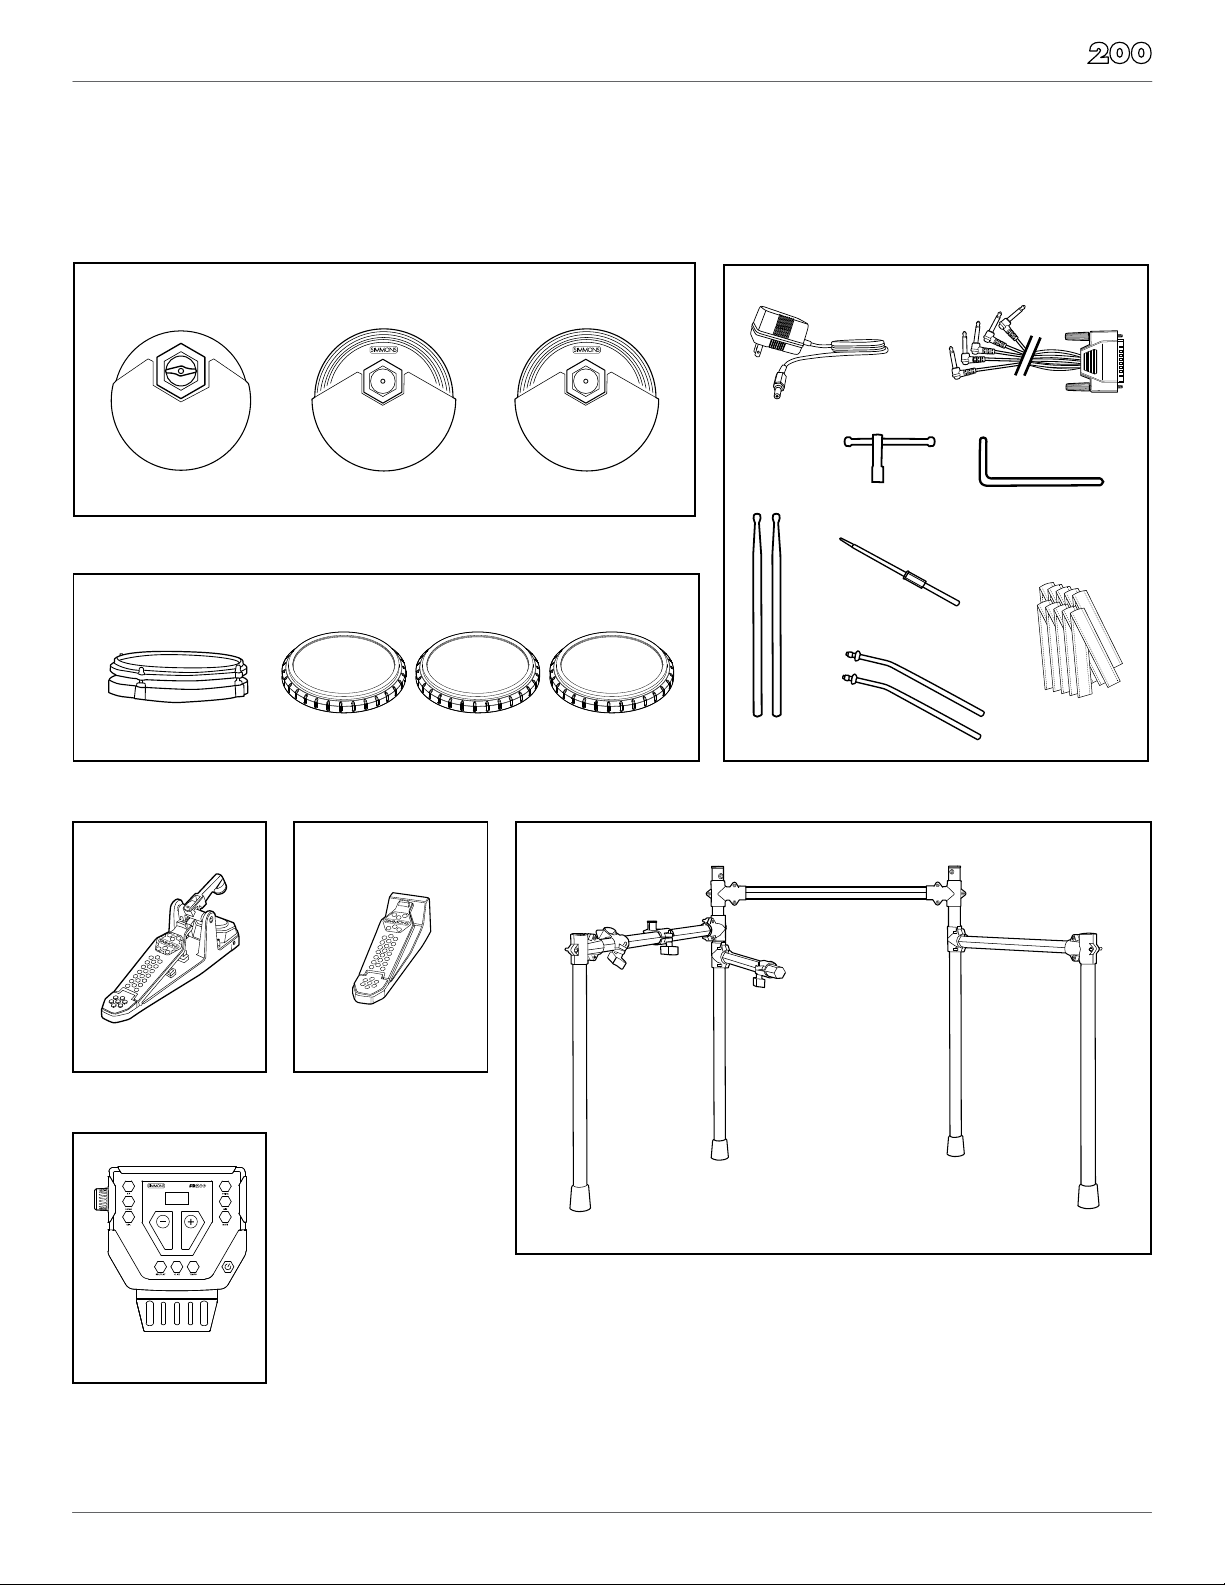
INSIDE THIS PACKAGE
Before assembly, please make sure that all the items listed below are present.
Cymbals
Drum Rack
Accessories
Kick Pad
Kick Drum Pedal
and Trigger
Drum Module
S200M
Hi-Hat Pedal
Foot Controller
SD300HHC
Multi-pin Cable Harness
1 Pair
Drumsticks
AC Adaptor
4 L–Rods for Pads
10–Velcro
Cable Strips
Drum Key
Single Zone
8” Hi-Hat Pad
S200CYM8S
Drum Pads
Single Zone
8” Snare Mesh Drum
Single Zone 8” Tom Pads
S500PAD8SS200SN8
Single Zone
10” Crash Cymbal Pad
SD600CYM10S
Single Zone
10” Ride Cymbal Pad
SD600CYM10S
SD200RK
SD300KICK

6
OWNER’S MANUAL
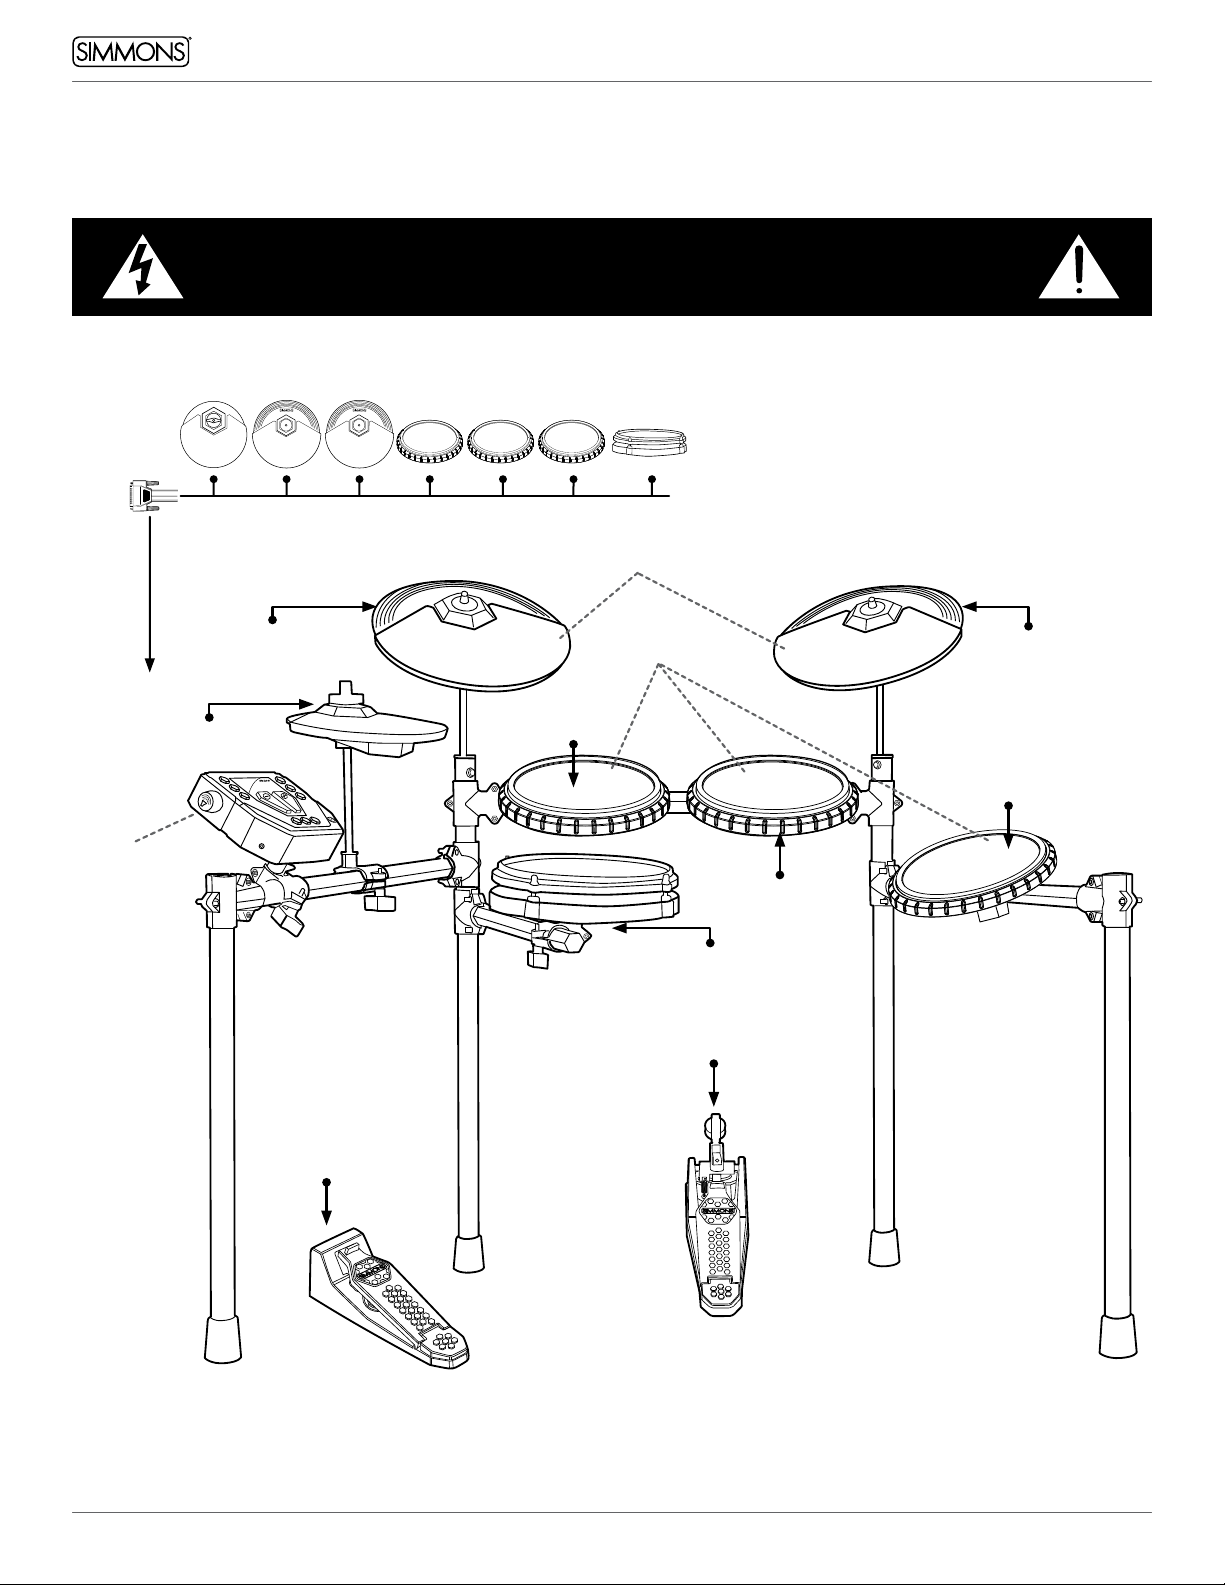
ASSEMBLING YOUR KIT
STEP 1 - DRUM RACK
The Drum rack will be fully assembled in the box.
Remove the drum rack from the box and tighten
the connecting clamps until the kit is stable.
STEP 2 - ATTACH CYMBAL ARMS
Insert each cymbal arm into the rack clamp.
arm’s cymbal clamp. Slide the hi-hat arm
through the plastic sleeve to adjust the height.
STEP 3 - ATTACH CYMBAL PADS
Place the cymbal pads on the tilter assemblies
and felt to the hi-hat arm.
STEP 4 - ATTACH DRUM MODULE
Loosen the wing screw on the module mount
located on the crossbar. Place the drum
module into the drum clamp. Tighten the
wing screw to secure the module.

7
SD
ASSEMBLING YOUR KIT
STEP 5 - POSITION PEDALS & ATTACH DRUM PADS
as illustrated below. Place the bass pedal on the
Loosen the wing screws on the drum mount
clamps then place the tom pads into the mounts
and tighten the wing screws.
Place the snare drum in the mount on the lower
into the clamp and tighten the wing screw.
STEP 6 - CONNECT MODULE TO THE PADS
Using the provided cables, connect the ¼” jacks
to the corresponding drum pads, cymbal pads
The pin connection will attach to the multi-pin
connector of the sound module. Use cable strips
to retain cables to the rack.
NOTE: The voice of the hi-hat pad is controlled
by the hi-hat pedal. Similar to a real drum kit,
the hi-hat pad functions as an ‘open hi-hat’
when the pedal is released. When the pedal is
pressed down, it functions as a ‘closed hi-hat’.
8
OWNER’S MANUAL
CONNECTIONS
CONNECTING THE PADS
CAUTION!
To prevent electric shock and damage to the device, make sure the power is switched
OFF on the sound module and all related devices before making any connection.
*See Appendix for Pad, Triggers, Name and MIDI chart.
Cymbal Pads
To Ride
Drum Pads
To Snare
To Crash
To Hi-Hat
Sound Module
To Tom 1
To Tom 2
To Hi-Hat
Control
To Kick
To Tom 3
From Sound Module to 7 Pads
9
SD
CONNECTIONS
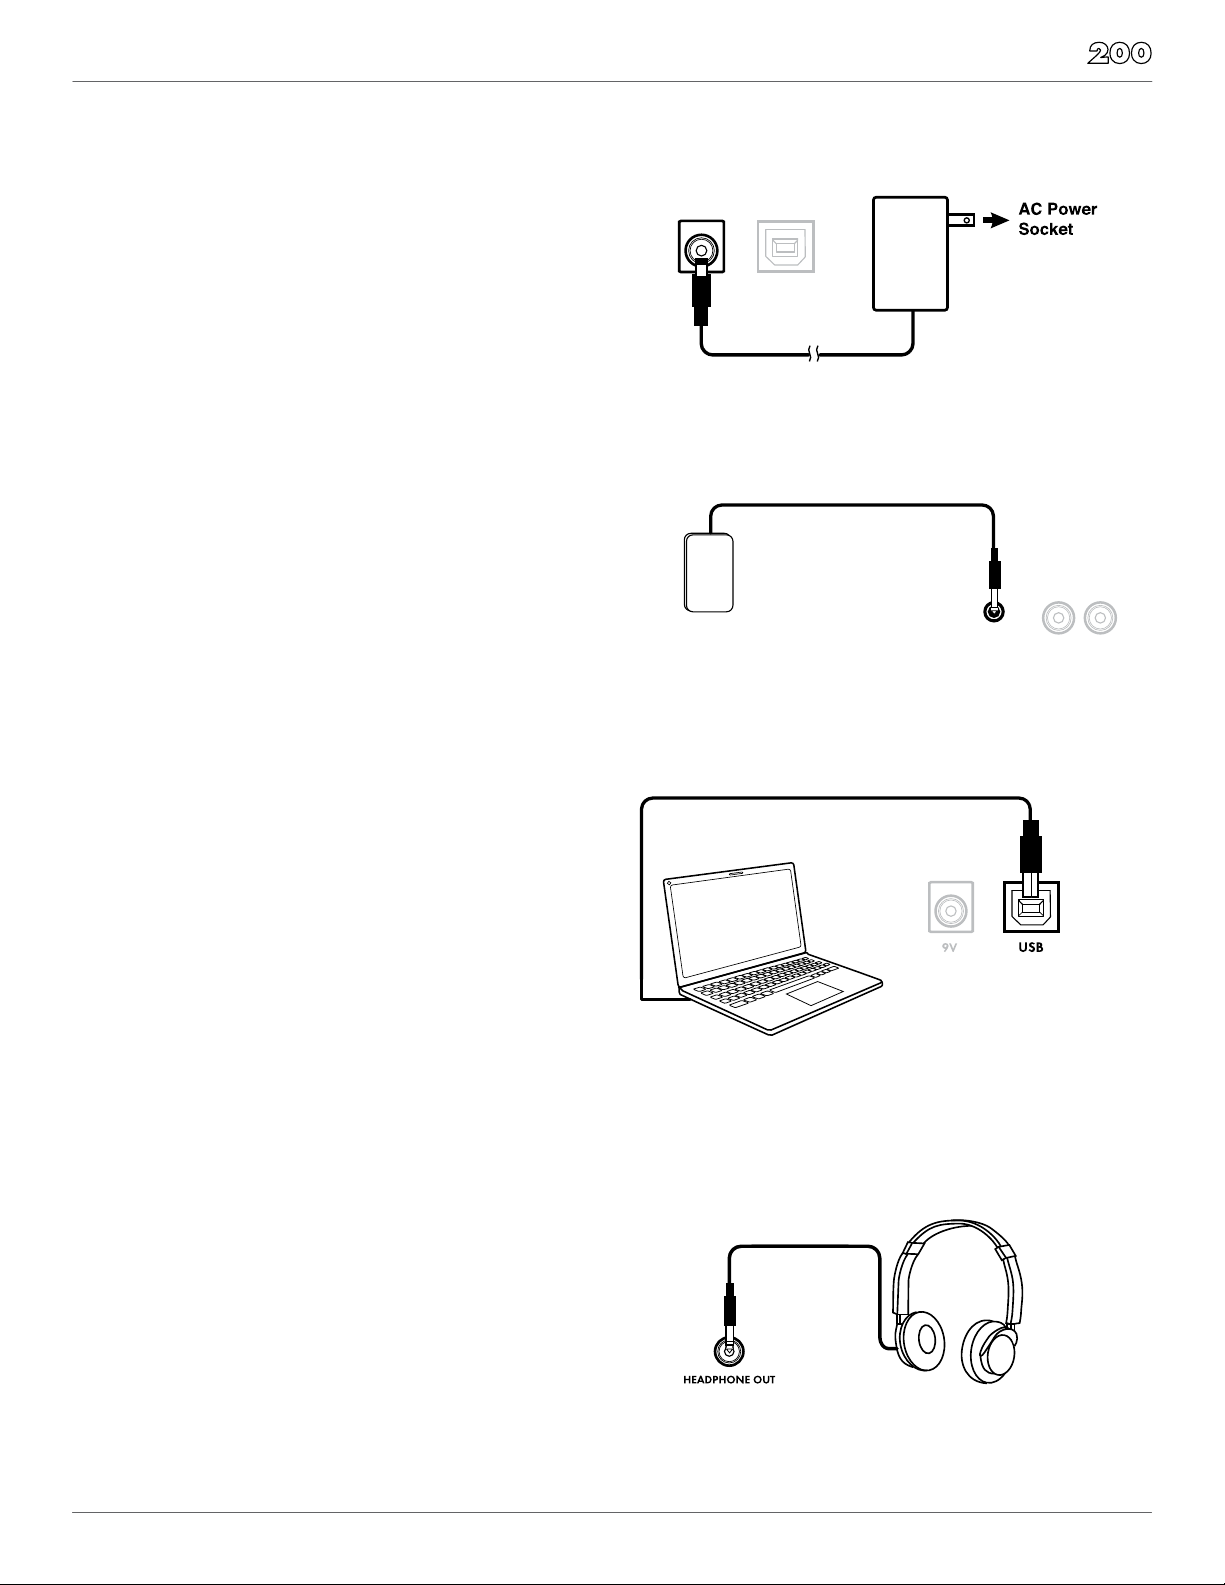
CONNECTING THE POWER SUPPLY
Connect the AC power adapter to a wall socket
as shown in this illustration.
CONNECTING EXTERNAL AUDIO DEVICES
The audio output from an external source can
be connected to the AUX INPUT jack on the rear
panel and mixed with the sound of the drum
module. This is ideal if you want to play along
with songs or follow an audio drum tutorial on
your smartphone or tablet. The volume of the
external signal is controlled on that device. AUX INPUT
AUDIO
DEVICE
—OUTPUT —
R L/MONO
CONNECTING USB MIDI
Your drum module is USB class-compliant. This
means you can plug it into a USB class compliant
host (such as most modern macOS, Windows,
immediately. There are no drivers to install;
simply plug n’ play.
If you connect the drum module to a computer,
you can trigger software programs or record your
performance into a MIDI sequencing application.
Check the operation and setup instructions for
the software you intend to use for more details.
USB cable not included.
AUX INPUT
AUDIO
DEVICE
—OUTPUT —
R L/MONO
CONNECTING HEADPHONES
Your headphones can be connected to the
SD200 module. The headphone jack is located
on the front left side of module. Use the MASTER
VOLUME knob to adjust the headphone volume.
AUX INPUT
AUDIO
DEVICE
—OUTPUT —
R L/MONO
10
OWNER’S MANUAL
SD200 DRUM MODULE OPERATION
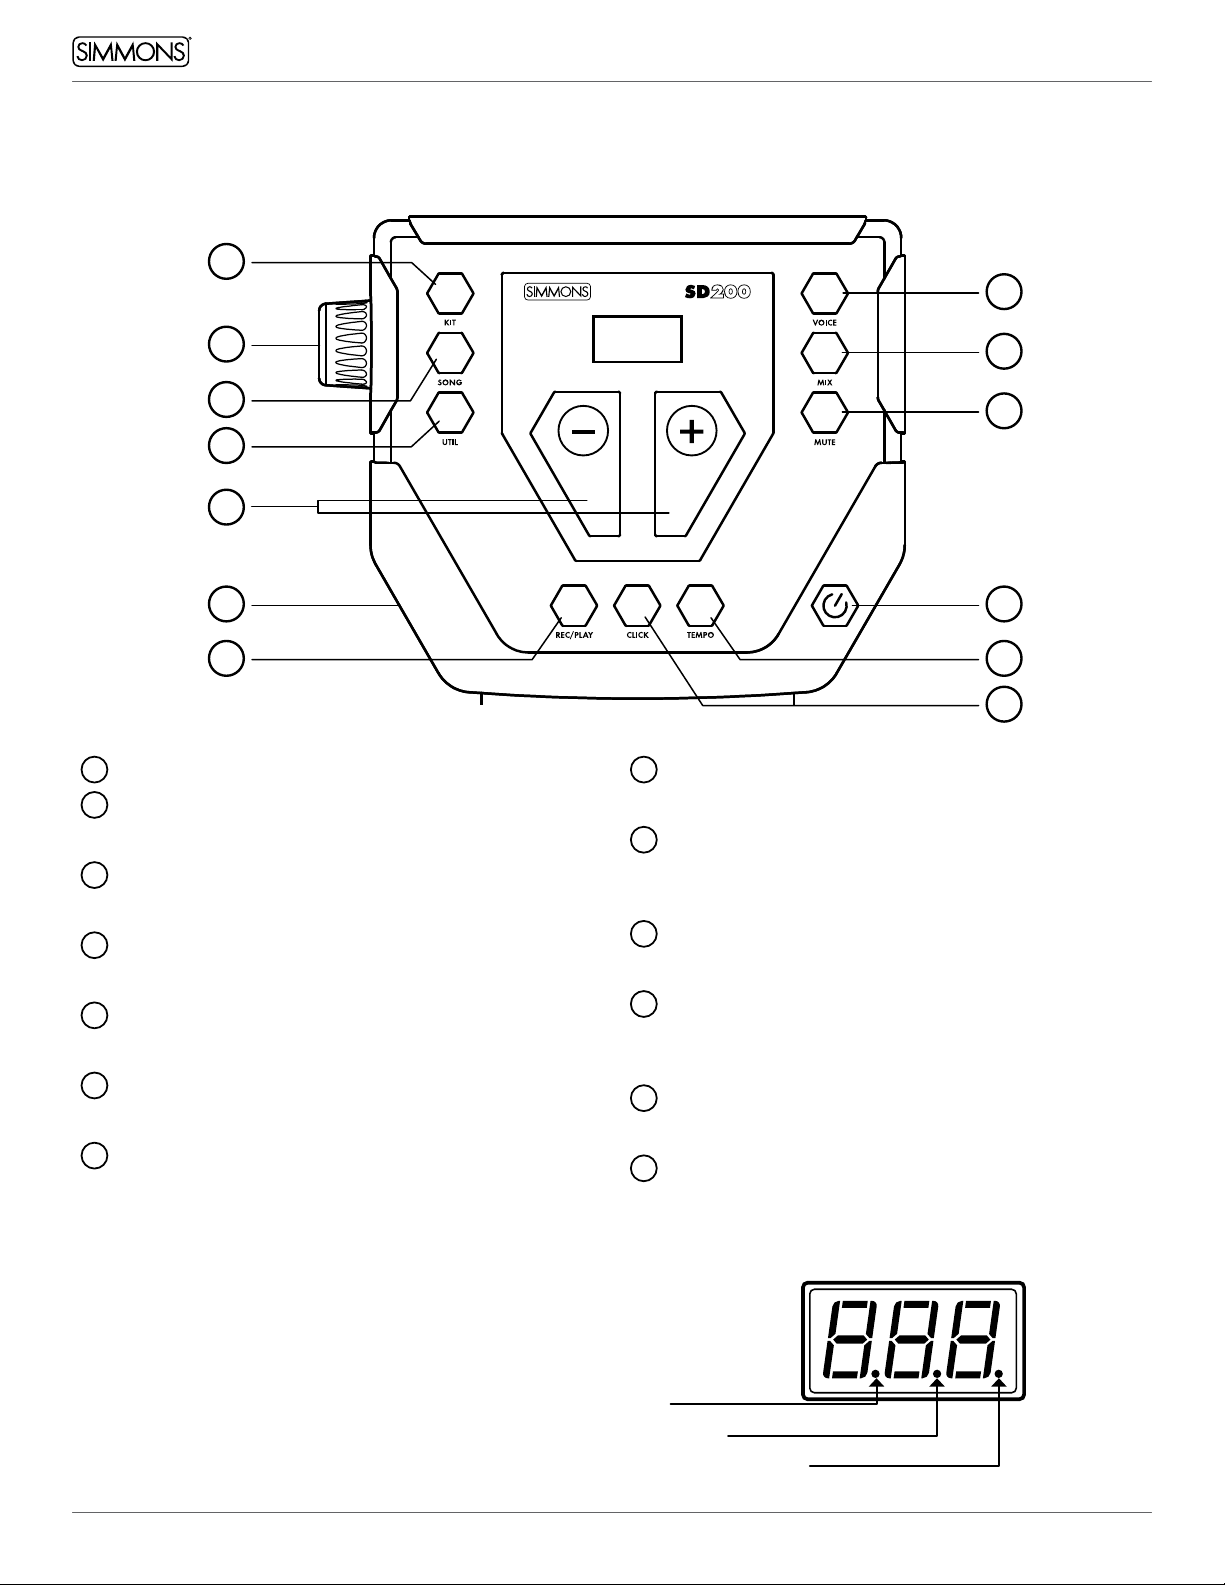
TOP PANEL
1Volume Knob
2Kit Button
Switches the module to Kit Mode
3Song Button
Switches the module to Song Mode
4Util Button
Access Utility Functions
5Voice Button
Press to assign a new drum sound to the pad
6Mix Button
Press to change the volume of the selected pad
7Mute Button
Mutes the drum track in the currently-playing song
8+/- Buttons
Adjusts the current parameter on the screen
9Rec/Play Button
Plays the currently selected song, or records a
user song
10 Click Button
Activates the metronome click
11 Tempo Button
Press to change the tempo of the metronome
or song using the +/- buttons
12 Power Button
Press and release to power ON or OFF
13 Headphone Output
3
4
1
2
7
12
6
5
13
119
10
8
Kit mode
Edit mode
Song mode
LED DISPLAY
The LED indicates the SONG, EDIT or KIT status.
When SONG is selected, the song number appears
in the display. When VOICE or MIX is selected, the
pad name such as Snare, Crash, and Tom, etc. will
appear. Press the KIT button and the drum kit
number will be displayed on the LED.
Table des matières
Autres manuels Simmons Instrument de musique


