Sima XL-72 Manuel utilisateur

ClASSIC
GRAY / BLACK
®
®
®
®
GREEN / WHITE
WHITE
BLACK
®
Sima XL-72 Theater
Inatable Indoor/Outdoor
Projection Screen
www.simaproducts.com

Table of Contents
TABLE OF CONTENTS......................................................................................................................................................2
INTRODUCTION................................................................................................................................................................3
LIST OF MATERIALS..........................................................................................................................................................4
SELECTING A SETUP SITE...............................................................................................................................................4
UNPACKING THE SCREEN...............................................................................................................................................5
INFLATING THE SCREEN...........................................................................................................................................5,6,7
SCREEN INSTALLATION WITH VELCRO PATCHES....................................................................................................8
SETTING UP THE INFLATABLE HOME THEATER FOR FRONT AND REAR PROJECTION..............................9
SECURING THE SCREEN AND FILLING WATER BALLASTS.................................................................................10
SCREEN DEFLATION & REPACKING............................................................................................................................11
TROUBLESHOOTING GUIDE.........................................................................................................................................12
SPECIFICATIONS SHEET..................................................................................................................................................13
CONSUMER WARRANTY AND DEFECTIVE RETURN POLICY..............................................................................14
Page 2

Introduction
Congratulations on purchasing the XL-72 Theater by Sima Products. Please read this instruction manual
carefully before installing your inatable screen. When used properly according to this manual it will pro-
vide hours of entertainment for you and your family.
General Information and Warnings
• Do not over inate. Use only the supplied air pump as directed. Never use an air compressor.
• This screen is not a otation device, do not use in any type of pool.
• To avoid danger of suocation, keep children away from the screen when inating and deating. Do not
let children sit or play on the screen. Always deate and store screen immediately after use. Adult super
vision is required.
• Do not use screen during high winds in excess of 15 mph or threat of lightning.
• Do not smoke near the screen. Keep away from re.
• Do not use sharp objects in any manner around the XL-72 Theater.
• Do not climb or sit on inated surfaces.
• Clean only with mild soap and water. Do not use harsh chemicals.
Sima Products has researched all regulations regarding the use of this XL-72 Theater. We have not found
any regulations related to the use of our screen; however we will not be responsible if some other regula-
tions apply to this product in the country you intend to operate the system. It is the users responsibility to
be aware of such regulations and obey them. Sima Products will not accept any responsibility for failure to
meet local regulations.
Model XL-72
Size Inated 69” x 32” x 70” (with pontoons)
69” x 32” x 54.5” (without pontoons)
Weight (approximate) 28 lbs.
Page 3

List of Materials:
Your package should include the following materials:
Inatable Frame
72” White PVC Screen
16” Extra set of detachable pontoons
1 Air pump (inator / deator) Part # 52472
Select A Setup Site
• Select a site that has the necessary height clearance for the screen and enough room for your projector
to properly focus and size the projected image. The screen will stand nearly 63 inches in height. Allow
approximately 6 to 8 feet in front (or behind for rear-projection) of the screen to adjust the projector.
• Be sure there are no sharp objects lying on the surface that might puncture or tear the screen.
• Check to be sure that a 110V/120V AC wall outlet is within reach to plug in the air pump. Use a properly
grounded GFI outlet if using the product outdoors.
• Unpack the screen at the location in which it will be inated.
Page 4

Unpacking the Screen
1. Remove all the items from box. Don’t cut the boxes too deep,
as this may damage the screen. (FIG 1)
Inating the screen
1. Remove the frame from the package. Unroll the
screen as shown at right. Be sure both bases are
facing the correct way. (Both air valves should be
facing the same direction.) (FIG. 2)
2. Plug the AC air pump into an AC power outlet.
NOTE:
POWER SUPPLY MUST BE 120V AC, 60 Hz. USE A
PROPERLY GROUNDED GFI OUTLET IF USING THE
PRODUCT OUTDOORS
3. Locate the air inlet/outlet valves. You will notice that
each valve on each base has two layers of seals that
cut o the airow. The outer seal is a threaded cap
that screws into place. (FIG. 3)
4. The inner seal is a rubber check valve designed to
hold in air when a certain amount of pressure is applied.
(FIG. 4)
FIG 1
FIG 2
FIG 3
FIG 4
Page 5

5. Attach the inate end of the AC pump nozzle
to one of the air valves on the frame by push-
ing the end rmly into the ination port.
Be sure to close the unused valve so it doesn’t
leak air while inating the screen. (FIG. 5)
NOTE:
THE PUMP ATTACHMENTS SHOULD NOT BE
USED WITH THIS MODEL
6. Turn the pump to the “on” position.
(On Switch is located on the face of the pump).
NOTE:
THE FRAME SHOULD NOT TAKE MORE THAN 5
MINUTES TO INFLATE. MAKE SURE THE PUMP
ISN’T IN USE FOR MORE THEN 10 MINUTES. IT
CAN OVERHEAT!
WARNINGS:
• Never attempt to disassemble or close the
openings while pump is operating.
• Never leave pump unattended while in use.
• Never allow sand, small rocks etc… to be
sucked into the ination or deation port
while operating.
• Do not use under wet conditions – keep away
from water
• Never look into or point the inate port
toward your eyes while pump is operating.
• The power supply cord cannot be replaced.
If the cord is damaged, contact Sima customer
Service for a replacement pump.
• Keep away from children
• When used outdoors or near water, use a
properly grounded GFI outlet.
FIG. 5
Page 6
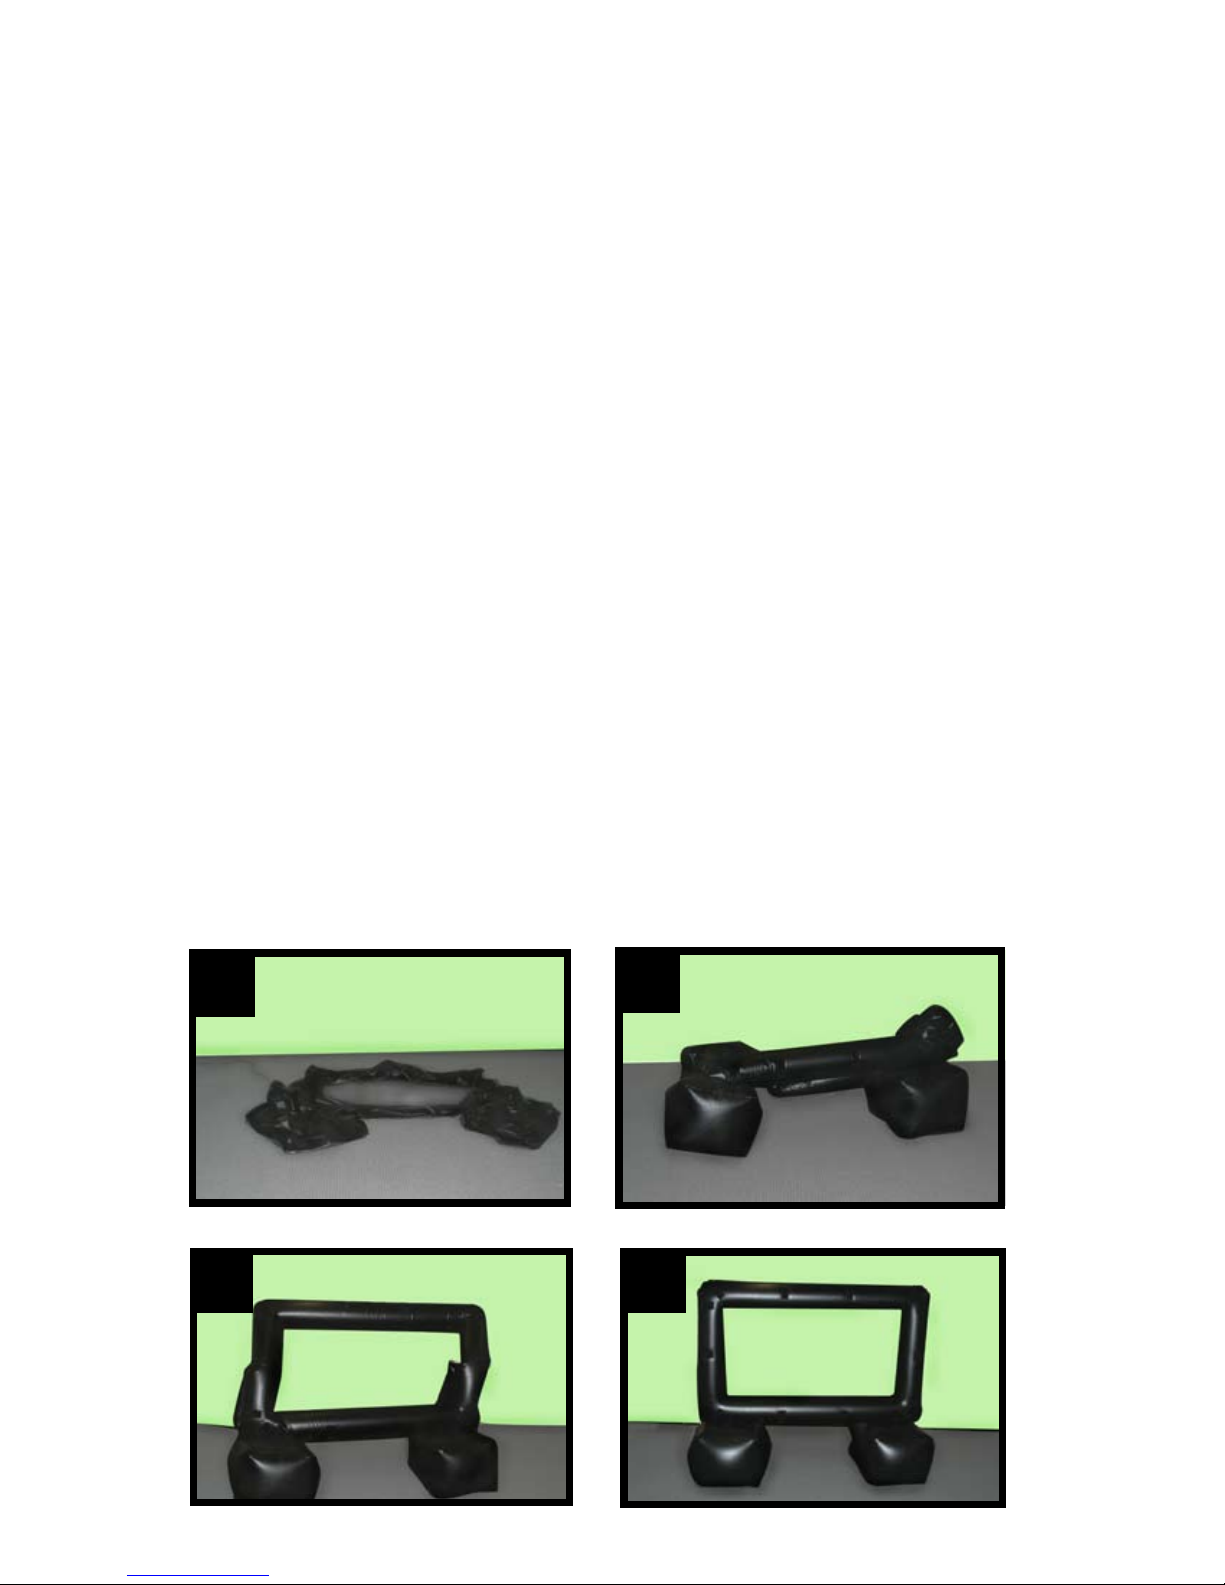
7. As the frame lls with air, be sure it is clear of any nearby objects. Guide the frame up as it lls with air,
helping to unfold and expand it. It should take approximately 5 minutes for the screen to inate.
( See Photos Below)
8. You are now ready to attach the screen using the Velcro patches. Please see
instructions for attaching the screen to the frame further on in the instruction manual.
Note: When Using the Screen Outdoors
• The dark colored material from which the Inatable Theater Frame is construction tends to absorb the
heat from the sun, which causes the air inside the frame to warm up and expand if the screen is used
on a sunny day. If the frame is left out overnight, the air inside the frame will cool and contract, which
may cause the frame to sag slightly. The sagging is not due to the frame losing air, and can be
corrected by “topping o” the frame with air prior to use.
• It is recommended to keep the supplied air pump on hand to add
additional air when using the XL-72 Theater during an all day event.
• Be sure to deate frame and store after usage.
12
3 4
Page 7

Screen Installation
Velcro patches are located at each corner and around the perimeter of the screen frame. The screen also
has a series of Velcro patches for easy attachment.
Starting with a top corner attach the screen using the Velcro patches. Continue to attach the screen
across the top of the (inated) frame, pulling it taut. Continue to attach each of the sides, again pulling the
screen taut between each Velcro connection. Smooth the screen and attach the bottom Velcro patches.
Page 8

Setting up the Inatable Home Theater
for Front and Rear Projection
Projector Distance
• Typically, set up the projector a distance
(1x – 1.5x) the diagonal from the screen.
• In general, for a 16:9 screen ratio use
1.15x the diagonal for projector distance.
For 4:3 screen use 1.25x.
• Follow the projector manufacturer’s
instructions.
Projector Angle
• Attempt to position
the projector so that it is
parallel to the inatable
screen.
• Care should be taken
so that the projector is
aligned both horizon-
tally and vertically to
the front of the
inatable screen.
• If your projector has
a keystone adjustment
feature, this may be used
to correct for the angle
Page 9
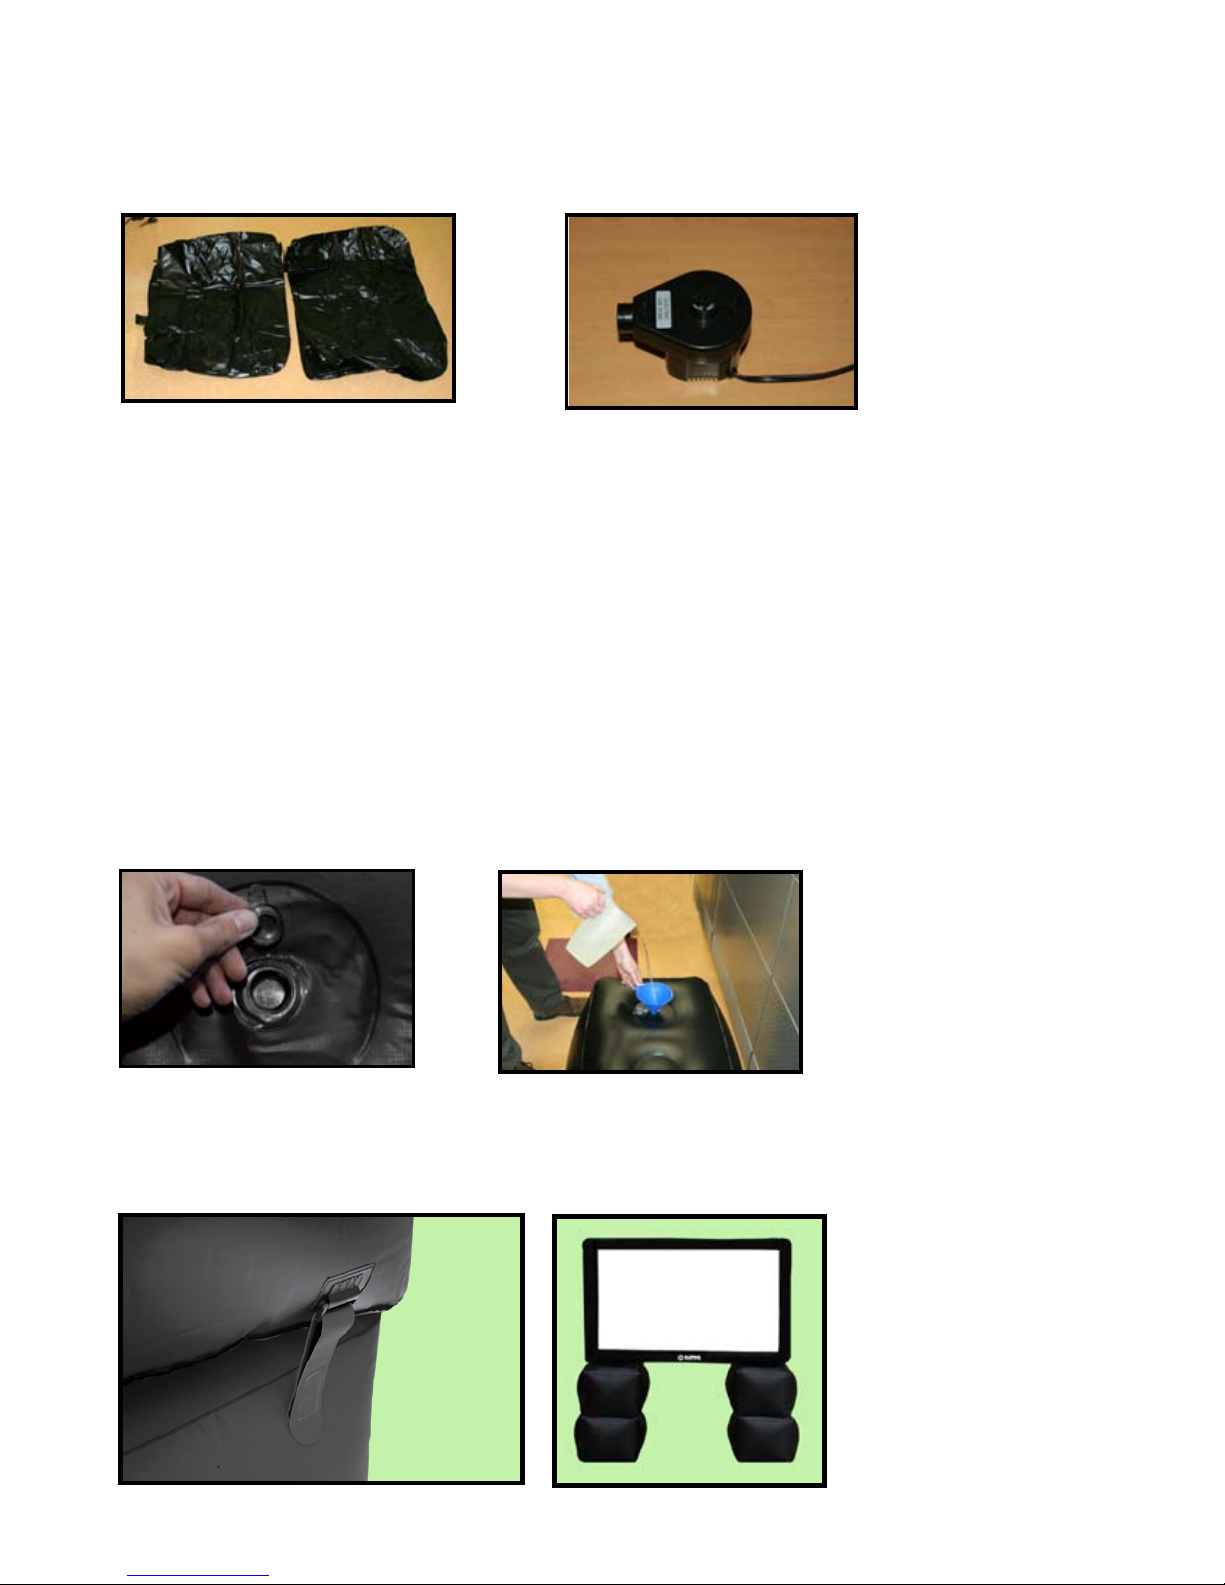
Securing the screen and lling the water ballasts
Inate the spare set of pontoons using the include pump.
The spare pontoons contain water ballasts to weight and secure the inated screen.
Locate the clear plastic water intake cap. (Note: the air intake valve has a black threaded cap, the
water intake is clear plastic) (FIG. 7)
Carefully pour (suggest using a funnel) the water into the ballast. Standard tap water can be used.
(FIG 8)
Each ballast holds approximately 2 Gallons of water. ( Fill to 1 gallon recomended )
Make certain the cap is securely closed when nished.
The spare pontoons are easily attached to the screen frame pontoons using the provided straps
FIG. 7
FIG. 8
Page 10
Table des matières
Autres manuels Sima Écran de projection


