Silver S6800 Manuel utilisateur
www.SILVERMoneyCounters.com
USER GUIDE
S6800
MAX MIXED BILL VALUE COUNTER

Thank you for purchasing a SILVER product.
It is highly recommended to read this user guide
carefully to get familiar with all its functions before
starting to operate the machine.
MONEY & BILL COUNTERS
For more information on our products visit
www.SILVERMoneyCounters.com

3
Table of Contents
Introduction ......................................................................................................4
1. Safety Instructions........................................................................................5
2. Installation....................................................................................................7
3. Equipment Overview....................................................................................8
3.1 Part Description......................................................................................8
3.2 Display Description................................................................................9
3.3 Control Panel Description ....................................................................10
4. User Menu Overview .................................................................................13
4.1 User Menu Description ........................................................................13
4.2 CF Settings (Counterfeit Detection).....................................................14
4.3 Time Set ...............................................................................................15
4.4 Speed Set ..............................................................................................16
4.5 Help ......................................................................................................16
4.6 Service..................................................................................................17
5. Operation....................................................................................................19
5.1 Counting Operation ..............................................................................19
5.2 Miscounting Errors...............................................................................19
5.3 Thickness Knob Adjustment (Feeding Gap)........................................20
5.4 Removing Jammed Notes.....................................................................21
6. Unit Maintenance .......................................................................................22
6.1 Periodic Cleaning Routines..................................................................22
6.2 CIS Calibration Procedure ...................................................................23
7. Warning and Error Messages ...................................................................244
8. Specifications ...........................................................................................266

4
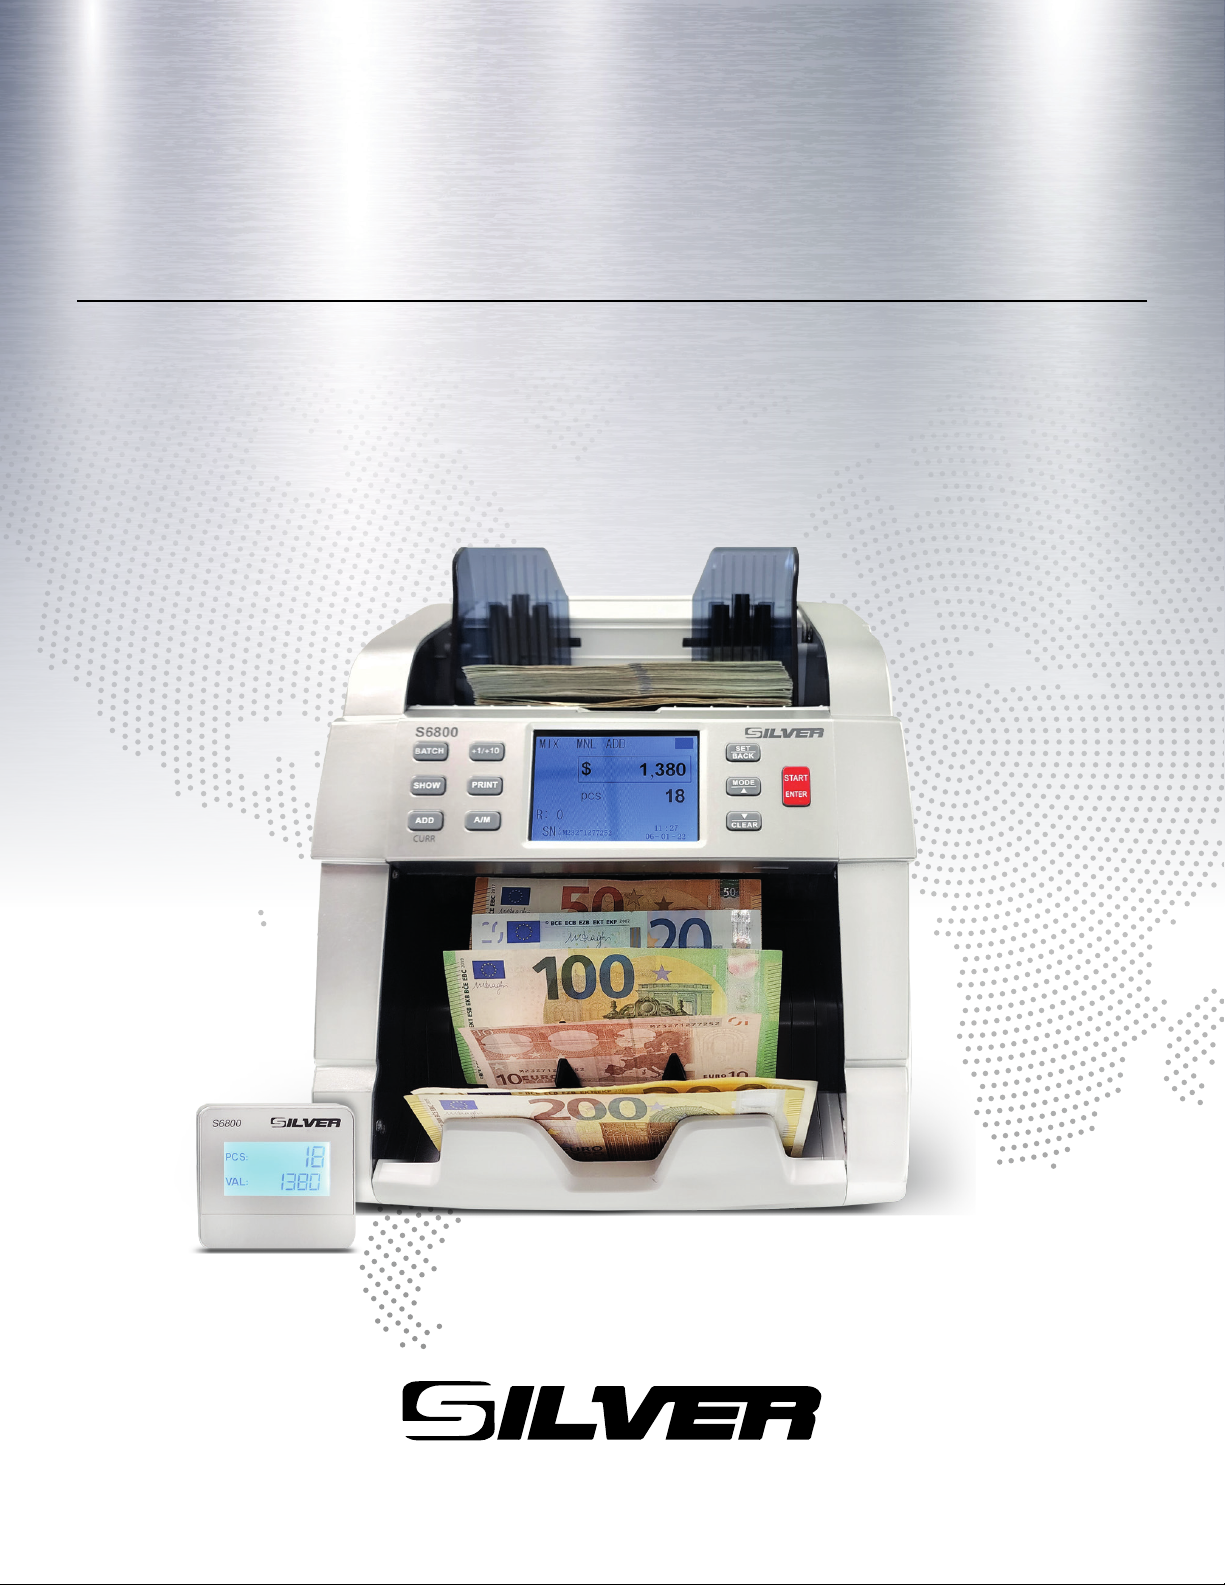
Introduction
The S6800 Mixed Bill Value Counter is the perfect solution for a fast,
accurate, and reliable banknote counting process. This machine is designed to
meet the most demanding applications in today’s financial markets.
Easy to operate and thanks to its versatility and value counting capability, it
will help you save time and money in processing your cash.
Among the most significant features this model offers are:
1. The unit has 4 modes of operation:
MIX - COUNT - LOCAL - SORT
2. Reliable, fast, versatile, and easy operation
3. Suitable to count mixed denomination bills to obtain a final total
amount of money
4. Easy software update procedure
5. Auxiliary external display
6. USB and Printer interface connection
This User Guide will allow you to get familiar with all the details related to
the unit’s operation. We recommend reading this guide thoroughly before
operating the unit and keeping it for future reference.
5
!
!
1. Safety Instructions
Warning
Do not use this product in areas where it may be exposed to water or other
liquids.
Unplug this product from the electric outlet before cleaning. Do not use liquid
oraerosol cleaners. To clean, use a damp cloth.
To reduce the risk of electric shock, do not disassemble this product. Take
it to qualified service personnel when service or repair work is required.
Opening or removing covers may expose you to dangerous voltages or other
risks. Incorrect reassembly can cause electric shock when the appliance is
subsequently used.
Only use the cable provided with the unit. The use of other cables may result
in electric shock, fire, or cause serious damage to the unit.
Do not operate the unit in areas with high temperature or high humidity sinceit
may prevent it from working correctly.
Caution
When unplugging the power cord, do not pull it by the cord, but rather grip the
plug to pull it out. Not following these instructions may result in electricshock,
fire, or damage to the unit.
Do not use the unit if the power cord is damaged or if the plug socket contactis
loose. Not following these instructions may result in electric shock, fire, or
other hazards.
Do not place heavy objects over the cord and do not bend it excessively since
it could get damaged. Not following these instructions may result in electric
shock, fire, or other hazards.
When not using the unit for a long time, remove the power plug from the electric
outlet.

6
1. Safety Instructions (continued)
xRead and understand all of the safety instructions.
xFollow all warnings and instructions marked on the unit.
xThis product is meant to be operated in an indoor environment with
proper ventilation.
xDo not place near direct sunlight, heat sources, or air conditioners.
xThis product should only be operated with the power cord supplied and
the type of power source indicated in this user guide. If you are not sure
of the type of power supply in your location, consult your vendor or local
power company.
xTo avoid the risk of fire or electric shock, never push objects into the unit
through the case slots or openings, since they may touch dangerous
voltage points or shortcut parts. Do not disassemble the unit.
xNever spill liquids of any kind on the product.
xUnplug this product from the wall outlet and refer servicing to qualified
service personnel under the following conditions:
- When the power supply cord or plug is damaged or frayed*
- If liquid has been spilled into the unit, or it has been exposed to rain
or water*
- If the product has been dropped or the case has been damaged*
- If the product shows a noticeable change in performance
*Not covered under warranty
NOTE: Do not remove the "ground" prong from the power cord. It is a safety
feature meant to protect the user from harm and the equipment from damage.
!
If the unit does not operate normally while following the
instructions, adjust only those controls covered by the operating
instructions. Improper adjustment of other controls may result in
damage and will often require extensive work by a qualified
technician to restore the product to normal operation.
7
2. Installation
A) Unpacking the unit
After unpacking the unit, store the box and the packing material for future
shipping. Failing to ship the unit in its original unit box and other included
packaging materials will void the unit’s warranty.
B) Installation
Select an appropriate workspace that is clean, flat, and leveled. The
equipment should never be placed near strong sources of light, heat sources,
or air conditioners. Please do not install the equipment where its weight
cannot be supported.
The voltage operating range is 100 - 240VAC with 60/50 Hz.
Plug the power cable to the back of the unit and into the wall power outlet.
Turn the unit on and verify it is functioning. In case of any functioning
problem, immediately contact your provider.
Note: When replacing fuses, make sure to use the same type and rating.
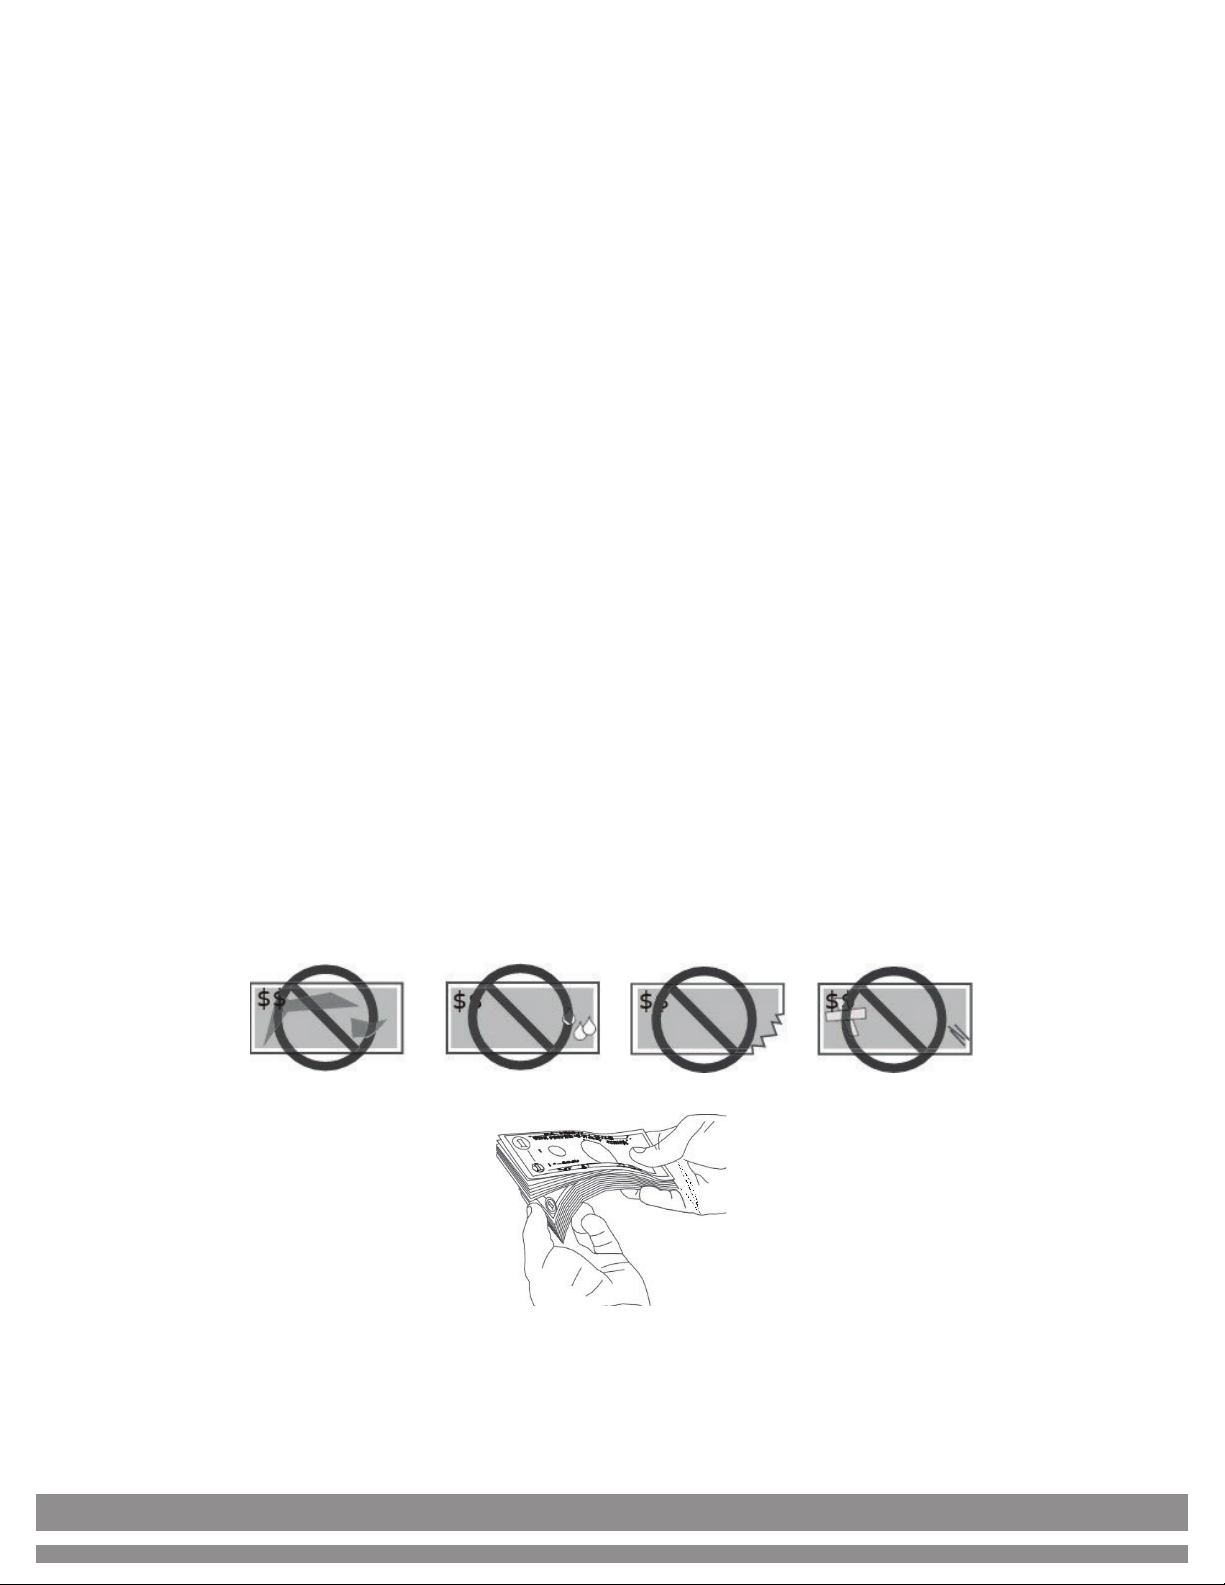
C) Bill Selection / Placement
1) Avoid counting wet, excessively dirty, folded, or damaged bills.
2) Check for foreign objects mixed up with the bills such as paper clips,
rubber bands, pieces of paper, etc.
3) If counting new bills, fan them lightly since they often stick together.
4) Position the bills in an orderly manner on the hopper tray to ensure an
error-free operation.
8
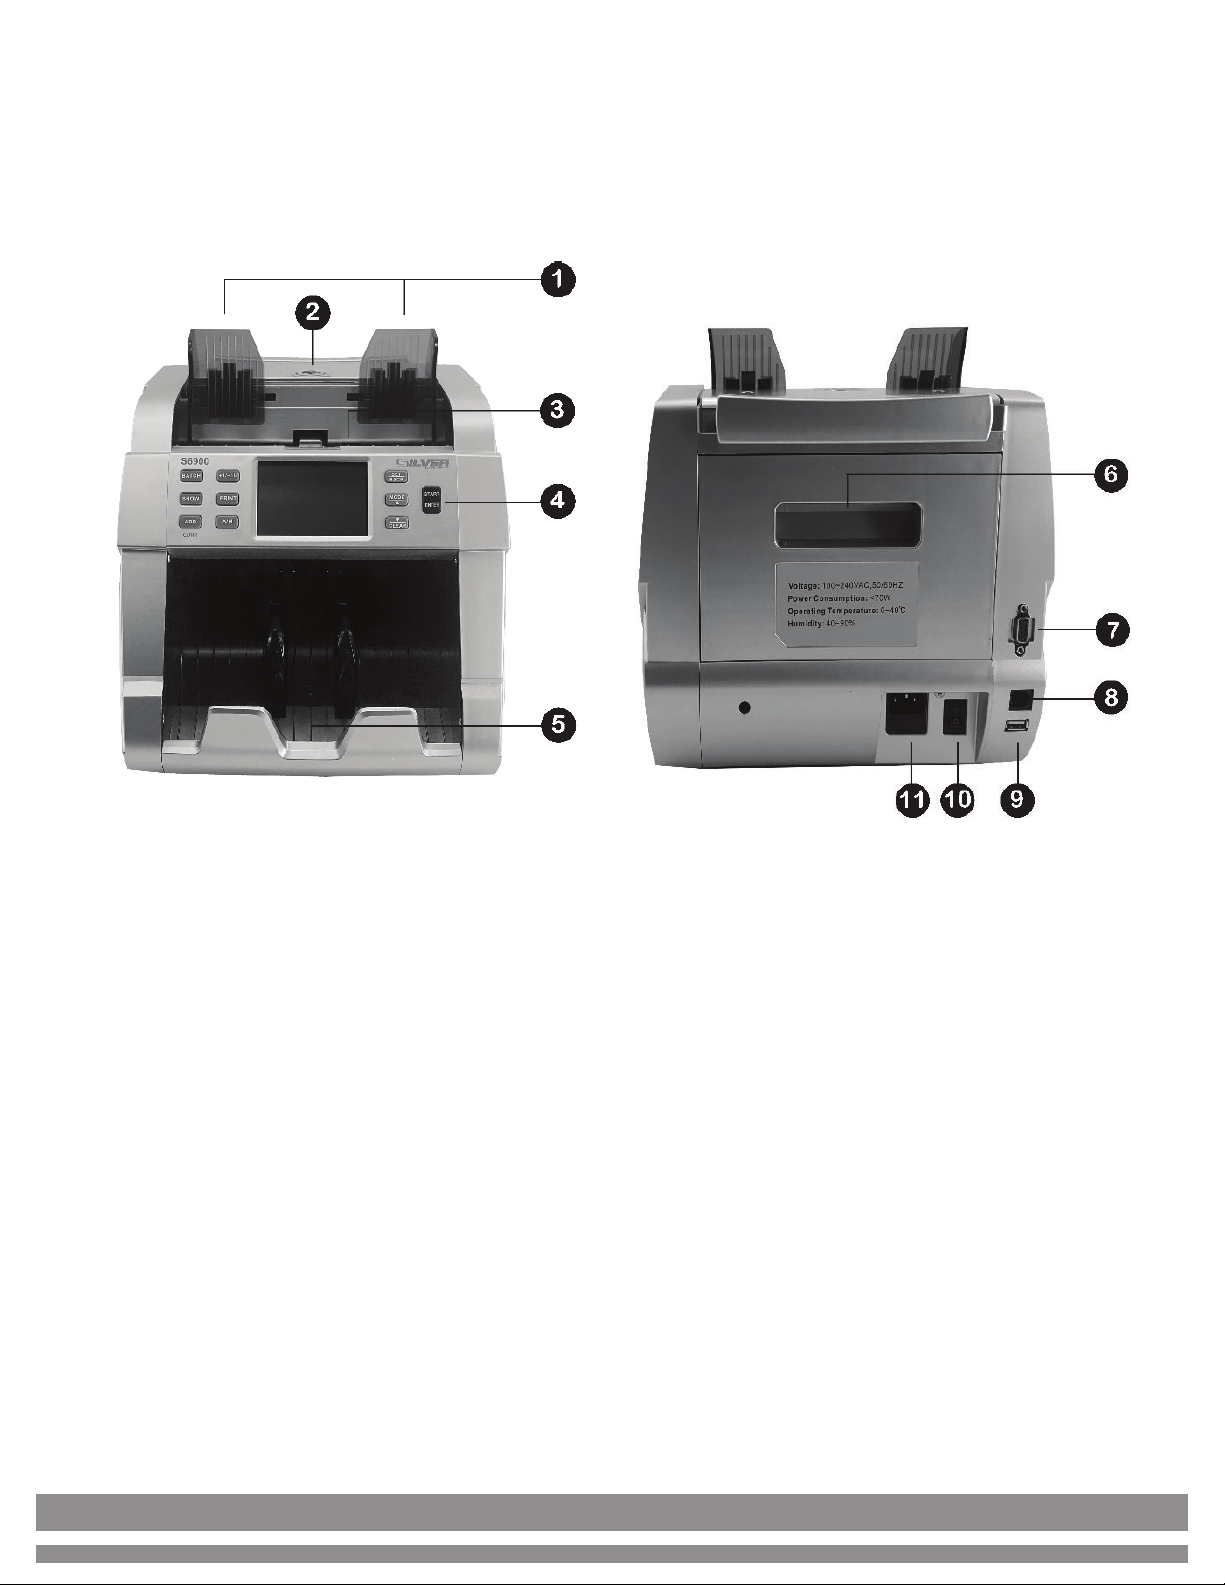
3. Equipment Overview
3.1 Part Description
1. Bill Guiders: Align the bills to be counted
2. Thickness Adjustment Knob: Adjust the bills’ feeding gap
3. Hopper Tray: Bills are placed here to be counted
4. Display / Control Panel: Controls operation / Shows counting results
5. Stacker Tray: Counted bills are collected here
6. Back Compartment Lid: Open back compartment lid to access inside
when any bill is jammed or for cleaning purposes
7. Serial 1 Port: Auxiliary Display connection port
8. RJ11-6 Port: Printer connection*
9. USB Port: Updates installation / Technical Service
10. On / Off Switch: For switching the unit ON & OFF
11. Power Jack: For connecting the power cable
*Note: Compatible printer is sold separately
9
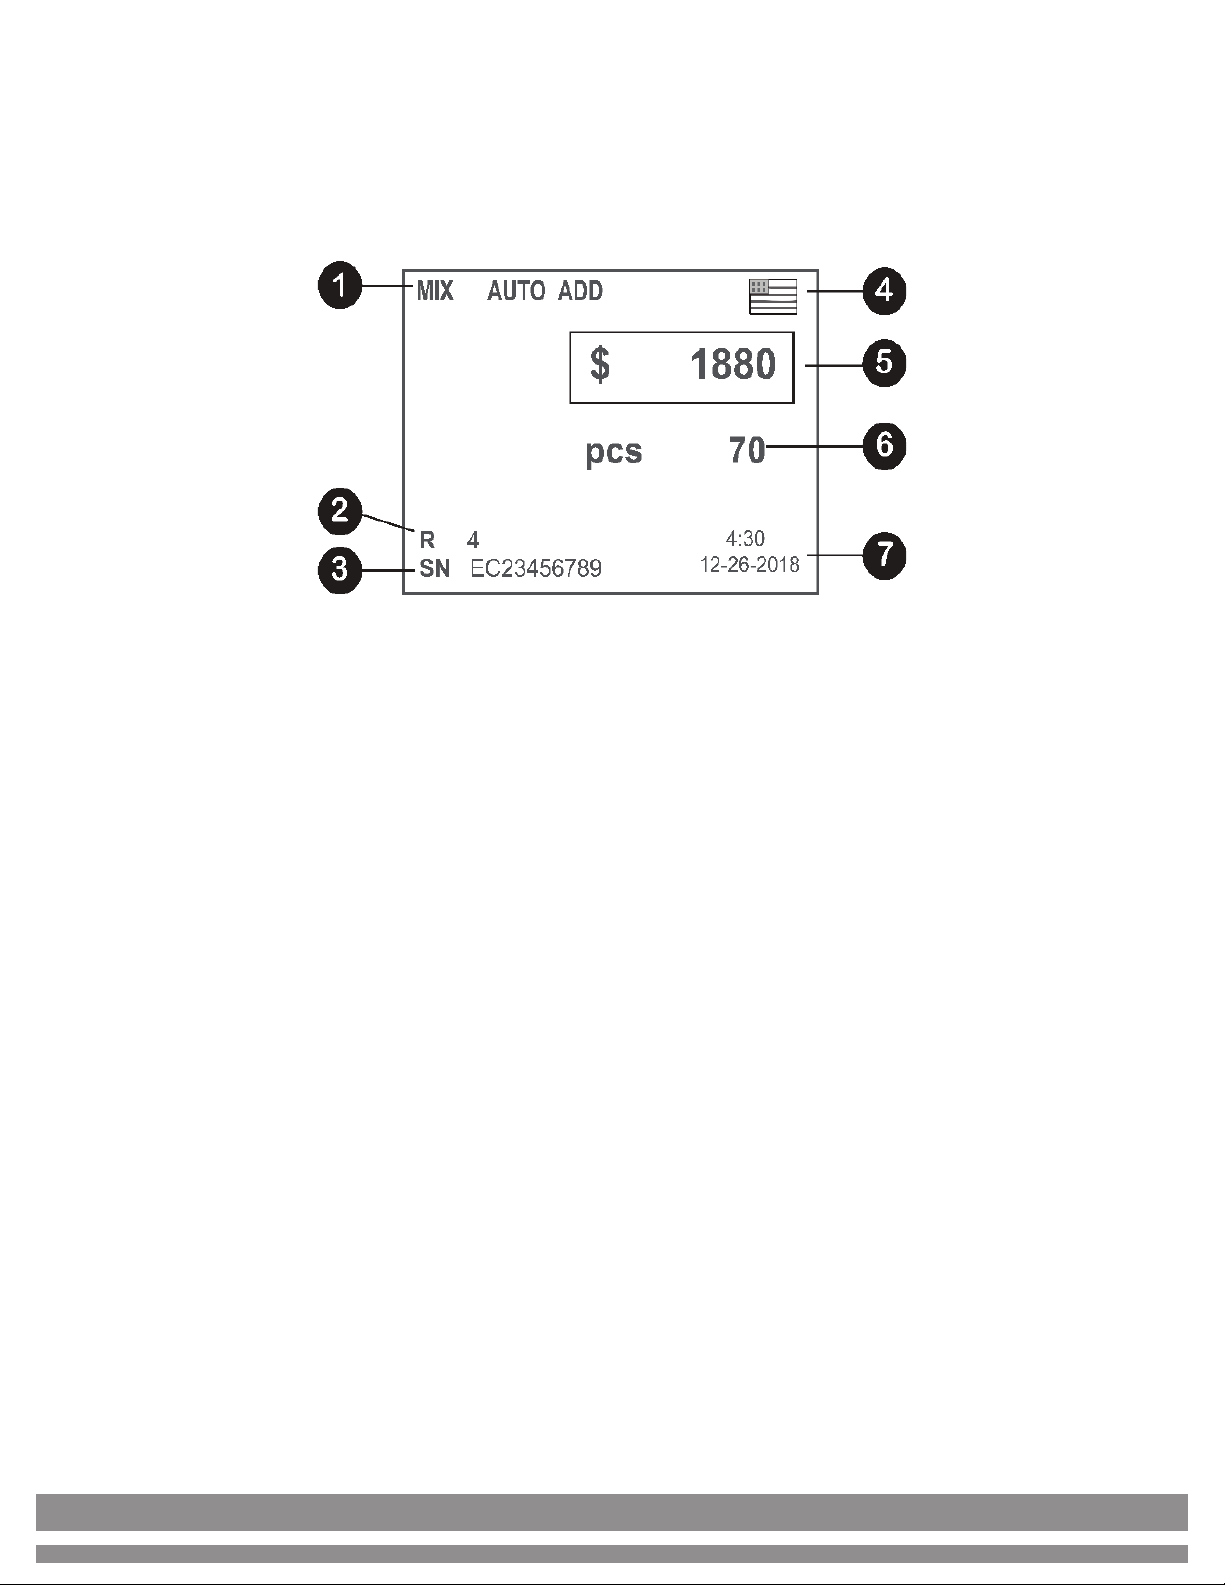
3. Equipment Overview (continued)
3.2 Display Description
1. Operation Mode
2. Quantity of suspicious notes
3. Serial Number of the bill
4. Currency
5. Total amount counted
6. Number of bills counted (pcs)
7. Date & Time
10
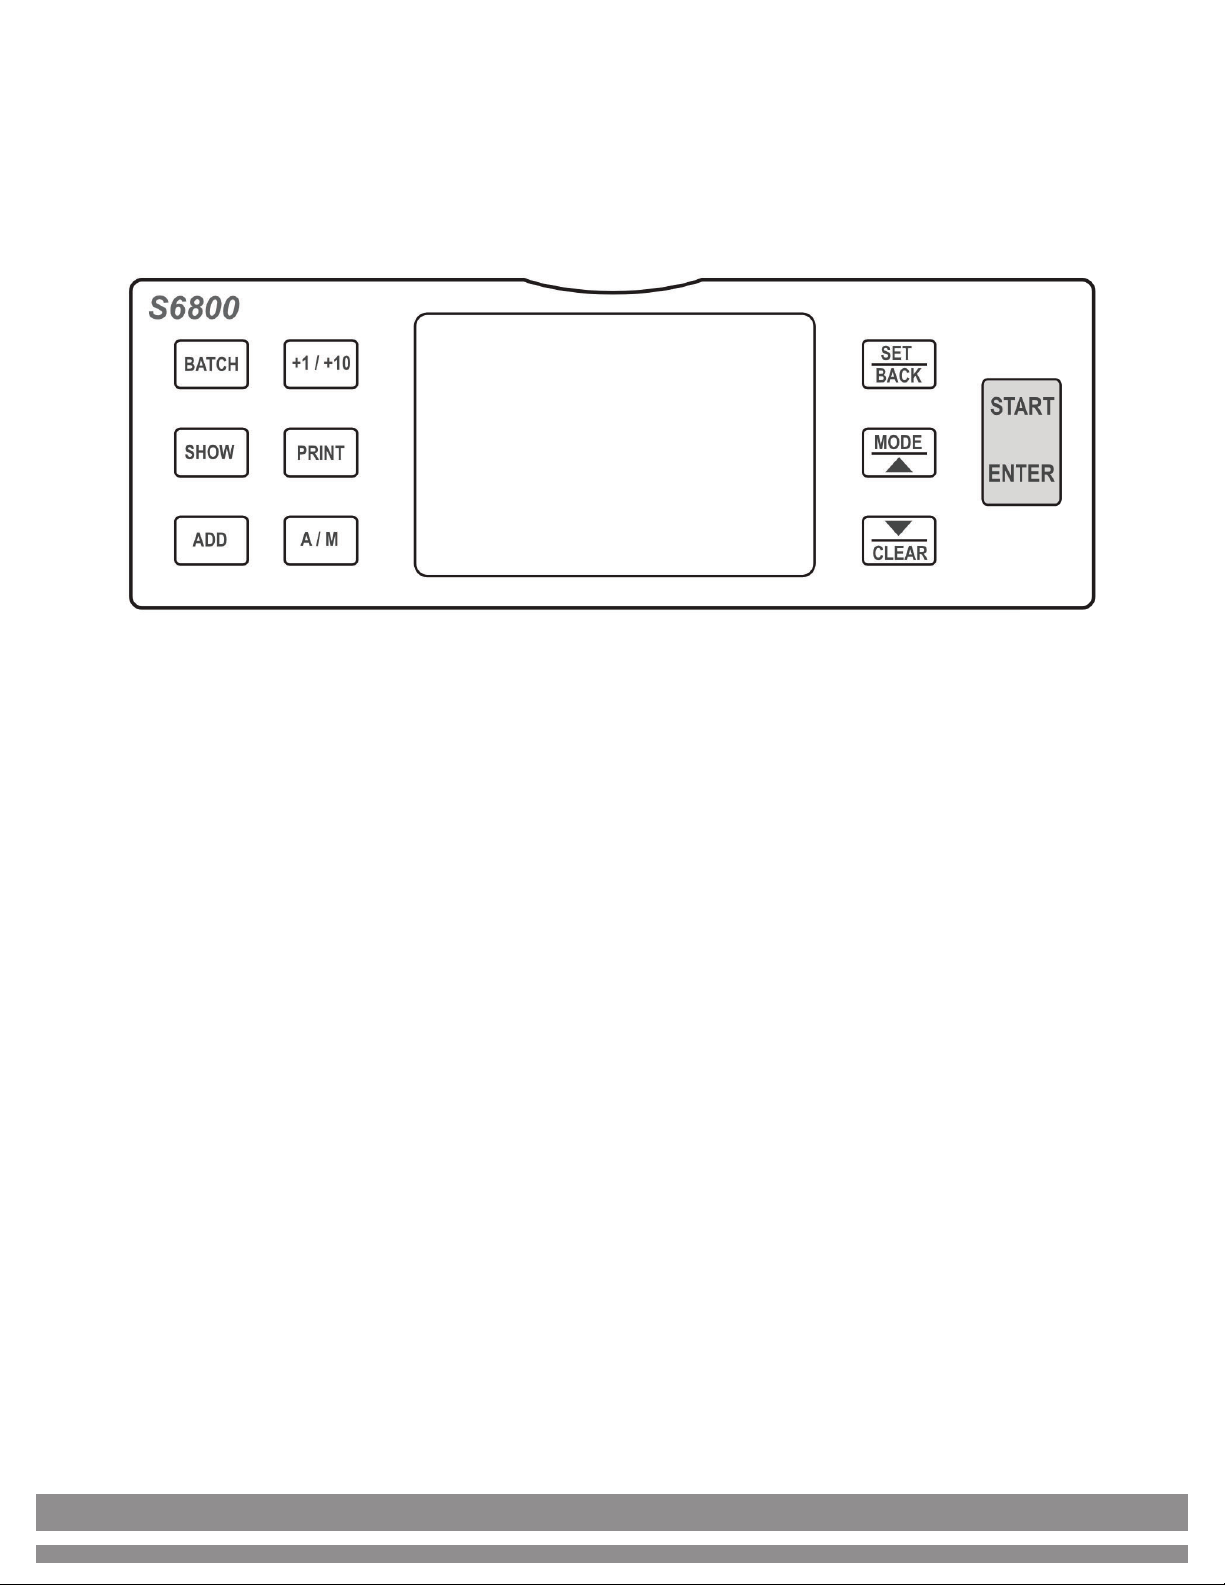
3. Equipment Overview (continued)
3.3 Control Panel Description
xBATCH: Batch mode selection.
Press it sequentially to select any predetermined batch option. Ranges
from 100 - 50 - 20 - 10 or disable.
x+1 / +10: In case the user desires to batch a quantity that is not
predetermined, simply select the nearest predetermined value with
“Batch”, then tap “+1/+10” to increase the value in steps of +1s or hold
down to increase the value in steps of +10s.
xSHOW: Shows Counting Report & Serial Number Report.
Press SHOW one time to access the “Counting Report” then press it again
to show the “Serial Number Report”*.
*Note: If the Serial Number report consists of several screens, press the
“arrow” keys to scroll up and down.
Table des matières
Manuels Caisse enregistreuse populaires d'autres marques


Cashmaster
Cashmaster Sigma 105 Manuel utilisateur

Agilent Technologies
Agilent Technologies 53151A Manuel utilisateur

Cashmaster
Cashmaster Sigma 105 Manuel utilisateur

Tellermate
Tellermate TY Manuel d'utilisation et d'entretien

HYOSUNG
HYOSUNG MX-4000W Manuel utilisateur

Cashmaster
Cashmaster Sigma 105 Manuel utilisateur


