Showerbuddy P1 Manuel utilisateur

Owners Manual
ShowerBuddy
P1 & P2 Pediatric Kit
INTENDED USAGE:
The Showerbuddy shower/commode chair is a medical device indicated for use by persons with limited
mobility who are unable to stand, walk and/or seat independently. The device is specifically designed for
individuals who require additional support and stability during washing, toileting and other hygienic
activities. It is a class 1 medical device, which is intended to be used only as a seating option for toilet
issues, showering and bathing. Its purpose is to help physically handicapped people during their hygienic
activities. Any other use is prohibited.
INDICATIONS:
The device is specifically indicated for individuals who (because of the wide variety of possible health
problems) are unable to stand and /or walk and so they need an assistance device to maintain some or all
daily hygienic tasks.
CONTRADICTIONS:
This type of device must not be used by a disabled person alone. The user should always be accompanied
by a caregiver or assistance person. The device is not recommended for persons with flaccid paralysis or
other diseases that cause serious body control problems. Such persons require special wheelchairs
designed for extra stability and support of the user’s body. The need for this type of specialty wheelchair
should be always estimated and indicated by a physician or a physical therapist.
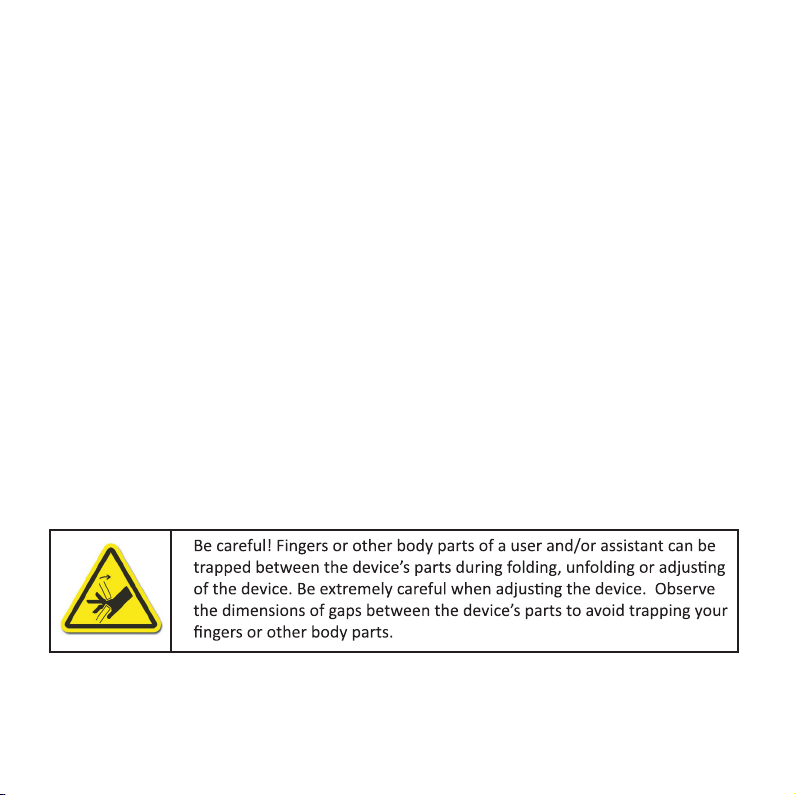
WARNING – Included in this packaging and fitted to the Showerbuddy chair are small parts, plastic wrap
and polystyrene packing that could be dangerous to children under 5.
Keep children away from this device and do not let them play with any parts.

This Shower Chair conversion kit is a Class 1 Medical Device designed to
support people with disabilities or users with reduced mobility during toileting
and showering.
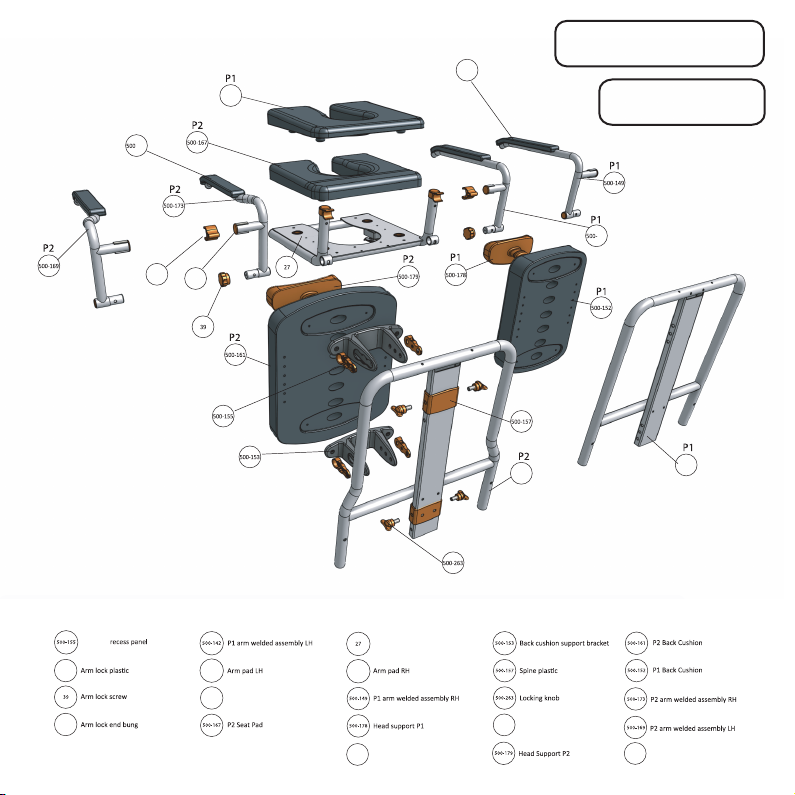
P1 & P2 Parts
Pediatric Kit Assembly
Operation Pediatric Kit
Cleaning and Maintenance
Safety Instructions
Warranty Information
3
4
6
9
10
13
Contents Page
P1 & P2 Pediatric Conversion Kit 2
P1 Seat Pad
500-166-R
collar
plastic
500-117
38
500-264
Arm lactch
500-271
Arm lock
3 P1 & P2 Pediatric Conversion Kit
500-166-R
38
500-271
-264
500-117
Exploded Parts
P1 & P2 kit
500-481
500-480
500-480
500-481
P1 Handle frame
P2 Handle frame
500-117
142
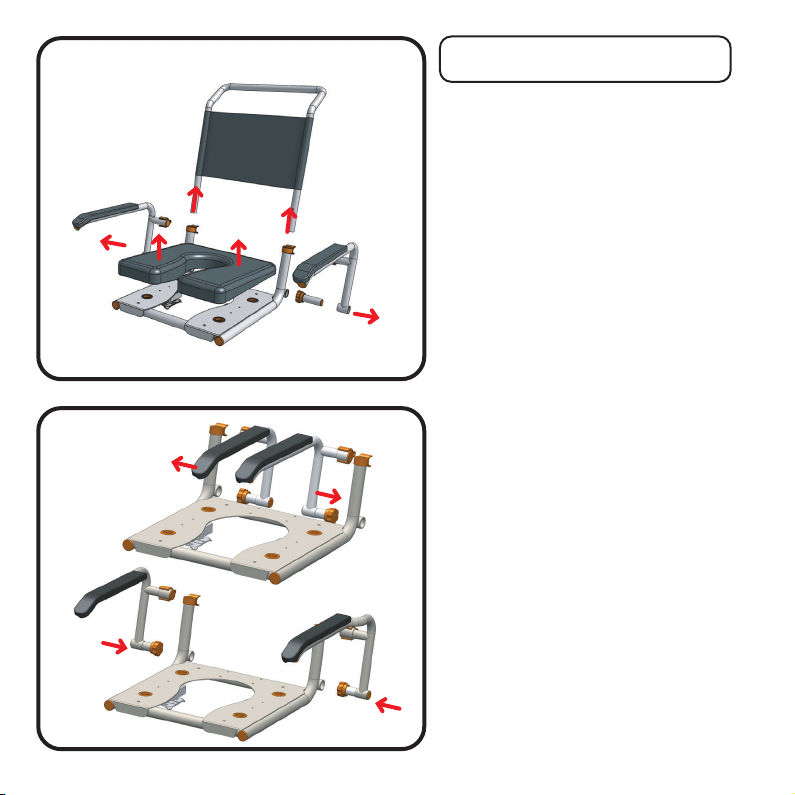
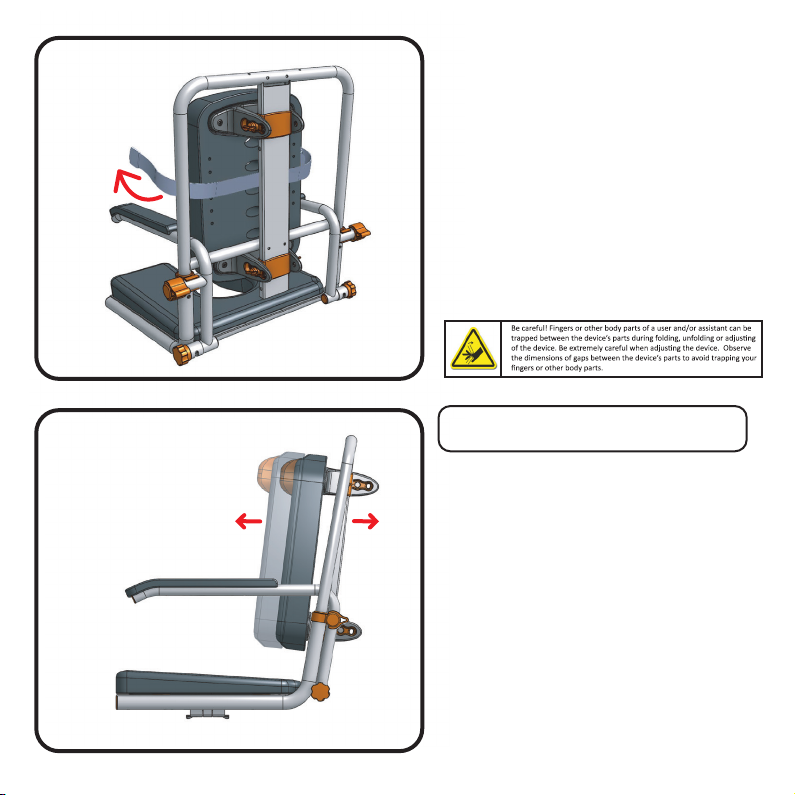
Step 1
Start by removing your handle, seat
cushion and arms as shown in the
illustration.
If needed you should refer to your
chairs user manual, if you don’t have
this you can find it on our website.
Note: If fitting to SB2T or SB3T you will
need to disconnect the tilt release
handle (part #75) from the chair push
handle. Refer to your chair user manual
Pediatric Kit Assembly
Both P1 and P2 kits are assembled in the
same way. A note will explain at each stage
where P1 & P2 options exist.
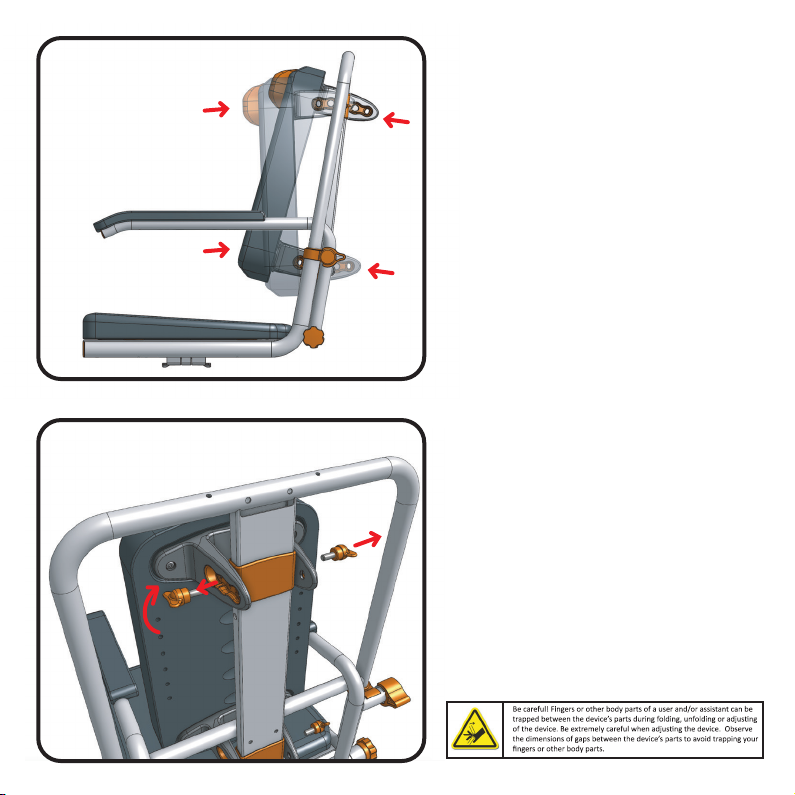
Step 2
Arm fitting is the reverse of step 1
using your newly supplied pediatric
arm assemblies.
If you are fitting the P1 kit, refer to the
top image, showing the arms being
inserted from the inside
If you are fitting the P2 kit, refer to the
bottom image showing the arms being
inserted from the outside.
P1 & P2 Pediatric Conversion Kit 4
P1
P2
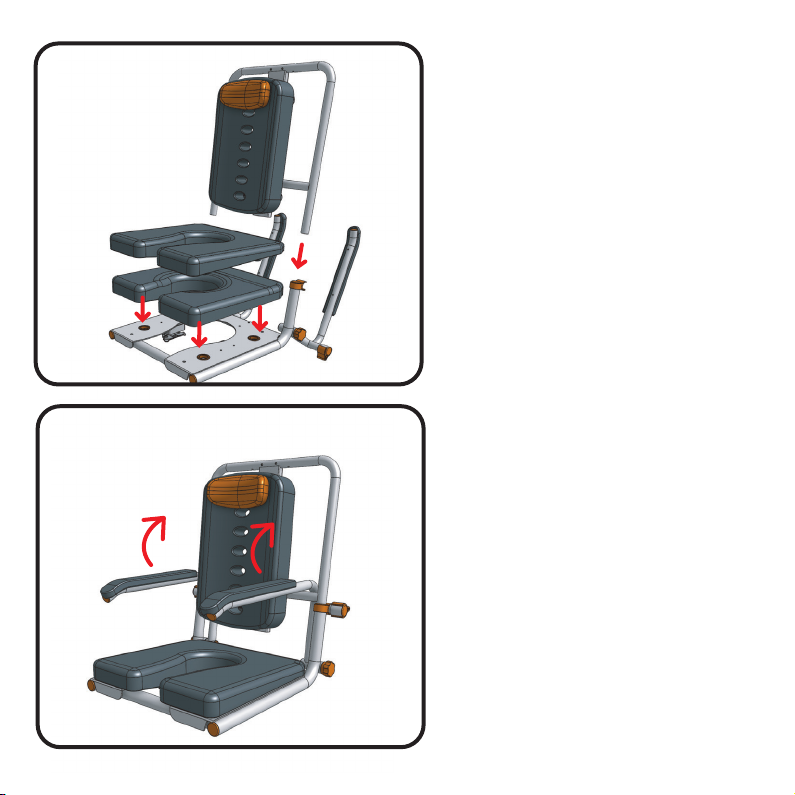
Step 3
Fit your new seat cushion (part
#500-166-R for P1 and part #500-167
for P2) as shown.
Your new seat cushion is a direct
replacement of your existing shower
chair and will fit in the existing holes in
the seat base plate.
Note: If fitting to SB2T or SB3T you will
need to reconnect the tilt release
handle (part #75) back using the holes
provided on the handle of your
pediatric kit.
Step 4
Once all the elements of the kit have
been fitted, check to make sure
everything is fitted correctly, tightened
up and that the arms can fold freely
back and forward.
5 P1 & P2 Pediatric Conversion Kit
P1
P2
Step 5
The existing chest restraint can be
transferred from the adult chair and
used as shown in the diagram.
If you do not have lateral supports
fitted simply wrap it around the back of
the seat back cushion as shown.
6
P1 & P2 Pediatric Conversion Kit
Operation Pediatric Kit
Your new pediatric conversion kit has
been designed in such a way to allow it
to grow with your child.
The P1 kit will accommodate younger
children from the approx age of 5+ but
allows a certain amount of growth
before needing to move to the P2 kit.
The P2 kit will accept a child from
around the age of 10 years up to
teenage before needed to convert back
to adult size seat.
Adjustments in the kit are as follows.
You can also make adjustments
through the backrest cushion adjust-
ment system.
This system has been designed to offer
unrivalled flexibility and superior
comfort to suit different users by
adapting the backrest angle and
backrest height that best suits the user.
7 P1 & P2 Pediatric Conversion Kit
To adjust your seat back angle simply
undo the seat lock knobs (part #500-
263) and position the backrest to the
desired recline position by re-fixing the
lock knob into that desired location
hole. Screw the thread tight.
To adjust your seat backrest height
simply undo the seat lock knobs (part
#500-263) and position to the desired
height location hole in the metal spine
to give the required height. Screw the
thread tight.
These adjustments are best carried out
by adjusting the top or bottom individu-
ally while the other is still located, this
then acts as a pivot for the seat
backrest and makes alignment of holes
easier. Ensure all seat lock knobs are
tightened before use.
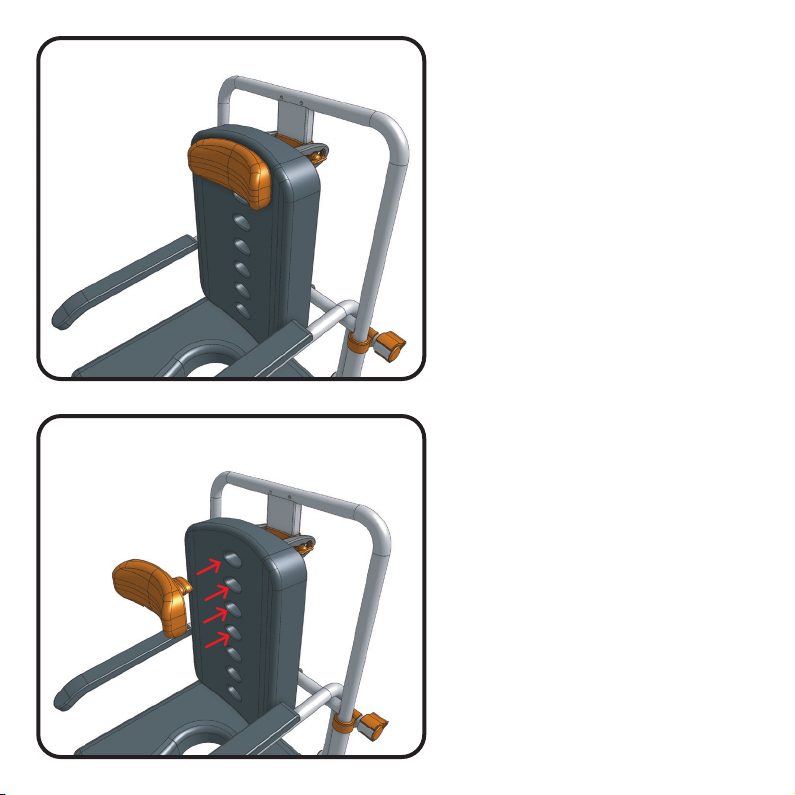
Cushion Support
Your Pediatric chair comes with a
unique cushion support that can be
used for a range of purposes.
1, It can be used to support the head
with its curved sides offering sideways
stability.
2. It can be used to provide neck
support should this be needed for
certain users.
3. It can also be used as a lower back
lumbar support to help sitting up
correctly.
8
P1 & P2 Pediatric Conversion Kit
We’ve design this system to be simple
and fast so that changes can be made
swiftly with minimal distruption to the
user.
Simply pull your support cusion (part
#500-179 P2 and part #500-178 P1) out
from the back rest cusion and position
it where required the selection of holes
provided.
Note: This support is optional and may not
suit all users. remove if not required.
These adjustments are best carried out
by adjusting the top or bottom individu-
ally while the other is still located, this
then acts as a pivot for the seat
backrest and makes alignment of holes
easier. Ensure all seat lock knobs are
tightened before use.

Cleaning and Maintenance
It is recommended that your shower chair and accessories are serviced annually by your Showerbuddy
Dealer or an authorised, competent service agent. In addition:
1. Regularly inspect all parts of the kit for defects. Any defective part should be attended to promptly by an
authorised service agent.
2. Clean the seat using a damp cloth and a mild cleanser. Always read the manufacturers instructions prior
to applying the cleanser. When using Sodium Hypochlorite (Bleach) on the seat, a solution of 0.1% Sodium
Hypochlorite should have no adverse effects on the cleaning of chairs. However, when using a solution of
1.0%, care should be taken to rinse the chairs thoroughly with clean water after application. Over a period
of time bleaching may occur, but the integrity of the product will remain unaffected.
3. Dry off the shower chair after use.
4. Do not oil or grease any parts.
5. Keep any moving parts free from lime scale, soap residue and hair by cleaning after use in the shower.
Caring for stainless steel.
Stainless steel has excellent corrosion resistance, but it is not stain or rust proof. Regular maintenance will
keep stainless steel clean and free of contaminants. In most applications stainless steel will not rust or stain
even after many years of service, but when used in certain environments such as concentrated chlorine or
other corrosive elements stainless steel requires proper care and maintenance. Do not leave stainless in
contact with iron, steel or other metals.
1. Clean stainless steel frequently with soap and water. Any cleaner safe for glass is usually safe for
stainless steel; apply with a cotton cloth.
2. Use a coating such as a good wax to help safeguard the stainless steel.
3. Remove discolouration or rust spots as soon as possible with a brass, silver or chrome cleaner. Irrevers-
ible pitting will develop under rust that remains on stainless steel for any period of time. Apply a mild
cleaner such as Ajax or an equivalent with a wet cotton cloth. Rinse thoroughly and wipe dry. Do not use
abrasives such as sandpaper or steel wool on stainless steel.
4. Do not clean with mineral acids or bleaches.
5. Do not store near any chlorine product.
P1 & P2 Pediatric Conversion Kit
9
Ce manuel convient aux modèles suivants
1
Table des matières
Autres manuels Showerbuddy Fauteuil roulant


