Showerbuddy SB1 Manuel utilisateur

elimination through innovation
SB1
Showerbuddy
Owners Manual
INTENDED USAGE:
The Showerbuddy shower/commode chair is a medical device indicated for use by
persons with limited mobility who are unable to stand, walk and/or seat independently.
The device is specifically designed for individuals who require additional support and
stability during washing, toileting and other hygienic activities. It is a class 1 medical
device, which is intended to be used only as a seating option for toilet issues,
showering and bathing. Its purpose is to help physically handicapped people during
their hygienic activities. Any other use is prohibited.
INDICATIONS:
The device is specifically indicated for individuals who (because of the wide variety
of possible health problems) are unable to stand and /or walk and so they need an
assistance device to maintain some or all daily hygienic tasks.
CONTRADICTIONS:
This type of device must not be used by a disabled person alone. The user should
always be accompanied by a caregiver or assistance person. The device is not
recommended for persons with flaccid paralysis or other diseases that cause
serious body control problems. Such persons require special wheelchairs designed
for extra stability and support of the user’s body. The need for this type of specialty
wheelchair should be always estimated and indicated by a physician or a physical
therapist.
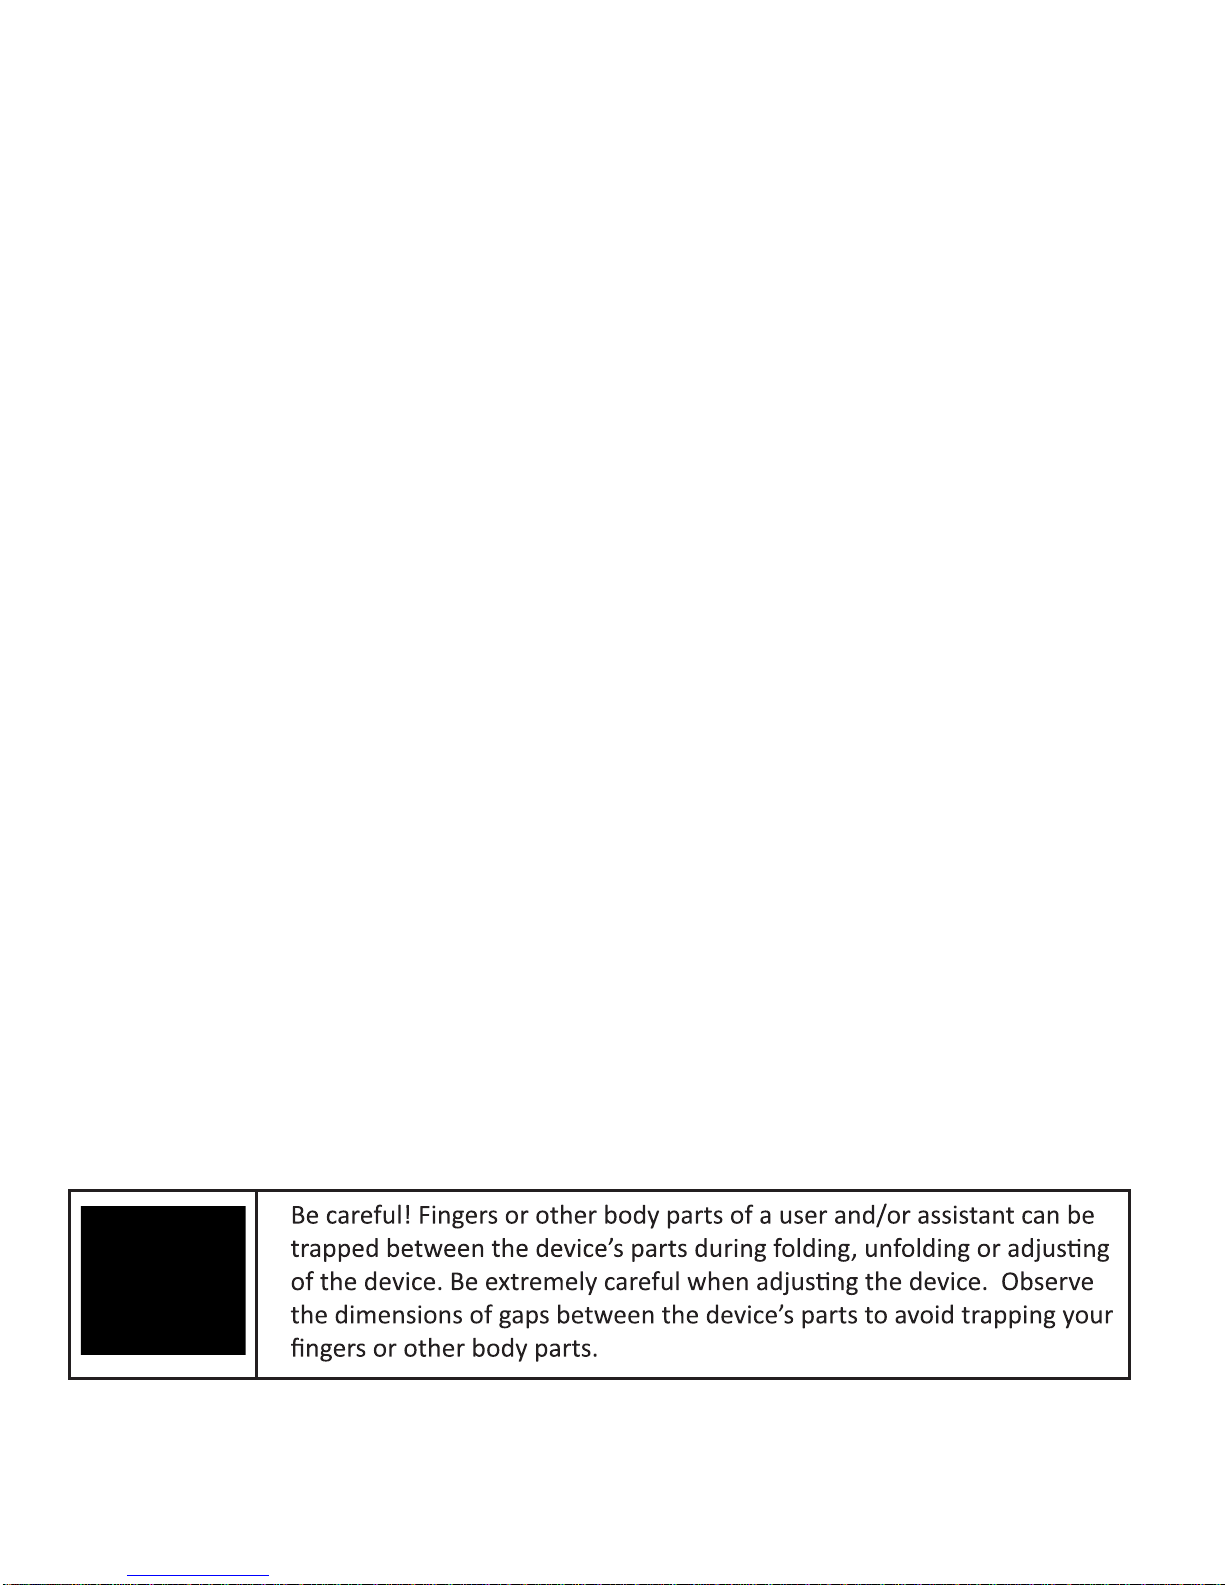
WARNING – Included in this packaging and fitted to the Showerbuddy chair are
small parts, plastic wrap and polystyrene packing that could be dangerous to
children under 5.
Keep children away from this device and do not let them play with any parts. It must
be kept away from children under 5 years old.

contents
SB1 ShowerBuddy page 2
Exploded Parts ............................................................... 3
Parts List ........................................................................ 4
Showerbuddy Assembly .................................................
Bridge Support Bracket ................................................. 10
5
Showerbuddy Setup ....................................................... 13
Showerbuddy Operation ................................................. 17
Cleaning + Maintenance ................................................. 23
Safety Information .......................................................... 24
Warranty Information ...................................................... 23
Registration Form ........................................................... 26
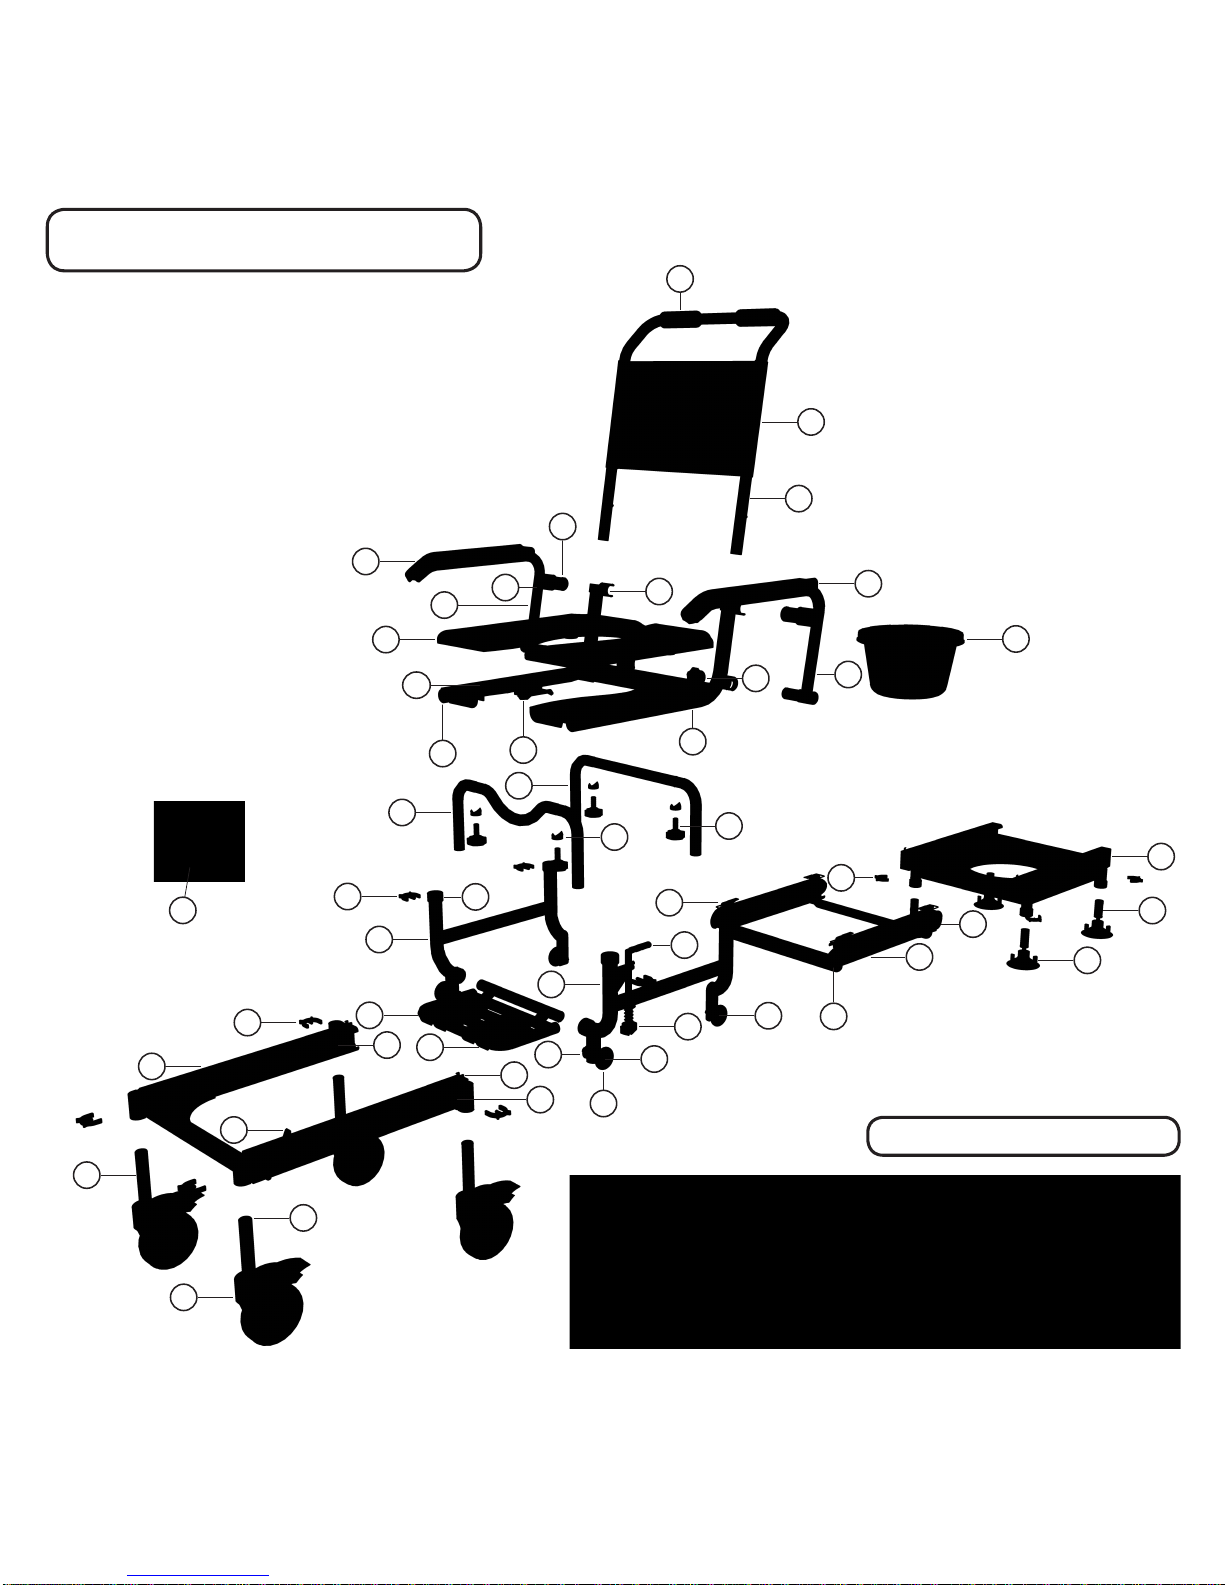
exploded parts
SB1 ShowerBuddypage 3
22
6
36
31
28
43
3
8
25
21
23 24
16
20
11
10
15
41
35
39
27
32
49
50
47
46
1
2
7
5
9
4
19
14
12
18
13
45
34
17
30
29
38
26
33
37
40
42
44
48
securing clip sizes
Small Medium Large
97

parts list
SB1 ShowerBuddy page 4
15” Castor Wheel
2Height Adjustment Tube (Castor Wheel)
Tube Cap
3
Rolling Track4
Secondary Brake (Left)5
Secondary Brake (Right)6
Primary Brake Latch7
Latch Hook8
Securing Clip (Medium)9
Base Leg (Left)10
11 Base Leg (Right)
12 Leg Tube Cap
Tube Washer (32mm)
13 Track Wheel
14
15 Track Wheel Axle (Front)
See the exploded chair image for the location of parts.
Track Wheel Axle (Rear)16
Primary Brake Lever17
Primary Brake Handle Sleeve18
Foot Rest (Seat Unit)19
Foot Rest Grips20
21 Height Adjustment Tube (Front)
22 Height Adjustment Tube (Rear)
Tube Washer (25mm)
23
Fixing Knob24
25 Securing Clip (Large)
26 Seat Base
27 Arm Rest Clip
Cushion Connector
28
Tube Cap (32mm)29
Commode Bucket Connector30
Cushion31
Commode Bucket + Lid32
Arm Rest (Left)33
Arm Rest (Right)34
Arm Rest Padding (Left)35
36 Arm Rest Padding (Right)
37 Arm Rest Lock
Arm Rest Knob
38 Arm Rest Cap
39
40 Back Rest Frame
Back Rest Fabric
41
Hand Grips42
Bridge43
Bridge Tongue (Long)44
Bridge Tongue (Short)45
46 Latch
47 Shower Track
Height Adjustment Tubes (Shower Track)
48
Suction Cups49
50 Securing Clip (Small)
97 Bridge Support Bracket

step 2
SB1 ShowerBuddypage 5
Insert each 5” castor wheel into the
wheeled track.
Secure each castor wheel at the required
height using 1 medium securing clip.
NOTE
- Each height adjustment hole raises the
wheeled track 1”.
- Check to ensure all securing clips are
fully inserted.
- Ensure all castor wheels are aligned at
the same height.
step 1 assembly
Insert the back rest frame into the seat
base.
Slide the back rest frame into the seat
base until the clip pins click into the holes
on the seat base.
The clip pins secure the chair back frame
in position.
NOTE
- To remove the seat back press the clip
pins in and slide the seat back out of the
seat base.

step 4
SB1 ShowerBuddy page 6
step 3
Insert the arm rests into the sockets on
the seat base until the clip pin clicks and
locates the arm rests in position.
Screw the arm rest knob into the arm rest
to firmly secure the arm rest in position.
Swing the arm rest forward so that it locks
into position in the arm rest clip.
Slide the arm rest lock over the arm rest
clip to lock the arm rest in position.
By sliding the armrest lock you can easily
swing the armrest out of the way or
secure the armrest in position.
To unlock the armrest slide the armrest
lock away from the armrest.
To lock the armrest slide the armrest lock
towards the armrest.
NOTE
- The armrest locks should always be used
when the armrests aren’t in the swing-
away position.
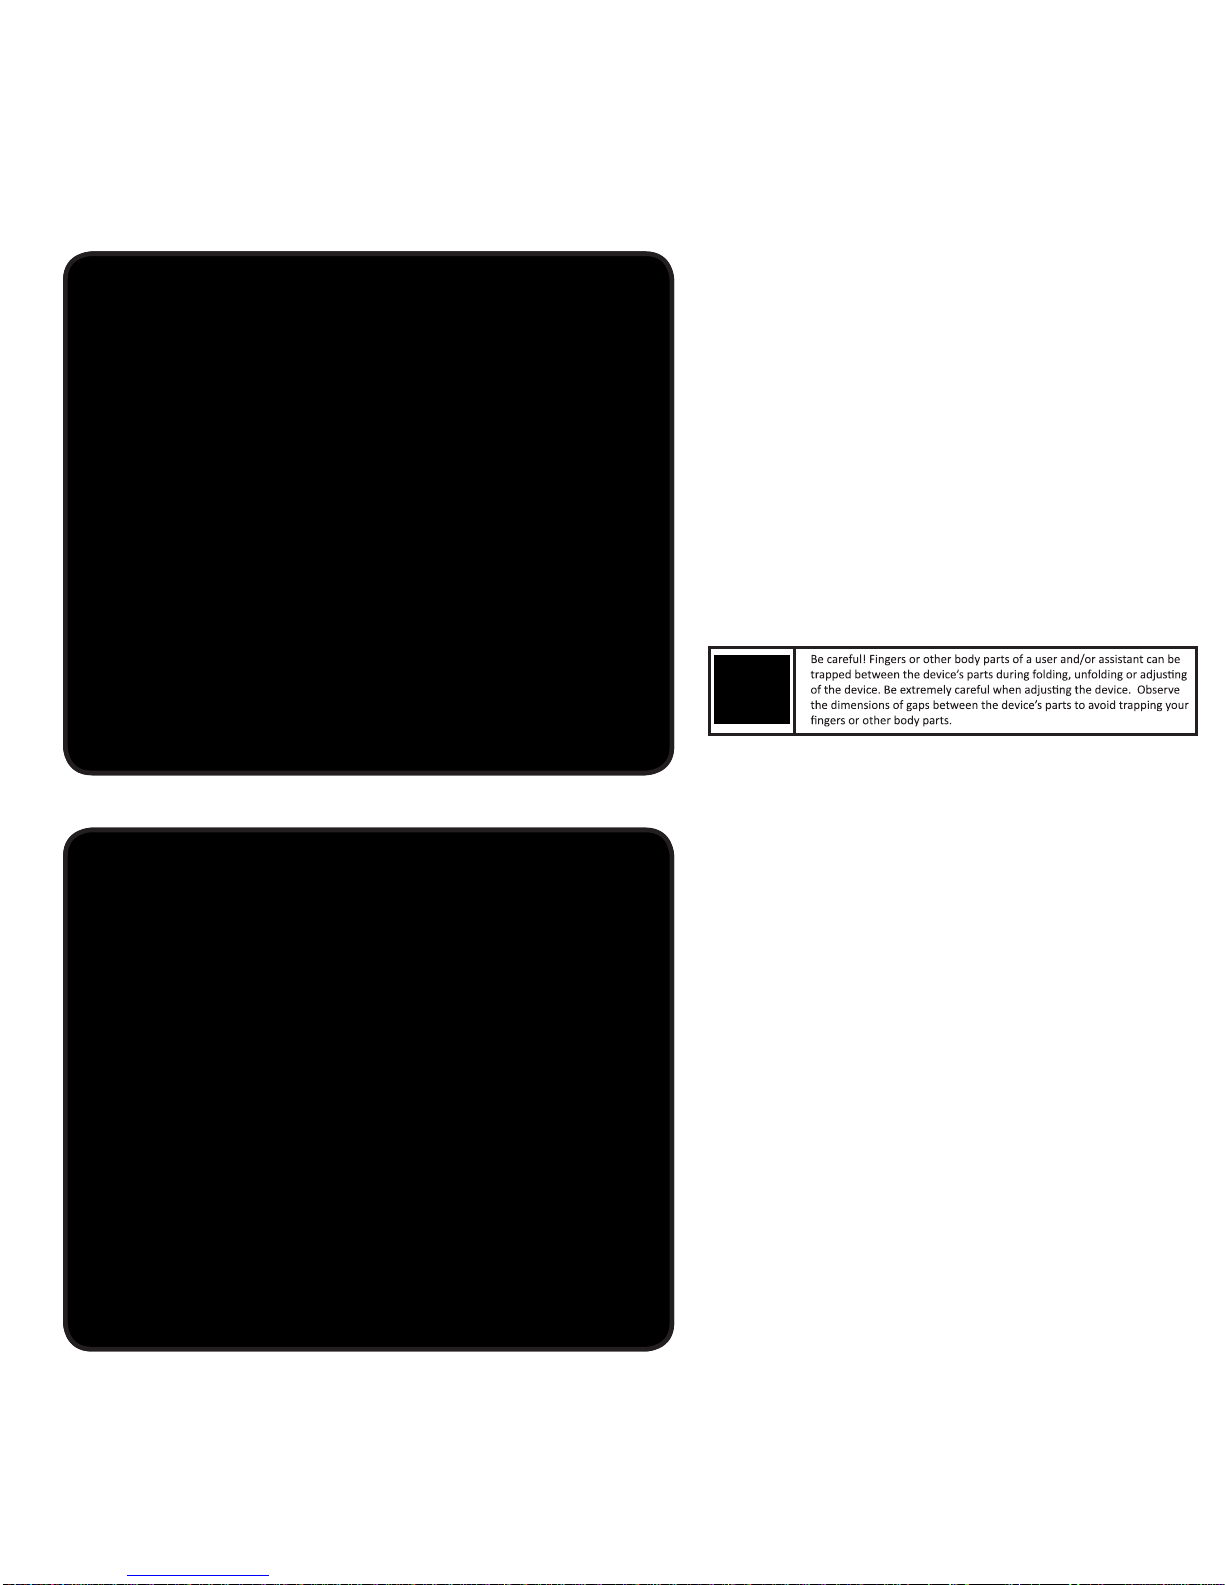
step 6
SB1 ShowerBuddypage 7
step 5
The armrests can be easily swung-away
when required.
Unlock the armrest by sliding the armrest
lock away from the armrest. Once this is
done the armrest can be swung away. The
clip pin which secures the armrest in posi-
tion stops the armrest from rotating to far.
NOTE - The armrest locks should always
be used when the armrests aren’t in the
swing-away position.
Ensuring the correct orientation attach
the seat cushion to the seat base by
pushing the 4 locating lugs on the
underside of the cushion into the
connectors on the seat base.
Firmly press the cushion into position
so that the 4 locating lugs are securely
located in the connectors.
NOTE
- To remove the cushion, carefully remove
one lug at a time from the connectors until
all 4 locating lugs are removed.

step 8
step 7
Insert the suction cups into the shower
track.
Secure each suction cup at the required
height using 1 small securing clip.
NOTE
- Each height adjustment hole raises the
shower track 1”.
- Check to ensure all securing clips are
fully inserted. Ensure all suction cups are
aligned at the same height.
Rotate the chair so that you have easy
access to the underside of the seat base.
From the back of the chair slide the
commode bucket into the 2 brackets on
the underside of the seat base.
Ensure the commode bucket is pushed in
far enough that the brackets securely hold
the commode bucket in position. The
commode bucket should be centred under
the opening in the cushion.
SB1 ShowerBuddy page 8

step 10
step 9
To attach the chest belt rotate the chair so
that you have easy access to the back of
the back rest.
Slide the chest belt through the 2
attachment loops on the back rest.
Before use adjust the length of the chest
belt to suit the user.
On the underside of the seat base there
are 4 attachment points for the lap belt.
Unscrew the provided screws and
washers from the front attachment points
on the underside of the seat base.
Choose the attachment points you prefer
for your lap belt.
Slide the washer onto the screw and then
insert through the grommet in the lap belt.
Screw the lap belt securely into
position.
SB1 ShowerBuddypage 9
Autres manuels pour SB1
2
Table des matières
Manuels Produit de soins personnels populaires d'autres marques


HiB
HiB Spectre 50 Manuel utilisateur

Carex
Carex SunLite Manuel utilisateur

Roper Rhodes
Roper Rhodes Intense Manuel de la liste des pièces

Interacoustics
Interacoustics Titan IMP440 Instructions d'utilisation et de sécurité

ReTrak
ReTrak VS001 Manuel utilisateur

LED Technologies
LED Technologies dpl PAIN RELIEF Joint Wrap Manuel utilisateur


