Sferalabs strato Pi Mini Manuel utilisateur

"
Pi Touch Display Kit
User Guide
September 2019
Revision 001
SPTM20XP Strato Pi Mini Touch Display Kit
SPTB21XP Strato Pi Base Touch Display Kit
SPTU21XP Strato Pi UPS Touch Display Kit
IPTB13RP Iono Pi Touch Display Kit
"

Safety information 3
Qualified personnel 3
Hazard levels 3
Safety instructions 4
General safety instructions 4
Battery and external rechargeable battery 4
Introduction 6
Kit Components 7
Features 8
Usage and connections 9
Hardware installation 9
microSD installation 9
Power supply 10
Wiring and GPIO operations 10
Replacing the RTC backup battery 10
Software installation 11
Technical specifications 12
Dimensions 13
Disposal 14
Installation and use restrictions 14
Standards and regulations 14
Safety instructions 14
Set-up 14
Conformity Information 15
1
User Guide

Be sure to always remove the power supply before handling the kit.
Don't touch any components on the Raspberry Pi card or other cards
while the device is on.
Follow all applicable electrical safety standards, guidelines,
specifications and regulations for installation, wiring and operations of
the Pi Touch Display Kit.
Carefully and fully read this user guide before installation.
The Pi Touch Display Kit is not authorised for use in safety-critical applications where a
failure of the product would reasonably be expected to cause personal injury or death.
Safety-critical applications include, without limitation, life support devices and systems,
equipment or systems for the operation of nuclear facilities and weapons systems. The kit
is neither designed nor intended for use in critical military or aerospace applications or
environments and for automotive applications or environment. Customer acknowledges
and agrees that any such use of the Pi Touch Display Kit is solely at Customer's risk, and
that Customer is solely responsible for compliance with all legal and regulatory
requirements in connection with such use.
Sfera Labs S.r.l. may make changes to specifications and product descriptions at any time,
without notice. The product information on the web site or materials is subject to change
without notice.
Please download and read the Terms and Conditions document available at:
http://www.sferalabs.cc
Strato, Iono and Sfera Labs are trademarks of Sfera Labs S.r.l. Other brands and names
may be claimed as the property of others.
#
Copyright © 2019 Sfera Labs S.r.l. All rights reserved.
2
User Guide
Safety information
Carefully and fully read this user guide before installation and retain it for future reference.
Qualified personnel
The product described in this manual must be operated only by personnel qualified for the
specific task and installation environment, in accordance with all relevant documentation
and safety instructions. A qualified person should be capable of fully identifying all
installation and operation risks and avoid potential hazards when working with this product.
Hazard levels
This manual contains information you must observe to ensure your personal safety and
prevent damage to property. Safety information in this manual are highlighted by the safety
symbols below, graded according to the degree of danger.
Indicates a hazardous situation which, if not avoided, will result in death or serious
personal injury.
Indicates a hazardous situation which, if not avoided, may result in death or serious
personal injury.
Indicates a hazardous situation which, if not avoided, can result in minor or moderate
personal injury.
Indicates a situation which, if not avoided, can result in damage of property.
DANGER
WARNING
CAUTION
NOTICE
3
User Guide
Safety instructions
General safety instructions
Protect the unit against moisture, dirt and any kind of damage during transport, storage
and operation. Do not operate the unit outside the specified technical data.
Never open the housing. If not otherwise specified, install in closed housing (e.g.
distribution cabinet). Earth the unit at the terminals provided, if existing, for this purpose.
Do not obstruct cooling of the unit. Keep out of the reach of children.
Life threatening voltages are present within and around an open control cabinet.
When installing this product in a control cabinet or any other areas where dangerous
voltages are present, always switch off the power supply to the cabinet or equipment.
Risk of fire if not installed and operated properly.
Follow all applicable electrical safety standards, guidelines, specifications and regulations
for installation, wiring and operations of this product.
The Raspberry Pi board could generate a substantial amount of heat when the software
forces the CPU and/or GPU to operate at high load levels. Ensure that the product is
properly installed and ventilated to prevent overheat.
The connection of expansion devices to this product may damage the product and other
connected systems, and may violate safety rules and regulations regarding radio
interference and electromagnetic compatibility.
Use only appropriate tools when installing this product. Using excessive force with tools
may damage the product, alter its characteristics or degrade its safety.
Battery and external rechargeable battery
This product uses a small lithium non-rechargeable battery to power its internal real time
clock (RTC). It also optionally uses an external rechargeable lead-acid battery for the
uninterruptible power supply.
WARNING
WARNING
NOTICE
4
User Guide
Improper handling of lithium and lead-acid batteries can result in an explosion of the
batteries and/or release of harmful substances.
Worn-out or defective batteries can compromise the function of this product.
Replace the RTC lithium battery before it is completely discharged. The lithium battery
must be replaced only with an identical battery. See the "Replacing the RTC backup
battery" section for instructions.
Do not throw lithium batteries into fire, do not solder on the cell body, do not recharge, do
not open, do not short-circuit, do not reverse polarity, do not heat above 100°C and protect
from direct sunlight, moisture and condensation.
Only use a lead-acid battery with electrical ratings recommended in the technical
specifications for this product.
Follow the battery manufacturer's instructions when installing the external UPS battery (not
provided).
Dispose of used batteries according to local regulations and the battery manufacturer's
instructions.
WARNING
5
User Guide
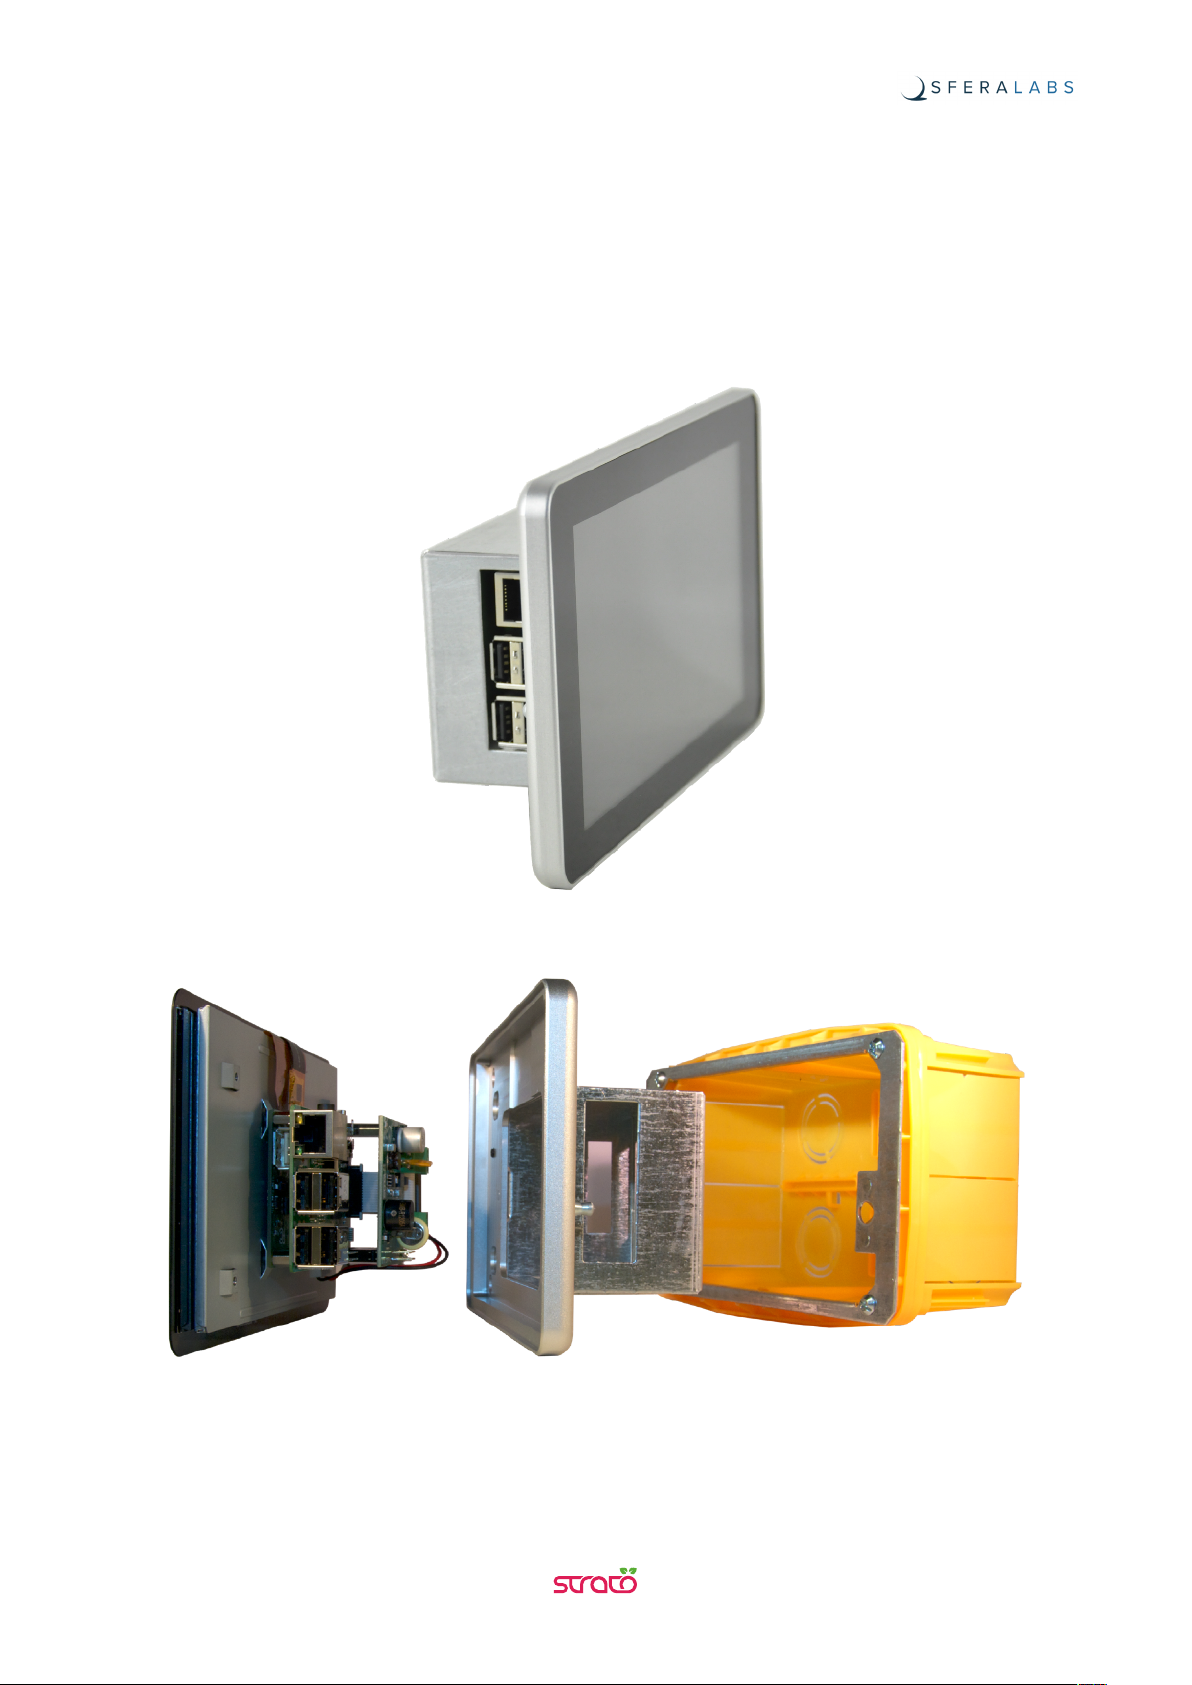
Introduction
The Pi Touch Display Kit is a factory-assembled touch panel computer kit based on the
Raspberry Pi computer board, the Raspberry Pi 7” Touch Display and the Strato Pi board
(Mini, Base or UPS version) or the Iono Pi board, enclosed in a rugged, high-quality
aluminium and steel chassis, that can be installed in-wall with its optional back-box mount.
6
User Guide

Kit Components
The kit is composed of:
•Pi Touch Display Mechanical Kit (XPTM10X)
•Raspberry Pi version 3 model B+
•Raspberry Pi Touch Display
•Strato Pi board (SPBM20X, SPBB21X, or SPBU21X) or Iono Pi board (IPBB13R)
•Optional Wall Mount Back Box (XPTB10X).
7
User Guide

Features
With Strato Pi Mini board:
✓12-28Vdc power supply, with surge and reverse polarity protection
✓power supply on a screw terminal block
✓on-board power supply LED indicator
✓real time clock with replaceable CR1025 Lithium / Manganese Dioxide back-up battery.
With Strato Pi Base board:
✓all features of Strato Pi Mini board
✓standard RS-232 and RS-485 interfaces to the Raspberry Pi serial line, with opto-
isolator and electrostatic discharge protection
✓on-board LEDs for serial line activity
✓serial connections on a screw terminal block
✓hardware watchdog implemented in the Strato Pi board, fully independent from the
Raspberry Pi, controlled via GPIO
✓on-board buzzer, connected to an I/O pin of the Raspberry Pi board, for acoustic
feedback.
With Strato Pi UPS board:
✓all features of Strato Pi Base board
✓integrated uninterruptible power supply, with external lead-acid 12V battery
✓simple UPS status and control via the I/O pins of the Raspberry Pi board
✓on-board LED for battery operations status.
With Iono Pi board:
✓all features of Strato Pi Mini board
✓4 power relay outputs rated for 6A at 250V
✓2 analog voltage inputs 0÷30V
✓2 analog voltage inputs 0÷3V on internal pin-headers
✓7 configurable digital input/output pins
✓1-Wire and Wiegand support
✓GPIO-controlled on-board LED.
8
User Guide
Usage and connections
Hardware installation
The Pi Touch Display Kit is shipped fully assembled. You will only have to access the
Raspberry Pi board to install your microSD card, and connect the power and other optional
cables.
Two M4 threaded holes in the back of the display panel are available to screw the display
directly to a panel board. A optional back box is also available for in-wall installations.
Before opening the case, disconnect all power sources, any connection to external
devices, including USB cables, and disconnect the UPS external battery.
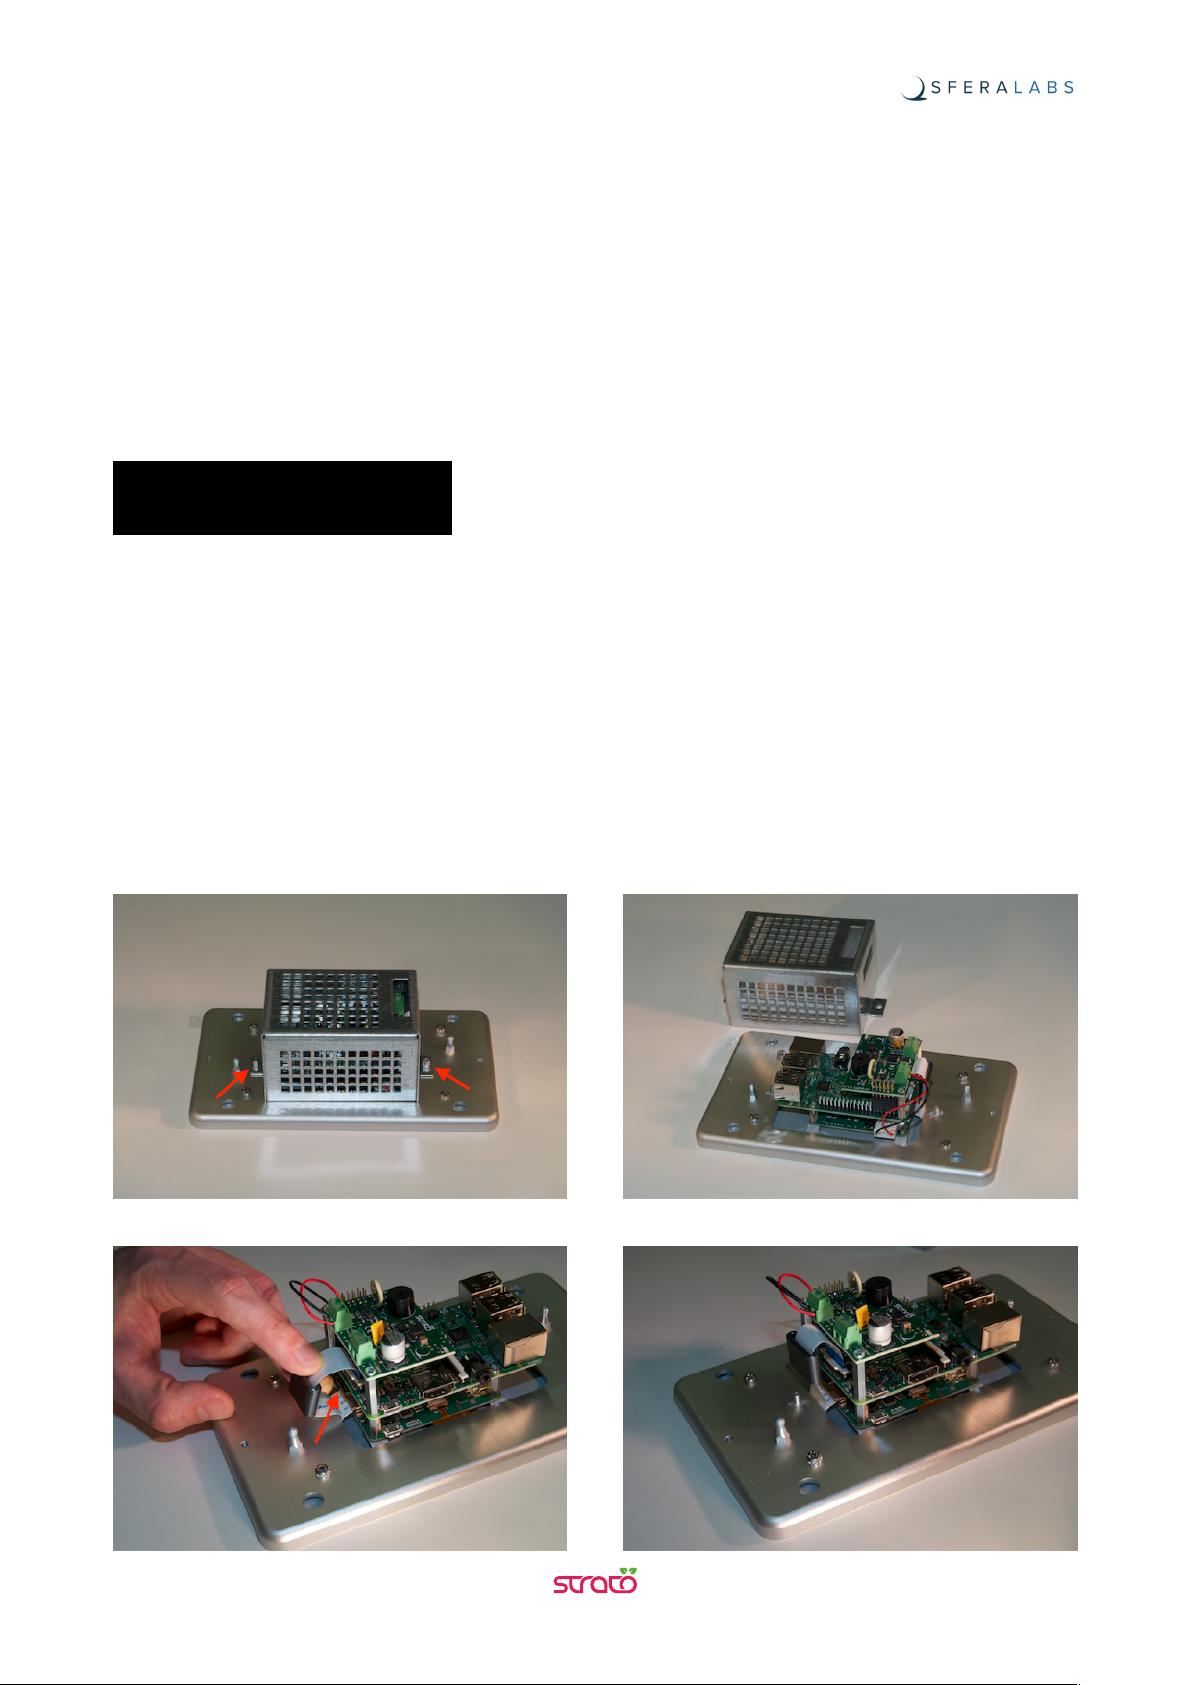
microSD installation
As the microSD socket is behind the flat cable that connects the Pi board with the display
control board, there is no direct access to the microSD socket when the kit is assembled.
You will need to remove the back steel cradle to expose the electronic boards to insert and
extract the microSD card.
NOTICE
9
User Guide
Ce manuel convient aux modèles suivants
7
Table des matières
Autres manuels Sferalabs Écran tactile

Manuels Écran tactile populaires d'autres marques


IBASE Technology
IBASE Technology ASTUT-152-RE1S Manuel utilisateur

YASKAWA
YASKAWA TP 610C Manuel utilisateur

B&R
B&R Power Panel C Series Manuel utilisateur

Beijer Electronics
Beijer Electronics X2 control Manuel utilisateur

AXIOMTEK
AXIOMTEK GOT321W-521 Manuel utilisateur

TRIDONIC.ATCO
TRIDONIC.ATCO x-touchBOX Manuel utilisateur


