6
QUICK START GUIDE
1. Remove the instrument and rechargeable battery from the carrying case and install the
battery into the instrument. Secure it with the Phillips head screw. Wait 30 minutes before
proceeding to step 2.
2. Press and hold the Abutton until the instrument powers on. The LED dome will illuminate
and the SENSIT logo will be shown on the display.
3. In clean air, allow the instrument to go through the startup sequence, warmup, and Autozero. This
typically takes around 30 seconds, but if the battery was disconnected it can take up to 5 minutes.
4. An automatic ow block test may be prompted during startup. If so, place your nger over
the inlet at the end of the gooseneck and wait until the test passes. This should happen
within 5 seconds. If ow block cannot be achieved replace sensor cap and orings, contact
SENSIT Technologies for assistance.
If the automatic ow block test is not prompted during startup, perform this test after the
Autozero is complete and the work display is shown.
FLOW BLOCKED
will be displayed.
NOTE: If any
FAIL
messages occur during the Autozero, ensure that the instrument is in clear
air, and attempt the zero again by pressing and holding the Cbutton until
AUTOZERO
is
shown on the display. Contact SENSIT Technologies if the instrument cannot pass the
Autozero.
5. The work display will be shown with gas readings.
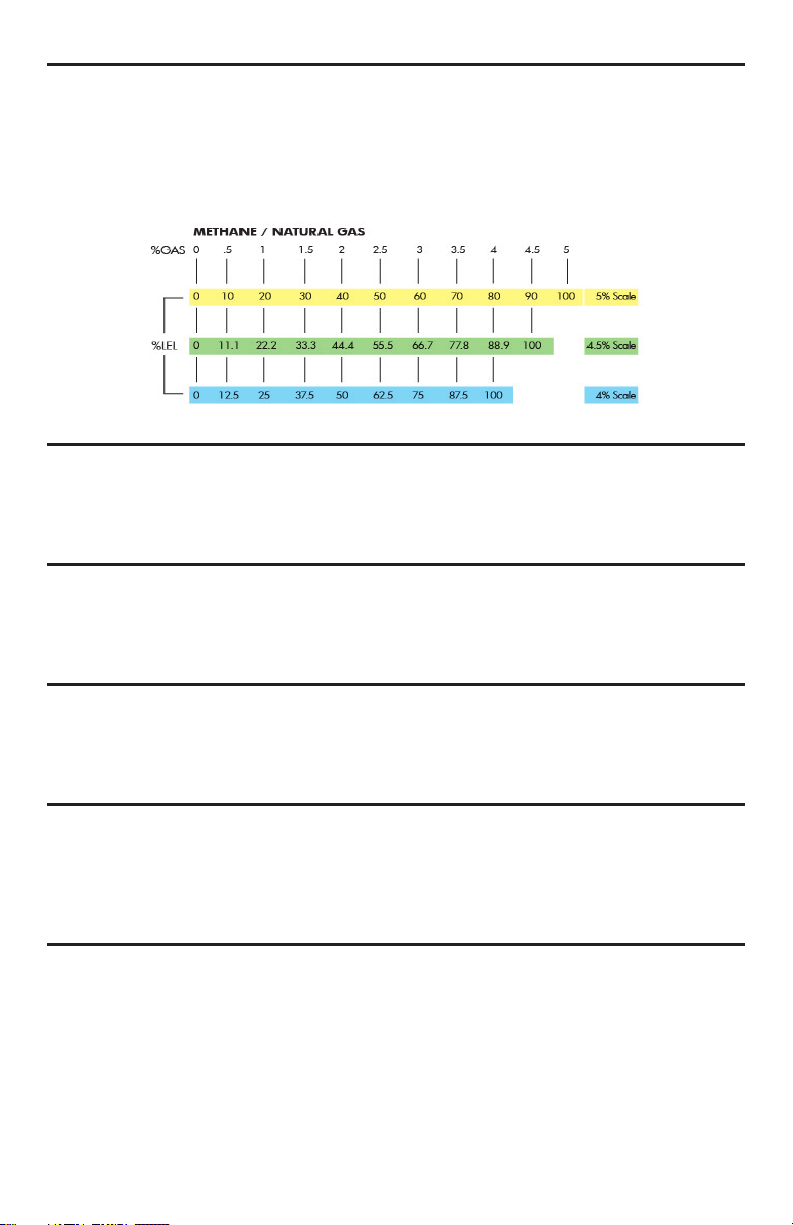
Up to (5) total gasses can be shown: EX, CO, O2,
H2S, and HCN. If equipped with the TC sensor, the
combustible gas reading will automatically scale into
the percent volume range after the LEL range.
6. Once the work display is shown with no fail messages,
and a ow block check has been successful, you are
ready to use the instrument.
7. Following federal, state, municipal, and/or company procedures, conduct the leak
investigation, survey, or other procedures as needed. See the Operation and Use and
Quick Menu Test Modes sections in the instruction manual for detailed information.
8. If the source of an odor or known leak needs to be pinpointed, use the
TICK
feature. To
enable, press and release the Bbutton to enter the
QUICK MENU
. Press and release the
Bbutton again to enable
TICK
.
An audible ticking sound will be heard. Move the end of the gooseneck towards the area
suspected of leakage. As you get closer to the source, the tick rate will increase. Press and
release the Bbutton or roll back the thumb wheel to decrease the tick. Press and release
the Abutton to deactivate.
9. If equipped with T/C any NSC reading shown on the display indicates a “non-standard
combustible” gas has been detected.
Any NSR reading shown on the display indicates a “non-standard response”, which means
the instrument has detected a likely non-combustible gas that it isn’t calibrated for.
10. To zero out very small levels of gas, press and hold the Cbutton until
AUTOZERO
is shown on
the display. This should only be done to set the instrument zero to your working environment,
(e.g. to zero out a small level of CO on a street with heavy vehicle trafc). The instrument will
not allow a zero if unsafe levels of gas are present and will show a fail message.