SEM 2SSD Manuel utilisateur

!
Operation and Maintenance Manual
!
SEM Model 2SSD Disintegrator
!
MAN-004 | Created 8-5-19 | ECN-00489
For Serial Numbers 19212 and up
For sales, service, parts, and customer support, contact us:
SECURITY ENGINEERED MACHINERY
5 Walkup Drive, Westborough, MA 01581
1-508-366-1488 • Toll Free US 1-800-225-9293
www.semshred.com

2
508.366.1488 | www.semshred.com
Disclaimers
Every care has been taken by the staff of SEM in compilation of the data contained in all training and informational
materials (“collateral”) and in verification of its accuracy when published; however, the content of this collateral is
subject to change without notice due to factors outside the control of SEM and this collateral should therefore be
used as a guide only. The products referred to in these publications are continually improved through further
research and development, which may lead to the alteration of information contained in this collateral. SEM does
not accept any responsibility whatsoever for misrepresentation by any person of the information contained in this
collateral and expressly disclaims any and all liability and responsibility to any person, whether a reader/viewer of
this collateral or not, with respect to claims, losses, damage, or any other matter, either direct or consequential,
arising out of or in relation to the use and reliance upon any information contained or products referred to in this
collateral. SEM does not warrant that the equipment will work properly in all environments and applications, and
makes no warranty or representation, either implied or expressed, with respect to the performance, throughput,
or maintenance requirements of the machine. Performance, throughput, and maintenance requirements vary
depending on screen size, feed rate, and media type as well as operational procedures. Information in this
collateral is subject to change without notice and does not represent a commitment on the part of SEM. SEM
assumes no responsibility for any inaccuracies that may be contained in this collateral or any omissions that may
have occurred. SEM makes no commitment to update or keep current the information in this collateral and
reserves the right to make improvements to this collateral and/or to the products described therein at any time
without notice.
Proprietary Information: This document contains proprietary and confidential information of SEM, and shall not
be used, disclosed or reproduced, in whole or in part, for any purpose, without the prior written consent of SEM.
Title in and to this document and all information contained herein remains at all times in SEM. This information is
exempted from disclosure under FOIA, as amended.

3
508.366.1488 | www.semshred.com
Important Safety Procedures
Your new SEM Model 2SSD incorporates powerful, heavy duty cutting mechanisms. Serious and permanent injury
may result if proper precautions are not followed.
1. This equipment should never be operated by children or individuals that are untrained or
incapable of understanding these safety precautions.
2. Do not reach into the feed opening for any reason. Never insert fingers, hands, other
extremities, or objects not meant to be crushed into the feed opening.
3. Do not operate or come into close proximity to this equipment wearing loose clothing, neckties,
dangling jewelry, or long hair which may become entangled in the cutting chamber.
4. Maintenance or repair of this equipment should be performed only by trained,
authorized service personnel.
5. Always disconnect electric power (unplug) before removing or opening any cover or
other panels providing access to the internal mechanisms.
6. If you over feed the shredder or have an emergency and need to shut down the
machine, press the red “Emergency Stop” button on the left side of the machine or
open the collection bin door.
7. SEM recommends that machine operators wear safety glasses, hearing protection, a
mask, and if doing maintenance or opening the cutting chamber, cut resistant gloves. It
is up to each customer to determine the PPE for their individual site.

4
508.366.1488 | www.semshred.com
Table of Contents
!
Disclaimers ............................................................................................................................................................................. 2
Important Safety Procedures ................................................................................................................................................. 3
Table of Contents ................................................................................................................................................................... 4
1. General Assembly .......................................................................................................................................................... 5
2. Unpacking Instructions ................................................................................................................................................. 7
3. Power Supply/Installation Requirements ..................................................................................................................... 8
4. Startup and Operation .................................................................................................................................................. 9
4.2 Controls ....................................................................................................................................................................... 9
4.3 Startup Procedures .................................................................................................................................................... 10
4.4 Feeding and Operating Procedures ........................................................................................................................... 10
4.5 Clearing a Jam/Accessing Stage 2 Cutting Chamber ................................................................................................. 12
4.6 Shutdown Procedures ................................................................................................................................................ 18
4.7 Shreddable Materials ................................................................................................................................................ 18
4.8 Unacceptable Materials ............................................................................................................................................ 18
5. Maintenance .................................................................................................................................................................... 19
5.1 Daily Cleaning ............................................................................................................................................................ 19
5.2 Lubrication ................................................................................................................................................................. 20
5.3 Fan Cleanout ............................................................................................................................................................. 20
5.4 Filters ......................................................................................................................................................................... 21
5.5 Remove Screen ................................................................................................................................................... 22
5.6 Belt Adjustment .................................................................................................................................................. 23
5.7 Changing Knives ................................................................................................................................................. 24
5.7 Current Relay Adjustment ......................................................................................................................................... 30
5.8 Plastic Shield Adjustment ................................................................................................................................... 31
6. Available Spare Parts ....................................................................................................................................................... 32

5
508.366.1488 | www.semshred.com
1. General Assembly
Top Cover
Collection Bin
Access Door
CE Serial Number Tag
Filter Access Panel
Front of Cabinet
IEC60320
Connector
Current Relay
E-Stop & Hour
Meter
Left Side
Power Cord
Rear of Unit
E-Stop
Drop Chute
Collection Bin
Hopper
Stage 2 Cutting
Chamber
Bed Knife
Adjustment Screws
Controls
Drawer Handle
6 Pin Amphenol Connect

6
508.366.1488 | www.semshred.com
Filter
Power Cord
Contactors
Overloads
Rear w/ Cover Removed
Electrical Panel
Fuses
Electrical Panel
Stage 2 Chamber
Stage 1 Chamber
PLC

7
508.366.1488 | www.semshred.com
2. Unpacking Instructions
The Model 2SSD has been secured to a pallet for shipping. Please inspect equipment immediately for any shipping
damage.
Important Note: Prior to unpacking, if there is any visible damage to the Model 2SSD or to the crate during
shipping, the receiver must note what is damaged on the Bill of Lading and contact the shipping party
immediately.
Tools needed:
• Lift truck with a minimum lifting capacity of approx. 2,500lbs. (crated unit weighs ~2,050lbs.).
• Hammer
• Pry bar
• Strap cutters
Unpacking:
• Remove sides of crate – Hammer and pry bar
• Cut straps holding Model 2SSD – strap cutters
• Remove the Model 2SSD from the pallet – lift truck
Note: It is recommended to lift the Model 2SSD from the front with the forks 30” apart or using the fork pockets
beneath the unit if ordered. Most of the weight will be on the right side of the Model 2SSD.
Casters: The Model 2SSD is equipped with swivel casters for ease of handling after the unit is lifted off the pallet.
To transport the unit, unlock all caster locks and then the unit may be pushed on a flat straight surface.
Warning: DO NOT push the unit on an inclined or declined surface as control of the unit can be lost and personal
injury could occur.
Storage: If the unit requires storage, it may be stored in its shipping crate or unpackaged. If unpackaged, ensure
that the wheel caster locks are engaged to prevent unwanted movement of unit.

8
508.366.1488 | www.semshred.com
3. Power Supply/Installation Requirements
Intended Use:
The SEM Model 2SSD is intended to shred and disintegrate solid state drives and electronic media. It can reduce
media down to a particle size of 2x2mm depending on the size of the screen chosen. Larger screen mesh sizes are
available for larger particles and faster throughput. For additional information about destruction of other media
see “Shreddable Materials” and “Unacceptable Materials” sections.
Warning: The Model 2SSD is not intended to destroy rotational hard drives. Inserting a rotational hard drive into
this device will catastrophically damage the unit and void the warranty.
Important: The electrical installation of this device must be completed by a licensed electrician who is versed in
the applicable electrical codes of the country/region in which this device is being installed.
Phase: All Model 2SSDs are designed for 3-phase electricity.
Voltage/Frequency
Full Load Amps (FLA)
Apparent Power (Line to Line)
Recommended
Disconnect
208/60
19 FLA
6.8 kVA
30 Amp
230/60
17 FLA
6.6 kVA
30 Amp
460/60
9 FLA
6.6 kVA
20 Amp
380/50
10 FLA
6.2 kVA
20 Amp
400-415/50
10 FLA
6.6 kVA
20 Amp
Note: Model 2SSD should be connected to a dedicated circuit regardless of voltage.
Connection Information: All Model 2SSD units are supplied with an open-ended power cord unless specified when
purchasing. This should be directly hardwired to a power disconnect switch mounted in close proximity (1-2 feet
away) to the unit. See attached electrical schematic for further details.
Panels: All electrical panels contained within this unit carry a rating of IP65.
Side Outlets: This unit is equipped with an IEC60320 outlet (120/1/60 or 220/1/50) and a 6-pin Amphenol
connector.
9
508.366.1488 | www.semshred.com
4. Startup and Operation
Important: Most problems occur during the first hours of operation. These can be eliminated by careful review of
the operating, maintenance and recommended service instructions.
Warning: Use only intended materials in disintegrator or severe jamming may occur. See page 18.
New Operators: It is recommended to give new operators approximately 2 hours for a break in period beginning
with a slow feed rate to familiarize themselves with the device.
4.1 Pre-Start-Up Procedure
• Familiarize yourself with all controls and button locations, as well as this manual.
• Familiarize yourself with the acceptable media for this device.
• Ensure that all guards and covers are in place.
• Ensure that the area is clean.
• Check input area for debris, discarded tools, etc.
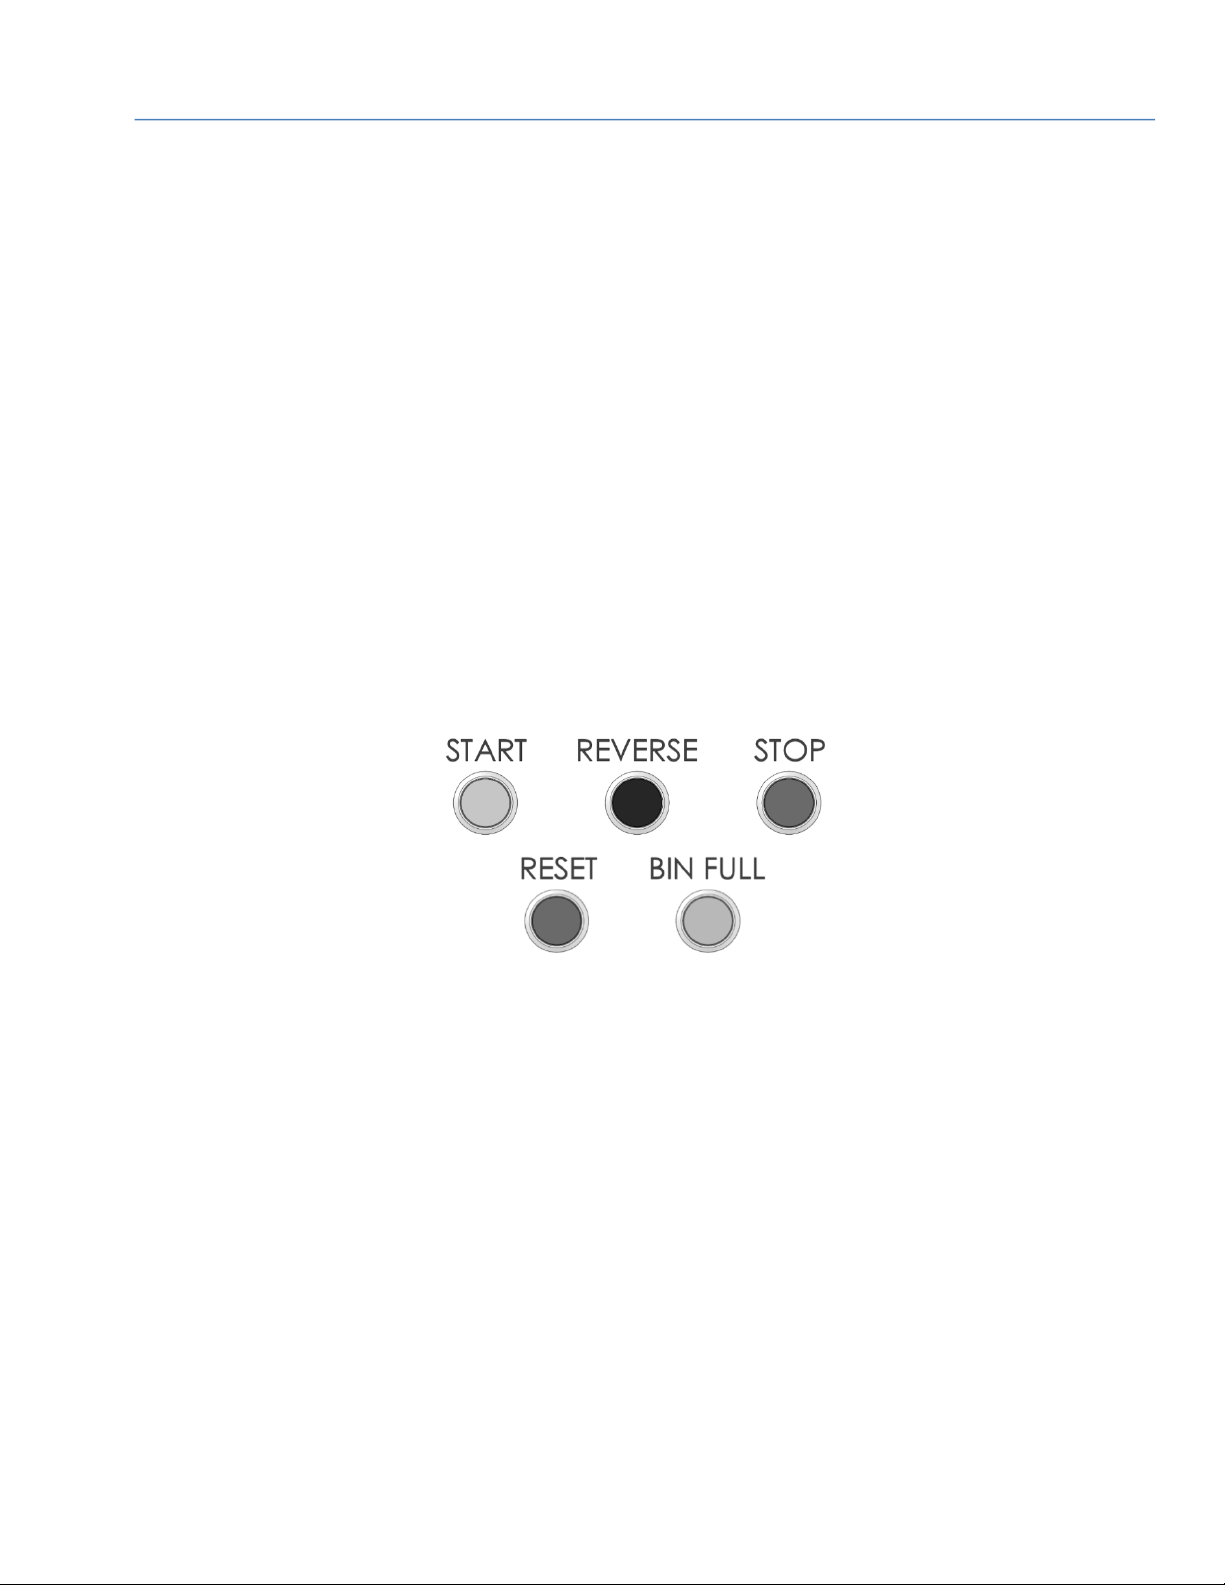
4.2 Controls
• Start: Turns the motors on, one at a time to avoid large current spikes.
• Reverse: Used to manually unjam the stage 1 chamber, will also illuminate during automatic unjamming of stage 1.
• Stop: Stops the stage 1 chamber and begins the timed shutdown for the stage 2 chamber.
• Reset: Used to reset the machine after stage 1 is unjammed.
o Jam Sensor: When the reset light is blinking, check stage 2 for a jam and check belt tension.
o When this light is solid, check the stage 1 chamber for a jam.
o The reset button must be pressed in order for any other button to work on the device, unless it is
completely powered down.
• Bin Full: When this indicator is illuminated, the bin underneath the stage 1 chamber is full and the machine will
begin a timed shutdown and shut off the stage 1 chamber.

10
508.366.1488 | www.semshred.com
4.3 Startup Procedures
1. Turn key-switch or e-stop located on the left side of the cabinet to the ON position.
2. Once the switch is in the ON position, the STOP pushbutton will illuminate indicating power to the
unit.
a. The internal filter will automatically turn on.
3. Press the START pushbutton to start the dual stage system. Once the pushbutton is pressed, the
START pushbutton will illuminate and the STOP light will extinguish.
4.4 Feeding and Operating Procedures
1.) Begin feeding solid state drives through the feed chute. Feed one solid state drive through the feed
chute every 45−60 seconds, depending on size of the items being destroyed and the screen size. For
screens smaller than 1/8”, and larger media such as enterprise devices, feed rates may double.
a. Warning: Do not insert rotational media into this unit. Doing so will damage the unit and void
your warranty.
b. Caution: Feeding drives too quickly may cause a jam or damage the screen.
2.) When the collection bin is full, the BIN FULL light and the STOP pushbutton will illuminate. The stage 1
chamber will stop, and the stage 2 chamber will initiate a timed shutdown.
a. After timed shutdown has completed, open the collection bin door and empty the contents of
the collection bin.
b. Re-insert the bin before starting the unit again.
c. When the BIN FULL light is illuminated the collection bin will weigh approximately 25 lbs.
i. Disclaimer: If destroying lighter material in volume the BIN FULL light may not
illuminate when the bin is filled. SEM recommends that the operator gauge how much
material is run to avoid overflow and potential damage to the unit.
3.) If STAGE 1 experiences a jam, the unit will automatically reverse up to five times to clear the jam. If the
jam is not “automatically’ cleared, the unit will go into a timed shutdown mode illuminating both the
Table des matières
Autres manuels SEM Matériel de bureau

Manuels Matériel de bureau populaires d'autres marques

silen
silen Space 2 Manuel utilisateur

Middle Atlantic Products
Middle Atlantic Products LD Series Manuel utilisateur

SHFL
SHFL DECK MATE BLACKJACK Manuel utilisateur

DROMEAS
DROMEAS LINE Manuel utilisateur

Siemens
Siemens HIPATH 2000 Manuel utilisateur

VITRA
VITRA Stefan Hürlemann Dancing Wall Manuel utilisateur


