OT-BX220 Installation Manual 5
EnglishEnglish
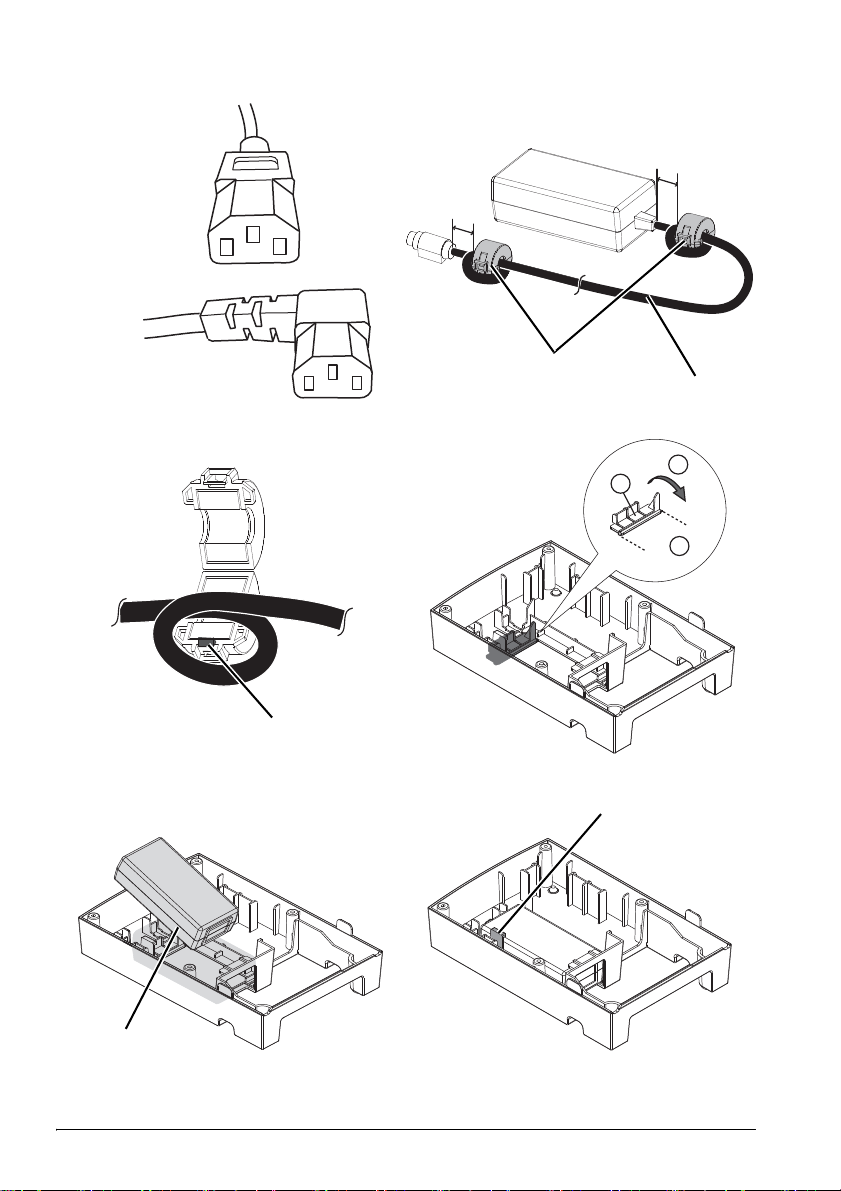
Installing the Ferrite Cores
Follow the steps described below to install the 2 ferrite cores (2in illustration B) on
the DC cable (1in illustration B) if you use the AC Adapter,C as a power unit. (See
illustration Band C.)
1. Unlock the stopper (3in illustration C) to open the ferrite core.
2. Wrap the DC cable once around the ferrite core.
3. Close the ferrite core until it clicks.
Installing the Power Unit
Note:
Follow the steps described below to cut off the part marked on the PS-cover before you
install the power unit PS-180 in the PS-Cover. (See illustration D.) If you use the AC
Adapter,C as a power unit, these steps are not necessary.
1. Cut off the 2 parts indicated by ➀with a nipper or a cutter.
2. Fold them in the direction indicated by ➁and remove them.
1. Remove the two pieces of adhesive tape from the bottom of the PS-Cover. The
removed tapes will be used when attaching the printer to the PS-Cover.
2. Place the power unit (4in illustration E) in the PS-Cover with the label side of the
power unit down. (See illustration E.)
3. Push the power unit downward until it is held in place by the hook (5in
illustration F).
4. Wrap the DC cable around the two projections (6in illustration G), and leave
about 5 ~ 10 cm {2 ~ 4 in} of the end of it out of the case. (See illustration G.)
Note:
You can create a cable outlet if you cut off the tabs (7in illustration H) on the side of the
PS-Cover with a nipper or a cutter. After you cut the tabs off, be sure to smooth the
surface to avoid damaging the cable.
Installing the Printer
1. Turn off the printer and all the devices connected to the printer, and then
disconnect all the cables connected to the printer.
2. Connect the DC cable to the power connector (8in illustration I).
3. Set the printer on the PS-Cover, and then put 2 fixing tapes (9in illustration J) on
the left side and the right side of the printer to attach the PS-Cover to the printer.
(See illustration J.)
CAUTION:
Be sure the DC cable is not caught between the printer and the PS-Cover.
When turning the printer over in the following steps, the printer may come
out of the PS-Cover and may fall. For the sake of safety, be sure to attach
the printer to the PS-Cover with 2 fixing tapes before you turn over the
printer and the PS-Cover.
4. Turn the printer over holding both the printer and the PS-Cover.
5. Insert the 4 provided screws in the screw holes and tighten the screws in the
order of ➀- ➃. (See illustration K.)
6. Remove the two fixing tapes.
7. Connect all the cables to the printer.
8. Connect the power cable.
A