seeger SAC12000S Manuel utilisateur
SAC12000S
EN Smart mobile air conditioner
User manual
NL Mobiele airconditioner Smart
Gebruikershandleiding
DE Mobile Klimaanlage Smart
Gebrauchsanweisung
FR Climatiseur Smart Mobile
Mode d’emploi
ES Aire acondicionado móvil smart
Manual del usario
4
21
38
55
72
2
3
4
1. INTENDED USE
The air conditioner is intended for cooling and removing moisture.
5 Read the manual carefully before the first use.
2. SAFETY
2.1 Labels in this manual
WARNING A warning means that injury is possible if the instructions are not obeyed.
CAUTION A caution means that damage to the equipment is possible.
A note gives additional information e.g. for a procedure.
2.2 Safety features
Automati defrost
When frost builds up on the evaporation filter the appliance starts defrosting. The power
button blinks.
Overload prote tion
In the event of a power loss the overload protection switches the appliance off. The
appliance switches on after 3 minutes.
2.3 General safety instru tions
General
To prevent damage or malfunctions: Please take time and read the general safety
instructions. This will avoid fire explosions electric shocks or other hazards that may
result in damage to property and/or severe or fatal injuries.
The manufacturer is not liable for cases of material damage or personal injury caused
by incorrect handling or non compliance with the safety instructions. In such cases the
warranty will be voided.
WARNING
This product can be used by children aged from 8 years and above and persons with
reduced physical sensory or mental capabilities or lack of experience and knowledge
if they have been given supervision or instruction concerning use of the product in a
safe way and understand the hazards involved. Children shall not play with the product.
Cleaning and user maintenance shall not be done by children without supervision.
Do not open the refrigerant loop.
If the refrigerant leaks immediately evacuate all persons in the room. Ventilate the room
and contact the local fire department to inform them about the propane leakage. Do not
enter the room until a qualified technician declares the room safe. Do not use a lighter
cigarette or other flamable item near the room.
Only use R-290 (propane) gas as the refrigerant.
Do not get refrigerant in your eyes on your skin or on your clothing.
Do not put force on the appliance.
ENG
5
Always check that the mains voltage corresponds to the voltage on the rating plate.
Only use original accessories from the manufacturer.
Do not spill any liquid on the appliance.
Never leave children unattended with the packaging material. The packaging material
represents a danger of suffocation. Children frequently underestimate the danger.
Always keep children away from the packaging material.
It is not permitted to open the product yourself or to have it opened neither is it
permitted to repair the product yourself or to have it repaired. This will void the
warranties. Let any maintenance be carried out by certified maintenance personnel.
Do not block the ventilation holes.
Do not insert any objects in the ventilation holes.
Power cords should be placed so that they cannot be walked on and they cannot easily
become trapped due to items resting on or against them. Pay particular attention to the
power cords at plugs sockets and points where the cords exit the product.
Disconnect the appliance from the power source during service or when not in use.
Do not operate the appliance with wet hands.
Do not leave the appliance unattended.
Do not unplug the appliance during operation.
Do not operate the appliance when damaged.
CAUTION
Do not place the appliance near a heat source. This could damage the appliance.
Place the appliance on a horizontal flat surface.
Remarks
We recommend that you retain the original carton and packaging materials in case it
ever becomes necessary to return your product for service. This is the only way to safely
protect the product against damage in transit. If you do dispose of the carton and the
pa kaging materials, please remember to re y le with due are to the environment.
ENG
6
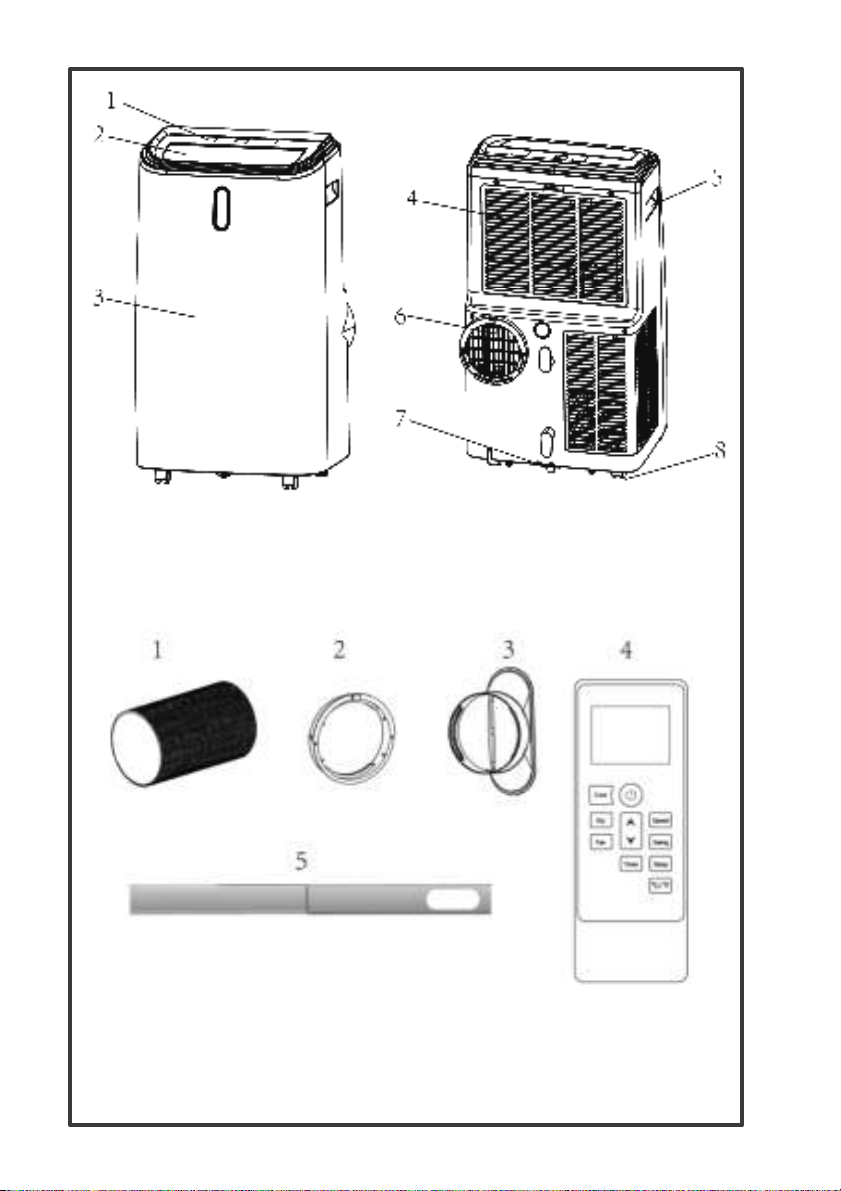
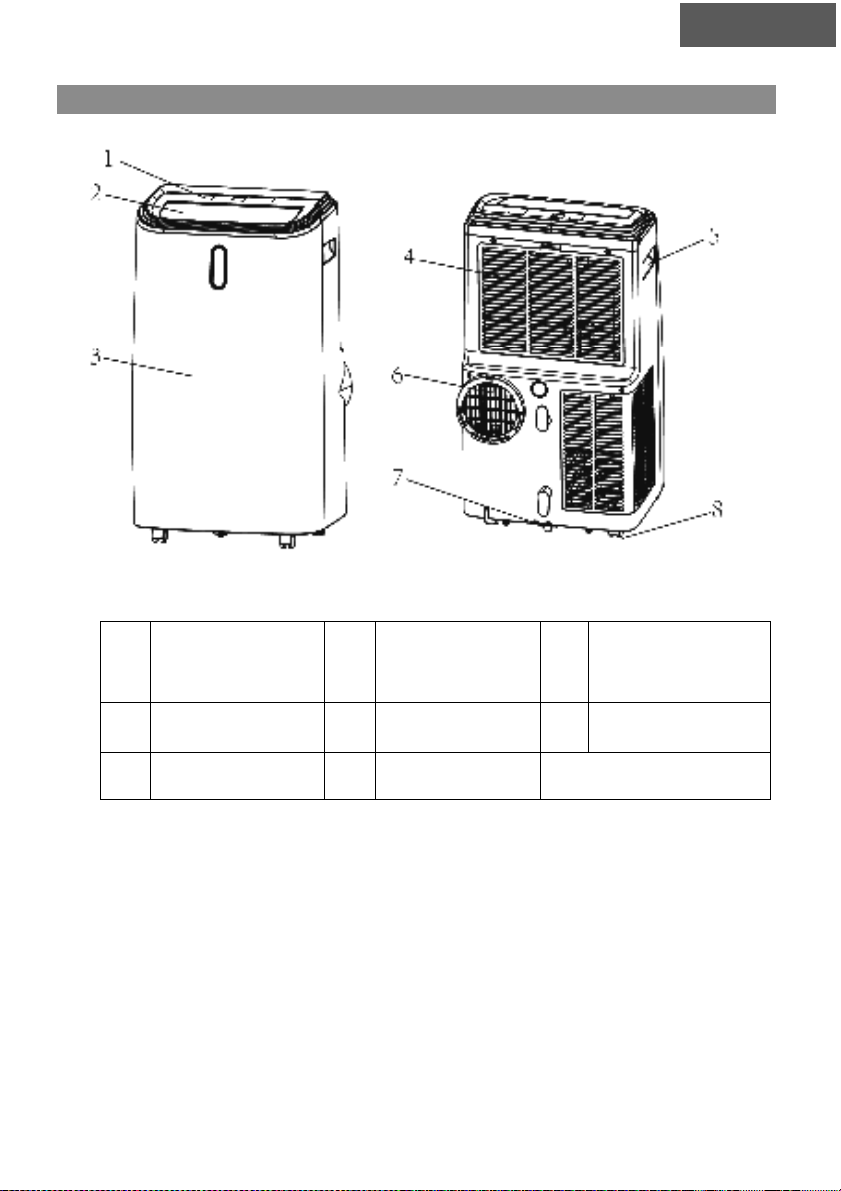
3. PRODUCT OVERVIEW
1 Control Panel 4 Air inlet with air
filter 6
Drain
ing
opening with
sealing plug
2 Air outlet with
adjustable louver 5 Recessed handle 7 Castor
3 Front Panel 6 Air xhaust
Note: Appearance is for reference only. Refer to the actual product for detailed
information.
ENG
7
4. INSTALLATION
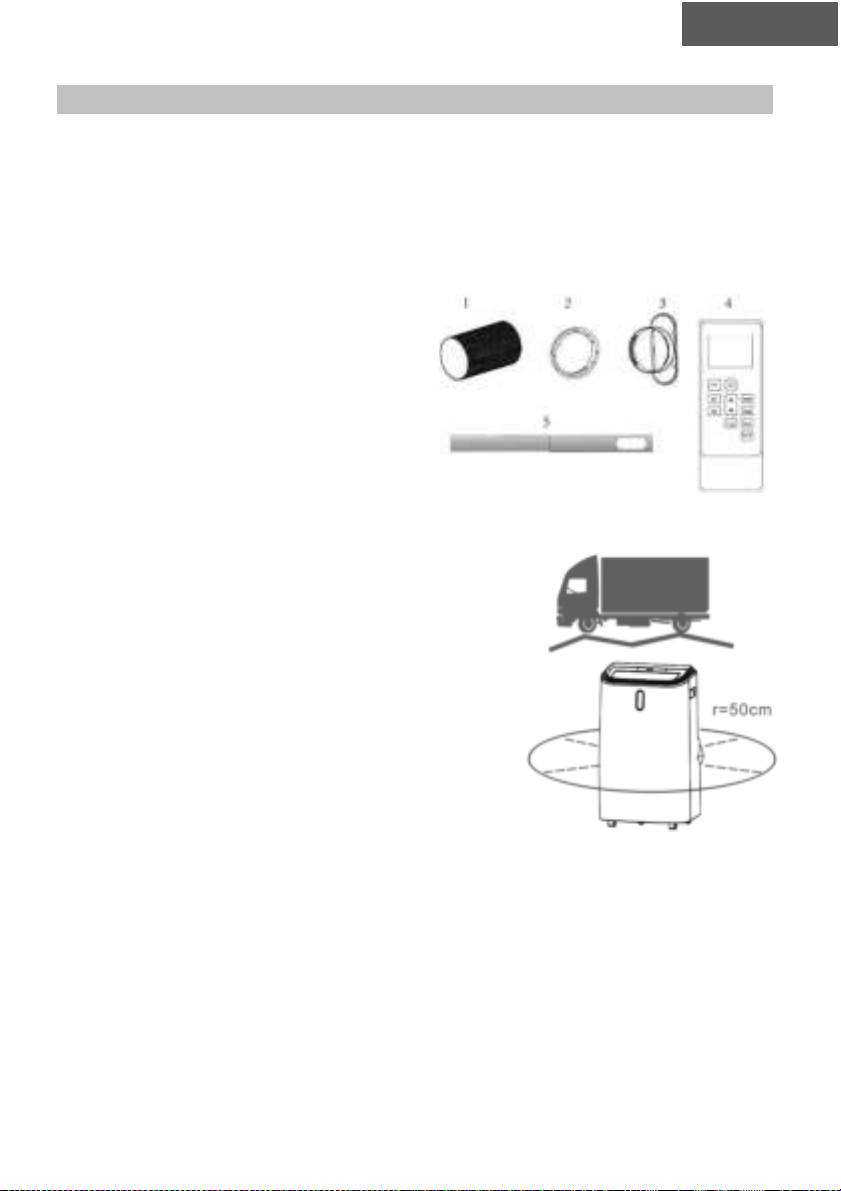
4.1 UNPACKING
Unpack the box and take out the device and accessories.
Verify that the device is not damaged or scratched
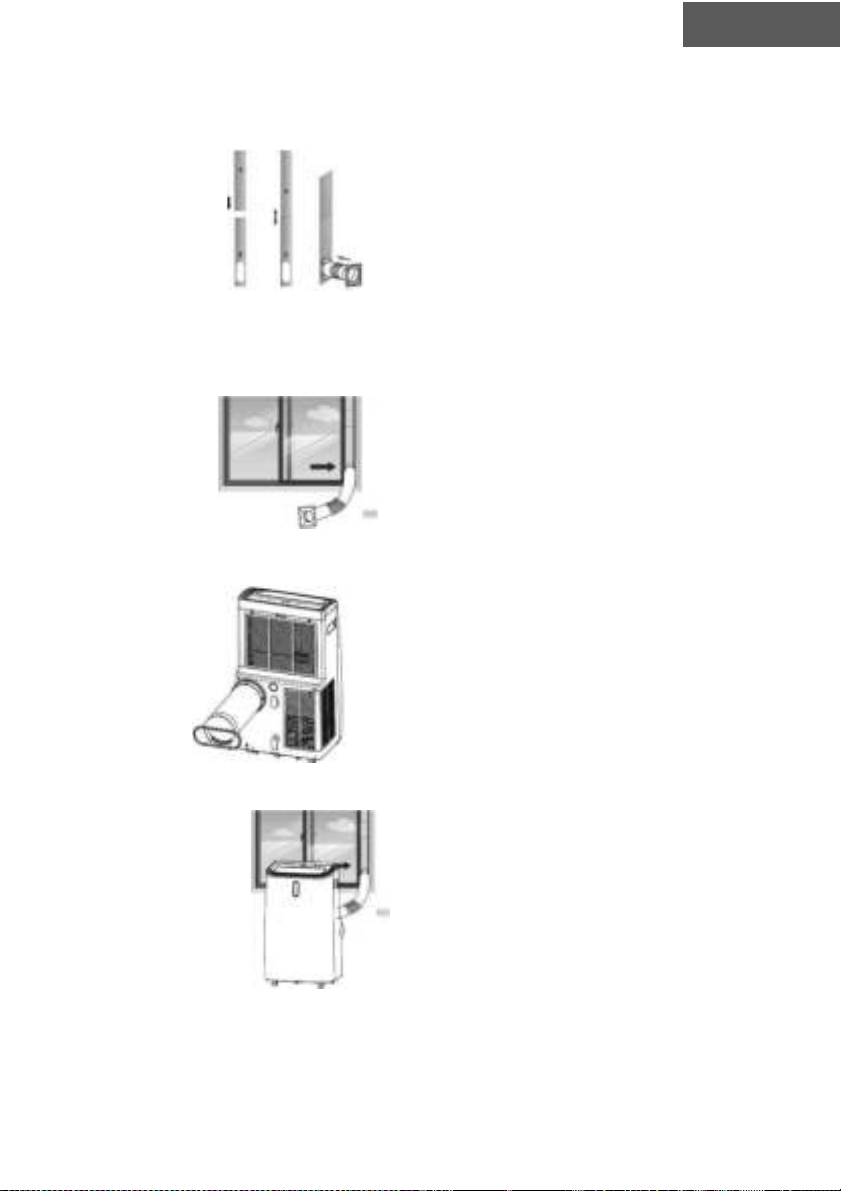
Accessories:
1. Accessories
2. Pipe connection
3. Window Kit Adapter
4. Remote control
5. Window kit
4.2 PLACE OF INSTALLATION
• If the device has been tipped down or laid
down during transport, let it sit vertically for
at least 24 hours before use.
• Place the device on a solid, flat surface with
at least 50 cm of free space to allow air
circulation.
• Do not use the device in the vicinity of walls,
curtains or other objects that may block the
entry and exit of air.
• Never install the unit in the places where it
will be displayed in: Heat sources such as
radiators, heaters or other products that produce heat.
Direct sunlight
Mechanical vibration or shock
xcessive dust
Lack of ventilation
Mechanical vibration or shock
ENG
8
Uneven surface
ATTENTION
Install the device in rooms of at least 12 m².
Do not install the device in a place where there are flammable gases.
NOTE!
The manufacturer may provide other appropriate examples or
additional information on the smell of the refrigerant.
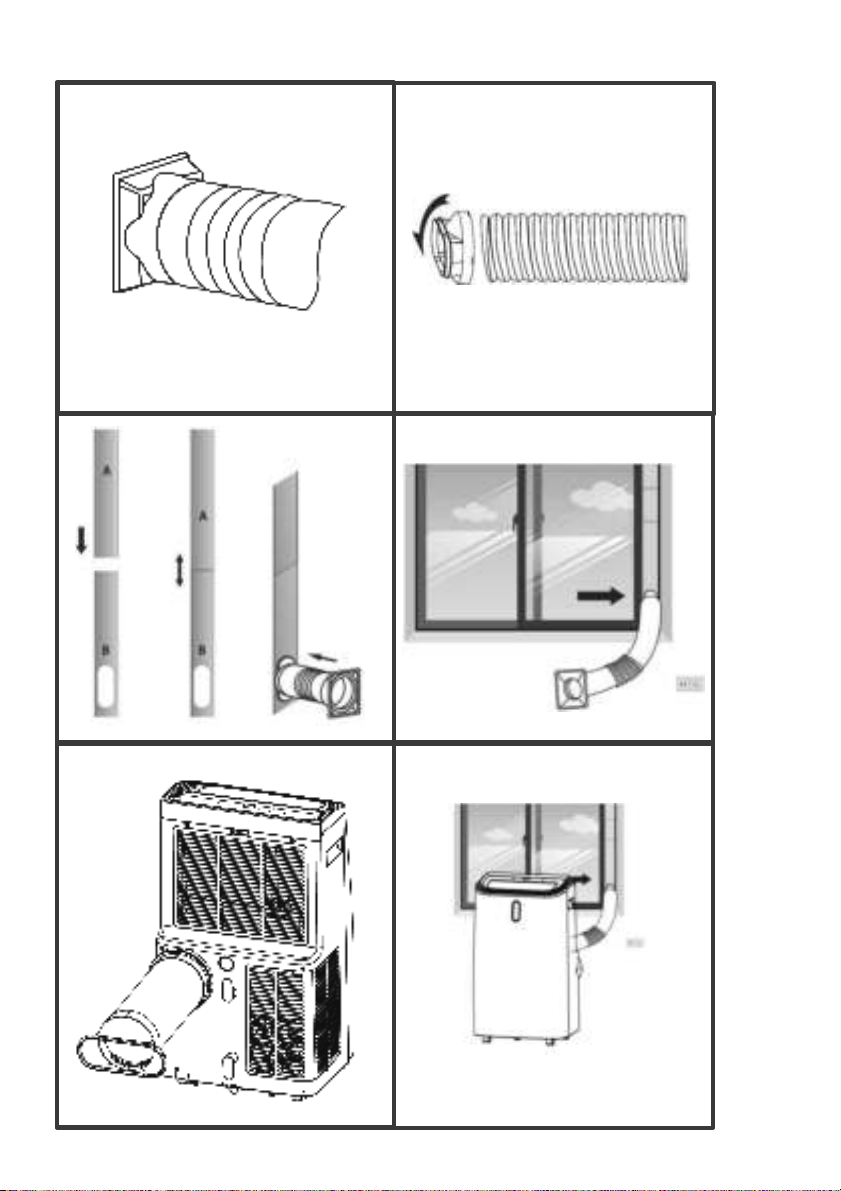
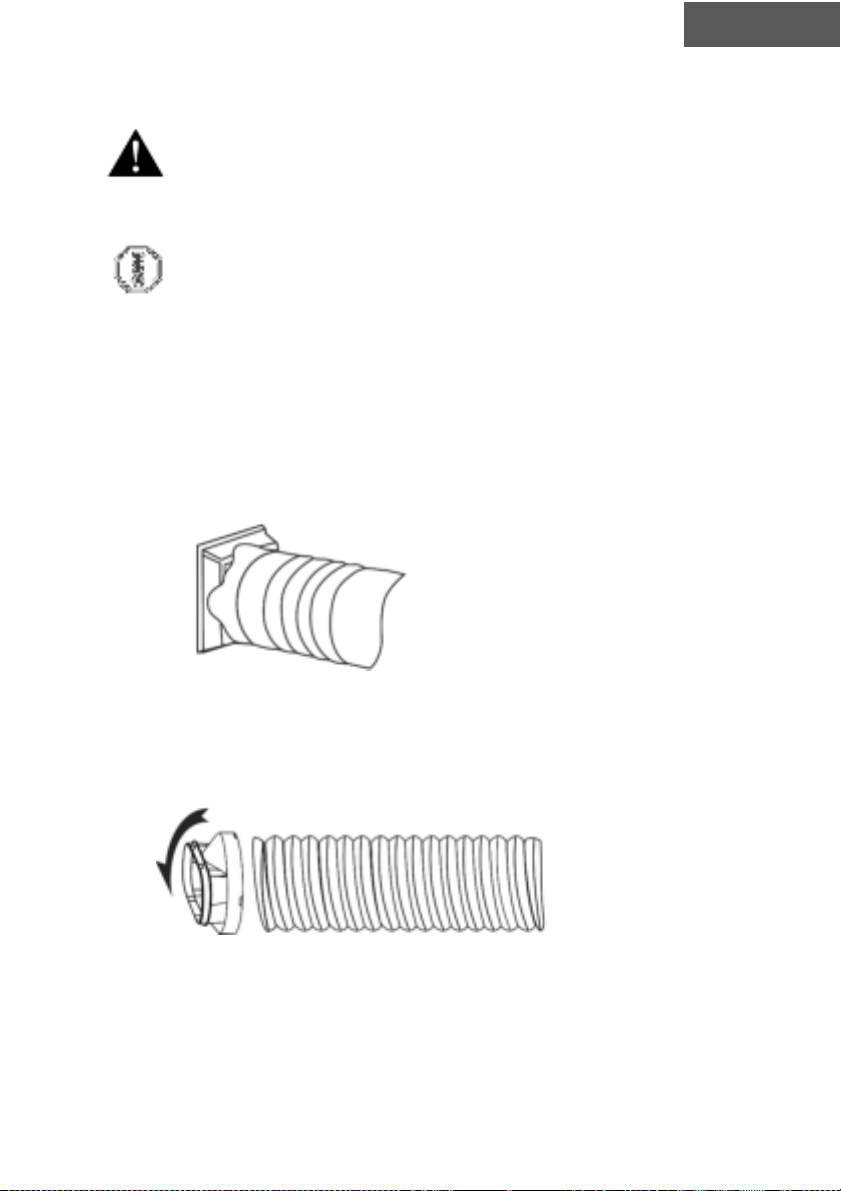
4.3 EXHAUST PIPE FIXATION
The air conditioner must be connected to the outside through a duct so that the return
air can escape from the room which contains the waste heat and moisture of the unit.
Step 1: Connect the pipe connector to the end of the return air hose.
Step 2: Connect the window adapter to the other end of the exhaust pipe.
ENG
9
Step 3: xtend the adjustable window kit by the length of your window. Connect the
air outlet tube to the window kit.
Step 4: Close the window so that the sealant stays in place. It is recommended to seal
the space between the adapter and the sides of the window for maximum efficiency.
Step 5: Connect the hose connector to the output of the device.
Step 6: Adjust the length of the flexible exhaust pipe and avoid bending it. Make sure it
is near a power outlet.
Step 7: Adjust the air outlet grille and then turn on the device.
ENG
10
5. OPERATION
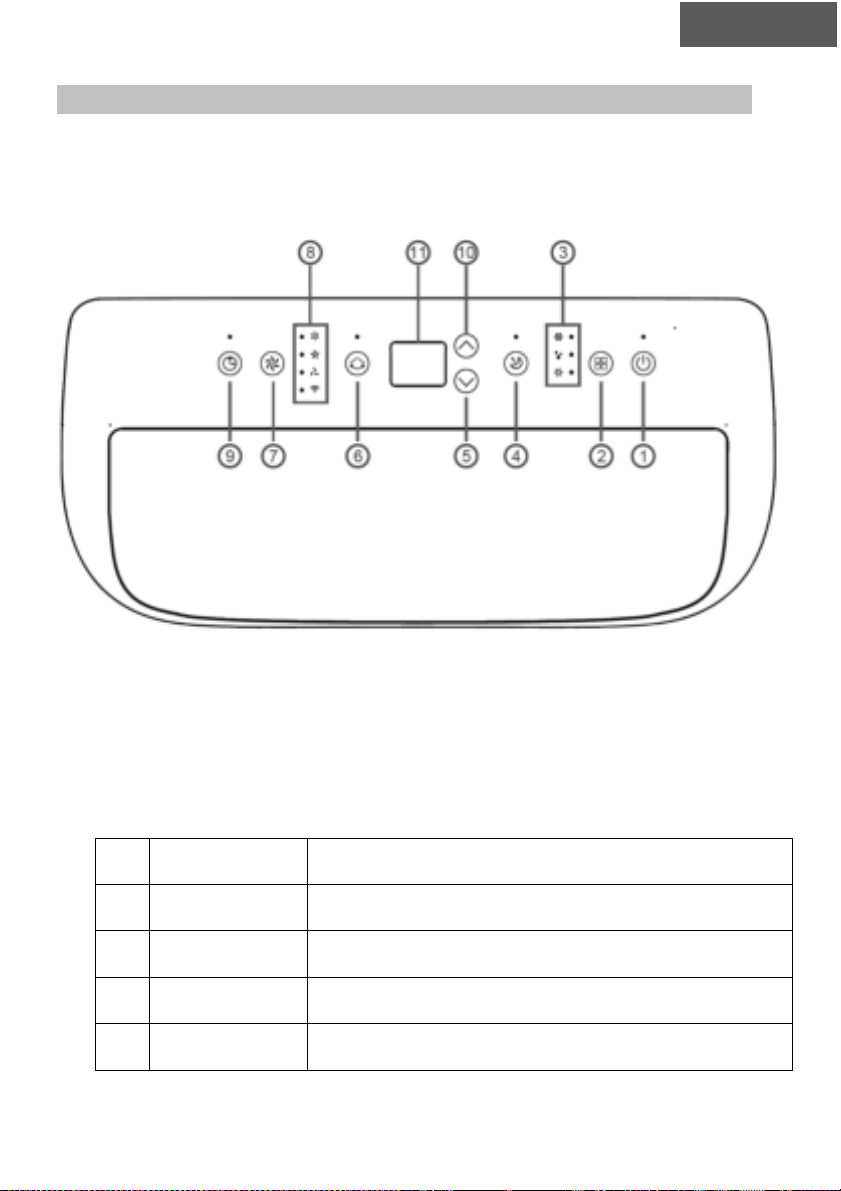
5.1 CONTROL PANEL AND DISPLAY
1.
POWER Button ON/OFF
2.
MODE Mode selection: Cooling, Dehumidification, Ventilation
3.
MODE Indicator This display the Mode Setting between cool, dry and fan.
4.
SLEEP Press to turn sleep mode on or off.
5.
DOWN Lower the temperature (16° - 32°)
ENG
Autres manuels pour SAC12000S
1
Table des matières
Langues :
Autres manuels seeger Climatiseur


