
Sedna SE-DECT-V1 Manuel utilisateur

DECT Wireless PSTN / VoIP 2 in 1 phone
User manual

Index -------
-----
2
5
1.General information -------
----- 6
2.User controls -------
----- 10
3.Setting up
3. Setting up -------
----- 11
3.1 Safety information -------
----- 11
3.2 Check contents of pack -------
----- 11
3.3 Connecting the base -------
----- 11
3.4 Fitting standard batteries -------
----- 12
3.5 Charging the standard batteries -------
----- 13
3.6 Tone(TD) or Pulse(PD) dialing -------
----- 13
3.7 Fitting the belt clip -------
----- 13
3.8 Setting the day -------
----- 14
3.9 Setting the time 15
4. Operation
4. Operation -------
----- 16
4.1 The display -------
----- 16
4.2 Receiving calls -------
----- 17
4.3 Making calls -------
----- 17
4.4 Dialing stored numbers from the phone book -------
----- 18
4.5 Call duration display -------
----- 18
4.6 Switching the handset on and off -------
----- 18
4.7 Range information -------
----- 19
4.8 Muting the microphone in the handset -------
----- 19
4.9 Adjusting the receiver volume -------
----- 19
4.10 Redial facility -------
----- 20
4.10.1 Deleting redial number -------
----- 20
4.10.2 Deleting all redial numbers -------
----- 21
- 2 -

4.10.3 Storing telephone numbers from the redial list in the phone
book
-------
----- 21
4.11 Keypad lock -------
----- 22
4.12 Temporary tone dialing -------
----- 22
4.13 Paging from the base station to the handset -------
----- 22
4.14 Using the wake-up/alarm function -------
----- 22
4.14.1 Setting the wake-up/alarm time -------
----- 23
4.14.2 Switching off the wake-up/alarm function early -------
----- 23
5.Phone book
5.1 Entering numbers in the phone book -------
----- 24
5.1.1 Note on the phone book -------
----- 25
5.1.2 How to enter names -------
----- 25
5.2 Changing numbers stored in the phone book -------
----- 26
5.3 Deleting stored numbers from the phone book -------
----- 27
5.4 Deleting all stored numbers from the phone book 27
6.Caller display CLID
6.1 The caller list -------
----- 29
6.2 Storing telephone number from the caller list in the phone book -------
----- 30
6.3 Deleting individual telephone number from the caller list -------
----- 31
6.4 Deleting the entire caller list -------
----- 31
7. T-Net / Private exchanges -------
----- 32
7. 1 “ R” Button on Private Exchanges -------
----- 32
7.2” R” Button and the DEUTSCHE TELEKOM T-Net -------
----- 32
7.3 Using Pause -------
----- 32
8.Special functions 33
8.1 Setting the ring melody tone on the handset 34
8.2 Ring tone volume on the handset 35
8.3 Setting the volume for speaker phone -------
----- 36
8.4 Setting the volume for earpiece -------
----- 36
8.5 Accepting calls automatically -------
----- 37
8.6 Tone(TD) or Pulse(PD) dialing -------
----- 37
8.7 Changing display names -------
---- 38
8.8 Activating/Deactivating warning tones -------
----- 38
8.9 Modify the pin code -------
----- 39
- 3 -

8.10 Setting the display language -------
----- 40
8.11 Setting the FLASH time -------
----- 40
8.12 Barring -------
-----
41
8.13 Restoring factory settings -------
-----
42
8.13.1 HS Factory settings -------
----- 42
8.13.2 BS Factory settings -------
-----
42
43
8.14 Menu structure -------
-----
44
45
9.Multiple handsets
9 Multiple handsets -------
----- 46
9.1 Making an internal call -------
----- 46
9.2 Connecting external calls to another handset -------
----- 47
9.3 Setting up conference calls -------
----- 47
9.4 Logging on and logging off handsets -------
----- 48
9.4.1 Logging on handsets -------
----- 48
9.4.2 Logging on other DECT-GAP telephones to the base station-------
----- 48
9.4.3 Logging off handsets -------
----- 49
9.5 Additional base stations -------
----- 49
9.6 Selecting a base station -------
----- 50
10.Troubleshooting -------
-----
51
11.Important information -------
-----
52
11.1.Technical data -------
-----
52
* Attached : DECT WITH VOIP
- 4 -

General information
1. General Information
Please read these operating instructions carefully. If you should have any questions, please contact our
service Department on the
Under no circumstances open the unit yourself and do not try to carry out your own repairs. For any claims
under the warranty, please refer to your dealer.
Intended use – This telephone has been designed for use on an analogue telephone line (PSTN). However,
no guarantee can be accepted for trouble-free operation on all telecommunications terminal equipment
connections due to the differences between the different telecommunications network operators. The
telephone requires a TZE socket with F/M coding in common with other plug-in units such as fax machines
or modems. Connect the telephone cable to the phone socket intended for the purpose only. Do not
change the plug on the connecting cable.
Power failure – If the power should fail, it will not be possible to make calls using the telephone. Keep a
cord-connected phone handy, which works without an external power supply, for possible emergencies.
Position – There must be a 230 Volt mains socket near to where the telephone is positioned. Do not set up
the base station in the immediate vicinity of other electrical equipment such as microwaves or hi-fi systems,
as this may result in mutual interference. The location has a decisive influence on the trouble-free operation
of the telephone.
Place the base station on a flat and non-slip surface. The feet of the base station do not normally leave any
marks on the surface. However, due to the large number of varnishes and surfaces in use, it may not be
possible to prevent marks occurring on the surface due to the feet of the unit.
Do not use the handset in areas where there is a risk of explosion.
Excessive exposure to smoke, dust, vibrations, chemicals, moisture, heat or the direct rays of the sun must
be avoided.
Power supply – Use only our plug-in power supply provided, as other power supplies could damage the
telephone. There is risk to life if the power supply is opened and hot disconnected from the mains.
- 5 -

General information
Standard rechargeable batteries – do not use any other rechargeable batteries or battery packs. There
could possibly cause a short circuit. When changing batteries, always use standard water. Do not dispose
of old or defective standard batteries with the normal household waste. The maximum standby and talk
times quoted are applicable for the standard rechargeable batteries supplied under optimum conditions.
Ambient temperature, charging cycle and other operating times. Furthermore, the charging capacity is
reduced for technical reasons during use or when stored at very high or low temperatures.
Charging the handset – it is normal for the handset or become warm when charging and is not dangerous.
Do not use other manufacturer’ s charging equipment for charging the handset, as otherwise damage
could occur.
Private exchanges – the telephone can also be connected to a private exchange. You can find out from the
dealer from whom the equipment was purchased whether your telephone will work on your private exchange
without any problems. Due to the large number of different private exchanges, it is not possible to
guarantee this function.
Information regarding medical equipment – the telephone works with a very low transmission power. This
low transmission power prevents any risk to health according to the current state of research and technology.
However, it has been shown that portable telephones can interfere with medical equipment when switched
on. Therefore, please maintain a distance of at least one metre from medical equipment.
Disposal – if the useful life of the standard batteries or the complete equipment has expired, please
dispose of these carefully in accordance with the statutory requirements and in a manner friendly to the
environment.
Temperature and ambient conditions – the telephone is designed for use in protected rooms with a
temperature range of +10°C to + 30°C. The base station must not be installed in damp rooms such as a
bathroom or laundry room. Avoid proximity to sources of heat such as radiators and do not expose the unit
to direct sunlight.
Cleaning and care – the surface of the case can be cleaned with a soft, dry, lint-free cloth. Never use
cleaning agents, particularly aggressive solvents. No attention is necessary apart from cleaning the case
occasionally, the rubber feet of the base station are not resistant to all cleaning agents. The manufacturer
can therefore not accept any liability for possible damage to furniture or the like.
- 6 -
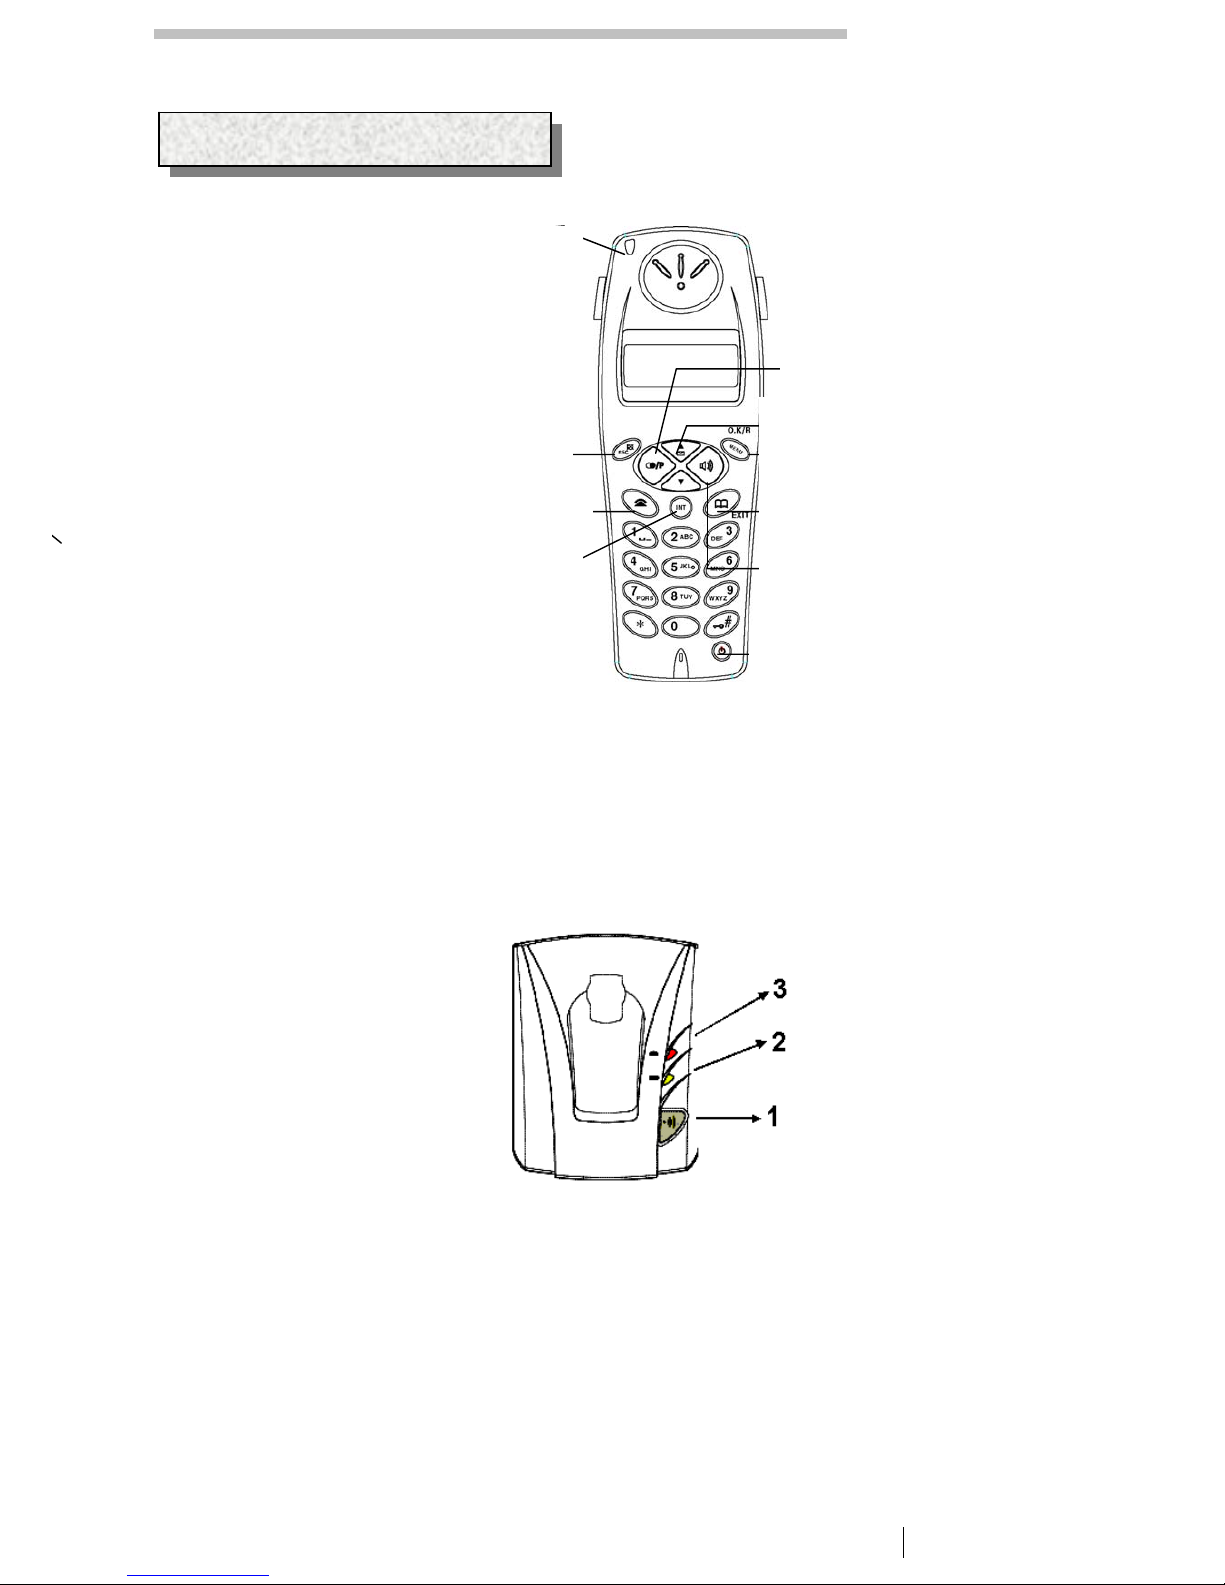
User controls
2 User controls
6
7
10
3
2
1
8
9
4
5
Handset
1. Redial
2. Menu button
3 Selection buttons
4. Call button
5. Internal calls
6. Power
7. Phone book/Exit menu
8. Mute button/Delete
9. Call indicator
10. Speaker phone
Base station
1. PAGE button
2. Charge monitoring lamp
3. Call and main indicator
- 7 -

Settin
g
u
p
3 Setting up
3.1 Safety information
Note: Before setting up, it is essential that you read the General information at the beginning of this
operating manual.
3.2 Check contents of pack
The following items are supplied:
One base station One main cable
One handset with belt clip Two standard batteries
One telephone connecting cable One instruction manual
3.3 Connecting the base station
Position the telephone near to your telephone connection socket and to a main socket.
1. Insert the plug of the power supply into the socket on the underside of
the base station and plug the power supply into a properly installed 230
V main socket. The plug-in power supply for the base station must
always be connected. For safety reasons, use only the plug-in main
power supply provided.
2. Connect the telephone cable supplied to the telephone socket and the
telephone jack on the underside of the base station. Use only the new
telephone cable provided.
3. Run the two cables through the two cable channels to the rear of the
base station.
3.4 Fitting standard batteries
To fit the standard rechargeable
batteries supplied into the handset,
press on the upper edge of the battery
compartment and slide it downwards.
Now insert the batteries taking care to
ensure that the polarity is correct. Close the battery compartment
cover.
- 8 -

Settin
g
u
p
Important note: Place the handset in the base station with the display to the front for at least 16 hours.
The telephone may malfunction if the batteries are not properly charged. The charging light on
the base station will come on.
3.5 Charging the standard batteries
The rechargeable batteries for your telephone have a stand-by time of max. 200 hours at room temperature
and a maximum talk time of up to 10 hours.
The current battery capacity is shown in the display.
If the battery capacity is too low, the symbol will flash in the display and you will hear warning tones every
60 seconds.
To charge the batteries, place the handset in the base station with the display to the front.
3.6 Tone(TD) or pulse (PD) dialing
This trend-setting feature enables you to use your telephone both on exchanges with Pulse dialing/PD and
on exchanges with Tone Dialing/TD. The unit is set in the factory to Tone dialing. If your telephone does not
work on your exchange, you can find out under Section 8.4 how to set up your telephone for pulse dialing.
3.7 Fitting the belt clip
Slide the belt clip into the guide until it audibly engages at the sides
Settin
g
u
p
3.8 Setting day
Your telephone is equipped with a clock including an alarm function. The current day is shown in the display.
You should set the day before using the mobile unit.
1. Press the menu button .
2. Select the HS SETTINGS menu with and and confirm with .
3. Select the DATE TIME menu with and and confirm with
4. Select the DATE FORMAT menu with and and confirm with
5. Select the DD-MM or MM-DD menu with and and confirm with
6. Now enter the current day in any format you want using the number pad
- 9 -

7. Confirm with the button.
8. Now select further menu functions or exit the menu by pressing and holding the button
O
p
eration
3.9 Setting a time
1. Press the menu button .
2. Select the HS SETTINGS menu with and and confirm with
3. .Select the DATE TIME menu with and and confirm with
4. Select the TIME FORMAT menu with and and confirm with
5. Select the 12-HOUR or 24-HOUR menu with and and confirm with
6. Select the SET TIME menu with and and confirm with
7. Set time with number pad and confirm with
8. Now select further menu functions or exit the menu by pressing and holding the button
O
p
eration
4 Operation
4.1 The display
In the normal operating mode, the display shows actual time. In addition, the main functions are shown in
the display by means of various symbols.
Lit: High sensitive range contact.
Flashing: Low sensitive range contact.
Lit: Battery level empty.
Lit: Battery level low.
Lit: Battery level middle.
Lit: Battery level full.
Lit: There are new calls stored in the caller list (CLID).
Lit: Making conference call
Lit: You are making a call
Lit: When the phone book is being used.
Lit: You are making an internal call.
Flashing: You are receiving an internal call.
O
p
eration
- 10 -
Table des matières
Autres manuels Sedna Téléphone IP


