Seculink NVR1104PF-P4 Manuel utilisateur

SECULINK POE NVR Operation Instruction
Please read the instruction carefully before using, and keep it properly
Fit Models:
NVR1104PF-P4, NVR1108PF-P8,
NVR1104PK-P4, NVR1108PK-P8,
......
Need Help? Visit us online for up-to-date software and complete instruction manuals.
SECULINK TECHNOLOGY (HK) LIMITED
SHENZHEN SECULINK TECHNOLOGY CO., LTD
Website: www.seculink.net
E-mail: info@seculink.net
Information in this document is subject to change without prior notice. As our products are
subject to continuous improvement, SECULINK and our subsidiaries reserve the right to
modify product design and specifications, without notice and without incurring any
obligation.

SECULINK POE NVR Connection Diagram
POE IP Camera (For reference only)
Network Cable
NVR
Router
APP(XMeye)

CONNECTION AND SETUP
Before the POE NVR is powered on, make sure you have installed a hard disk and connected at
least one poe camera. For details, please refer to the following sections.
HDD Installation
A SATA HDD is required before the POE NVR is powered on.
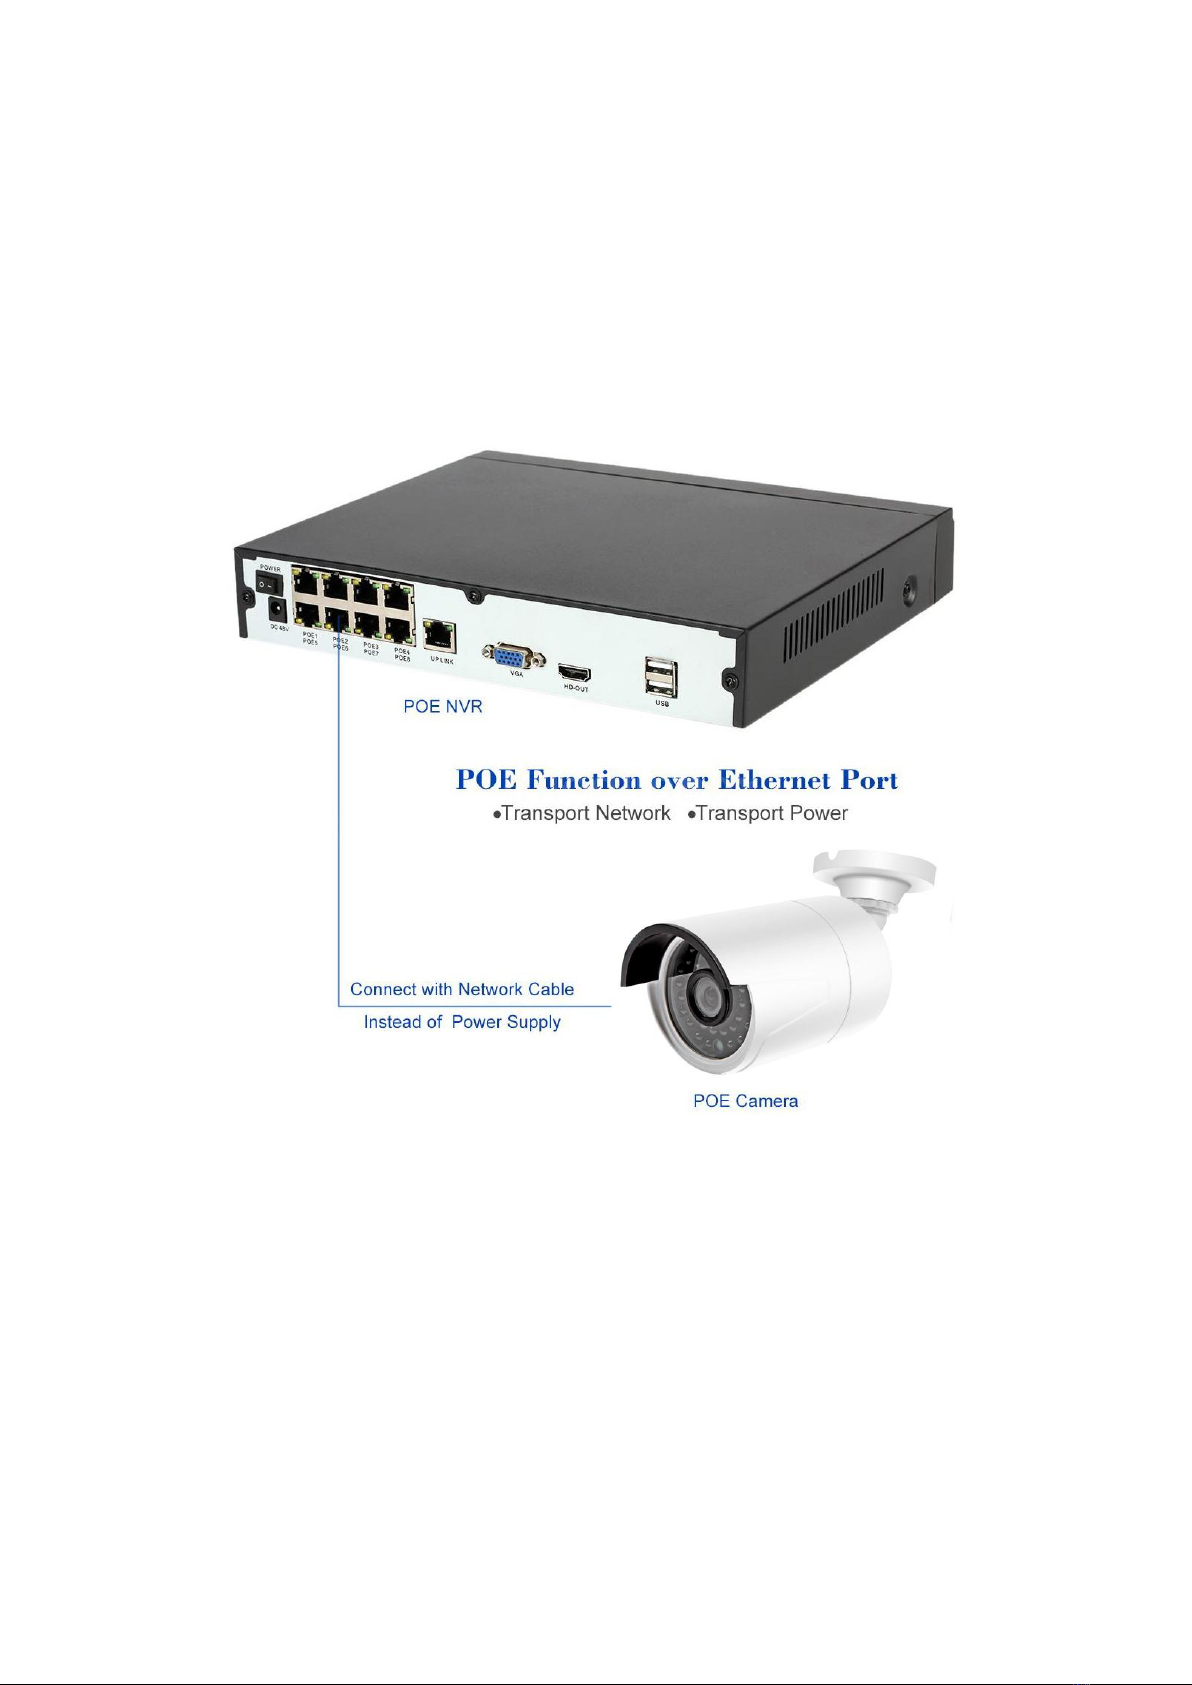
Camera Connection
POE (Power over Ethernet) enables you to use just a single cable for both power and data
transmission. Please connect a standard poe camera using an Ethernet cable.

Interface Specification
Quick Menu
Symbol
Specification
DC 48V
DC48V Power Supply Input
USB
USB Port, for USB drive and mouse, etc
LAN
LAN Port, connects router and switches,etc.
HD-OUT
HD-OUT Port, HD audio and video output, for HDMI monitor or projector
VGA
VGA Port, for VGA monitor or projector
AV-OUT
AV video output,such as DVD/ digital TV video signal
AUDIO OUT
Audio output, 3.5mm coaxial audio plug connector, to connect audio output device

Specification for main menu
Main Menu
Sub Menu
Functional Outline
Recording
recording
setting
Set each channel recording configuration, recording type,
recording time period, etc.
recording
playback
Video query, video playback, video file save
picture
storage
Set each channel capture configuration, capture type,
capture time period, etc.
Recording
backup
Detect backup devices, format backup devices, back up
selected files
Alarm
Motion
detection
Set motion detection alarm channel, sensitivity, area, and set
linkage parameters: arming time period, alarm output, screen
prompt, record, pan/tilt, round robin, buzzer, EMAIL, FTP
upload, mobile phone report
Video Shade
Set video shade alarm channel, sensitivity, and set linkage
parameters: arming time period, alarm output, screen
prompt, record, pan/tilt, round patrol, beep, EMAIL, FTP
upload, mobile phone report
Video Loss
Set the video loss alarm channel, and set the linkage
parameters: arming time period, alarm output, screen
prompt, record, pan/tilt, round robin, buzzer, EMAIL, FTP
upload, mobile phone report
Alarm Input
Set alarm input channel, device type, and set linkage
parameters: arming time period, alarm output, screen
prompt, record, pan/tilt, round robin, buzzer, EMAIL, FTP
upload, mobile phone report
Alarm
Output
Set alarm mode:configuration,manual,close
PS:Some devices don’t support this function

Exception
handling
No hard disk, hard disk error, insufficient hard disk space,
network disconnection event, IP conflict time, set linkage
parameters: screen prompt or buzzer
Smart
Analysis
Determine algorithm rules: perimeter alert, item care, video
diagnosis.
Set rules: display trace, sensitivity, minimum moving
distance, alert mode, and set linkage parameters: arming
time period, alarm output, screen prompt, record, pan/tilt,
round robin, buzzer, EMAIL, FTP upload, mobile phone
report
System
Normal
setting
Set system time, date format, time format, language, hard
disk full operation, device id number, video signal standards,
output mode, standby time, device name, daylight saving
time
Code Setting
Set the main coding and combined coding parameters for
each channel: coding mode, resolution, frame rate, code
stream control, picture quality type, code stream value, one
frame interval parameter, video/audio enable
Network
Setting
Set basic network parameters, and set DHCP, DNS
parameters, network high-speed download, network
transmission strategy
Network
Service
PPPOE, NTP, Email, IP permissions, DDNS parameters,
PMS, FTP, alarm center, cloud service, RTSP, wireless
dialing, WIFI, etc.
Output Mode
Set the channel name of the front end, preview prompt icon
status, transparency, area coverage, time title, and overlay of
channel titles.
PTZ Setting
Set channel, PTZ protocol, address, baud rate, data bit, stop
bit, check
RS485
Device
Set protocol, address, baud rate, data bit, stop bit, check.
PS:full digital channel displays RS485 device
Serial
Setting
Set serial port function, baud rate, data bit, stop bit, check
Round Robin
Setting
Set the mode and interval of the round robin
Spot Setting
Set round robin mode and interval time of Spot output end
Manage
Channel
Managemen
t
Set the channel mode, view the channel status, and set the
parameters of the digital channel.

Storage
Managemen
t
Set the specified hard disk as read/write disk, set as
read-only disk, set to redundant disk, clear data, restore
data, etc.
User
Managemen
t
Modify users, modify groups, change passwords, add users,
add groups, delete users, delete groups
Online Users
The network user who has logged in can be forcibly
disconnected. After disconnection, the account will be frozen
and can be restored after the next boot.
Output
Adjustment
Adjust the top margin, bottom margin, left margin, right
margin, black border vertical and black border horizontal.
Automatic
Maintenance
Set the time to automatically restart the system and
automatically delete files.
Reset
Default
Restore settings status: normal settings, encoding settings,
recording settings, alarm settings, network settings, network
services, output mode, serial port settings, user
management
System
Updating
Upgrade with an external device such as USB
Device Info
Set some hardware information of device
Input/Output
Export the log information or configuration of the device to an
external device (such as a USB flash drive); import the
configuration of the external device (such as a USB flash
drive) to the device.
System info
Storage Info
Display hard disk capacity and recording time
Stream
Statistics
Display stream information
Log Info
Clear all log information based on log recording and time
query log
Version Info
Display version information
Close
System
Perform logout, shutdown, and restart functions

1. System Login
When you start the NVR, user name is “admin”, no password , and then click“OK”. As
picture shows:
User Name: “admin” No Password
Click “OK”
Shutdown/Reboot: Right click the mouse > enter [Main Menu] > [Close System] to select
[Shutdown] or [Reboot]

2. Format Storage
When you install the new hard disk,you should format storage first. Right-click“Main
Menu→System→General→Storage”. Choose the Hard Disk, click“Format Storage”. As
picture shows:
Select the hard disk you need to format
Left-click “Format Storage”
FAQ: NVR does not recognize the hard disk drive (HDD)
1. The video recorder does not support hot swapping when connected to the hard disk.
When the NVR is powered off, connect the hard disk and then power on to start the
recorder;
2. Check whether the hard disk is properly powered and whether the SATA data cable is
connected normally. You can replace the data cable to check whether the hard disk is
normally powered.
3. It may be the compatibility problem of the hard disk and the device, try to replace other
hard disks; it is recommended to use WD Purple Surveillance Drive.
4. Check if the power adapter used is the standard, it may be caused by insufficient power
of the power adapter. 1TB hard drive uses 2A power supply, 4TB needs to use 3A or larger
power supply.
5. It may be that the hard disk is damaged and cannot be used normally. Connect it to a
computer or other recorder equipment to test whether the hard disk is damaged.
6. Restore the default setting of the video recorder, and confirm that the firmware of the
NVR recorder has been updated to the latest version.
7. After the above steps are confirmed, it is still not recognized, you can contact Seculink
service team to process.
Ce manuel convient aux modèles suivants
3
Table des matières
Autres manuels Seculink DVR


