Sea King 1500-HD Manuel utilisateur

11200 Hampshire Avenue South, Bloomington, MN 55438-2453
Phone: (952) 922-6889 Fax: (952) 922-8424
www.kingcontrols.com
20339 REV G
Digital TV Solutions for Mobile Markets
MEMBER
®
®
Gyro Stabilized Satellite TV Antenna
Model 1500-HD
Model 1800-HD
Installation and Operating Instructions

Page 1
IMPORTANT!
The satellite TV market is expanding and changing. The information in this manual was accurate at the time
of printing. If your Sea-King does not operate as outlined in this manual please call King Controls at (952)
922-6889 or visit our website at www.kingcontrols.com.
Please read this entire manual before beginning the installation.
DISH NETWORK - Bell TV: If you plan to use the Sea-King with multiple satellite programming and would like
to use the auto-switching feature, your receiver must be configured.
To configure the DISH receiver for automatic satellite switching, the antenna must be on the ground, dock or
motionless platform with no movement (see pages 25-27).
DIRECTV: This antenna will receive available HDTV programming from DIRECTV Ku band satellites at 101°,
110° and 119° with a properly installed HD converter accessory #9747 (included). It will not receive channels
broadcast from DIRECTV’s Ka band satellites at 99° and 103°.
TABLE OF CONTENTS
Section Contents Page
1. INTRODUCTION............................................................................................................2
2. DEFINITION OF TERMS...............................................................................................3
3. INSTALLATION.........................................................................................................4-17
4. OPERATION...........................................................................................................18-21
5. AUTOMATIC SATELLITE SWITCHING: DIRECTV®..............................................22-23
6. AUTOMATIC SATELLITE SWITCHING: DISH NETWORK®- BELL TV .......................25
7. CHECK SWITCH PROCEDURE............................................................................26-27
8. TROUBLESHOOTING............................................................................................28-31
9. MAINTENANCE...........................................................................................................32
10. LIMITED WARRANTY .................................................................................................33
DIRECTV®is a registered trademark of DIRECTV, Inc.
DISH Network®is a registered trademark of DISH Network L.L.C.
Bell ExpressVu and Bell TV are official trademarks of Bell Canada.
DVB is a trademark of the DVB Digital Video Broadcast Project (1991-1996)
King Controls®and Sea-King®are registered trademarks of Electronic Controlled Systems, Inc.
ELECTRICAL HAZARD WARNING!
The coax cable that connects the dome unit to the tuner carries a 24 volt
electrical current. Exercise extreme caution when handling this cable. Do
not cut, break, or splice this line. Do not insert or connect any devices such
as splitters or any other device for any reason. This line is not compatible
with any other equipment. Damage will occur to any device other than the
dome unit if connected to the antenna port on the tuner.
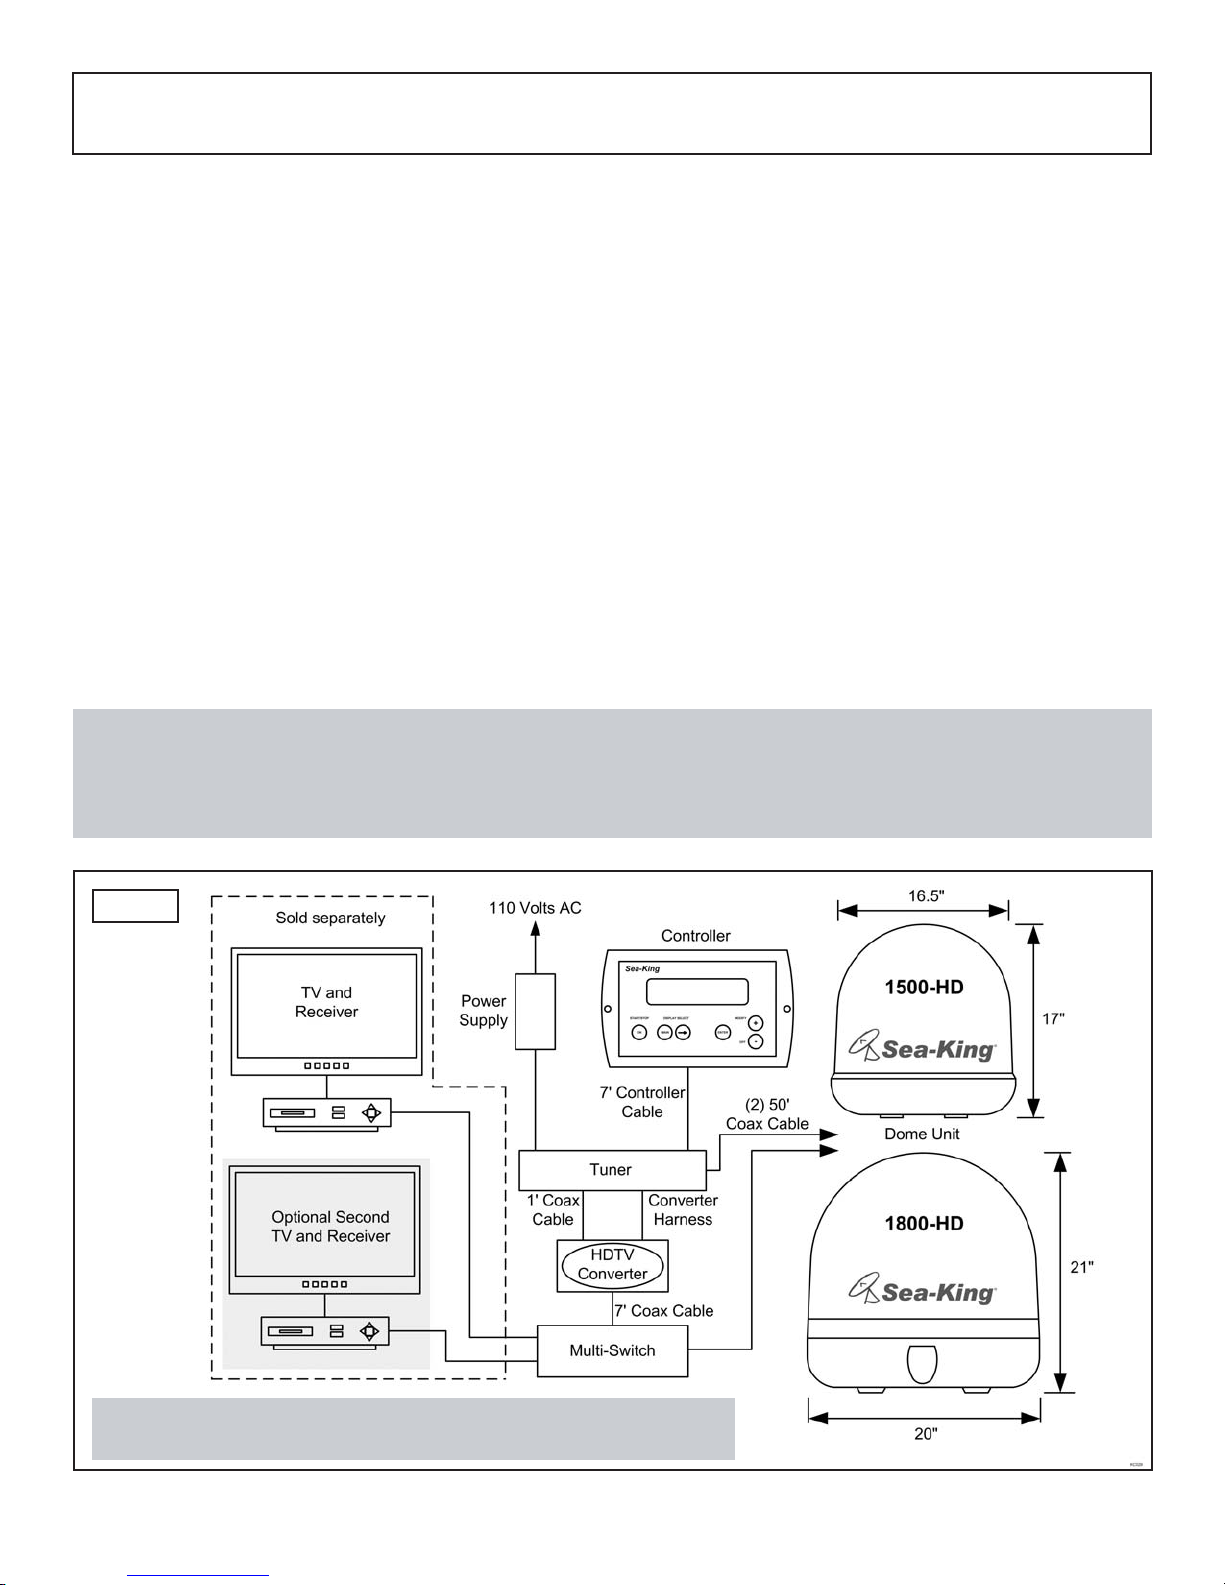
The Sea-King Fully Stabilized Marine Satellite System includes 6 main components (Fig. 1).
Dome (Antenna) Unit Mounted on the vessel. The dish is covered by a protective dome
that keeps operational components free from the elements.
Controller Located in the vessel. Used to activate and monitor the system,
and access programming and diagnostic information.
Tuner Located in the vessel. Decodes the satellite signal so the
Sea-King locks onto and tracks the correct satellite.
HDTV Converter Box Enables viewing of HDTV signals from DIRECTV 110 satellite.
Multi-switch Installed for multiple receiver hookup (DIRECTV only).
Power Supply Located in the vessel. Supplies proper operating voltage to the
Sea-King.
SECTION 1 INTRODUCTION
Page 2
Fig. 1
Note: HDTV Converter/Multi-switch installed for DIRECTV HD only.
Overview only: see Installation Section for wiring schematics.
Note: A TV, satellite receiver, and program subscription are also required for satellite TV viewing (sold separately).
You must have an HD Receiver, HDTV Monitor (TV), the proper HD cables (component video or HDMI) and the
appropriate programming subscription in order to view HD programming (sold separately).

AZIMUTH: Angle in degrees measured clockwise from Magnetic North (0°) (Fig. 2).
SIGNAL STRENGTH: Intensity of electronic signal received from the satellite transmission.
SECTION 2 DEFINITION OF TERMS
ELEVATION: Angle in degrees measured from a level plane (Fig. 3).
Page 3
Fig. 2
Fig. 3

KIT CONTENTS
1. Unpack and identify all components (Fig. 4).
Page 4
SECTION 3 INSTALLATION
TOOLS AND MATERIALS REQUIRED
• drill and drill bit set
• tape measure
• 7/16” open end wrench (coax connections)
• 5/32” allen wrench, channel lock or pliers (to remove shipping bolt)
• 1/8” allen wrench or phillips screw driver (to remove dome cover)
• appropriate fasteners and tools to install all components and wiring
• adhesive sealant, compatible with vessel material
Fig. 4
Page 5
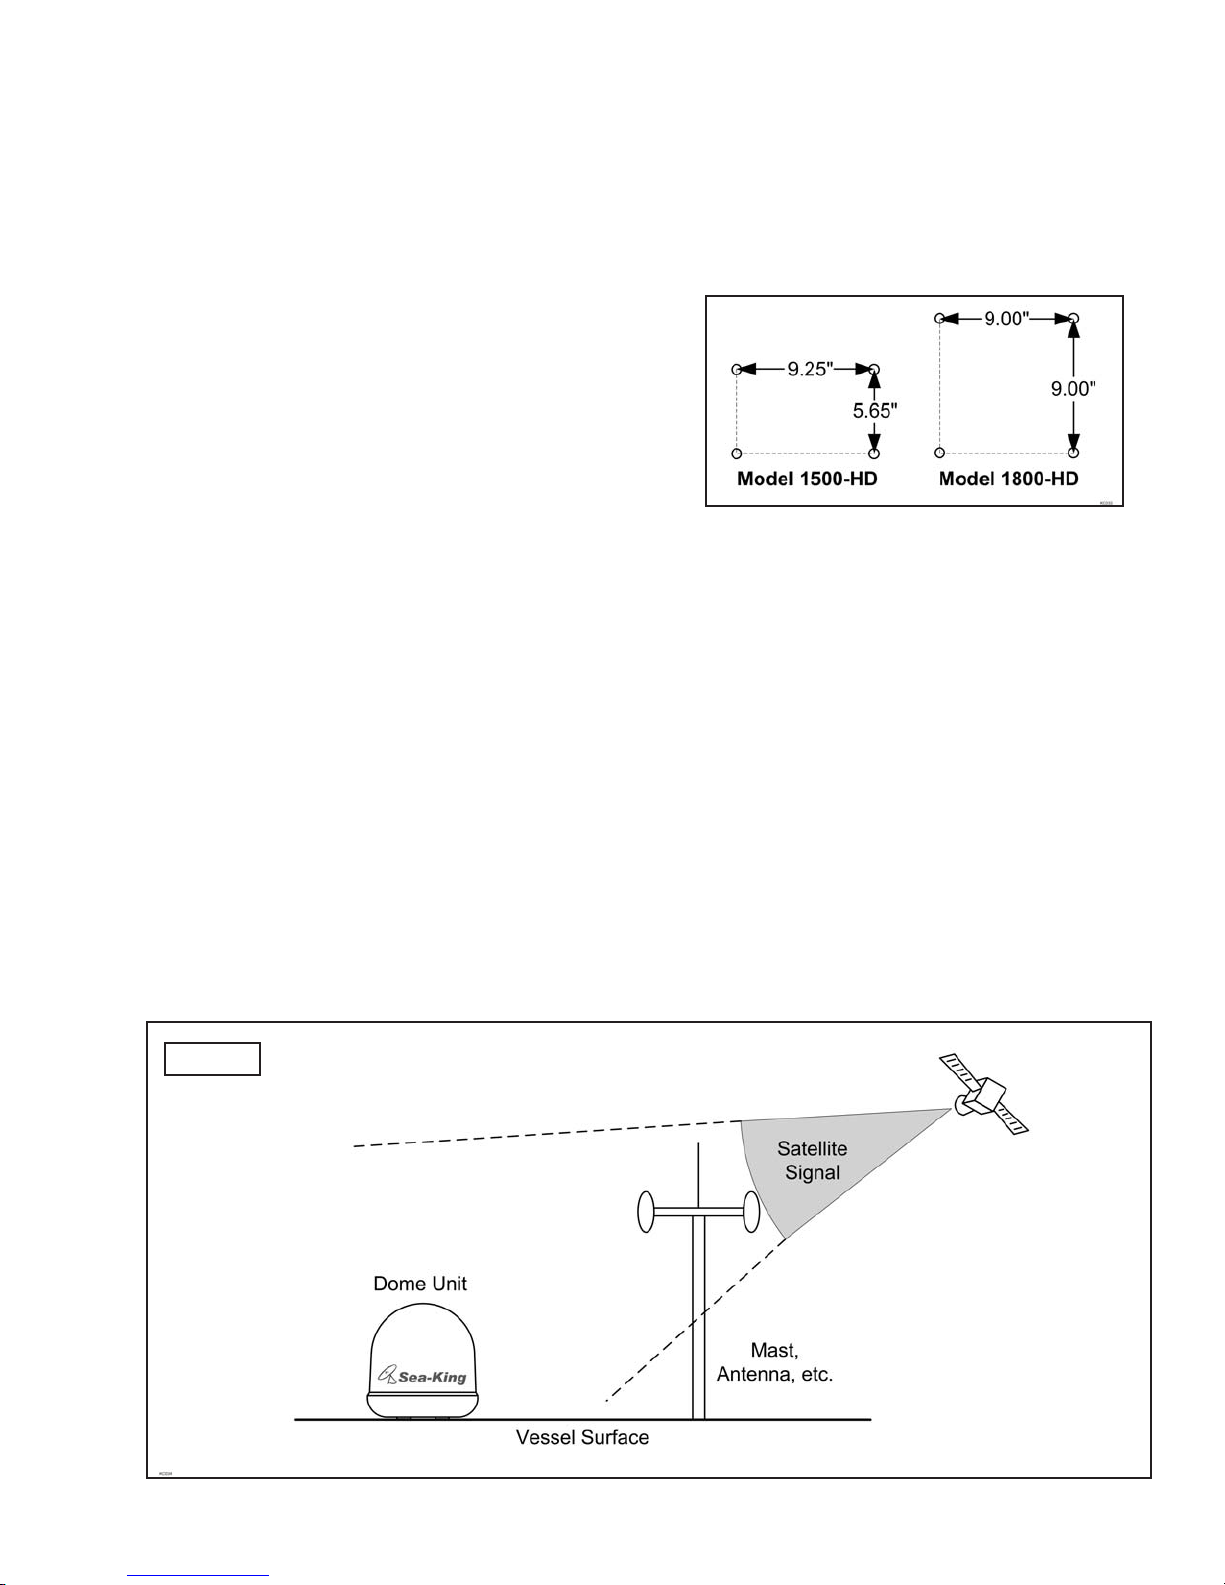
DOME LOCATION
1. Select an area on the vessel for the dome unit, keeping in mind the coax cables will enter the
vessel through the surface directly beneath the dome unit. Use the following criteria:
a) The shortest distance between the dome unit and the main satellite receiver is most
desirable.
b) The dome unit requires a 16.5” (model
1500-HD) or 20” (model 1800-HD)
diameter mounting area on the vessel
surface. You may also use an industry
standard mount. (Call King Controls or visit
www.kingcontrols.com for more information.)
Exact hole spacing is shown at right.
Distances are to centers of holes.
c) The dome unit should never be mounted so that it is tilted more than two degrees
in any direction.
d) Keep the dome unit as far away from the radar as possible, and if possible above the
level of the radar.
e) The dome unit should be mounted as close as possible to the center of the vessel
(fore-aft and side to side).
f) The mounting surface must be strong enough not to flex under the weight of the unit or
from vessel vibrations.
g) There must be no “line of sight” obstructions from this location. Items such as masts or
radar antennas that are too close to the dome unit may prevent the satellite signal from
reaching the dish (Fig. 5).
Fig. 5
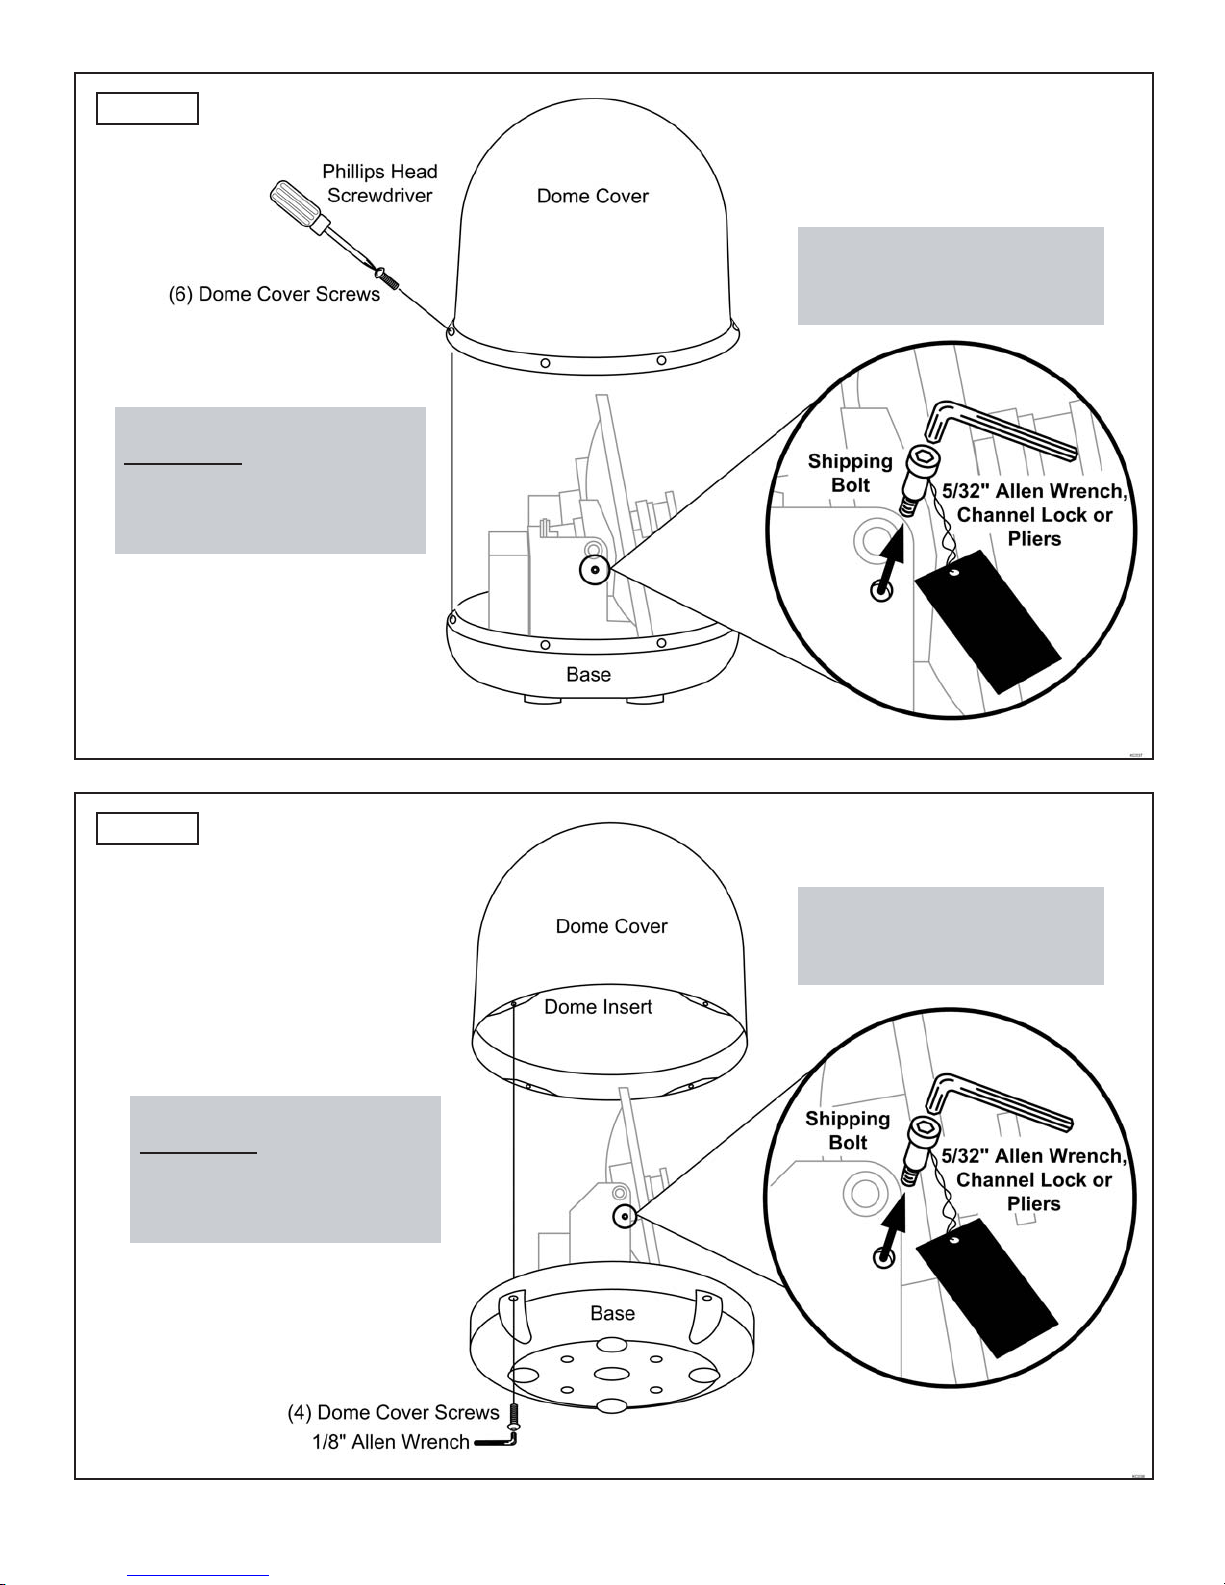
1. Remove and save the dome cover screws (Figs. 6A and 6B).
2. Carefully remove the dome cover. Do not allow dome cover to catch on internal components
or wiring.
3. Remove and discard the shipping bolt.
Page 6
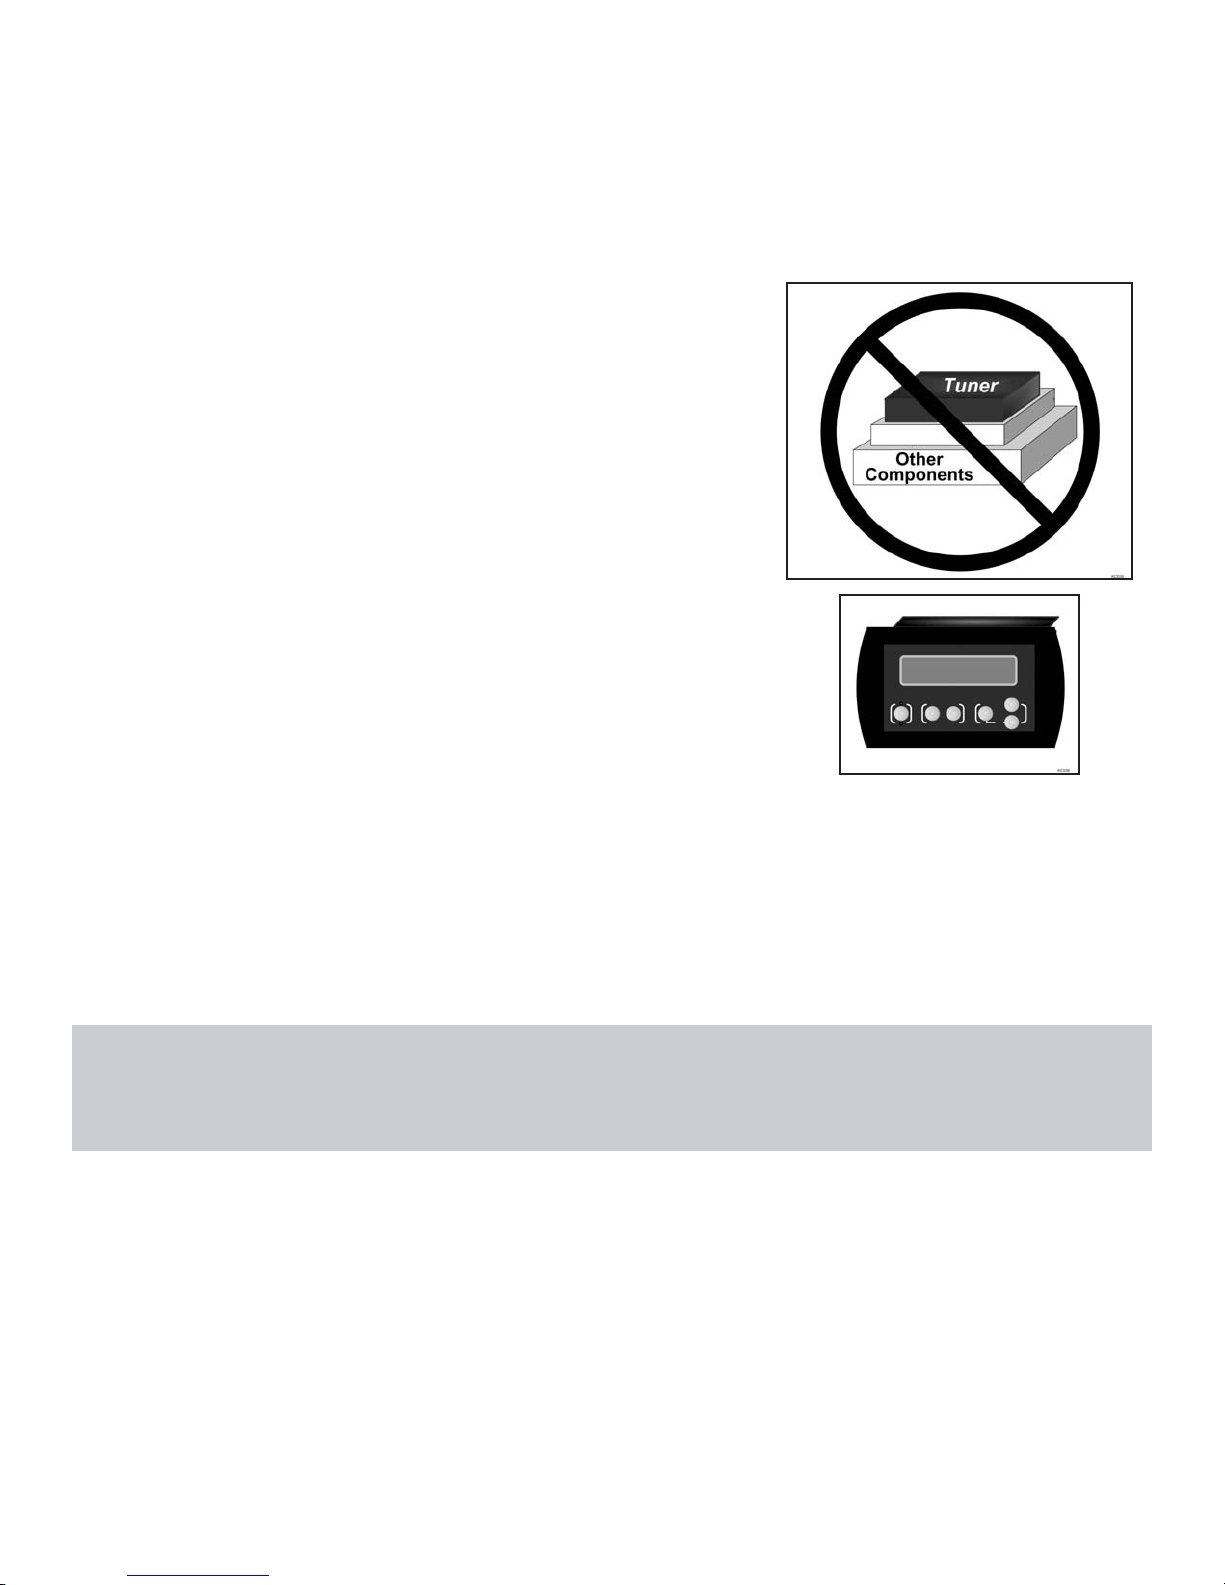
COMPONENT LOCATION
1. Select the location of the internal components using the following criteria:
a) The Controller, Tuner, HDTV Converter, Multi-switch and Power Supply should be in
the same general vicinity of the main satellite receiver, AND ACCESSIBLE FOR
OPERATION AND MAINTENANCE PURPOSES.
b) The Tuner should not be stacked directly on top of
other electronics. If located in a cabinet or other
enclosure, make sure there is adequate ventilation
around the unit. (If using the Tuner mounting
feet see page 17.)
c) The Controller should be conveniently located
for the end user. (If using the Wall Mount Faceplate,
see page 16.)
d) All components should be secured so they do not shift or bounce around during vessel
motion.
2. Place the components in the selected areas.
REMOVE SHIPPING RESTRAINTS
Note: Reference appropriate figure on next page for your model number:
Model 1500-HD: see Fig. 6A
Model 1800-HD: see Fig. 6B
Page 7
Fig. 6A
Fig. 6B
1500-HD
1800-HD
IMPORTANT!
The shipping bolt must be
removed prior to installation.
IMPORTANT!
CAREFULLYremove the dome
cover. Do not allow dome
cover to catch on internal
components or wiring.
IMPORTANT!
CAREFULLY remove the dome
cover. Do not allow dome
cover to catch on internal
components or wiring.
IMPORTANT!
The shipping bolt must be
removed prior to installation.

Page 8
To verify proper operation of the components, perform a Pre-Installation Check as follows:
1. Place the dome unit in your chosen location and on its mounting pedestal. Temporarily
secure the unit from falling. DO NOT PERMANENTLY MOUNT THE DOME UNIT UNTIL
YOU HAVE COMPLETED THE PRE-INSTALLATION CHECK ON THE NEXT PAGE.
If mounting to the vessel surface, you will need to
temporarily place the dome unit on a pedestal or
blocks to perform the pre-installation check.
IMPORTANT! IF CONFIGURING THE RECEIVER FOR MULTIPLE SATELLITE
SWITCHING WITH DISH NETWORK OR BELL TV, Y0U MUST DO THE
PRE-INSTALLATION CHECK ON A MOTIONLESS PLATFORM SUCH AS THE DOCK
OR GROUND.
EXTREMELY IMPORTANT!
NEVER lift the unit by the LNB assembly, Wave Guide assembly, or the dish.
Lift the unit by the base ONLY.
PRE-INSTALLATION CHECK
ELECTRICAL HAZARD WARNING!
The coax cable that connects the dome unit to the tuner carries a
24 volt electrical current. Exercise extreme caution when handling
this cable. Do not cut, break, or splice this line. Do not insert or
connect any devices such as splitters or any other device for any
reason. This line is not compatible with any other equipment.
Damage will occur to any device other than the dome unit if
connected to the antenna port on the tuner.
Ce manuel convient aux modèles suivants
1
Table des matières
Manuels Antenne populaires d'autres marques

Alfa Network
Alfa Network APA-L01 Manuel utilisateur

Naval
Naval PR-422CA Manuel utilisateur

Feig Electronic
Feig Electronic ID ISC.ANTH200/200 Series Manuel utilisateur

TERK Technologies
TERK Technologies TV44 Manuel utilisateur

Directive Systems & Engineering
Directive Systems & Engineering DSE2324LYRMK Manuel utilisateur

HP
HP J8999A Manuel utilisateur


CommScope
CommScope CMAX-OMFX-43M-I53 Manuel utilisateur

Ramsey Electronics
Ramsey Electronics DAP25 Manuel utilisateur

COBHAM
COBHAM SAILOR 800 VSAT Manuel d'utilisation et d'entretien

Trango Systems
Trango Systems AD900-9 Manuel utilisateur

Steren
Steren ANT-100 Manuel utilisateur

Proxim
Proxim 5054-PA-23 Manuel utilisateur