
Sarotech DVP-370 Manuel utilisateur

1
User Guide
DVP-370
zBefore operating the unit, please read this manual thoroughly, and retain it for
future reference
zDue to the static, Miss-use, inferior product, your data could be damaged.
zHandle with care when you use your valuable data.
zPlease back up your valuable data for safe work.

2
※ AivX has passed EMI testing for home use.
1. Before you begin
AivX is a portable multimedia player. You may enjoy digital contents on TV without PC. AivX is able to
directly connect to HD TV, Car TV, and projector and playback various audio and video files(Movie, Music,
and Picture).
It can be also used as USB 2.0 portable HDD storage device.
2. Main features
1. Multimedia player for Audio and Video contents without PC
2. USB2.0 external storage device
3. Analog 2ch stereo, digital 5.1ch Coaxial, Optical, FM stereo audio(Option) supported
4. Easy firmware upgradeable
3. Check supplied Accessories
1. DVP-370 unit
2. Remote control (Include battery)
3. AV cable (Composite image, Stereo sound)
4. Component cable
5. AC power cord
6. USB cable
7. Driver installation CD
8. User guide
9. Screws
10. FM antenna(option)
11. Media Converter CD(option)
12. Vertical stand
▷Separate sales item for Car user: External IR, Car power adaptor, Slim remote control
4. Warning
1. If you connect USB 2.0 product to USB 1.1 Host Adaptor, operating speed would be USB 1.1 speed (12
Mbps).

3
2. If you want to use USB 2.0 product with full speed USB 2.0 speed (Max. 480Mbps), you should use PC
with USB 2.0 Host Adaptor.
3. We recommend 3.5” HDD bigger than 40GBytes in capacity.
4. Be careful for shock hazard.
5. Do not expose high temperature or moisture. It may cause malfunction.
Working temperature is recommended -10~60℃
6. Keep in dry place.
5. Requirement
▷Over 586 Pentium2 PC or MAC
▷USB port should be available
6. Specifications
Movie AVI(DivX 3.x/4.x/5.x, Xvid), DAT, MPG, VOB, ISO, IFO
Music MP3, WMA, OGG, WAV
Photo JPEG
Support
File format
Caption smi, srt, sub
Main chipset EM8511(Sigma design)
Video output
Composite
S-Video
HD Component (support progressive output) (480i, 480p, 720p, 1080i)
Audio output
Analog 2Ch Stereo
Digital 5.1Ch Optical & Coaxial(DTS pass through)
FM Transmitter (option)
HDD Type 3.5" IDE HDD (Not included)
File format FAT32, NTFS
Interface USB 2.0
Transmission speed 480Mbps (Max.)
Support OS
Windows98/98SE/ME/2000/XP
Mac OS 9.0 or higher
Linux 2.4 or higher
Weight 0.77kg (without HDD)
Dimension 206.6(D) * 144.2(W) * 55(H)mm
Material All Aluminum with FAN
*Caution- Specifications can be changed upon applied Drive.

4
7. Name of each part and function
7.1 Front side
1. Infrared Receiver: Receiving remote control signal.
2. Power (left) / HDD (right) LED: Indicates power status & HDD access.
3. POWER: Power ON/OFF switch.
4. FF/REW: Press the FF & REW buttons to select any point along the file length /
Use to select the option from menu
5. UP/DOWN: Use to adjust subtitle position / Use to select the option from menu
6. OK: Press “OK” to start movie/ Use to move to the menu during movie playback
7. LED Display
1) NTSC: LED will turn on when you select NTSC TV out.
2) PAL: LED will turn on when you select PAL mode.
3) 720p: LED will turn on when you select HDTV 720p.
4) 1080i: LED will turn on when you select HDTV 1080i.
5) PLAY(▶) : LED is turned on during movie/music/picture playback.

5
6) RANDOM : LED will turn on when you set random playback.
7) REPEAT ( ): LED will turn on when you select repeat playback.
8) 16:9: LED will turn on when you set the screen type to 16:9.
9) DTS: LED will turn on when you play DTS file.
7.2 Back side
1. AC power : Input power using AC cord.
★Caution: When the device suddenly stopped working please turn on and turn off the power
(or disconnect the power cord and reconnect it).
2. Power switch: The power button on remote control & DVP-370 will not work while the power
on/off switch is turned off.
3. DC input jack for car power adaptor: Connect car power adaptor for use in your car. (Option,
please use specified car adaptor)
4. Composite: Composite (CVBS) video & audio signal output.
5. Component : Component(Y Pb Pr) video signal output.
6. S-VIDEO : S-Video signal output

6
7. Optical jack: Optical digital 5.1ch audio signal output.
8. Coaxial: Coaxial digital 5.1ch audio signal output.
9. USB port: For USB connection to PC.
10. Ext IR: Connect the external IR receiver (Option)
11. FM : Connect the FM Antenna (Option)
8. How to input HDD
1. Detach front case.
2. Detach Fixture.
3. Assemble HDD to fixture bottom using 4 screws.
Caution: when you assemble HDD to fixture, make sure that direction is correct as shown below pictu
re.
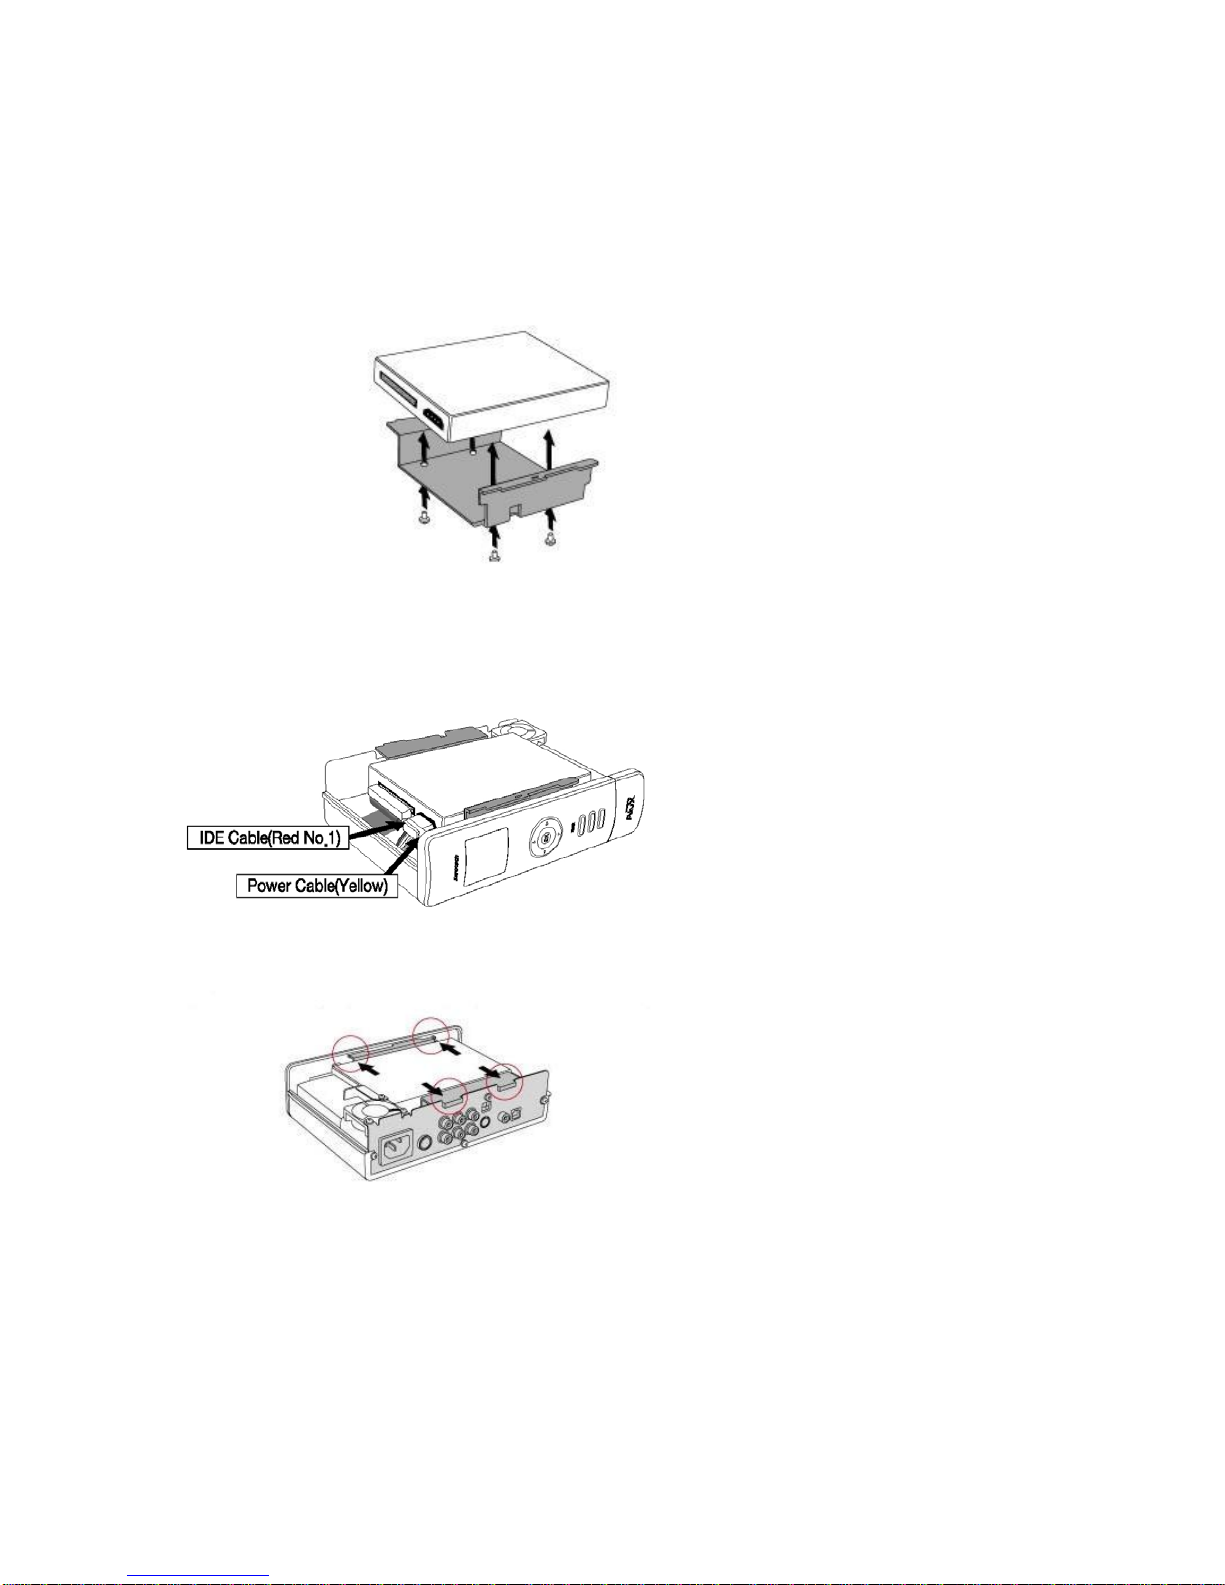
7
4. Connect POWER and IDE cable to HDD with Power cable.
At this time, please make sure that red cable of No.40 ribbon cable would be No. 1 pin (please double
check)
5. Slide in attached HDD and fixture to guide.
6. Close front case and screw 3 bolts with screw driver.

8
9. Connection to PC
This is to use AivX as a portable Hard Disk Drive.
You should disconnect the USB cable from AivX when you use AivX on your TV.
Otherwise, it will not show the main menu on TV.
9.1 Windows ME/2000/XP
AivX doesn’t need to setup drive to install on WinME/2000/XP OS.
⊙Connection
1. Connect AC power cable.
2. Push “power ON/OFF” on the back side of AivX.
3. If you connect AivX to your PC using USB cable, new local drive will be created in “My Computer”. Now
you may use the drive.
★Caution:
1. If you use a new HDD to AivX, you should FDISK and FORMAT.
Please refer to the Installation CD at “/MANUAL/FDISK&FORMAT/format(English).pdf”
2. When you make a partition, please make sure that the integrated HDD is partitioned to “primary
partition (P)”. If AivX is partitioned to “logical drive or extended partition”, you will get a message saying
“HDD mount fail” on TV.
3. If you make more than two partitions, it will be shown as “/hd1/, /hd2/…”.
When you make one partition into AivX, the “hd1” will be the highest level folder.
⊙Disconnection
1. If you want to physically disconnect AivX from PC after using, point your mouse cursor to the USB device

9
icon ( ) in task bar and click the left mouse button.
2. Select “Safely Remove USB Mass Storage Device” as shown below.
9.2 Windows 98/98SE
You need to install a driver on Windows 98/98SE.
⊙Driver Installation
1. Execute the “/Windows/USB/Setup.exe” from provided CD.
2. Press “next” on installation wizard.
3. Click “completion” from confirmation window. Now the Driver installation is completed.
4. Connect AC power cable.
5. Push “ON/OFF” switch on the back side of AivX.
6. If you connect AivX to PC using USB cable, new removable drive will be created in “My Computer”.
Now you may use the drive.
★Caution:
1. If you put a new HDD into AivX, you should FDISK and FORMAT.
Please refer to the Installation CD at “/MANUAL/FDISK&FORMAT/format(English).pdf”
2. When you make a partition, please make sure that the integrated HDD is partitioned to “primary
partition (P)”. If it is partitioned to “logical drive or extended partition”, you will get a message saying
“HDD mount fail” on TV.
⊙Connection, disconnection
Please refer to contents of Windows ME/2000/XP.
10. Connection to Video/Audio
10.1 Using Composite video and stereo sound
Connect composite cable (indicated by yellow & red & white) to AV input on your TV as shown below.
1. Connect AC power cable to an outlet.
2. Connect Composite cable to Composite connector on TV.
3. Turn on your TV and set it to “Video” mode.

10
4. Turn on the power switch on rear side of DVP-370 and then turn on the power button on remote
control or DVP-370.
5. Connect stereo audio cable (indicated by white & red) to audio input on TV.
Table des matières
Autres manuels Sarotech Lecteur multimédia


