
SAMWAY P20D Guide produit

P20D
USER MANUAL
www.samway.com SAMWAY
Operation Book
Read Before Opeartion

1. INTRODUCTION .................................................................................. 3
2. SAFETY RULES .............................................................................. 3 - 4
3. EQUIPWENT ................................................................................... 4 - 6
3.1 WARRANTY ............................................................................................. 4
3.2 IMPORTANT ............................................................................................ 5
3.3 IDENTIFICATION ............................................................................... 5 - 6
4. START - UP ..................................................................................... 6 - 9
4.1 MACHINE PLACEMENT ......................................................................... 6
4.2 SELECTING DIES .................................................................................. 6
4.3 P20D CONTROL PANEL lLLUSTRATION .............................................. 7
4.4 CHANGE OF A SINGLE DIE ................................................................... 8
4.5 CRIMPING ............................................................................................... 8
5. SELECTING THE DIE SET, 20 MODEL ............................................... 9
6. IF THE MACHINE DOES NOT WORK ............................................... 10
7. RE-CALIBRATION OF CRIMPING DIAMETER DIAL ......................... 11
8. TROUBLE SHOOTING ................................................................................ 11
9. SAMWAY P20D .................................................................................. 12
CONTENTS
P20D USER MANUAL EDITION 2019 www.samway.com
All Die Sets Required to be installed Clockwise 1 2 3 4 5 6 7 8 if you look
infront of the crimping machine. Die number 1 could install to any master
die, but the folowing die number 2 should be beside the die number 1 and
clockwise. Especially for the die number under under 16 mm . This is
important to keep the ferrule crimped with good roundness.
Caution

1. INTRODUCTION
2. SAFETY RULES
Do not unpack or operate the crimping machine until you have thoroughly read this manual.
All who operate the crimping machine must read this manual.
This manual provides necessary information for safe use of this machine.
This manual is the result of continual development, testing and technical evaluations that are registered
and verified by SAMWAY according to 2006:42/EG, 2004:108/EG, 2006:95/EG, EN614-2, 97/23/EG.
This manual does not explain disassembly or comprehensive maintenance in detail. These may only be
performed by an authorized service technician.
It is necessary to store the manual and keep it in good condition for future use. Contact your closest
authorized supplier for a replacement manual or additional information if necessary.
This manual should be preserved and stored for the length of the machine’s lifetime or at least ten(10) years
in a well-known, easily accessible location together with other machine documentation.
SAMWAY is not liable for injury/damage to persons/machine or property as a result of improper use,
having made prohibited modifications to the machine or misinterpreting this manual’s safety instructions.
Always ensure that the minimum standards for safety, installation and operation are complied with before
operating the machine. Observe the surrounding environmental conditions such as temperature,humidity,
lighting, vibrations, dust and other conditions at the machine operation site. Never remove the machine’s
information or warning plates. Ensure that they remain clearly readable. Contact an authorized service
workshop for replacement plates if they become unreadable.
The use of any spare parts that deviate from this manual’s specifications, any other changes/manipulations
(however insignificant) made to your machine releases SAMWAY from any liability for consequences
that arise due to the machine’s performance, level safety for nearby persons and / or personal property.
This information is intended only for specialized operators who can operate the machine without risk to
themselves, other persons, property, the machine, or the environment. The operator should have
fundamental knowledge in trouble-shooting methods, perform machine inspections and simple
maintenance according to the information provided in this manual and according to local legislation for
protection of health and safety.
P20D USER MANUAL EDITION 2019 www.samway.com

3. EQUIPMENT
Disassembling or side-stepping safety devices or rules is extremly hazardous and absolutely
prohibited. Refusal to follow these requirements puts others at severe risk of injury!
Note!
Note!
Note!
3.1 Warranty
Always dispose of operation waste according to current local laws and regulations.
Always dispose of operation waste according to current local laws and regulations.
The warranty lasts one(1) year from purchase and only under the strict condition that the manual
instructions have been followed. The warranty covers defected material/parts and flawed workmanship,
replacing defected parts cost.
The warranty dose not cover improper use or normal wear. Travel costs, time for repair and shipping costs
are not covered by the warranty. Repairs under the warranty are to be made only by SAMWAY or an
authorized service technician approved by SAMWAY. Lost income or extra costs that may arise for any
reason are not covered by the warranty.
Ensure that the machine is undamaged and that the all of the described items are present upon arrival or
shortly after. SAMWAY is not liable for incorrect or missing parts that are not reported within eight(8)
days after delivery.
All maintenance not described in this manual must be performed by an authorized service technician.
The machine consists of a chassis, crimping head and is delivered ready to use, packed in a wooden box
on a pallet.
P20D USER MANUAL EDITION 2019 www.samway.com

3.2 Important
Pinch point!
Keep hands and all other body parts away
from the red-indicated are while crimping.
Warning!
P20 is designed manufactured and made safe for crimping hydraulic hose in dimensions 3/16”-1”.Any
other use of this machine is considered improper and SAMWAY is not liable for injury or damage to
persons, property or the machine. The machine shall only be used for crimping hydraulic hose according
to specification. SAMWAY instructions for operating conditions and limitations for use/operation as well as
health and safety regulations must be complied with.
3.3 Identification
Note!
The machine can be identified by the CE-label with the following information located on its backside:
It is absolutely prohibited to remove or damage the identification plate. Contact an authorized service
workshop for new plats if they become damaged and unreadable.
Always provide the following information and technical explanation of the machine’s problem when
contacting the authorized service workshop.
Manufacturer
Serial number
Manufactured year
Weight
P20D USER MANUAL EDITION 2019 www.samway.com
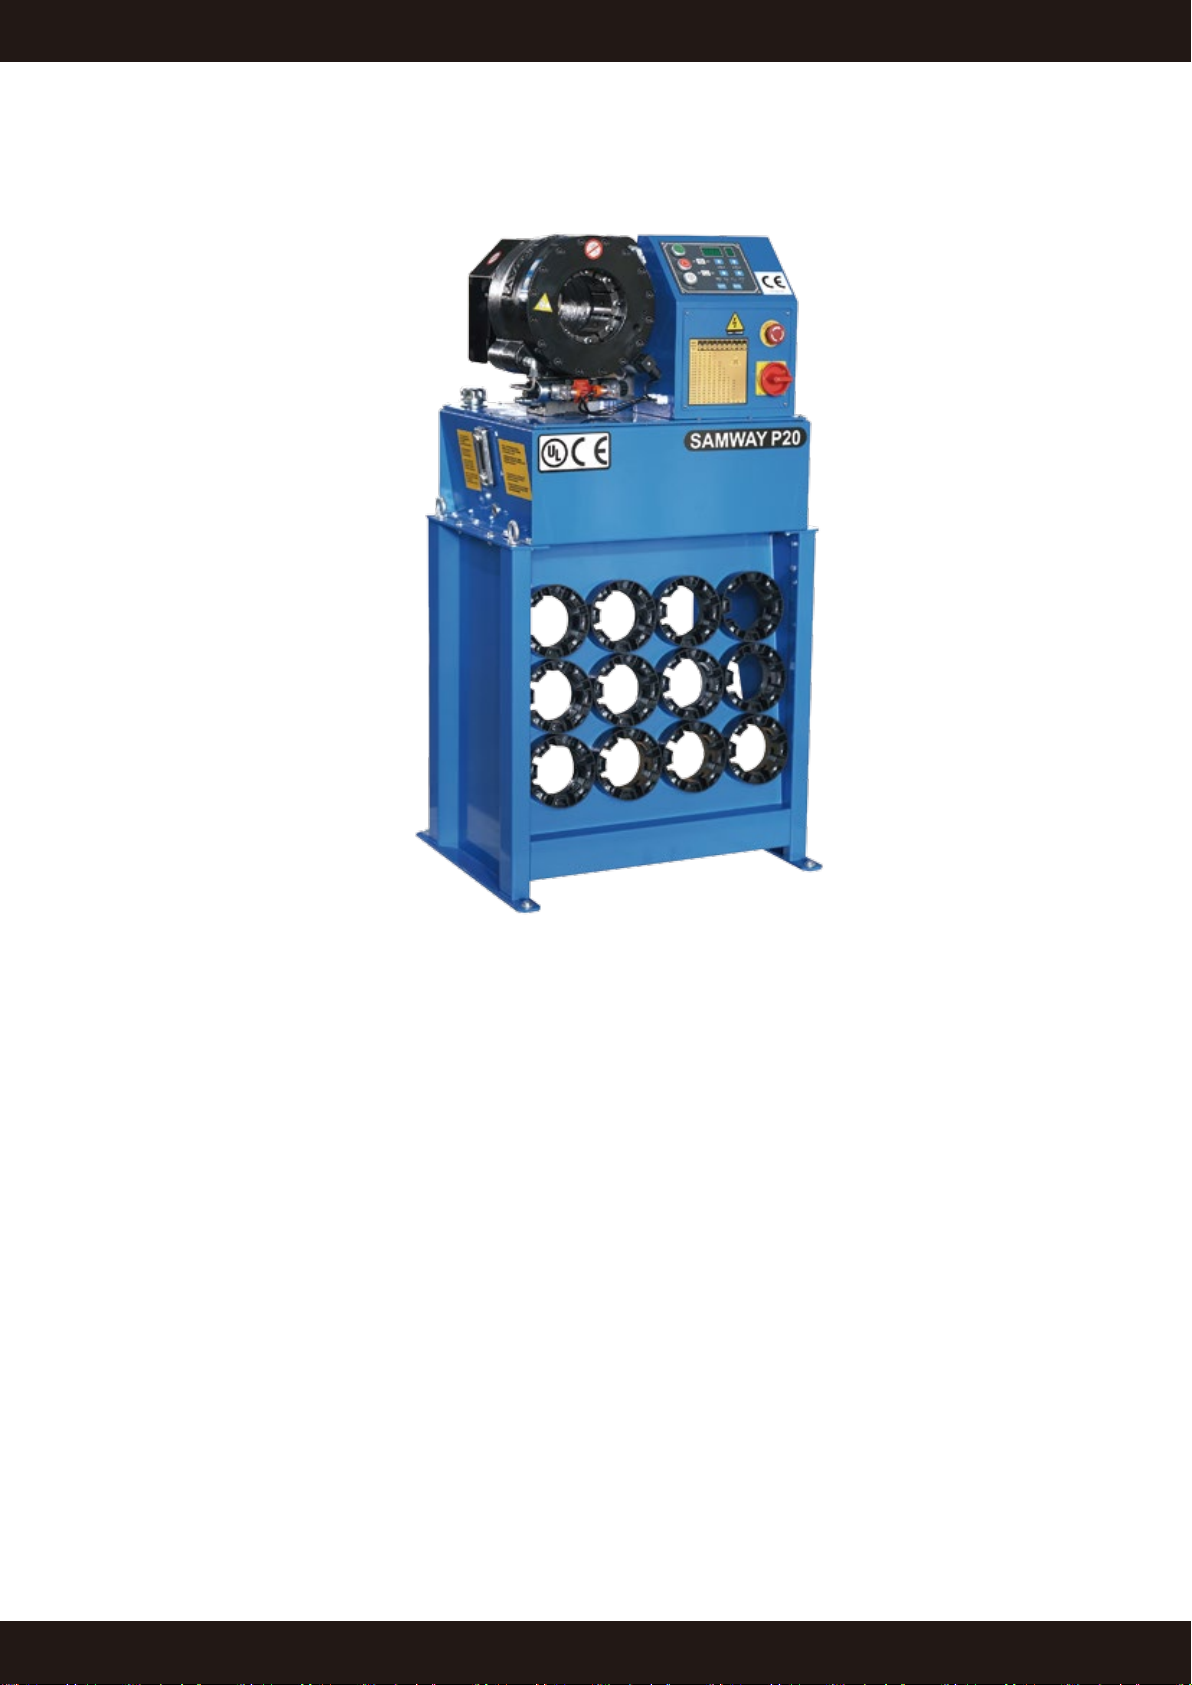
P20D
4. START-UP
4.1 Machine placement
Place the machine on a stable and flat surface.
4.2 Selecting dies
Determine the crimping dimensions for the current operation and select the die set with the correct interval
that corresponds to the crimping measurement.
For example: A crimping measurement of 17mm requires the die size nr 16 (since it covers the 16-19 mm
interval).
Always select the die set within the correct interval to achieve the best crimping results. Every die is marked
with the smallest crimping measurement in the interval.
Note!
Crimping any measurements outside the table crimping measurement interval is not recommended.
USing dies that are too small risk the ferrule becoming oval.
P20D USER MANUAL EDITION 2019 www.samway.com
P20D USER MANUAL EDITION 2019 www.samway.com
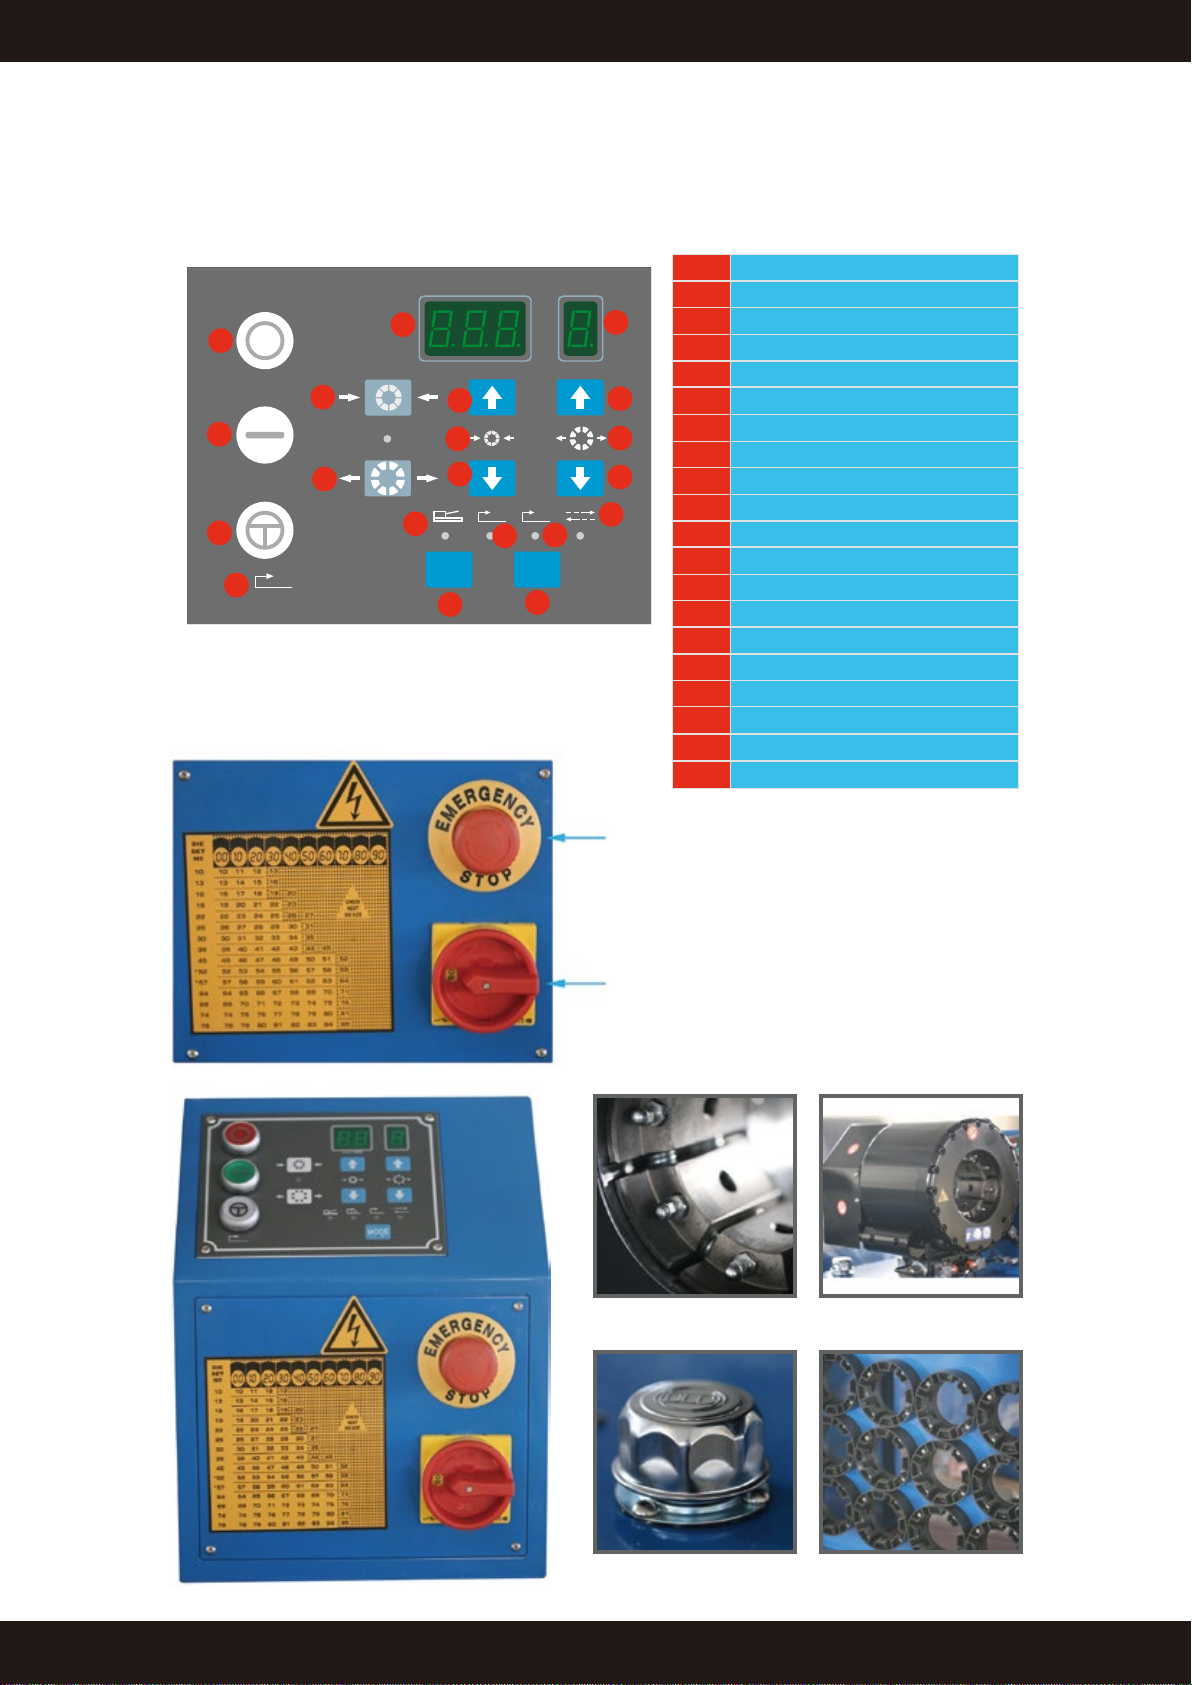
4.3 P20D control panel illustration
Emergency Stop
Main Power Switch
Die base Crimping Head
Die RackOil Cap
1 Motor Stop
2 Motor Start
3 Semi-Automatic Control
4 Semi-Automatic Control Symbol
5 Manual Opening Button
6 Crimping data adjustment
7 Foot Pedal Control Mode
8 Back Stop Control Mode
9 Mode Selection
10 Semi-Automatic Mode
11 Manual Control Mode
12 Opening data adjustment
13 Opening Symbol
14 Opening Data Adjustment
15 Opening Data Digit Display
16 Crimping Data Display
17 Crimping Data Display
18 Manual Crimping Button
19 Crimping Symbol
20 digit position input
SHIFT
L.S
MODE
1
2
3
4
18
5
16 15
14
13
12
11
9
20
810
7
17
19
6

P20D USER MANUAL EDITION 2019 www.samway.com
4.4 Change of a single die
Open the dies to the maximum retraction. Open the supply disconnecting device.
CAUTION! SUPPLY DISCONNECTING DEVICE
SHALL ALWAYS BE OPENED DURING THE
INSTALLATION OF THE DIES.
Prior to installing the dies, clean the contact surface of
both the die set and master dies properly to avoid
damaging the surfaces
Pull the pull pin in the master die with the tool delivered
together with the machine (see figure).
Insert the die with the retaining pin into the master die,
die number always towards you. Release the pull pin.
After installing all the dies, make sure they are straight
and properly seated in the master dies.
4.5 Crimping
WHEN CRIMPING A FITTING, HOLD THE HOSE FAR ENOUGH TO AVOID CRIMPING
The machine can be operated manually
by using the crimping- and the opening -
push buttons or with semi-automatism.
YOUR HAND! DO NOT CRIMP THE EDGE OF THE DIE!
1. Adjust the recommended crimping
diameter.
2. Press the crimping button until the
dies hold the fitting lightly.
3. Press the crimping button until the
dies stop.
4. Open the dies and remove the fitting.
5. Check the crimping diameter.

P20D USER MANUAL EDITION 2019 www.samway.com
5. SELECTING THE DIE SET, 20 MODEL
D L Die set No Crimping range
10 55 18013/10 10...12 mm
12 55 18013/12 12...14 mm
14 55 18013/14 14...16 mm
16 55 18013/16 16...19 mm
19 55 18013/19 19...23 mm
23 55 18013/23 23...27 mm
27 70 18013/27 27...31 mm
31 70 18013/31 31...36 mm
36 75 18013/36 36...41 mm
41 75 18013/41 41...47 mm
47 85 18013/47 47...54 mm
54 85 18013/54 54…61 mm
In addition to the standard die sets, a wide range of special die sets is available on request.
From the crimping diameter
chart, delivered together with the
machine, you can see the die
set numbers and the
corresponding crimping ranges.
The upper section of the chart
shows the corresponding dial
position for each crimping
iameter in the columns.
d
Crimping diameters in the grey
zone of the chart are not
recommended to be used with
he die set in question.
t
The crimping diameter dial has
been calibrated at the factory so
that when the dial is set at 0.0,
the resulting diameter will be the
minimum diameter of the die set
installed, i.e. with die set No 20-
16 the crimping diameter will be
16 mm, No 20-19 gives a
diameter of 19 mm etc. Each full
turn clockwise of the adjusting
knob of the dial will add 1 mm to
the crimping diameter. Each
division on the measuring scale
corresponds to 1/100 mm.
The crimping diameter chart P20
P20 DIES

P20D USER MANUAL EDITION 2019 www.samway.com
6. IF THE MACHINE DOES NOT WORK…
If the motor doesn’t start up
1. To start up the machine, turn the switch completely to the left (0) and then to the upright
position (I).
2. Make sure that the voltage on the machine plate is the same as the power supply.If not,
please contact the seller of the machine.
3. Check the power supply to the machine: check the power supply cable, contact plug
and wall socket, possible safety or main power switch as well as the fuses outside of
the machine.
4. Open the crimping machine’s electrical cabinet and check the thermal relay.
If the motor starts up but the dies don’t move
1. Check the rotation of the motor.
2. Check the oil level.
3. Check that the measuring device is in its place and the cable is connected.
4. Check that the dies are not already in close- or retraction position.
5. Check that the direction valve gets power (24V). Press the crimping- and retraction
buttons, the lights on the valves should light up at the same time.
If the machine leaks oil
1. A new machine might leak a small amount of rust protection oil under the cylinder or
under the machine.
2. When the machine has been filled up with oil, some oil might have leaked inside the
machine and then slowly under the machine.
3. If the machine is in continuous use, some oil (0,1dl) might pass the seals and leak
under the cylinder when the machine is stopped or when changing the die sets.
If the machine’s power is not enough
If you contact the manufacturer or the distributor about the operating or service-problems,
remember to give your crimping machine’s serial number and the type of the control.
1. The lack of power might be caused by dry sliding surfaces. Grease the machine.
2. Check that the coupling or the piece you are crimping is the size that the machine can
crimp. The machine’s pressure relief valve opens and the dies stop when the maximum
power of the machine has been reached.
3. If the dies open up in normal speed but close slower and the machine is lacking
crimping power, there is dirt in the hydraulic system which causes a leak in the valve.
The hydraulic system of the machine has to be cleaned and the valves either cleaned or
changed.
4. The pressure relief valve of the machine has been adjusted at the factory. Do not open
or adjust this valve in any way. If you suspect that the valve is not working properly,
contact the seller of the machine.
5. Make sure that there is oil enough in the tank.
Table des matières
Autres manuels SAMWAY Outils de sertissage


Manuels Outils de sertissage populaires d'autres marques


Milwaukee
Milwaukee M18 Manuel utilisateur

HOGERT
HOGERT HT1P169 Manuel utilisateur

Textron
Textron ESG105L Manuel utilisateur

Tyco Electronics
Tyco Electronics 90035-3 Manuel utilisateur

Emerson
Emerson Klauke ES 20RMCCFB Manuel utilisateur

Continental Refrigerator
Continental Refrigerator PC150HD Manuel utilisateur