Safe N Secure dvr4004 Manuel utilisateur

User Manual

User Manual
CONTENTS
Safety Instruction......................................................................................................................................................................1
Chapter 1:DVR Features..........................................................................................................................................................2
Chapter 2:Layoutt.....................................................................................................................................................................3
2.1 Front Panel ....................................................................................................................................................................... 3
2.1.1 4-CH Front Panel (Details please refer to the real product).................................................................................... 3
2.1.2 8-CH Front Panel (Details please refer to the real product).................................................................................... 3
2.2 Rear Panel.........................................................................................................................................................................4
2.2.1 4-CH Rear Panel (Details please refer to the real product)..................................................................................... 4
2.2.2 8-CH Rear Panel (Details please refer to the real product)..................................................................................... 4
2.3 Remote Controller
(
Only for reference)......................................................................................................................... 5
Chapter 3:DVR Installation.....................................................................................................................................................6
3.1 Hard Drive Installation.....................................................................................................................................................6
3.2 Camera and Monitor Connection .....................................................................................................................................6
3.3 Power Supply connection..................................................................................................................................................6
Chapter 4: DVR Boot up ..........................................................................................................................................................7
4.1 System Initialization.......................................................................................................................................................... 7
4.2 Main Interface................................................................................................................................................................... 7
Chapter 5:DVR Menu...............................................................................................................................................................7
5.1 Main Menu Preview ..........................................................................................................................................................8
5.2 Main Menu........................................................................................................................................................................8
5.2.1 Camera setup ......................................................................................................................................................... 9
5.2.2 Record setup........................................................................................................................................................... 9
5.2.3 Network Set ............................................................................................................................................................. 10
5.2.4 Recording Search................................................................................................................................................. 11
5.2.5 Multi player ............................................................................................................................................................12
5.2.6 Device Management............................................................................................................................................14
5.2.7 System Function...................................................................................................................................................20
5.3 Menu Lock.......................................................................................................................................................................22
5.4 Video Search....................................................................................................................................................................22
5.5 PTZ Control ....................................................................................................................................................................22
5.6 Record.............................................................................................................................................................................22
5.7 Stop recording .................................................................................................................................................................22

User Manual
Chapter 6:NetViewer Program..............................................................................................................................................23
6.1 Plug-ins download and installation ................................................................................................................................23
6.2 Log-in to NetViewer ........................................................................................................................................................ 23
6.3 Main Interface of Net-viewer ..........................................................................................................................................23
6.3.1 Menu column.........................................................................................................................................................24
6.3.2 PTZ Control...........................................................................................................................................................26
6.3.3 Live play Control...................................................................................................................................................26
Chapter 7:Specification ..........................................................................................................................................................27
Chapter 8: Windows Vista User.............................................................................................................................................28
Chapter 9: Appendix............................................................................................................................................................... 29
9.1 Operation Function Table...............................................................................................................................................29
9.2 Recording Alarm setting.................................................................................................................................................. 30
9.3 Troubleshooting............................................................................................................................................................... 30
9.4 Email server check list
(
The below info only for your ref.
)
.........................................................................................31
9.5 Usage Maintenance......................................................................................................................................................... 31
9.6 System connection Configuration....................................................................................................................................32

User Manual
1
Safety Instruction
1. Use proper power source.
Do not use this product with a power source that applies more than specified voltage (100-240V AC).
2. Never insert anything metallic into the DVR case.
Putting something into the DVR case can be a source of dangerous electric shock.
3. Do not operate in wet & dusty area or use near water.
Avoid places like a damp basement or dusty hallway.
4. Do not expose this product to rain or use near water.
If this product accidentally gets wet, unplug it and contact an authorized dealer immediately.
5. Keep product surfaces clean and dry.
To clean the outside case of the DVR, use a cloth lightly dampened with water (no solvents).
6. Provide proper ventilation.
This DVR has a built in fan that properly ventilates the system.
7. Do not attempt to remove the top cover.
If there are any unusual sounds or smells coming from the DVR, unplug it immediately and contact an
authorized dealer or service center.
8. Do not attempt to remove the top cover.
Warning: You may be subjected to severe electrical shock if you remove the cover of the DVR.
9. Handle DVR box carefully.
If you accidentally drop your DVR on any hard surface, it may cause a malfunction. If the DVR doesn’t
work properly due to physical damage, contact an authorized dealer for repair or exchange.
10. Use standard lithium cell battery. (NOTE: Manufacturer has preinstalled battery.)
The standard lithium cell 3v battery located on the mother board should be replaced if the time clock does
not hold its time after the power is turned off. Warning: unplug the DVR before replacing battery or you may
be subjected to severe electrical shock. Properly dispose of old batteries.
11. Make sure there is good air circulation around the unit.
This DVR system uses a hard drive for video storage, which generates heat during operation. Do not
block air holes (bottom, upper, sides and back) of the DVR that cool down the system while running. Install or
place this product in an area where there is good air circulation.

User Manual
2
Chapter 1:DVR Features
Real time monitoring Supports real time surveillance via Monitor
Saves Recordings DVR saves real-time recording image to HDD
Backup Recordings Supports DVR backup via USB flash drive and hard drive.
Playback Recordings Supports DVR single CH and multiple CH playback of recorded files
Network operation Supports remote surveillance by multiple users simultaneously
Alarm Setting Supports HDD & video input alarm management and external alarm signal
inputs
Mouse Operation Supports Mouse operation for faster menu navigation.
PTZ Control Supports PTZ camera operations through RS-485.
List 1-1
Other Features:
H. 264 video compression format, supports D1, HD1, CIF resolution
ADPCM audio compression format
Windows Graphical interface
Supports remote live viewing via 3G mobile networks
Supports sending email alerts when motion is detected by system
Triplex (recording, playback and net transmitting at the same time)
Supports USB mouse, IR remote control operation
Rear USB2.0 ports for backup、upgrade and mouse operation.
Supports Double Encode bit network transmission
The video package time is adjustable
Multiple alarm record mode
Multi-language OSD
Supports auto maintenance

User Manual
3
Chapter 2:Layoutt
2.1 Front Panel
2.1.1 4-CH Front Panel (Details please refer to the real product)
List 2-1
Item Key title/Indicator Marks Functions
1 Power Switch Turn Power on and off
2 Power indicator PWR If the “Green” indicator is on the system is getting power
3 IR Receiver Receives signal from Remote Control
4 HDD indicator HDD When the “Red” indicator flashes it means the hard drive is being
read or written to.
5 Channel Select:
CH1 CH2 CH3 CH4 Select Single Channel Display
6 QUAD Display all cameras in Live display or playback mode
7 REW Move Left / Rewind
8 PAUSE Pause / play frame by frame
9 PLAY Enter into pop-up Menu/Play
10 FWD Move Right / Play Forward
11 STOP Stop Playback; stop manual recording
12 REC Start Manual recording
13 MENU/ESC Enter into main menu or exit menu
14 Up Move Up
15 SEL/EDIT Enter into pop up menu; Select key / Edit
16 Down Move Down
17 PTZ:Move to PTZ control mode
17 PTZ:The button allows
y
ou
p
roceed PTZ control
2.1.2 8-CH Front Panel (Details please refer to the real product)

User Manual
4
1 Power Switch 11 PAUSE: Pause / Frame Play
2 PWR: PWR Indicator 12 PLAY: Play
3 IR receiver for Remote Control 13 FWD: Play Forward / Move Right
4 HDD: HDD Indicator 14 STOP: Stop Playback; Stop manual Recording
5 SEARCH: Recording Search 15 REC: Manual Recording
6 MUTE: Audio Mute key 16 MENU/ESC: Menu / Escape
7 CH-: Switch to previous channel 17 UP: Move Up
8 CH+: Switch to next channel 18 SEL/EDIT: Select / Edit
9 ALL: Preview all channels 19 DOWN: Move Down
10 REW: Rewind / Move Left 20 PTZ: Move to PTZ control mode
2.2 Rear Panel
2.2.1 4-CH Rear Panel
(Details please refer to the real product)
Item Physical port Connection method
1 Video input Connect CH1-4 ( BNC interface)
2 Video output Connect monitor output ( BNC interface)
3 Audio input Connect CH1-4 audio signal input (RCA interface)
4 Audio output Connect signal output (RCA interface)
5 Ethernet: Port Connect intranet, internet (RJ45 interface)
6 USB Port Connect USB device (Flash Drive, Hard Drive)
7 USB Port Connect USB mouse
8 RS-485/Sensor/Alarm RS485/Sensor/Alarm interface (see pin outs below)
9 Power Port Connect power supply - DC12V 3A
2.2.2 8-CH Rear Panel (Details please refer to the real product)

User Manual
5
1 CH1-8: Video inputs 6 Audio Output
2 Video Outputs 7 USB port
3 Audio Input 8 Mouse port
4 LAN: LAN port for Network Access 9 RS-485/Sensor / Alarm port
5 Not used 10 Power switch port
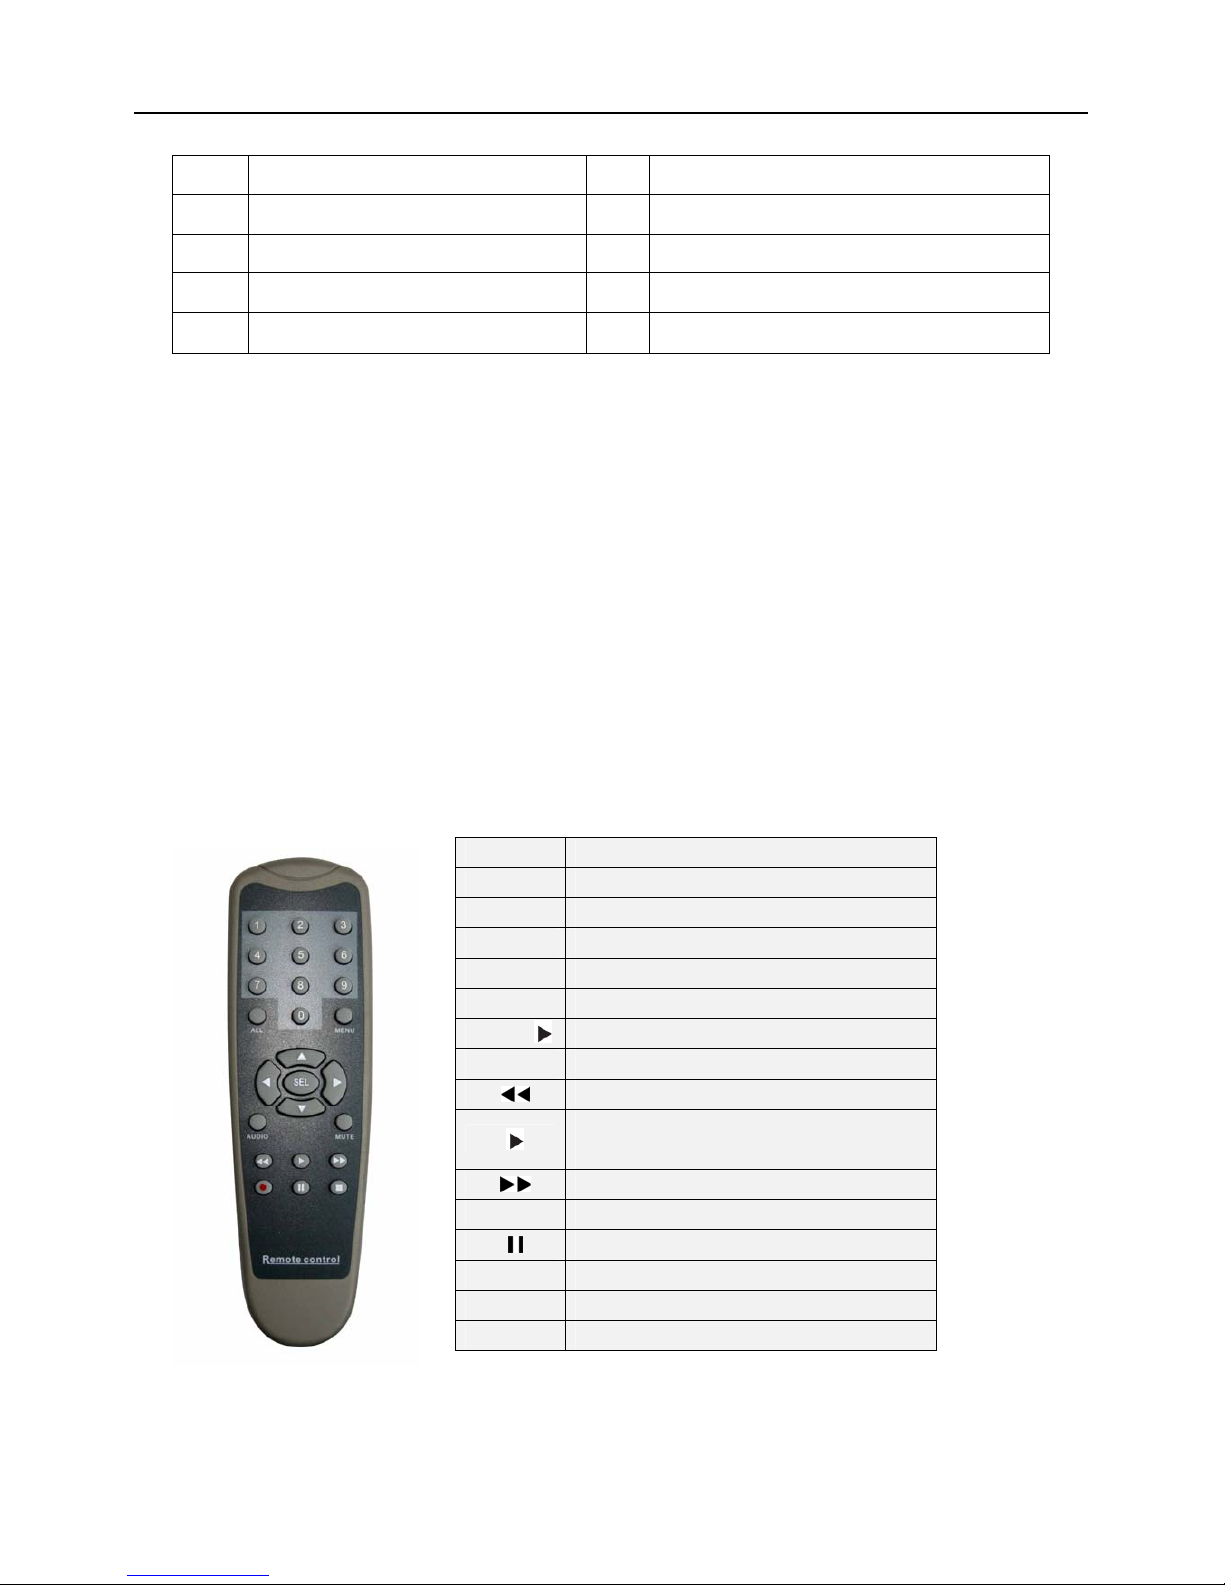
2.3 Remote Controller (Only for reference)
1-8 Channel Select 1-8 ; Numeric key
9、0 Numeric Key
ALL Preview all Channel
Menu Enter/Exit Main Menu
▲Up Key
▼Down Key
◄/Left / Right Key
SEL Select Key/ Edit Key
Rewind key
Play Key, Enter to recording search
menu
Forward Key
●Manual Recording
Pause / Frame Play
■Stop manual recording; Stop Playback
Audio Undefined
Mute Undefined
4-CH: RS485/Sensor/Alarm port
functions (from left to right):
Pin 1-2:PTZ Control port
Pin 1:RS-485A
Pin 2:RS-485B
Pin 3-4: Sensor 1 input
Pin 5-6: Sensor 2 input
Pin 7-8: Sensor 3 input
Pin 9-10:Sensor 4 input
Pin 11-12:Alarm Output
8-CH: RS485/Sensor/Alarm port functions
(from left to right):
Pin 1-2:PTZ Control port
Pin 1:RS-485A / Pin 2:RS-485B
Pin 3-4:Sensor 1 input
Pin 4-5:Sensor 2 input
Pin 6-7: Sensor 3 input
Pin 7-8:Sensor 4 input
Pin 9-10: Sensor 5 input
Pin 10-11: Sensor 6 input
Pin 12-13: Sensor 7 input
Pin 13-14: Sensor 8 input
Pin 15-16:Alarm Output

User Manual
6
Mouse Operation
You can use a mouse instead of front panel buttons or remote control.
In menu lock mode, Enter into pop-up menu and clicking any sub menu to pop up Log-in
window; on menu unlock mode, enter into pop-up menu, and then clicking left key to
enter into any sub menu directly.
After entering main menu, clicking left key could enter into any sub menu; On[Detailed
file] menu mode, clicking left key could playback one recording file.
Change the status of check box and motion detection area.
Clicking combo box to access pull-down menu
By clicking left key you can adjust Color control bar and volume control bar.
By clicking left key you can select values in edit boxes or pull-down menu and supports
Chinese word input, special symbol, numeric and character input, use instead of
[Enter- ] or [Backspace ]
Click left key of
Mouse
In the [Detailed file] menu mode, clicking left key will playback one recording file.
In live display mode, clicking right key will display pop-up menu (shown as Picture 5-1).
Click right key of
Mouse In Main menu or sub menu mode, clicking right key will exit current menu.
Double-click Left
key of Mouse In live display or playback mode, double-clicking left key will maximize the screen.
Moving Mouse Select menu item
Sliding Mouse On motion mode, sliding mouse will select motion area; On [Color set] menu mode,
sliding mouse will adjust color control bar and volume control bar.
List 2-3
Chapter 3:DVR Installation
3.1 Hard Drive Installation
Caution:Please do not Install or take out hard drive when DVR is running!
(1) Remove screws and open DVR upper cover carefully;
(2) Insert Power Cord and data cable into Pin of hard drive securely;
(3) Put the upper cover back carefully, re-attach screws.
3.2 Camera and Monitor Connection
Connect camera cable to video input of DVR, and from video output of DVR to Monitor via BNC
connector (Refer to section2.2-Rear Panel); or
If the camera is a PTZ speed dome, you could connect RS485 A & B to the according port of DVR
respectively (refer to system figuration on Chapter 8).
3.3 Power Supply connection
Please only use the power adapter supplied with the DVR .

User Manual
7
Chapter 4: DVR Boot up
4.1 System Initialization
4.2 Main Interface
Chapter 5:DVR Menu
Pop-up Menu
After finishing system initialization, click right key of mouse on main
interface mode to enter into Pop-up Menu. Now you could proceed
parameter setting and operate for Main Menu, Menu lock, Recording
search, PTZ control and recording etc.
Picture 5-1
After connecting the power adapter and turning
On the power button, the system will boot-up and start
initializing.
After finishing system initialization you are allowed to enter into main
interface. The picture4-2 is the main interface faulted by system, which is
under no video input status. Once there are any video inputs, the interface
will display live images accordingly for relative channels. On main interface
mode, when double-clicking live image of any channel, the image will be
maximized to full screen, then double-clicking again, will be come back to
quad display; when clicking right key of mouse, allow you enter into Pop-up
Menu; when clicking left key of mouse, allow you select menu item; when
clicking any area outside menu, allow you exit the Pop-up menu.
Picture 4-1
Picture 4-2
Table des matières