
Ruby Street Brewing Alpha Ruby Manuel utilisateur

Owners Manual
The Alpha Ruby™
Electric

Table of Contents
Copyright © 2016 Ruby Street Brewing, LLC
Introduction 3
Safety Instructions 4
Brewery Overview 5
Setup and Assembly 7
Tune and Test 11
Brewing Instructions 14
Kettle Assembly 17
Care and Storage 19
Limited Warranty 20
2

Introduction
Copyright © 2016 Ruby Street Brewing, LLC
Thank You for purchasing The Alpha Ruby™
Our machines are hand built and shipped almost completely
assembled using high quality components and materials. With
proper use and care, this equipment will provide many years of
outstanding performance.
NOTICE!
Please review this manual in its entirety prior to any operation of this
equipment
Failure to follow all manufacturer’s instructions could result in serious
personal injury and/or property damage.
Ruby Street Brewing, LLC assumes no responsibility for personal injury or
property damage sustained by or through the use of this product.
If you have any questions or need assistance please contact us at:
Ruby Street Brewing, LLC
Fort Collins, CO
Email:
Questions@RubyStreetBrewing.com
SAVE THESE INSTRUCTIONS
3

Copyright © 2016 Ruby Street Brewing, LLC
Safety Instructions
WARNING: To Reduce the risk of serious injury, read the following
important precautions before using The Alpha Ruby Brewery.
•It is the responsibility of the owner to ensure that all users of this equipment are
adequately informed of all precautions.
•Use this equipment as described in this manual, do not use for anything other than its
intended purpose.
•The brewing structure must only be used on a level hard surface such as concrete. Do
not use on a surface that could be damaged by moisture.
•Make sure that all 4 legs contact the ground evenly, and that the frame cannot rock or
sway during use. Shim legs with solid material as needed to correct for uneven surfaces.
•Inspect and tighten all parts before each use. Replace any parts that are worn or
damaged immediately.
•Keep children and pets away from this equipment during use.
•DANGER! Water and Electricity Do Not Mix… Make sure that your circuit is a GFCI
protected circuit. If in doubt consult a licensed electrician before using.
•Do not leave brewery unattended at any time during operation.
•Do not attempt to tilt or move the brewery unless all kettles have been removed
•Always make sure that the control panel is powered off and all control switches are in
the off position before connecting or disconnecting any power, pump, or element
connections at the panel.
•DANGER! Unplug Panel from the main outlet before opening or servicing the panel.
•Never dry fire stainless heating elements. Energizing an element that is not submerged
in liquid will result in immediate and permanent damage.
4

Copyright © 2016 Ruby Street Brewing, LLC
Brewery Overview
Familiarize yourself with all system components prior to assembly
Our breweries are
constructed with high
quality solid stainless steel
tri-clamp fittings. These
fittings are extremely easy
to clean and keep sanitary
and offer a completely
universal connection
system. See illustration at
right for proper assembly
5
Electric Control Panel
HLT Return Fitting
Mash Tun
Wort Pump (w/sensor)
Boil Kettle
Water Pump
HERMS Inflow
Welded Steel Frame
Whirlpool Inlet
(Optional)
Sparge Inlet
Hot Liquor Tank (HLT)
HERMS Outflow
Pnuematic
Tire/Wheel
Kettle Outflow Valves x3
½” ID silicone hoses with
stainless tri-clamp ends
included:
•(1) 3’ Hose
•(3) 4’ Hoses
•(1) 7’ Hose
3/8” x 24” silicone hose
with cork float end
included (sparge hose)
Boil Kettle Inlet

Copyright © 2016 Ruby Street Brewing, LLC
Brewery Overview
Electric heating and control system components
6
Stop Button and
Indicator Light
Key Switch and Power
On Indicator Light
HLT Controller
Wort Pump Switch
Timer Start and
Reset Buttons
Event Timer
Boil Controller
Alarm on/off switch
Visual and Audio Alarm
Mash Controller
Main Power Cord
4 Stainless Steel
Heating Element
Assemblies:
(2) Short 8’
(2) Long 11’
Element Selector
Switch (1 or 2
Depending On Model
Element Selection
Indicator Lights (orange)
Water Pump
Switch
Element Energized
Indicator Lights (white)
Sensor Cables (x3)
Panel Mounting
Hardware Kit
Safety Shutoff Key
Key to Open Enclosure

Copyright © 2016 Ruby Street Brewing, LLC
Brewery Setup and Assembly
Power Supply and Panel Mounting
When choosing a location for your brewery, you need to plan ahead to make sure there is adequate space for
the system, wall mounted control panel, and necessary power receptacle. You also want to make sure that
your flooring surface is solid and wont be damage by moisture. The brewing system creates a significant
amount of steam so make sure that you have a plan for proper ventilation, as the excess steam can damage
wall and ceiling surfaces.
Power Supply:
Your panel includes a 6’ power cord that connects the panel to the wall outlet. We recommend that you place
the wall outlet within 3’ of the panel mounting location and close to the same height. See illustration below.
The supply outlet for your brewery must be a dedicated GFCI protected circuit installed by a licensed
electrician based on the following specifications:
•50 Amp Systems:
–50 Amp 240VAC Single Phase GFCI Protected (4 Wire) circuit.
–Plug Type: NEMA 14-50
Panel Mounting:
Choose a location to mount your control panel either directly to the left or right of the brewing system
location. The panel should be mounted at a height that has good access for adult use (out of reach of small
children).
Your panel includes (2) wall mounting tabs in a separate kit for securing the panel. Using the included bolts
and nuts, tighten the tabs onto the panel using the (2) holes in the top corners of the back of the panel. When
securing the panel to your wall make sure that you are mounting to a solid wall surface using anchors and
fasteners that are rated in excess of the panel weight (the control panels are heavy!).
7
Electric Outlet
6’ Power Cord
Control Panel
Copyright © 2016 Ruby Street Brewing, LLC
Brewery Setup and Assembly
Frame and Kettle Setup
Step 1: Place the kettles on the brewery frame in the correct locations.
•Left side: Hot Liquor Tank (HLT) –The HLT can be identified by the stainless steel HERMS coil mounted
inside
•Center: Mash Tun –The mash tun will have a wall to wall false bottom assembly and no element ferules
•Right Side: Boil Kettle –The boil kettle will have a domed false bottom and (2) element ferules in the back
All kettles should be placed in the center of the black painted kettle support frames with the outlet valves
facing forward. Refer to image on page 5 for proper kettle placement.
Step 2: Remove all packaging material from inside of the kettles. There is a foam protection sheet beneath
the domed false bottom in the boil kettle, as well as a foam block supporting the HERMS coil in the HLT.
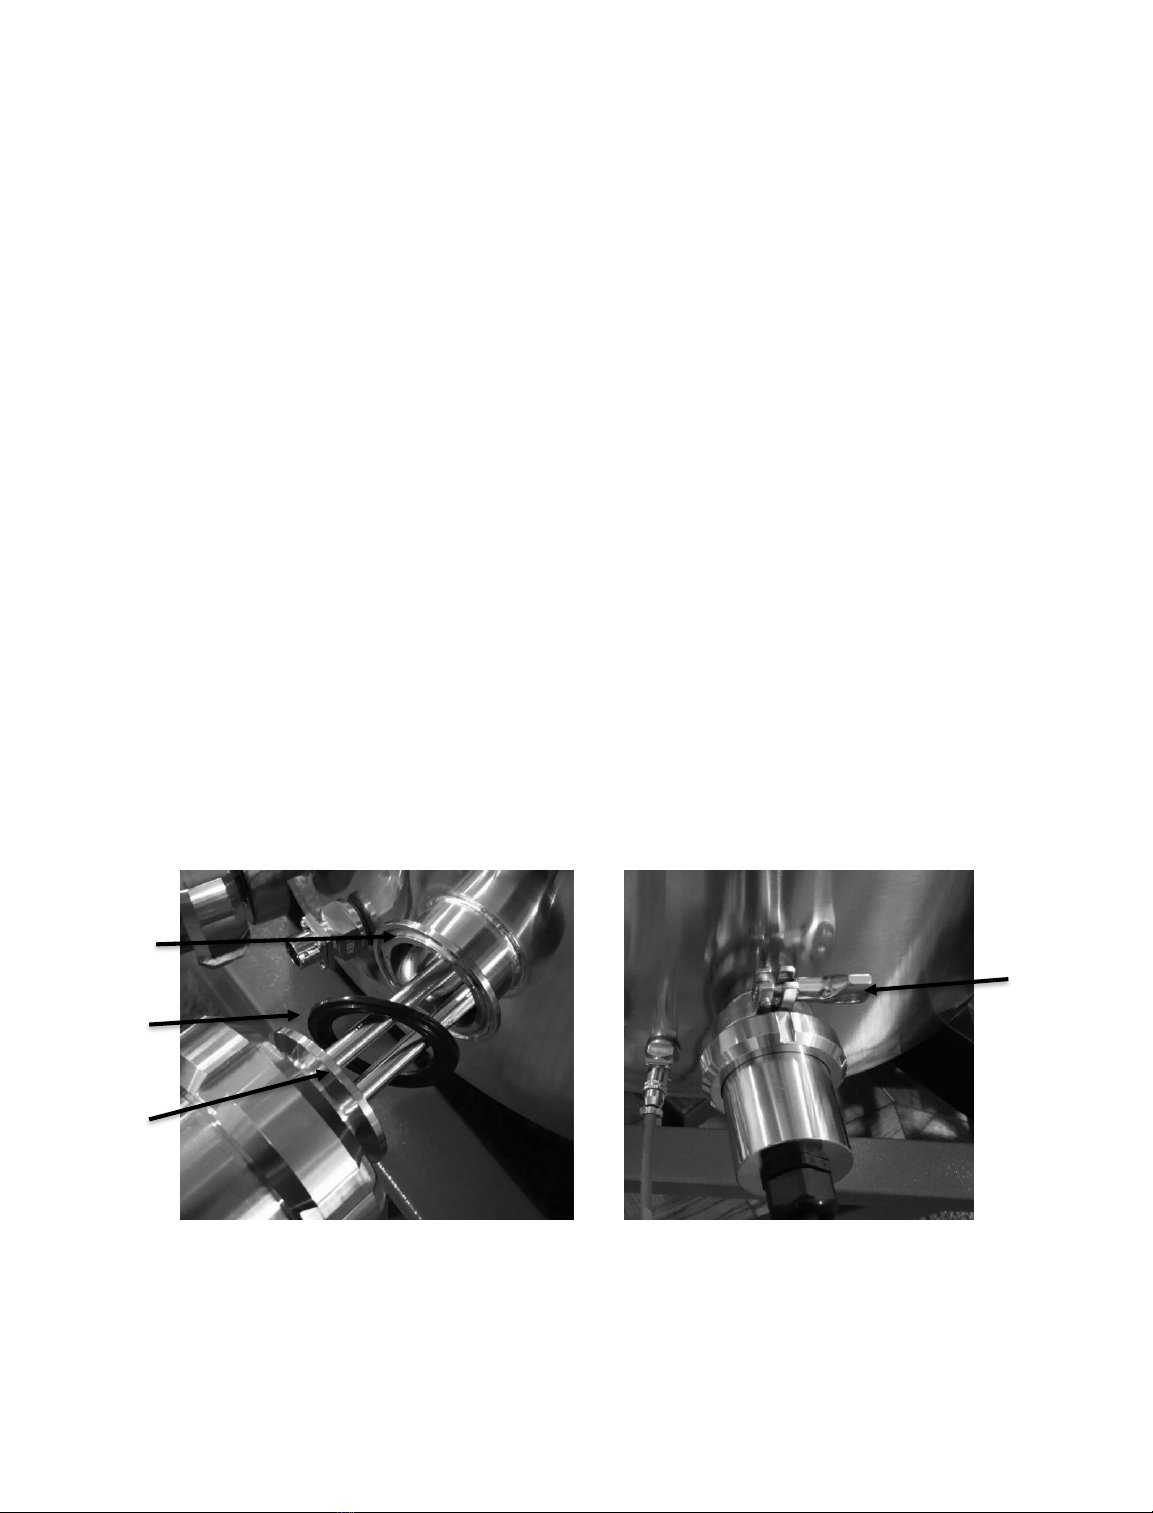
Step 3: Install the heating elements into the HLT and Boil kettles. Place a tri-clamp gasket onto each of the
four heating elements by pushing the gaskets over the element and up against the sealing surface. Note that
the (4) included element assemblies do not have the same length of cable. The elements with the longer
cables should be placed in the kettle that is furthest from the control panel. Installing the elements into the
kettles as shown below. Once an element is in the kettle, make sure the tri-clamp gasket is properly mated
onto both sealing surfaces (ferules), and install a stainless clamp to complete the connection as shown below.
The element ferules are staggered one slightly above the other so that the elements can intersect inside of
the kettle (see image on next page)
8
Installing Element Installed with Clamp
Kettle Ferule
Tri Clamp
Gasket
Element
Assembly
ferule
Clamp

Copyright © 2016 Ruby Street Brewing, LLC
Brewery Setup and Assembly
Frame and Kettle Setup (cont.)
Step 4: Verify that the elements are positioned properly inside of the kettles using the images below for
reference.
Step 5: Install the pumps onto the frame by removing the (2) wing nuts from each pump assembly and placing
the stainless bolts on the pump assembly through the holes in each welded pump bracket. While holding the
pumps in place, secure the wing nuts back onto the pump assembly. The pump with the temp sensor
connection should be mounted on the right side bracket as shown below.
Step 6: If your system included the optional plate chiller package, secure the plate chiller to the mounting
bracket using the included stainless wing nuts to secure.
Step 7: Connect the temp sensor cables to the HLT, Pump (Mash), and Boil Kettle connections on the system.
All (3) sensor cable are identical. The color coding is for your reference only. Gently push the cable ends onto
the connectors until they click (they are indexed inside, so they will only go on one way. To disconnect the
cables simply pull back on the metal connector sleeve. Make the 3 system connections as shown below.
9
Water Pump
Wort Pump with
Temp Sensor
Connection

Copyright © 2016 Ruby Street Brewing, LLC
Brewery Setup and Assembly
Frame and Kettle Setup (cont.)
Step 8: Connect the (3) temp sensor cables into the correctly labeled sockets on the control panel as shown.
Use the color coding on the cable to verify that each connections is correct. The socket that is labeled mash
should connect to the pump sensor cable.
Step 9: Plug the (2) pump power cables into the panel as shown below. Left Pump = Water Pump; Right Pump
= Wort Pump.
Step 10: Plug the (4) element power cables into the panel as shown below, making sure that the correct kettle
is plugged into the corresponding labeled sockets.
Step 11: Make sure that all switches (including the key switch) are in the off position on the control panel.
Connect the 240 Volt power cable into the socket on the control panel, and then plug the power cable into the
wall socket.
Congratulations, your brewery is all setup and ready for use. Before brewing on the system, please complete
the steps on the next few pages to test, tune, and get familiar with the control systems.
10
Autres manuels pour Alpha Ruby
1
Table des matières
Autres manuels Ruby Street Brewing Système de brassage

Manuels Système de brassage populaires d'autres marques


Curtis
Curtis ThermoPro G4 Series Manuel utilisateur

Animo
Animo ComBi CB5 Manuel utilisateur

MoreBeer
MoreBeer BrewSculpture Manuel utilisateur

Keurig Hot
Keurig Hot Commercial Series Manuel utilisateur

Keg King
Keg King KEGMASTER XL Manuel utilisateur

Blichmann Engineering
Blichmann Engineering BrewEasy Compact TC Instructions d'installation