Refine A7 Manuel utilisateur

RF-APL-M001-1.2
Model: A7

For your safety and the safety of your patients please read this user manual carefully
before use and le for future reference.
This manual is published by Manufacturer.
We do not guarantee its contents and reserves the right to amend at anytime without
prior notice, amendments will be published in new editions of this manual.

Contents
1. Intended Use .....................................................................................................................................1
2. Precautions ........................................................................................................................................1
3. Contraindication ...............................................................................................................................2
4. Package Contents .............................................................................................................................3
5. Component .......................................................................................................................................4
6. Installation .........................................................................................................................................7
7. Operation ...........................................................................................................................................8
8. Audio Alarm Volume Control...........................................................................................................11
9. Maintenance ......................................................................................................................................11
10. Charging Battery .............................................................................................................................13
11. Regular Maintenance Checks ........................................................................................................14
12. Trouble Shooting ............................................................................................................................15
13. Specications ..................................................................................................................................20
14. Classication of Equipment ..........................................................................................................21
15. Operation Principle ........................................................................................................................21
16. Declaration of Conformity .............................................................................................................22
17. Transportation and Storage Environment ..................................................................................22
18. Symbols ............................................................................................................................................22
19. Warranty ...........................................................................................................................................23
20. Disposing Product ..........................................................................................................................23
21. EMC Information .............................................................................................................................24
(Electromagnetic Compatibility Information) ..................................................................................24

1
1. Intended Use
Intended use:
determination of the apical foramen position and measurement of the root canal length.
The product is only to be used in dental surgeries by qualied dental personnel.
2. Precautions
• All precautions should be read and understood before use.
• Equipment is only to be used for its specied intended use.
• Safety instructions are provided in order to prevent the risk of personal injury or damage to the device
and are classied as below in accordance with the level of potential risk.
WARNING: Indicates a hazard that may result in serious injury/device damage if
instructions are not correctly followed.
CAUTION: Indicates a hazard that may result in mild to moderate injury/device damage if
instructions are not correctly followed.
WARNING:
• Use this product in accordance with its intended use and proper method of use.
• This product is not waterproof. Avoid water or chemical solutions on the control unit as it may cause
electric shock due to a short circuit.
• The scale indication on the screen does not represent a distinct length or distance in mm or other linear
units. It simply indicates the le’s progression towards the apex.
• Do not expose to or dispose of the battery in a re.
• Be sure to prevent the lip hook , le clip , le probe and their connector parts from having contact with
household power supply sources (such as electrical outlets) as it may cause an electric shock.
• The components in the product package are delivered in a non-sterile condition, be sure to sterilize the
le clip, le probe and lip hook by autoclave sterilization prior to use and after each patient.
• Do not operate close to patients with cardiac pacemakers as there is a danger that it may affect the
pacemaker.
• Keep away from explosive substances and ammable materials.

1
CAUTION:
• Do not keep using the product when the battery indicator “ ” is ashing. Normal operation or
indication may not be performed. Please recharge the battery.
• Should the product function abnormally during operation, cease operation immediately.
• Do not use the product by connecting or integrating into other medical devices.
• Do not drop or allow impact on the product. This may result in personal injury or damage to the unit.
• Avoid using chemical solutions on the lip hook, le probe or le clip during procedures. Use of solutions
may cause inammation.
• When gripping the metallic part of a file or reamer with the file clip, grip the upper part (near the
handle). If the lower part (blade transition part and blade part) is gripped, the root canal length cannot
be correctly measured and the tip of the le clip may be broken.
• Do not use or leave the product in a high-temperature environment such as under strong direct
sunlight, or next to equipment that produces heat as it may cause overheating or re due to a failure of
the internal circuit.
• Do not attempt to disassemble the product nor tamper with the mechanism except as recommend by
manufacturer in this User manual.
• This device is for indoor use only.
• Keep the control unit on a level surface.
• If the product is not used for a long period check it is functioning correctly before using on a patient.
• Portable and mobile RF communications equipment can affect Medical Electrical equipment. Do not use
RF equipment near the product.
• During operation the Apex Locator may interfere with computers, LAN cables or may cause noise in
radio receivers nearby.
• Installation and use of this product requires special precautions regarding EMC according to the EMC
information.
• Use only original accessories with this device.
• The apical position is indicated on the screen with “00”. In order to avoid over instrumentation, it is
suggested to subtract 0.5mm from the reading when determining the working length for shaping.

2
• Always dry the cavity entrance with a cotton pellet in order to obtain an accurate measurement.
• Users are responsible for the operational control, maintenance and continual inspection of this product.
• The battery can be replaced, please contact our distributor if a replacement battery is required.
3. Contraindication
The Apex Locator is not recommended for use:
a. In patients who have a pacemaker or other implanted electrical devices or have been cautioned by
their physicians against the use of small electric appliances such as shavers, hair dryers etc.
b. In Patients allergic to metals.
c. Children.
4. Package Contents
Apex Locator is composed of a control unit, AC adapter, Plug adaptor, measuring wire, lip hook, le clip,
le probe .
Accessories
h
a). File Clip
d). Lip Hook e). File Probe f). AC adapter
b). Measuring wire c). Battery
ICR14500 3.6V 800mA

3
Accessories list
No. Name Quantity Consumable? Can be sterilized?
a File clip 4 PCS YES YES
b Measuring wire 1 PCS YES NO
c Battery 1 PCS NO NO
d Lip hook 4 PCS YES YES
e File probe 4 PCS YES YES
f AC adapter 1 PCS NO NO
5. Component
5.1 Control Unit

4
LCD Panel Displays the position of the le tip, remaining battery
level and alarm sound volume
Power key
When the Power key is pressed, the power turns on
sounding an alarm, then the LCD panel lights up, press the
Power key again, the power and the LCD panel turns off.
Alarm key When the Alarm key is pressed, the alarm audio volume
can be adjusted (rotation of OFF->Low->Medium->High).
Measuring wire socket Socket to which the measuring wire is inserted.
Battery cover Secures battery in place.
Charging light The light will remain on when battery is charging
Demonstration mode Press the button to demonstrate the measurement process
Charging socket Socket to which the AC adapter is inserted
5.2 LCD Panel
2
3
1
5
6
74

5
Bar graph Displays the approximate position of the end of the le
Batter
indicator
Displays the remaining battery level. When the Battery indicator flashes,
immediately recharge the device with AC adapter
Alarm indicator Displays the alarm audio volume
(rotation of OFF ->Low ->Medium ->High )
Number display
Displays the present position from the end of the root canal in numerical
value. When the value displays “10” to “05”, an alarm corresponding to each
value sounds. When the value reaches “04” to “00”, a short alarm sounds
with “APEX”displayed on the LCD panel. When the values reaches “-1” to “-3”, a
shorter alarm sounds with “OVER”displayed on the LCD panel
Apex indicator Turns on when the value representing the present position of the file end
reaches “00”
OVER Display Turns on when the value representing the present position of the file end
reaches “-1”
Measurement
indicator Indicates the les position in the root canal
* 4 is not a value to show the actual distance from the end of the root canal in the unit of mm. It is to be
used as indication for measurement.
6. Installation
1) Connect the measuring wire: securely insert the plug of the measuring wire into the Measuring wire
socket on the unit.(Fig.2)
6
2) Connect the le clip: connect the plug of the le clip to either plug of the measuring wire. (Fig.3)
3) Connect the lip hook: connect the lip hook to the other plug of the measuring wire. (Fig.3)
Fig.1 Fig.2 Fig.3
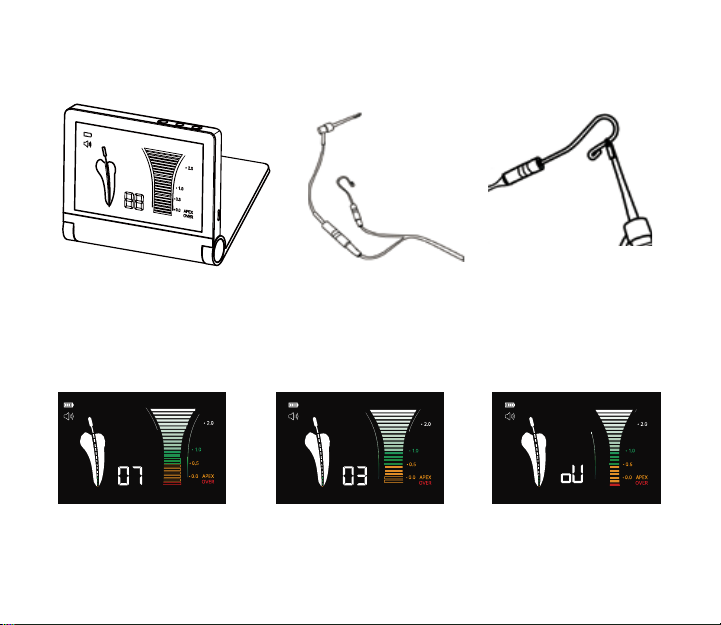
4) Make the lip hook touch the bent section of the le clip (Fig.4), the screen will display“OVER”,(as show
in Fig.5 c), otherwise, it means the le clip or the measuring wire is damaged, and should be replaced.
5) Display explanation
• “10 to 05”, Green bar graph and/or low frequency sound: File has reached the front region of the Apex;
• “04 to 00”, Yellow bar graph and/or middle frequency sound: File is very close to the Apex;
• “-1 to -3”, Red bar graph and/or high frequency sound: File has exceeded the Apex.
Display Screen explanation
a. The file has reached the front
region of the apex
b. The le is very close to the apex c) The file has already exceeded
the Apex
Fig.5
Table des matières
Autres manuels Refine Équipement dentaire


Manuels Équipement dentaire populaires d'autres marques

Vatech
Vatech EzRay Air VEX-P300 Manuel utilisateur

KaVo
KaVo GENTLEpower LUX Contra-angle 25 LP Manuel utilisateur

DENTSPLY
DENTSPLY SmartLite Focus Manuel utilisateur

LM
LM ProPower CombiLED Manuel utilisateur

Owandy Radiology
Owandy Radiology RX-AC Manuel utilisateur

mectron
mectron Piezosurgery Manuel utilisateur


