
RedMax DST24 Manuel utilisateur

DST24, DST27, DST30
EN Operator's manual 2-23
ES-MX Manual del usuario 24-46
FR-CA Manuel d’utilisation 47-70

Contents
Introduction............................................................... 2
Safety........................................................................4
Assembly.................................................................. 7
Operation................................................................ 10
Maintenance........................................................... 14
Troubleshooting...................................................... 20
Transportation, storage and disposal......................22
Technical data.........................................................23
Introduction
Product overview
9
25
26
24
23
1
15
17
16
18
19
20
21
22
2345
8
9
1011
12
14
13
7
6
2791 - 002 - 08.01.2020

1. Auger engagement
2. Discharge chute control lever
3. Drive speed control lever
4. Deflector remote control lever
5. Drive engagement
6. Steering triggers
7. Light
8. Handle knob
9. Muffler
10. Skid plate
11. Augers
12. Clean-out tool
13. Discharge chute
14. Chute deflector
15. Starter rope handle
16. Oil drain
17. Fuel switch
18. ON/OFF key
19. Primer
20. ON/OFF switch (DST27, DST30)
21. Choke
22. Gasoline filler cap
23. Oil fill and Dipstick (DST27), Oil fill (DST27)
24. Electric start button
25. Connection, electric start
26. Oil fill and Dipstick (DST24, DST30)
Product description
The product is a wheeled snow thrower that is used
to remove snow from the ground.
Intended use
This product can be used to remove snow from
fields, roads, walkways and driveways. Do not use it
on slopes that are greater than 20°. Do not use the
product in areas where there is much debris, dirt and
protruding stones.
Symbols on the product
Note: If the decals on the product are damaged,
contact the distributor to replace them.
Warning.
Read the operator's manual.
Engine on
Engine off.
Fast.
Slow.
Fuel.
Oil.
Ear protection recommended.
ON/OFF key. Insert to start and run.
Choke closed (start).
Primer.
Pull starter rope handle to start.
Choke open (run).
ON/OFF key. Pull out to stop.
No operation on slopes more than 10
degrees.
Do not remove shields while engine is
running.
Remove spark plug cable before
maintenance.
791 - 002 - 08.01.2020 3
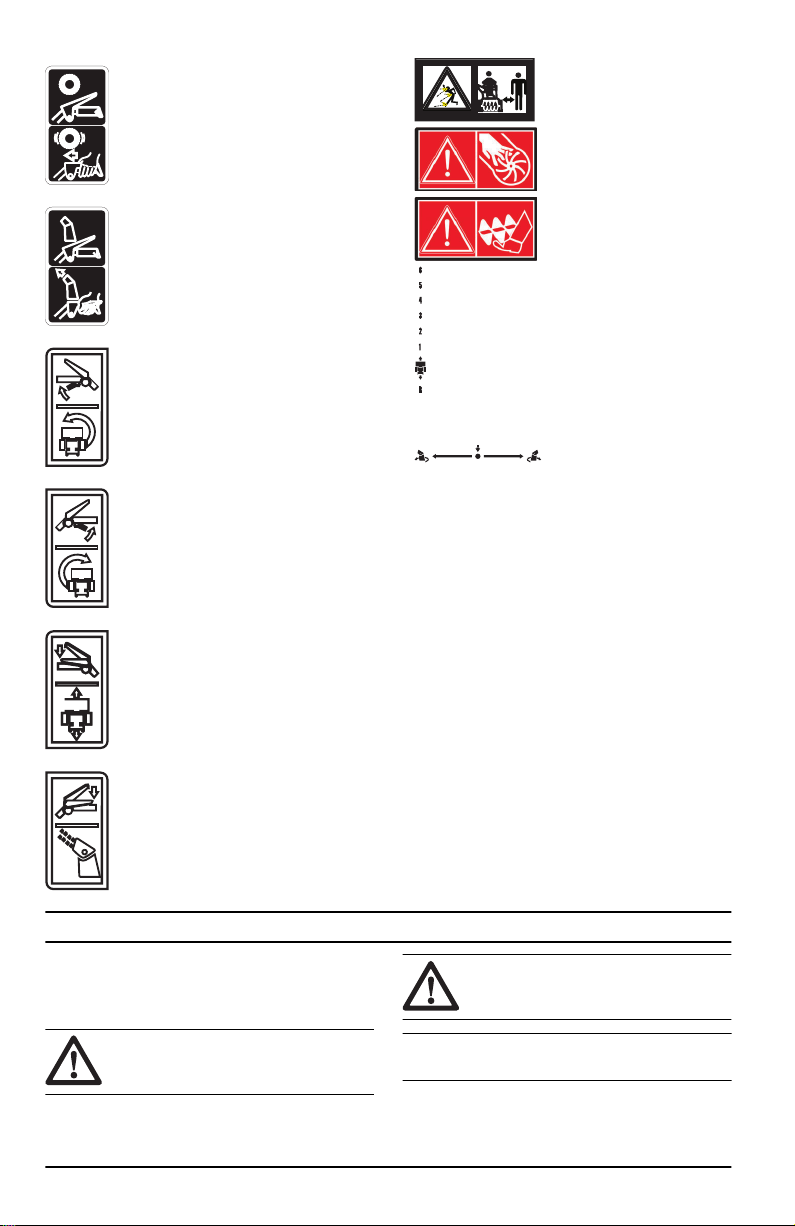
Traction drive off/on.
Snow discharge off/on.
Steer left.
Steer right.
Traction drive control.
Snow discharge.
Beware of thrown ob-
jects-keep bystanders
away.
Warning, keep hands
away.
Warning, keep feet
away.
Forward/reverse.
Rotate left/push down/
rotate right.
Product liability
As referred to in the product liability laws, we are not
liable for damages that our product causes if:
• the product is incorrectly repaired.
• the product is repaired with parts that are not
from the manufacturer or not approved by the
manufacturer.
• the product has an accessory that is not from the
manufacturer or not approved by the
manufacturer.
• the product is not repaired at an approved
service center or by an approved authority.
Safety
Safety definitions
The definitions below give the level of severity for
each signal word.
WARNING: Injury to persons.
CAUTION: Damage to the product.
Note: This information makes the product easier to
use.
4791 - 002 - 08.01.2020

General safety instructions
• Use the product correctly. Injury or death is a
possible result of incorrect use. Only use the
product for the tasks found in this manual. Do not
use the product for other tasks.
• Obey the instructions in this manual. Obey the
safety symbols and the safety instructions. If the
operator does not obey the instructions and the
symbols, injury, damage or death is a possible
result.
• Do not discard this manual. Use the instructions
to assemble, to operate and to keep your product
in good condition. Use the instructions for correct
installation of attachments and accessories. Only
use approved attachments and accessories.
• Do not use a damaged product. Obey the
maintenance schedule. Only do the maintenance
work that you find an instruction about in this
manual. An approved service center must do all
other maintenance work.
• This manual cannot include all situations that can
occur when you use the product. Be careful and
use your common sense. Do not operate the
product or do maintenance to the product if you
are not sure about of the situation. Speak to a
product expert, your dealer, service agent or
approved service center for information.
• Disconnect the spark plug cable before you
assemble the product, put the product into
storage or do maintenance.
• Do not use the product if it is changed from its
initial specification. Do not change a part of the
product without approval from the manufacturer.
Only use parts that are approved by the
manufacturer. Injury or death is a possible result
of incorrect maintenance.
• Do not breathe in the fumes from the engine.
Long term inhalation of the engine's exhaust
fumes is a health risk.
• Do not start the product indoors or near
flammable material. The exhaust fumes are hot
and can contain a spark which can start a fire.
Not sufficient airflow can cause injury or death
because of asphyxiation or carbon monoxide.
• When you use this product the engine makes an
electromagnetic field. The electromagnetic field
can cause damage to medical implants. Speak to
your physician and medical implant manufacturer
before you operate the product.
• Do not let a child operate the product. Do not let
a person, without knowledge of the instructions
operate the product.
• Make sure that you always monitor a person,
with decreased physical capacity or mental
capacity, that uses the product. A responsible
adult must be there at all times.
• Lock the product in an area that children and
unapproved persons cannot access.
• The product can eject objects and cause injuries.
Obey the safety instructions to decrease the risk
of injury or death.
• Do not go away from the product when the
engine is on.
• The operator of the product is responsible if an
accident occurs.
• Before and while you walk rearward, look behind
and down for small children, animals or other
risks that can cause you to fall.
• Make sure that parts are not damaged before
you use the product.
• Make sure that you are at a minimum 15 m (50
ft) away from other persons or animals before
you use the product. Make sure that a person in
adjacent area knows that you will use the
product.
• Refer to national or local laws. They can prevent
or decrease the operation of the product in some
conditions.
Safety instructions for operation
• Do not put hands or feet near or under rotating
parts. Keep clear of the discharge opening at all
times.
• Exercise extreme caution when operating on or
crossing gravel drives, walks, or roads. Stay alert
for hidden hazards or traffic.
• After striking a foreign object, stop the engine
(motor), remove the wire from the spark plug,
disconnect the cord on electric motors,
thoroughly inspect the product for any damage,
and repair the damage before restarting and
operating the product.
• If the product starts to vibrate abnormally, stop
the engine (motor) and check immediately for the
cause. Vibration is generally a warning of trouble.
• Stop the engine (motor) whenever you leave the
operating position, before unclogging the auger
housing or chute deflector, and when making any
repairs, adjustments or inspections.
• When cleaning, repairing or inspecting the
product, stop the engine and make certain the
augers and all moving parts have stopped.
Disconnect the spark plug wire and keep the wire
away from the plug to prevent someone from
accidentally starting the engine.
• Do not run the engine indoors, except when
starting the engine and for transporting the
product in or out of the building. Open the
outside doors; exhaust fumes are dangerous.
• Exercise extreme caution when operating on
slopes.
• Never operate the product without proper guards,
and other safety protective devices in place and
working.
• Never direct the chute deflector toward people or
areas where property damage can occur. Keep
children and others away.
• Do not overload the product capacity by
attempting to clear snow at too fast a rate.
• Never operate the product at high transport
speeds on slippery surfaces. Look behind and
use care when operating in reverse.
791 - 002 - 08.01.2020 5

• Disengage power to the augers when the product
is transported or not in use.
• Use only attachments and accessories approved
by the manufacturer of the product (such as
wheel weights, counterweights, or cabs).
• Never operate the product without good visibility
or light. Always be sure of your footing, and keep
a firm hold on the handles. Walk; never run.
• Never touch a hot engine or muffler.
Work area safety
• Thoroughly inspect the area where the
equipment is to be used and remove all
doormats, sleds, boards, wires, and other foreign
objects.
• Disengage all clutches and shift into neutral
before starting the engine (motor).
• Do not operate the product without wearing
adequate winter garments. Avoid loose fitting
clothing that can get caught in moving parts.
Wear footwear that will improve footing on
slippery surfaces.
• Handle fuel with care; it is highly flammable.
• Use an approved fuel container.
• Never add fuel to a running engine or hot
engine.
• Fill fuel tank outdoors with extreme care.
Never fill fuel tank indoors.
• Never fill containers inside a vehicle or on a
truck or trailer bed with a plastic liner. Always
place containers on the ground, away from
your vehicle, before filling.
• When practical, remove gas-powered
equipment from the truck or trailer and refuel
it on the ground. If this is not possible, then
refuel such equipment on a trailer with a
portable container, rather than from a
gasoline dispenser nozzle.
• Keep the nozzle in contact with the rim of the
fuel tank or container opening at all times,
until refueling is complete. Do not use a
nozzle lock-open device.
• Replace gasoline cap securely and wipe up
spilled fuel.
• If fuel is spilled on clothing, change clothing
immediately.
• Use extension cords and receptacles as
specified by the manufacturer for all units with
electric drive motors or electric starting motors.
• Adjust the auger housing height to clear gravel or
crushed rock surface.
• Never attempt to make any adjustments while
the engine (motor) is running (except when
specifically recommended by the manufacturer).
• Always wear safety glasses or eye shields during
operation or while performing an adjustment or
repair to protect eyes from foreign objects that
may be thrown from the machine.
Personal protective equipment
Always use the correct personal protective
equipment when you operate the product. This
includes, at minimum, sturdy footwear, eye
protection and hearing protection. Personal
protective equipment does not erase the risk of injury
but may decrease the grade of injury if an accident
occurs.
• Always wear safety glasses or eye protection
while you operate the product or do maintenance
or repairs.
• Always wear appropriate winter garments when
you operate the product.
• Always use heavy-duty slip-resistant boots with
good ankle support while you operate the
product.
• Do not wear loose fitting clothing that can get
caught in moving parts.
• Use approved protective gloves, if necessary.
For example, when attaching, examining or
cleaning the blade.
• Always use approved ear protection while you
operate the product. Noise for a long period can
cause noise-induced hearing loss.
Safety devices on the product
• Make sure that you regularly do the maintenance
to the product.
• The life of the product increases.
• The risk of accidents decreases.
Let an approved dealer or an approved service
center regularly examine the product to do
adjustments or repairs.
• Do not use a product with damaged protective
equipment. If the product is damaged, speak to
an approved service center.
Muffler
The muffler keeps the noise levels to a minimum and
sends the exhaust fumes away from the operator.
Do not use the product if the muffler is missing or
defective. A defective muffler increases the noise
level and the risk of fire.
Examine the muffler regularly to make sure that it is
attached correctly and not damaged.
CAUTION: The muffler becomes very
hot during and after use and when the
engine operates at idle speed. Be careful
near flammable materials and/or fumes
to prevent fire.
Fuel safety
WARNING: Read the warning
instructions that follow before you use
the product.
6791 - 002 - 08.01.2020

• Do not start the product if there is fuel or engine
oil on the product. Remove the unwanted fuel/oil
and let the product dry.
• If you spill fuel on your clothing, change clothing
immediately.
• Do not get fuel on your body, it can cause injury.
If you get fuel on your body, use soap and water
to remove the fuel.
• Do not start the product if the engine has a leak.
Examine the engine for leaks regularly.
• Be careful with fuel. Fuel is flammable and the
fumes are explosive and can cause injuries or
death.
• Do not breathe in the fuel fumes, it can cause
injury. Make sure that there is a sufficient airflow.
• Do not smoke near the fuel or the engine.
• Do not put warm objects near the fuel or the
engine.
• Do not add the fuel when the engine is on.
• Make sure that the engine is cool before you
refuel.
• Before you refuel, open the fuel tank cap slowly
and release the pressure carefully.
• Do not add fuel to the engine in an indoor area.
Not sufficient airflow can cause injury or death
because of asphyxiation or carbon monoxide.
• Tighten the fuel tank cap fully. If the fuel tank cap
is not tightened, there is a risk of fire.
• Move the product a minimum of 3 m (10 ft) from
the position where you filled the tank before a
start.
• Do not put too much fuel in the fuel tank.
Proposition 65
WARNING
The engine exhaust from this product
contains chemicals known to the State of
California to cause cancer, birth defects
or other reproductive harm.
Safety instructions for maintenance
WARNING: Read the warning
instructions that follow before you use
the product.
• The exhaust fumes from the engine contain
carbon monoxide, an odorless, poisonous and
very dangerous gas. Do not start the engine
indoors or in closed spaces.
• Before you do the maintenance on the product,
stop the engine and remove the ignition cable
from the spark plug.
• Use protective gloves when you do maintenance
on the blades. The blades are very sharp and
cuts can easily occur.
• Accessories and changes to the product that are
not approved by the manufacturer, can cause
serious injury or death. Do not change the
product. Always use accessories that are
approved by the manufacturer.
• If the maintenance is not done correctly and
regularly, the risk of injury and damage to the
product increases.
• Only do the maintenance as given in this
operator's manual. All other servicing must be
done by an approved service agent.
• Let an approved service agent do servicing on
the product regularly.
• Replace damaged, worn or broken parts.
Assembly
To remove the product from the
carton
1. Remove loose parts included with the product.
Cut the four corners of the carton and put the
end panels down flat.
2. Remove the two screws that attach the auger
housing to the pallet. Remove the steel brackets
from the skid plates if they have it.
3. Remove all package materials.
4. Remove the product from the carton and make
sure no loose parts are left in the carton.
Loose parts
Knob (3)
791 - 002 - 08.01.2020 7

Discharge chute (1)
ON/OFF key (s)
Carriage bolts 5/16-18 x 2 ¼” (2)
Handle knobs (2)
Locknut 3/8 (1)
Shear pins ¼-20 x 1-¾ (2)
Locknuts ¼-20 (2)
Locknut 5/16-18 (1)
Locknut ¼-20 (1)
Nylon washer (1)
Carriage bolt 5/16-18 x 5/8 (1)
Spring (1)
Shoulder bolt ¼-20 (1)
To install the handle
1. Raise the upper handle to the operating position.
2. Adjust the handle position to one of the mounting
holes (B) and tighten the handle knobs (C) with
the carriage bolts (D).
B
C
D
8791 - 002 - 08.01.2020

3. Install more carriage bolts (D) and handle knobs
(C) to secure the upper handle (A) to the lower
handle (E).
D
E
A
C
To install the chute deflector and
chute rotator head
1. Put the chute deflector assembly on top of the
chute base with the discharge opening to the
front of the product.
2. Put the chute rotator head (A) on the chute
bracket (B). If necessary, turn the chute
assembly to align the pins under the chute
rotator head with the holes in the chute bracket.
3. Put the chute rotator head on the pin (C) and the
threaded stud (D) of the mounting bracket (E).
4. Attach a locknut (F) on the threaded stud and
tighten.
FA
C
D
E
B
5. Attach the rotator cable (H) to the lower handle
with the double clip (G).
H
G H
To install the chute deflector remote
control
1. Attach the remote cable bracket (A) to the
discharge chute with a carriage bolt (B) and a
5/16-18 locknut (D). Tighten the bolt.
2. Install the remote cable eyelet (E) to the chute
deflector (F) with a shoulder bolt (G), a nylon
washer (C), and tighten with a ¼-20 locknut (K).
The cable eyelet will be loose on the shoulder
bolt.
3. Attach the spring (L) between the hex nut (M) on
the chute rotator head and the hole on the chute
deflector.
791 - 002 - 08.01.2020 9

F
L
M
B
A
D
K
C
E
G
4. Attach the lever control knobs (N) by pressing
them down on the control levers (O).
O
N
Operation
Before you start the product
• Keep persons and animals away from the work
area.
• Do daily maintenance. See
Maintenance
schedule on page 14
.
• Make sure the ignition lead fits correctly on the
spark plug.
• Add oil or gasoline, if necessary. See
Technical
data on page 23
.
To fill the engine with oil
CAUTION: Do not rotate the dipstick
when you check the oil. Do not fill above
the mark.
1. Remove the oil cap and clean the dipstick. See
Product overview on page 2
for the location of
the dipstick.
2. Add oil to the top mark on the dipstick. Use the
dipstick to do a check of the oil level at regular
intervals.
3. Put the oil cap back.
To fill fuel
If available, use low-emission/alkylate gasoline. If
low-emission/alkylate gasoline is not available, use
good quality unleaded gasoline or leaded gasoline.
Use gasoline with an octane number of 90 RON out
of North America (87 AKI in North America) or
higher, and with a maximum of 10% ethanol (E10).
CAUTION: Do not use gasoline with an
octane number less than 90 RON out of
North America (87 AKI in North
America). This can cause damage to the
product.
1. Open the fuel tank cap slowly to release the
pressure.
2. Fill slowly with a fuel can. If you spill fuel, remove
it with a cloth and let remaining fuel dry off.
3. Clean the area around the fuel tank cap.
4. Tighten the fuel tank cap fully. If the fuel tank cap
is not tightened, there is a risk of fire.
5. Move the product a minimum of 3 m (10 ft) from
the position where you filled the tank, before a
start.
To adjust the discharge chute and
the chute deflector
1. To adjust the discharge chute position, move the
discharge chute control lever (A) back and to the
left or right direction.
2. To adjust the snow throwing distance of the
chute deflector, move the deflector remote
control lever (B) down to decrease the distance
and up to increase the distance.
AB
10 791 - 002 - 08.01.2020
Ce manuel convient aux modèles suivants
2
Table des matières
Langues :


