Ready2Talk PA 64 Manuel utilisateur

PA 64
Installation & Operation Manual
The PA for ALL applications!

IMPORTANT!
Please read ALL these key points to ensure the proper
connection and use of your PA 64. If you have ANY
questions, please call 1 888 724-5351 BEFORE proceeding!
The PA 64 is intended to be installed by a professional installer, service
mechanic, vehicle manufacturer or dealer. Do not attempt to install
the PA 64 without confirming compatibility with your vehicle
manufacturer or authorized dealer. Failure to do so may cause
damage to you, the PA 64, your vehicle electrical system and possibly void
your vehicle warranty.
Basically… the PA 64 is an amplifier with microphone inputs (and a lot
more) that is connected between the stereo’s output and the vehicles
speakers. Just like an aftermarket car stereo amplifier!
The PA 64 is NOT designed to be used with ANY other amplifiers (e.g.
being connected between the stereo and a high powered amplifier). If
done, the PA 64 will not function and it may cause damage to the PA 64
and / or the additional amplifiers. If you need more amplification than the
PA 64 offers, we have other PA options to suit. Just give us a call.
Although the PA 64 is internally fused, always make ensure your power
wires are fused at the power source, to protect the wires from shorts!
Only use with Ready2Talk microphones; use of any other microphones
may cause damage or trip the onboard fuse. (For reset instructions,
please see page 5)
If you are not 100% sure about the installation or application of the PA 64
for your needs or vehicle type, please contact us at 1 888 724-5351. We
are happy to answer ANY questions!
Ready2Talk (Double E Products Ltd.) is not responsible for any damage
caused by misconnection, misuse or abuse of any Ready2Talk products.
Ready2Talk Limited Warranty
2 Year Limited Warranty on all PA Systems
1 year Limited Warranty on all Cables and Microphones

Now with the important warnings out of the way… the fun
stuff.
The PA 64 is designed to be the best PA system for all applications, offering a
real amplifier with 4x50Watts (peak), solid state variable mic / music muting
from both the rear RCA input and the dual front / rear 3.5mm AUX input.
Use the PA 64 as a stand-alone PA system or connected to your factory (OEM)
stereo, any aftermarket stereo / DVD player or automated tour system. Don’t
forget you can also connect your MP3 player though the front or rear AUX input.
The PA 64 can be mounted on any flat surface vertical, horizontal, even upside-
down. With the optional front decal, the printing will always be the right way
around. We try to think of everything.
Want to hide it away? There is an optional RMK (Remote Mounting Kit) in 5 ft.
and 15 ft. lengths and a 20 ft. RME (Rear Mic Extension) for a second mic when
using a step on guide.
It also allows the use of two microphones, hand or headset, wired or wireless;
and is the perfect PA system for Vans or Busses for Sightseeing, Shuttle,
Transit, School Bus, Church Busses, Retirement Homes, People Movers, Boats,
Trolleys, Snow Cats and Horse Carriages. Did we forget anything? Oh yes… it
can also be an easy PA system replacement for many older Highway Coaches.
We even have PA 64 wiring options for Multi Trailer Trams so you can couple or
remove trailers without sending your audio system into a tail spin. We also
have diagrams for vehicles to meet ADA (Americans with Disabilities Act) and
automated announcement or tour systems. Checkout the bottom of our
Ready2Talkpa.com FAQ page for the list of diagrams.
Karaoke anyone? Absolutely… Karaoke tours as starting to claim center stage…
we have connection plans for that too!
Easy to connect, easy to use and is better sounding than any other PA you’ve
heard before. Finally, you too can sound like a radio DJ. *sound effects and
annoying side kick not included.
Thanks for purchasing your PA 64, now go have fun with it or just talk
into it every day… all day!

Stereo Connection Options
Diagram 1 - Connection to Aftermarket Stereo RCA Output
Note: Set Input Switch on PA 64 to “Low”
Note: When using RCA cables the stereo’s speaker wires are not connected to
the PA 64 or the speakers, just like an aftermarket amp.
Diagram 2 - Connection to OEM Factory Stereo Speaker Wires
Use RCA to speaker wire pig tails included in the box.
Note: Set Input Switch on PA 64 to “High”
Note: Rear speaker wires from the stereo are not connected

PA 64 Multi Pin Plug Wiring Code
12V + Battery Yellow
12V + Switched Red
12V – Ground Black
Right Front + Gray
Right Front - Gray / Black
Left Front + White
Left Front - White / Black
Right Rear + Purple
Right Rear - Purple / Black
Left Rear + Green
Left Rear - Green / Black
Additional Wiring Info
Yellow 12V + Constant power - 10 Amp fuse in the multi wire socket base
Red 12V + Accessory power - Internal automatic re-settable fuse
Acc. Fuse Reset Instructions To reset the onboard Accessory Fuse, unplug
the main power plug or turn off the vehicles power for 10 seconds.
Note: Never increase the value of the fuse as damage may occur.
Note: The 4 x 50 Watt amplifier inside the PA 64 is designed to accommodate a
4 – 8 Ohm floating speaker load.
Note: DO NOT EXCEED a 4 – 8 Ohm speaker load! If speaker load is outside
intended range, the PA 64 will blow the 10A power fuse after a short time.
Note: The PA 64 amplifier uses a floating output. Please ensure your speakers
are not common grounded or connected to the vehicle ground as damage will
occur to the PA 64 and repairs / replacement will not be covered by warranty.
Note: All “Speaker Connection Options” are drawn using 4 Ohm speakers and
these diagrams will offer a load range from 4 – 8 Ohm to the PA 64 amplifier.
When in doubt… please call 1 888 724-5351

Speaker Connection Options - Based on 4 Ohm Speakers
Note: To lower the front speaker level see, “Fine Adjustment” on page 10
Normal 4 Speaker Option
6 Speaker Option with Door Speakers
8 Speaker Option with Door Speakers

8 Speaker Option
10 Speaker Option with Door Speakers
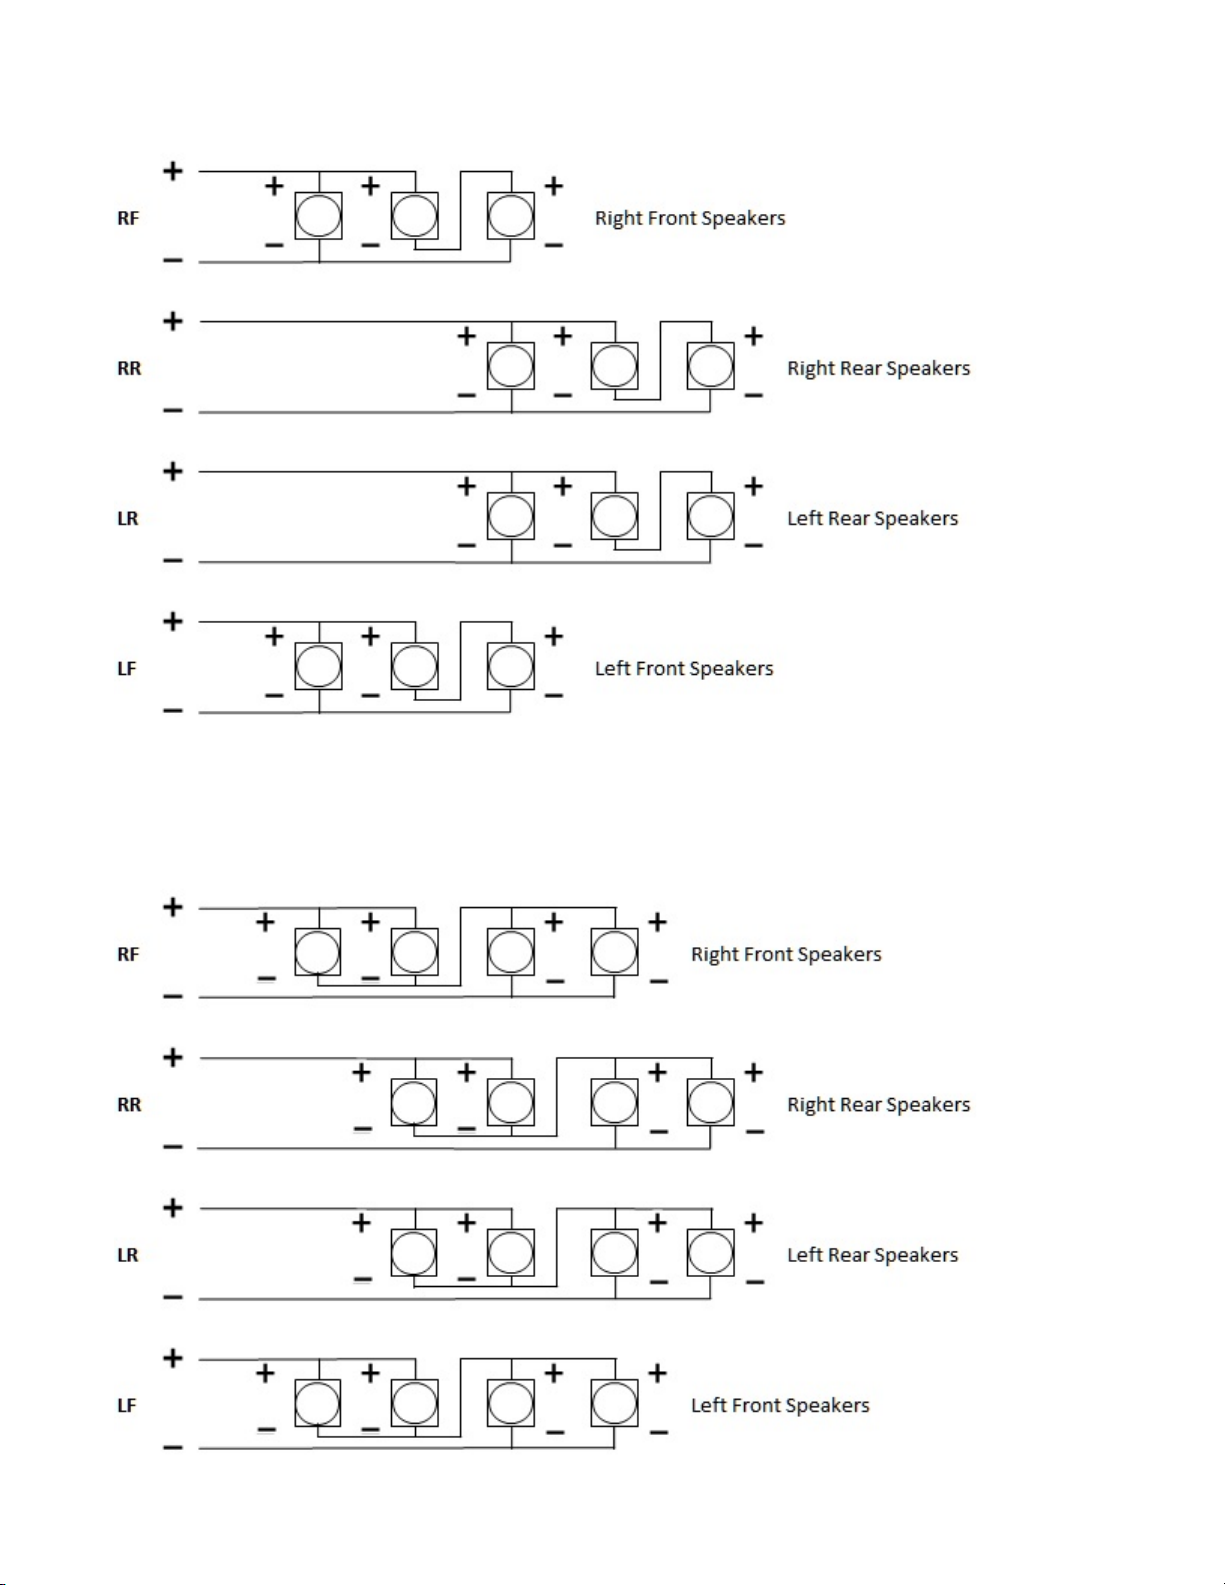
12 Speaker Option
16 Speaker Option

PA 64 Start Up and Initial Testing
1. Connect your microphone to the “Mic 1” on the front of the PA 64 and / or
“Mic 2” on the back.
2. Turn on the vehicle, then the PA 64 power switch (the power light will
come on), turn on the microphone and talk in to the mic. Adjust the mic
volume to your desired level with the “Volume” control on the front of the
PA 64.
3. Turn off the mic and turn on the stereo, adjust the stereo volume as
normal to desired level.
4. Turn the “Audio Mute” control on the front of the PA 64 to half way /
50%. (nothing will happen yet)
5. Turn the mic back on and the radio volume will mute to 50% of what you
just set. Turn the mic off and the radio will come back up to full volume
automatically.
6. You can adjust the amount of muting by turning the “Audio Mute” control
on the front of the PA 64. Full left = no muting, full right = 100% muting.
7. When playing music from your MP3 player through the front “AUX 1 or
rear AUX 2 input”, the muting will function the same as listed above in
point #5.
Note: Both mic inputs are tied together internally. When using two mics, if
either mic is turned on, it will trigger the audio muting.
Note: The front controls on the PA 64 will not function with the mic switch in
the OFF position. This is normal.
Note: When connecting your MP3 player into the “AUX 1” or “AUX 2” inputs
the sound will blend together with the stereo. It’s recommended to turn off the
stereo when using the “AUX input” so they don’t compete.

Fine Adjustments - (see Image 1)
Front channel audio output. This allows the installer to lower the sound
output of the front speakers in relation to the rear speakers. Factory set fully
clockwise for full front channel volume, to reduce turn counter clockwise.
Mic level. This allows the use of Ready2Talk Condenser mics OR other makes
of Dynamic mics. Factory set at midpoint for R2T mics, fully counter clockwise
for Dynamic Mics. To reduce overall mic input, turn clockwise.
For more information
You can find us at
www.ready2talkpa.com
or give us a call at 1 888 724-5351
Autres manuels pour PA 64
6
Table des matières
Autres manuels Ready2Talk Amplificateur


