RC REA C187 Manuel utilisateur

BETRIEB SANLEITUNG/
USER MANUAL
C187

1.Recommended age of users: Not suitable for children under 14 years old.
2.Operate it in an open space, away from the traffic and people.
3.Obey the instructions and warnings, includes the use of optional equipment.
4.It has to stay away from chemicals. Small parts and electric equipment must be out of the
reach of children.
5.Keep away from water because this product has no waterproof function.
6.Do not put any parts in the mouth, it will cause injury or death.
7.Don’t operate the model if the transmitter’s battery is in low voltage.
8.Don’t view the beam of the light emitting diodes, it would effect the eyesight.
9.The motor and electric equipment will be heat after flight. Please do not touch them
to avoid scald.
10.In order to avoid causing damage, please do not touch the high-speed.
1
Please read the manual to learn the function of the this product before operation.
Damage to the product and potential personal injury may occur if you make an
operational error.
This is a RC helicopter, not a toy. You should not only have a prudent operation, but
also to have an operational basis. All children using it should be under adult supervision.
The manual includes safety, operation and maintenance. In order to avoid causing
damage or serious injury, please obey the instructions and warnings before you
using this product.
Important Note C187
C187

Warnings! The battery will fire, explode or leak if not strictly observing this item described
below. :
1. Do not immerse the battery in water or seawater, and keep the battery in a cool dry
environment during stands by period.
2. Keep all batteries out of the reach of little children. Consult a doctor immediately if a
battery is swallowed.
3. Do not use or leave the battery near a heat source such as fire or heater.
4. Use the battery charger specifically for that purpose when recharging.
5. Do not reverse the positive (+) and negative (-) terminals.
6. Do not connect the battery to an electrical outlet.
7. Do not dispose the battery in fire or heat.
8.Do not short-circuit the battery by directly connecting the positive (+) and negative (-)
terminals with metal objects such as wire.
9.Do not transport or store the battery together with metal objects such as necklaces,
hairpins etc.
10.Do not strike or throw the battery against hard surface.
11.Do not directly solder the battery.
12.Do not unpack the battery with a nail or other sharp object.
13.Never disassembling the battery in any way.
Note:The battery can not be placed for a long time under full power and low power.
Otherwise, the battery will not be charged or the battery will be wrapped. For long-term
storage, please charge the battery to 7.8V and store it in a dry and safe place.
Note: Using the original factory USB charger can ensure charging safety. Suggest you use
the original factory USB charger part, other chargers may cause battery damage and property
damage.
2
Warning And The Guide Of Using Battery C187
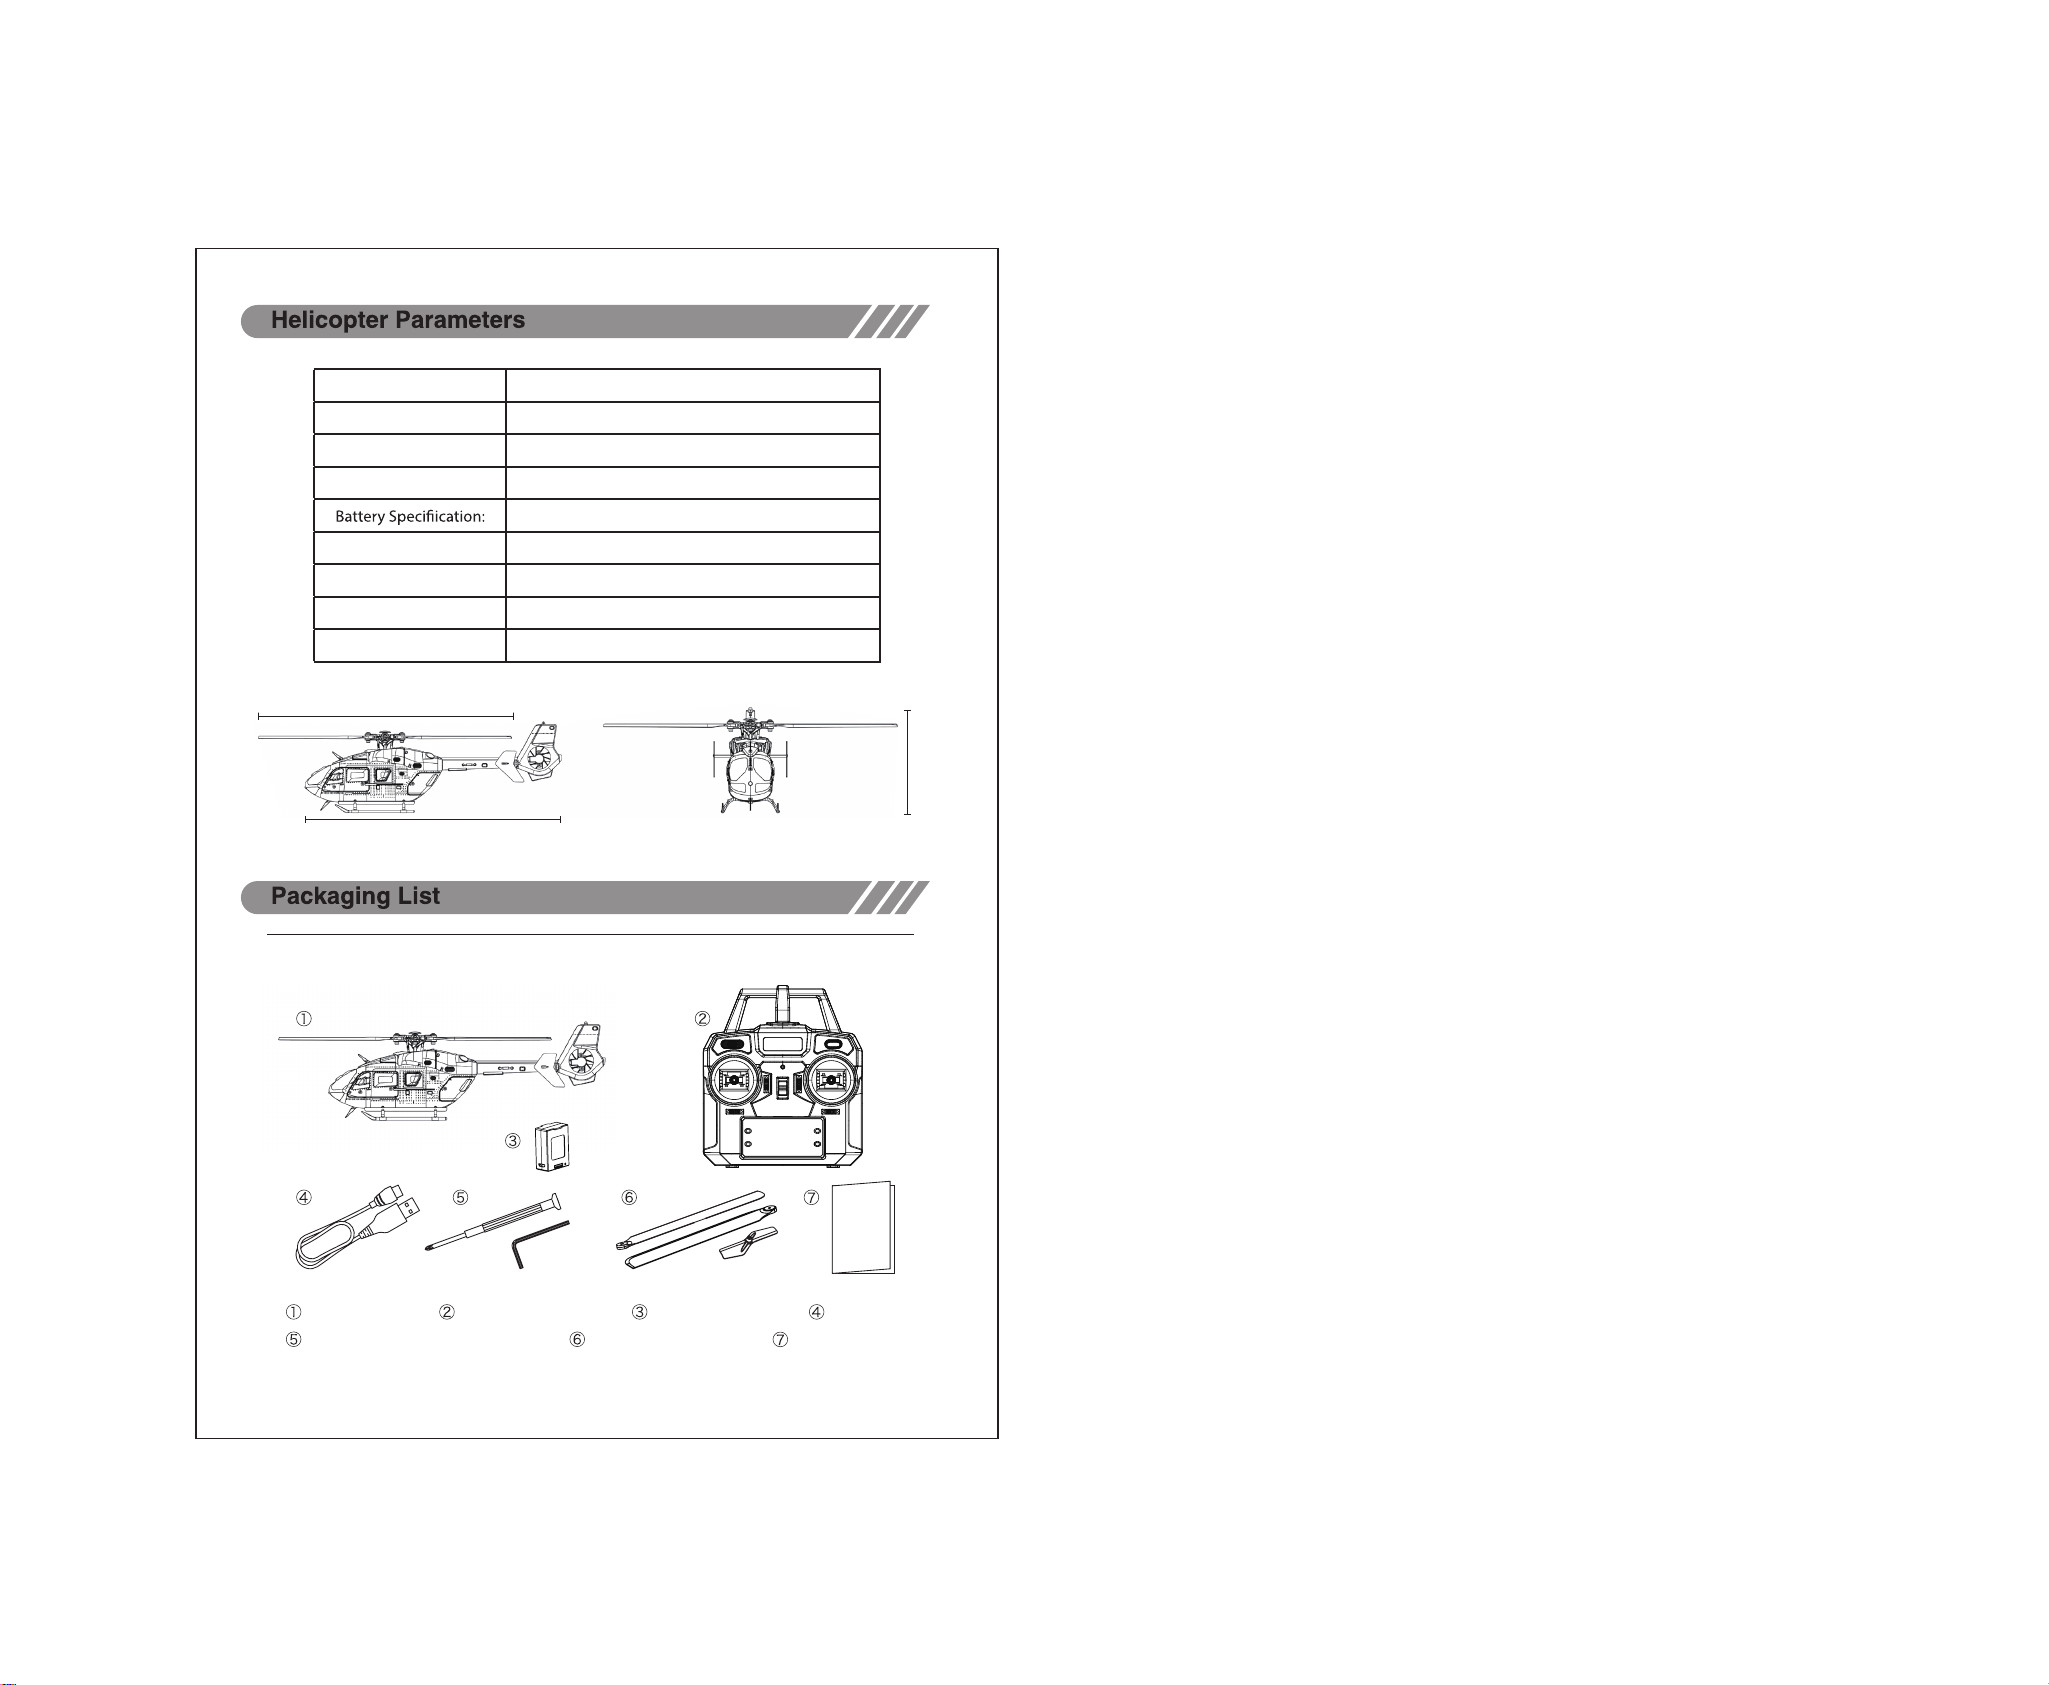
256mm
260mm
80mm
3
C187
C187
Length: 260 mm
Height: 80 mm
Weight: 100G
Propeller length: 256 mm
7.4V 350mAh
Flight Time: About 13-15 min.
Main Motor: 1020
Tail Motor: 0720
Charge Time: About 45 min.
Remote Control USB chargerLipo battery
Phillips screwdriver+hex wrench Instruction manual
Helicopter
Upper connecting rod /
Propeller / tail rotor


1.ensure suffcient power supply of the transmitter and helicopter.
2.Keep a flight in a suitable space which away from the traffic,
people, electricity pylons and pool.
3.Do not lock the main rotor screws too tightly to keep folding
smoothly. If the main rotor screws are too tight, the helicopter
will shake when flying.
4.Under emergency situation, you can press "sharp stop" button
for 3" to land the helicopter without rotating.
(Note: this acticon may cause helicopter crash.)
Batteries Charging Method
5
P
C187
C187
Charging Method 1:
Charging Battery by the USB port on a computer.
Description:
1. Connect the USB charger with USB port.
2. Connect the battery with USB charger: LED on when charging, LED OFF when char -
Charging Method 2:
Charging Battery by power supply adapter.
Description:
1. Connect the USB charger with power supply adapter.
2. Connect the battery with USB charger: LED on when charging, LED OFF when char-
Charging Method 3:
Charging Battery by power bank.
Description:
1. Connect the USB charger with power bank .
2. Connect the battery with USB charger: LED on when charging, LED OFF when char-
ging finished
ging finished
ging finished

If you are unfamiliar with the control of the C187, take time to familiarize it before your
first flight.
6
Direction of operation
Installation method of remote controller battery
Transmitter
C187
C187
4
Throttle
Throttle up Throttle down Decend
Nose Yaws Left
Rudder left Rudder right
Rudder left
Nose Yaws Right
Climb

Flight Operation Steps
7
1.Turn on the transmitter and let helicopter stay near to transmitter.
2.Install the aircraft battery in the battery compartment safely and securely. Press the power switch
for 2 seconds to turn on the aircraft power.
3.The lights of the helicopter and the remote control flash at the same time. Then push the throttle
stick from top to bottom quickly. The remote control makes a 'DI' sound, and the indicator lights of
the helicopter and remote control are always on, which means binding successful.
4.Pull the two joysticks to outer eight angles to start the helicopter. (You can also press the one-key
takeoff button to take off the helicopter directly.)
5.Keep the helicopter head forward, and keep safe distance with the helicopter.
6.When manually operating the aircraft to land, please keep the throttle stick at the bottom
for 2-3 seconds, and then release it after the propeller has completely stopped rotating.
(This operation is not required when using the one-key landing function)
Corresponding to step 1C Corresponding to step 3C Corresponding to step 4
Note:1.In order to avoid hitting, do not look at the helicopter at hip level when it fly.
2.In order to avoid distractions, please confirm without other transmitters at work around.
C187

Note: Beginner should pay attention to the direction of flight. Keep the head forward to
avoid causing injury .
Forward flight
The helicopter has set up hovering. If you are dissatisfied with hovering or the helicopter have
a yaw, please follow there steps to adjust.
8
Take off with the throttle joystick. According the direction of yaw, press the fine-tuning button
in the opposite direction until the plane hovering.
Keep a safe distance of more than 2 meters
Flight Yaw correction method C187
Press the triming button when helicopter has yaw problems.
Forward/
backward Yaw Fine-tune according to
the direction of the arrow
Fine-tune according to
the direction of the arrow
Fine-tune according to
the direction of the arrow
Left/right Yaw
Side fly Yaw

9
Warning
Maintain a flying altitude above one meter
Introduction of the corresponding socket of receiver
Gyro calibration method
1. When flying yaw, first land and calibrate the gyroscope.
2. When calibrating the gyroscope, the aircraft must be
placed on a level ground.
3. The indicator light will flash quickly during the calibration process,
the indicator light stops flashing to take off.
Trimming Notes
main motor
tailor motor
tail LED
front LED
left
right forward/
backward reserved
channel
reserved
channel
Table des matières


