RBSM BIGBOY Manuel utilisateur

E L E C T R I C B I C Y C L E M A N U A L - B I G B O Y
Page 1
Contents
1.Users Considerations------------------------------------------------------------------------------------------------------------------------------------------------------------------ 2
2.Description of Bike Structure--------------------------------------------------------------------------------------------------------------------------------------------------------- 3
3.Bike Unpacking and Assembling---------------------------------------------------------------------------------------------------------------------------------------------------- 4
4.Bike Debugging Instruction----------------------------------------------------------------------------------------------------------------------------------------------------------- 9
4.1 Disc Brake Device Debugging---------------------------------------------------------------------------------------------------------------------------------------------- 9
4.2 Shifting System Debugging-------------------------------------------------------------------------------------------------------------------------------------------------11
4.3 Battery Charging-----------------------------------------------------------------------------------------------------------------------------------------------------------------12
4.4 Whole bike Circuit Test----------------------------------------------------------------------------------------------------------------------------------------------------------- 13
5. Common Circuit Problems Checking-------------------------------------------------------------------------------------------------------------------------------------------- 15
6. Daily Maintenance Instruction----------------------------------------------------------------------------------------------------------------------------------------------------- 18

E L E C T R I C B I C Y C L E M A N U A L - B I G B O Y
Page 2
Users Considerations
1. Before riding, please read production Instruction carefully and check whether each part is intact to ensure your safe riding. If there are any
problems, please get connected with dealers.
2. Please follow urban traffic laws and stipulations and not to carry people on this vehicle; and the speed should be slowed on rainy and snowy days
as well as slippery areas.
3. This vehicle should be placed at dry and ventilated areas and please don’t put it in water. The water level cannot come to the place of the
controller box at the bottom of crankset or will lead to the short out of the internal circuit and also casue non-repairable damage.
4. The battery used in this vehicle is safety power source, but the anode and cathode of the battery cannot be touched with wet hands at the same
time even get touched with metal at the same time, if so, a large circuit current will be generated and cause an accident. Please pay attention to it.
5. Please do not disassemble and decompose components by yourself, you can buy standard components from RBSM Corp for replacement.
6. In order to keep others’ safe and prevent your electric bicycle from unnecessary damage, please do not lend it to someone who cannot operate it.
7. Please use display to adjust the assistance gears to the minimum level before riding.
8. Please make sure the tire pressure is normal before riding.
9. Please make sure the screws of each component is properly tightened before riding.
10. This vehicle’s controller is equipped with the function of overload protection which means the power supply will be cut automatically when the
vehicle is overloaded, and the power supply will be switched on automatically when it is back to normal.
11. You should turn off the power supply when you cannot drive this vehicle even though it has electricity to avoid damaging the bike.
12. You should turn off power when you are walking the vehicle to avoid turning the handle throttle or wheel disc by accident
2.
3. .

E L E C T R I C B I C Y C L E M A N U A L - B I G B O Y
Page 3
Description of Bike Structure
1. Seat post clamp
2. Stem
3. Handle bar
4. Frame of the Bicycle
5. Front Disc brake Device
6. Battery and Controller
7. Pedal
8. Rear Derailleur
9. Flywheel
10. Rear Disc brake Device
11. Crank set
12. Taillight
13. Saddle
14. Seat Post
15. Head light
16. Side reflector
17. Kick stand
18. Chain
19. Rear Motor
20. Tires
1. Left grip
2. Left brake lever
3. Display
4. Shifter lever
5. Right brake lever
6. Right grip

E L E C T R I C B I C Y C L E M A N U A L - B I G B O Y
Page 4
Bike Unpacking and Assembling
1.Unpacking the packaging box and making an inventory of accessories.
2.Taking out the bike from the packaging box, clipping the ribbons which used on front wheel and handlebar, dismantling the pearl wool cover on
bike.

E L E C T R I C B I C Y C L E M A N U A L - B I G B O Y
Page 5
Bike Unpacking and Assembling
3.Find the front wheel quick release rod, fix the front wheel in the front fork and keep the front wheel on the center of the fork, then tighten the quick-
release rod;
4.Fix the front disc brakes with the inner six screws on the front fork disc brake mount.

E L E C T R I C B I C Y C L E M A N U A L - B I G B O Y
Page 6
Bike Unpacking and Assembling
5.Putting down the kick stand to make the bike stand on the ground.
5.1 dismount the screws
5.2 Assemble the Handle bar to the stem and tighten the screws;
Please ensure the handle bar should be symmetrical and the Stem should be in the center of frame;
E L E C T R I C B I C Y C L E M A N U A L - B I G B O Y
Page 7
Bike Unpacking and Assembling
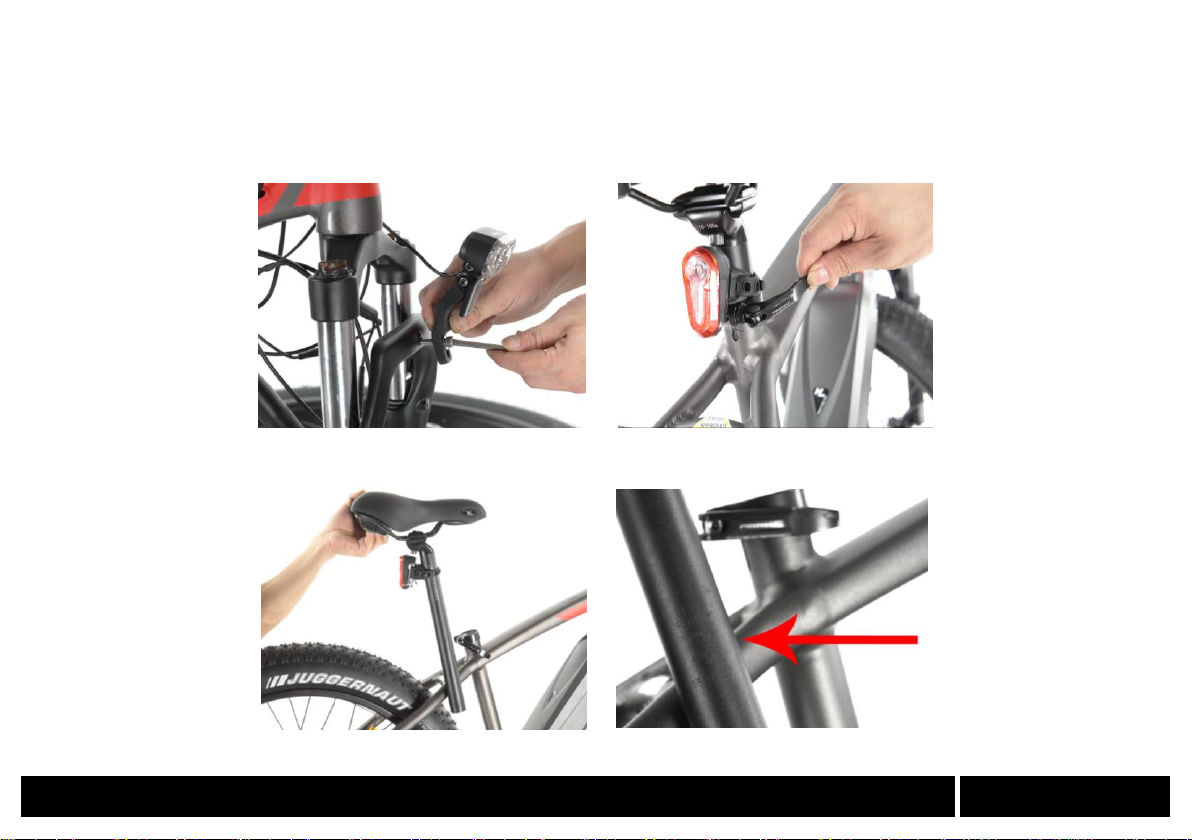
6.Lock the head light to the front fork by the screw, washer and nut; (A)
7.Put the seat post inside the seat tube, adjust it to proper height and lock the seat post clamp; (B)
Please pay attention: the seat post cannot be lower than the security line;
A
B

E L E C T R I C B I C Y C L E M A N U A L - B I G B O Y
Page 8
Bike Unpacking and Assembling
8.Fix the pedals to crank arm and lock by wrench;
E L E C T R I C B I C Y C L E M A N U A L - B I G B O Y
Page 9
Bike Debugging Instruction
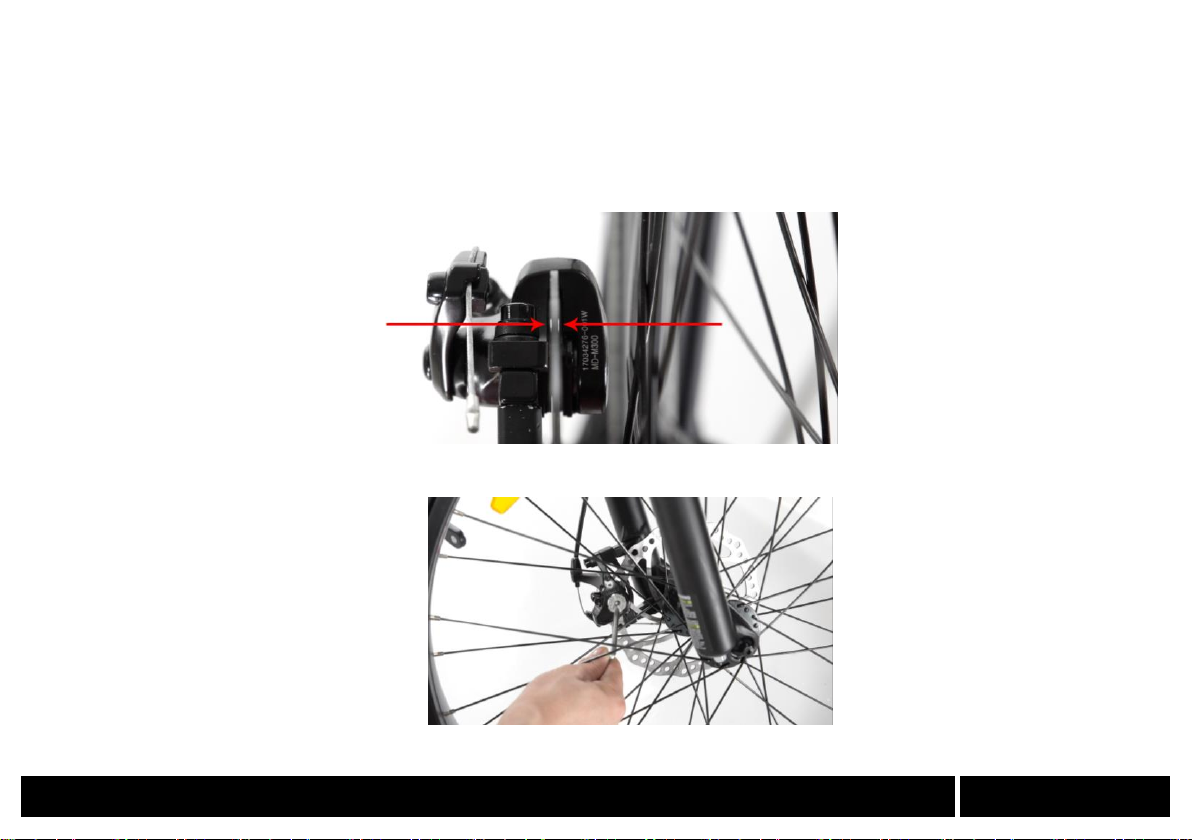
1.Disc brake Device Debugging:
1.1Adjusting the right and left space of disc brake’s shoe by adjusting the position of the bracket of disc brake device to achieve the back
lash uniformity at the both sides of disc brake pad and disc brake device :
You can also slightly adjust the space between disc brake piece and disc brake device by slightly adjust the screws on the right side of disc
brake device.

E L E C T R I C B I C Y C L E M A N U A L - B I G B O Y
Page 10
Bike Debugging Instruction
1.2. Finally, through adjusting the installed nut of the fixed brake core of disc brake device and adjusting the core’s degree of tightness to
achieve the proper degree of tightness of the brake which means effective brake can be realized when the brake handle is pushed to the 1/3
position.
1.3 The tires can be completely stopped when the brake handle is pushed to the 1/2 position.
How to check whether the disc brake debugging is qualified: Turn the wheel, there is no noise, then the disc brake is good;
Table des matières
Autres manuels RBSM Vélo


