Pyle PUCRC95 Manuel utilisateur

Robot Vacuum Cleaner
User Manual

CONTENTS
FAQs – Product Setup Video – Contact Us
www.PureCleanHome.com
1
2
4
4
5
6
7
8
8
9
10
11
13
13
13
14
14
15
15
16
17
PRODUCT SPECIFICATION

1
Safety Instructions
Before using this product, please read the safety instructions!
● Read this user manual thoroughly and carefully before using this product.
● Keep this user manual and save it for future reference.
● Any operation that does not comply with this manual may cause damage to
the product.
1. Only authorized technicians should disassemble the product.
2. Only use the original battery and power adapter of the product for charging.
Using an unmatched adapter may cause electric shock, fire or product
damage.
3. Do not touch power cord, plug, adapter or any other metal part of the machine
with wet hands.
4. Make sure this product is not close to cigarette butts, lighters, matches or any
flammables.
5. If the product needs cleaning, clean it after power is switched off.
6. Do not put heavy or sharp objects on machine.
7. Only use the product indoors; do not use it outdoors.
8. Do not sit or attach an item on the top of this product. Beware of children or
pets while the product is in operation.
9. Do not use this product in wet or moist environment (any environment with
liquid), e.g. bathroom or laundry.
10. Before use, clean floor environment (remove all fragile object, and all objects
that may get caught in the product, such as cords, clothing, papers, loose
cables); Lift curtains and drapes off the floor to avoid any possible accidents.
11. Never use the product to clean combustible or highly volatile liquids, such as
gasoline. If there is too much water on the floor, please wipe off the water by
manual firstly before running machine.
12. Do not place this product where it’s easy to drop off (tables, chairs, etc.).
13. Turn off the power switch during product transportation or for long term
storage.
14. Before charging, check whether adapter and outlet are properly connected.
15. Check if dustbin is empty prior to use.
16. Use this product in temperature from 32F to 104F.
17. Do not use this product in high-temperature environment or under intense
sunlight.
18. The battery must be removed from the product before it is disposed of.
19. The battery should be disposed of properly for safety.
20. The adapter must be removed from the socket-outlet before cleaning,
maintaining the appliance or removing the battery.

2
WARNING:
The appliance is not intended for children under 8 years old, people with reduced
physical, sensory or mental capabilities, or lack of experience and knowledge.
Proper supervision or instruction should be given to help them understand the
hazards involved, and how to use the appliance in a safe way.
Do not use the product in any area higher than the height of the user, so as to
prevent the machine from falling to cause injury.
PRODUCT FEATURES
Powerful Suction
Suction power of this product is strong
enough to ensure that even tiny dust on
the floor will be cleaned thoroughly!
User Friendly Design
Operation is greatly simplified.
One-key start/clean:
Just press the CLEAN button to start robot !
Washable dust bin and primary filter
Dust bin and primary filter can be washed
with water after emptying the bin.
a. Re-install the HEPA and primary filter
after they’re fully dry.
b. HEPA and primary filter can be replaced
when needed.
c. Wash primary filter after 15~30 days of use.
Maximum life span for HEPA and filter is 24 months.
d. Do not bake the filters under intense sunshine.
Cleaning Modes
1. Auto cleaning mode
The robot will clean a room automatically
and adjust its cleaning behavior based
on specific situation.

3
Product Features
2. Spot cleaning mode
The robot will clean intensively in a spiral way with more power, suitable for an
open area with much dust.
3. Edge cleaning mode
In this mode the robot will clean along the wall or obstacles.
4. Scheduling mode
After being scheduled, the robot will leave charging station and start working at
scheduled time.
4
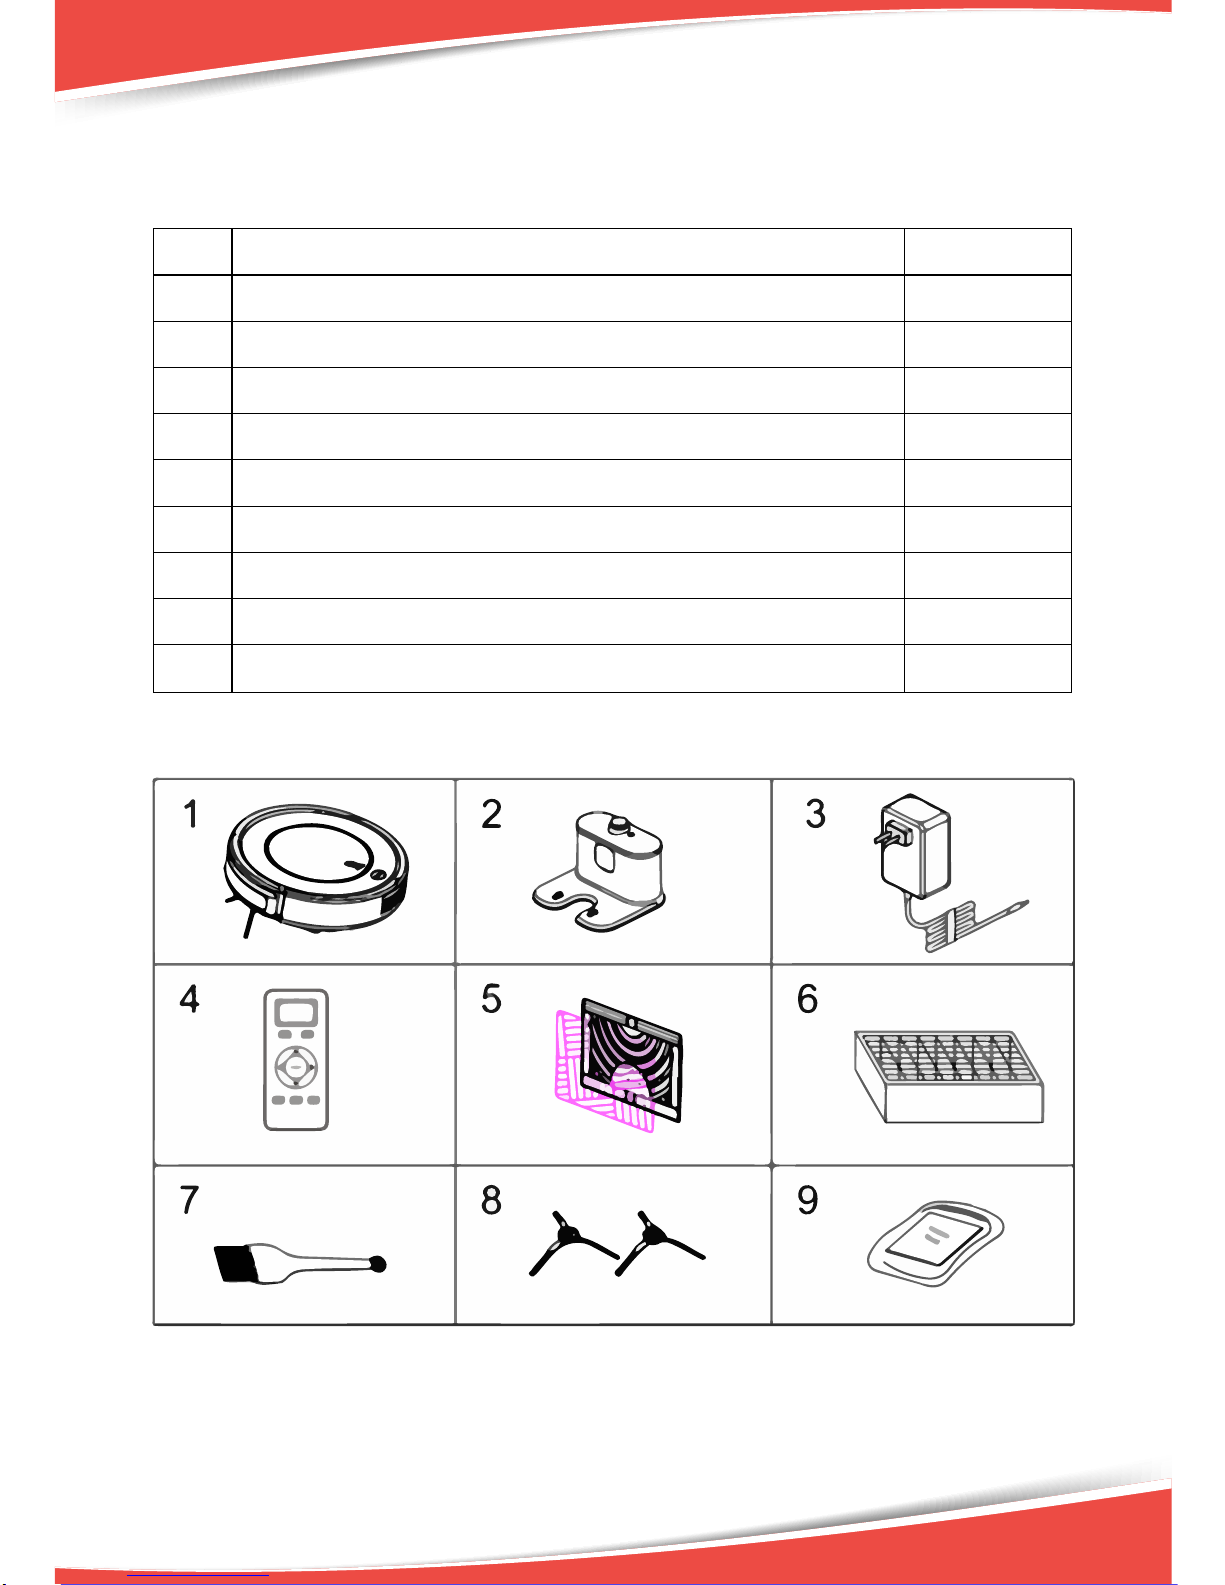
Product Components
Main body and Accessories
No.
Descripon
Quanty
1
Main Body
1
2
Charging Staon
1
3
Power Adapter
1
4
Remote Controller (baery not included)
1
5
Mopping Cloth*1 and Mopping Plate*1
1+1
6
HEPA Filter
1
7
Cleaning Brush
1
8
Side Brushes *2
2
9
User Manual
1

5
Product Components
Main Body Diagram
Upper cover
Dust bin
Charging socket
Primary filter
Dust bin
HEPA filter shelf
HEPA filter
Dust Bin
Bottom cover
Bumper
Upper cover
Button
Bottom cover
Suction passage
Left side brush
Universal wheel
Battery cover
Right side brush
Right wheel
Power switch

6
Product Components
Charging Station
Remote Controller
1. Digital display
2. Auto charging
3. Scheduling button
4. Direction buttons
5. ON/OFF
6. Mode selection button
7. Spot cleaning button
8. Time setting button
A. Install two AAA type batteries into the remote controller before use.
B. Remove the batteries if the remote controller will be left unused for
a long period.
C. If you use the remote controller near the charging station, the robot may not
recognize the command and may not work.
Signal receiver
Infrared signal transmitting window
Power supply socket
Power light
Top cover
Charging poles

Product Components
Display Panel
A. Switch on robot, press CLEAN button or ON/OFF on remote, robot will beep
twice and enter in standby status, the indicator will flash blue.
B. Press CLEAN button or ON/OFF on remote again, robot will beep three times
and the indicator will flash blue quickly, if its function is normal, robot will start
cleaning, and the indicator stay blue during cleaning.
C. If the robot is malfunctioned, its indicator will be in different status with
different color (please see details in troubleshooting).
D. The indicator will display quick red flash when the robot is low power.
E. While charging (by charging station or adapter), indicator will flash red. After
fully charged, robot will beep five times and indicator turns blue.
F. When the robot is successfully scheduled, the indicator will keep on pink for 2
seconds and beep once, then return to its original status.
G. Cancel scheduling, indicator will flash pink for 2 seconds and beep twice, then
return to its original status.
H. Press PLAN button on remote to check whether robot has already scheduled.
If yes, the indicator will keep on pink for 2 seconds and beep once, then return
to its original status. If no schedule, the indicator will have no change
but beep once.
7

Product Operation
Battery Charging
1. Charging station placement
Place charging station against the wall
and remove obstacles within 1 meter
at two sides and 2 meters ahead.
As shown in the right figure.
2. If the robot has been shut down, power on it by turning on the power switch at
the right side of the robot before charging.
3. Charge the robot in either of following way as shown:
a. Plug the adapter into the robot and plug the other end into the power socket,
as shown in Fig A.
b. Press “HOME” button on remote controller to direct the robot to charging
station for recharging, as shown in Fig B.
Note:
a. Make sure the power switch of robot is turned on while charging. Otherwise,
CLEAN indicator will flash red quickly and beep a long time. (If power switch is
turned off, the schedule setting will be lost.)
b. When robot is being charged, CLEAN indicator will flash red gradually.
c. After fully charged, the robot will beep five times. (Every charge should take no
more than 5 hours).
d. In the working status, the robot will return to charging station automatically
when battery power is low.
Tips to extend battery life:
a. Before first use, charge the robot for 12 hours.
b. Charge the robot as soon as battery power is low.
c. The robot will return to charging station automatically when it finishes cleaning
or battery power is low.
d. If the robot is not to be used for a long time, fully charge the battery, turn the
power off, remove it from robot and store it in a cool, dry place.
e. If the robot is not to be used for more than 3 months, charge the robot for 12
hours, turn the power off, and store it in a cool, dry place.
8
Table des matières
Autres manuels Pyle Aspirateur

Pyle
Pyle PureClean PUCVC38 Manuel utilisateur

Pyle
Pyle PUCRC65 Manuel utilisateur

Pyle
Pyle Pure Clean PUCRC99 Manuel utilisateur

Pyle
Pyle PUCVWD43 Manuel utilisateur

Pyle
Pyle PUCRC750 Manuel utilisateur

Pyle
Pyle PureClean PUCRC105 Manuel utilisateur

Pyle
Pyle PUCVCBAT48 Manuel utilisateur

Pyle
Pyle Pure Clean PUCRC17 Manuel utilisateur


