Pyle PLMR15BW Manuel utilisateur


2
CONTENTS
Installation...........................................3
Mounting..........................................4
Wiring Connection..............................5
Operation.............................................6
Location of the keys...........................6
Power on/off the unit..........................7
Main menu.........................................7
Setup.................................................7
Reset function....................................9
Radio operation ..................................9
Switching to the radio mode ..............9
Selecting the frequency band............9
Selecting frequency...........................9
Automatic storing program
scanning............................9
Manually store station and recall
Preset station.....................10
Stereo on/off......................................10
Loc on/off...........................................10
USB operation.....................................10
Playing USB ......................................10
Pause playback.................................10
Select chapter/track...........................10
Stop playback....................................10
Back to the playing list.......................11
Select chapter/track with
number buttons.....................11
Playback with speed..........................11
Playback in scan mode......................11
Playback in random...........................12
Playback in RPT................................12
Playback in image mode....................12
AV IN operation...................................12
Other function.....................................12
Equalization.......................................12
Mute ..................................................12
Loud ..................................................12
Sel menu ...........................................13
Scan..................................................13
OSD...................................................13
BT operation........................................13
Pre-pair for bluetooth operation.........13
Paring................................................13
Bluetooth audio(A2DP function).........13
Remote control....................................14
Performance........................................16

3
INSTALLATION
Notes:
Choose the mounting location where
the unit will not interfere with the
normal driving function of the driver.
Before finally installing the unit, connect
the wiring temporarily and make sure it
is all connected up properly and the
unit and the system work properly.
Use only the parts included with the
unit to ensure proper installation. The
use of unauthorized parts can cause
malfunctions.
Consult with your nearest dealer if
installation requires the drilling of holes
or other modifications of the vehicle.
Install the unit where it does not get in
the driver’s way and cannot injure the
passenger if there is a sudden stop, like
an emergency stop.
Avoid installing the unit where it would
be subject to high temperature, such as
from direct sunlight, or from hot air,
from the heater, or where it would be
subject to dust, dirt or excessive
vibration.


5
WIRING CONNECTION
ISO CONNECTION

6
OPERATION
LOCATION OF KEYS
1. BAND button
2. Seek down button
3. Power button
4. MODE button
5. VOL -
6. VOL +
7. Seek up button
8. MUTE button
9. Play/pause button/SAVE
10. TFT
11. IR SENSOR
7
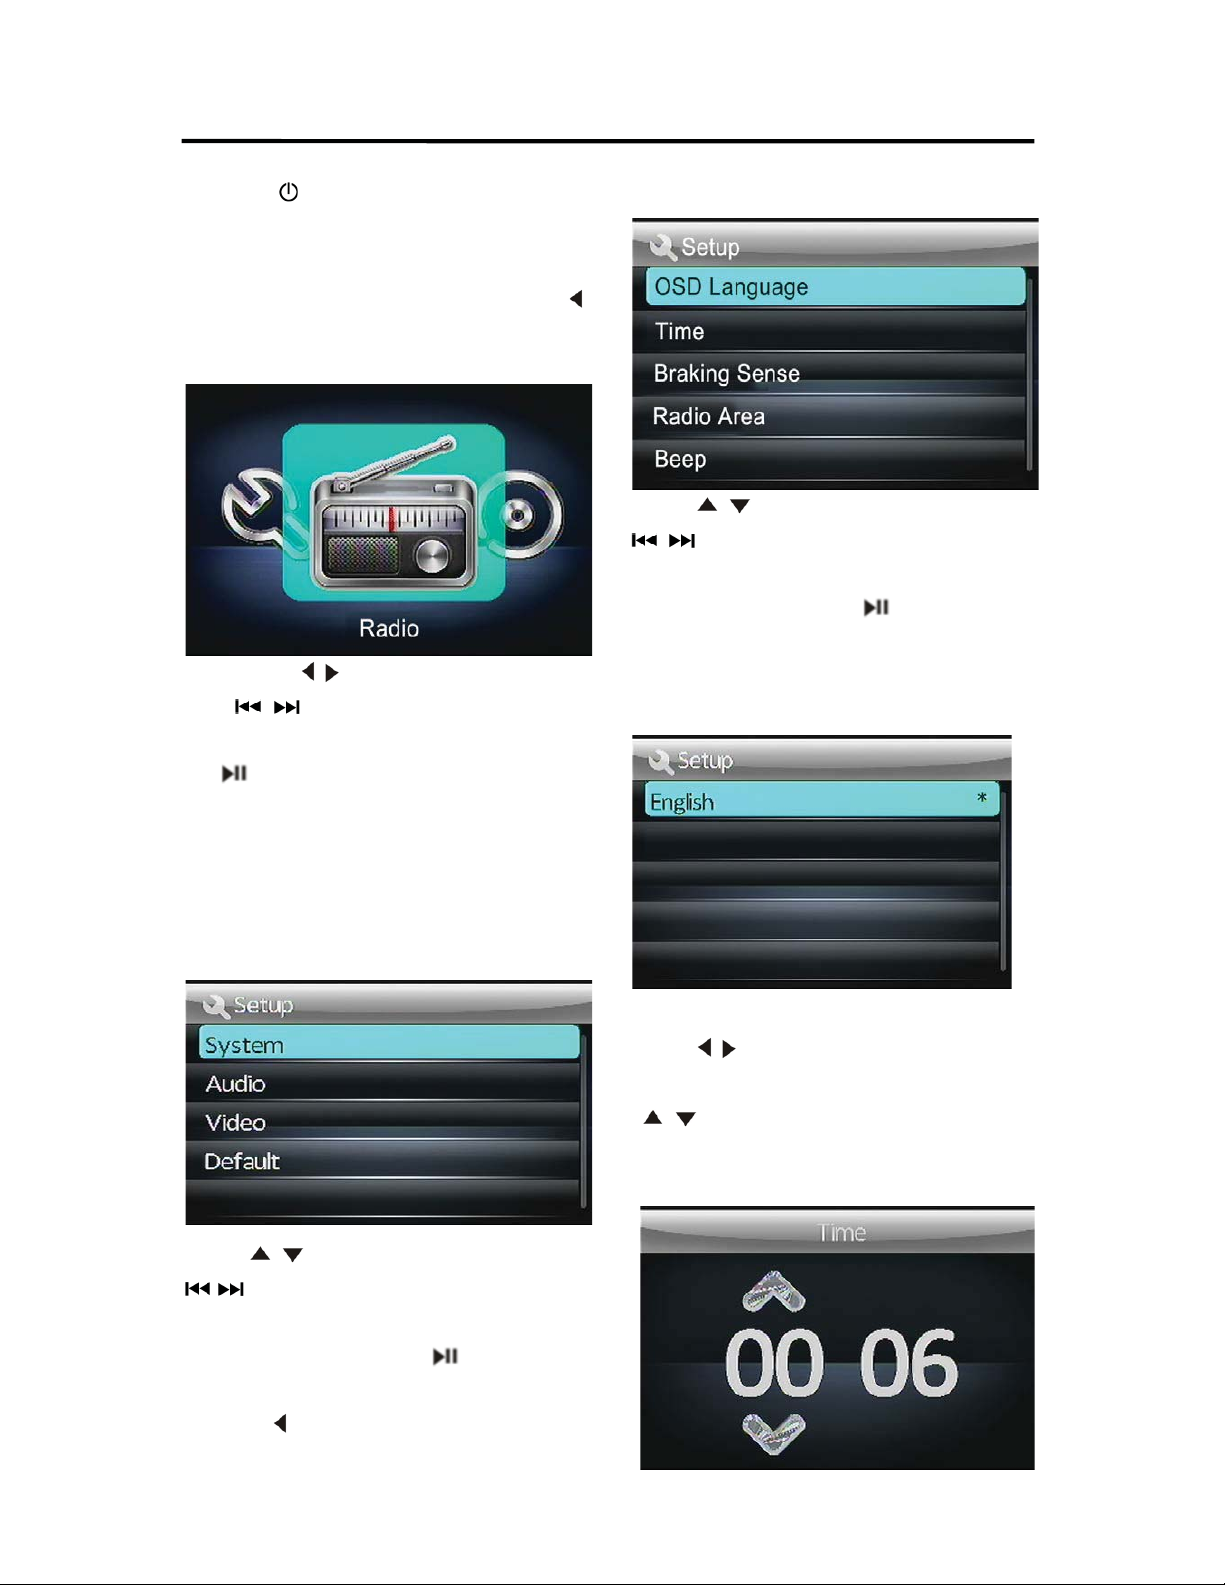
OPERATION
POWER ON/OFF THE UNIT
Press the button to turn on/off the unit.
zMAIN MENU
Press and hold SETUP/ENTER button on the
remote control for 2 seconds ,Then Press “ ”
button on the remote controlwill enter this
MAIN menu(see below picture).
Then Press “ /”button on the remote control
or “ /” on the front panel to select
desired item then press ENTER/SETUP button
or button of the front panel to setting
corresponding item.
zSETUP
Press and hold ENTER/SETUP button on the
remote control for 2 seconds will show the
SETTUP menu. See below:
Press “ /”button on the remote control or ”
/” on the front panel to select System
/Audio/Video/Default item. Then press
ENTER/SETUP button or button of the
front panel to enter corresponding item.
(Press “ ”button on the remote control or
BND button on the front panel to exit to
previous menu.)
ySYSTEM SETTINGS
Press “ /”button on the remote control or ”
/” on the front panel to select OSD
Language/Time/Radio Area/Beep. Then press
ENTER/SETUP button button of the
front panel to enter corresponding item.
1).OSD Language˖
Now It has English only.
2).Time
Press “ /”button on the remote control to
select adjusting hour or minute. Then press
“/”button on the remote control to adjust
correct time. Press ENTER/SETUP button exit
this item.
8
OPERATION
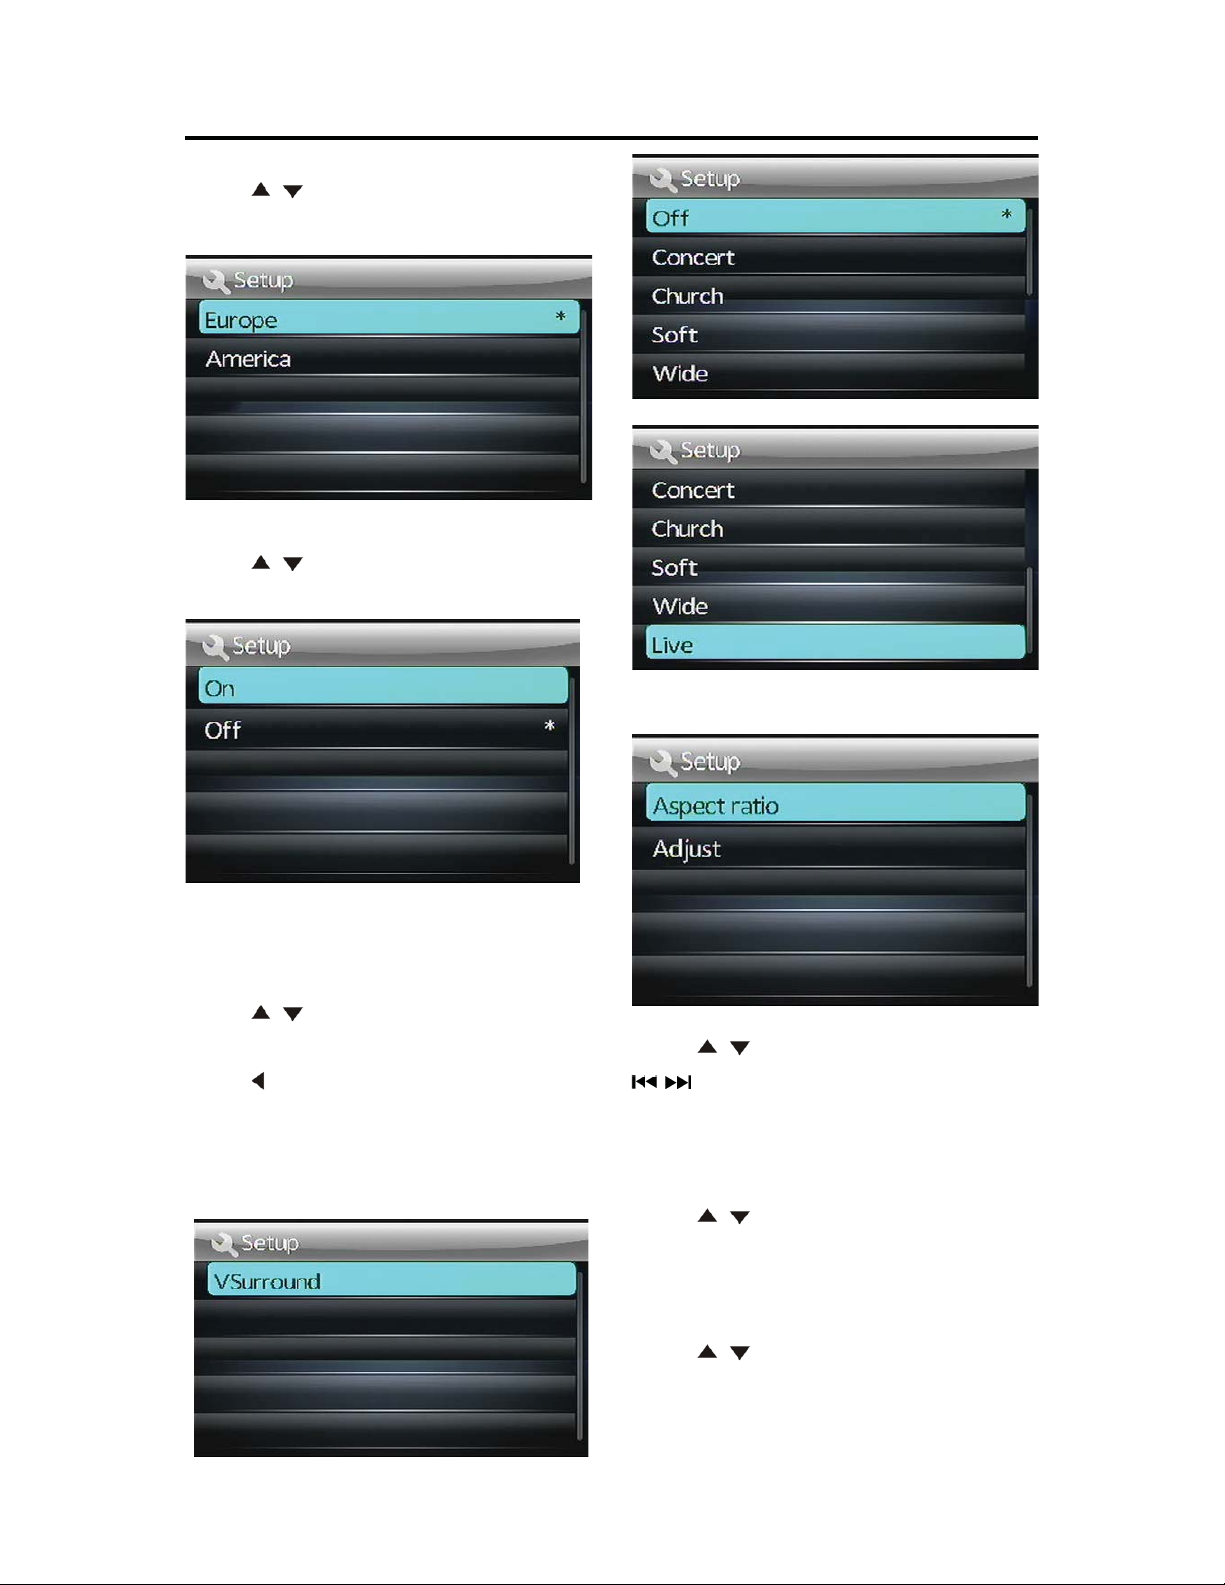
3). Radio Area
Press “ /”button on the remote control to
select Europe/America.
4).Beep
Press “ /”button on the remote control to
select on/off.
yAUDIO SETTINGS
1).V surround
Press “ /”button on the remote control to
select Off/Concert/Church/Passive/Wide/Live.
Press “ ” button on the remote control or
BND button on the front panel to exit to
previous menu.
yVIDEO SETTINGS
Press “ /”button on the remote control or ”
/” on the front panel to select Aspect
ratio/Adjust. Then press ENTER/SETUP
button to enter corresponding item.
1).Aspect ratio
Press “ /”button on the remote control to
select 4:3 pan scan/16:9.
2).Adjust
Press “ /”button on the remote control to
select Brightness/Contrast/Hue/Saturation/
Sharpness.

9
OPERATION
In every item using “ /”button to adjust
and press ENTER/SETUP button to exit.
yDefault SETTINGS
When selecting default function, Press
ENTER/SETUP button will reset to default
(Same as below RESET function).
RESET FUNCTION
Press and hold button for 6 seconds to
active the RESET function. The RESET
function is to be activated for the following
reasons:
Initial installation of the unit when all wiring is
completed.
OPERATION Error symbol on the display.
Once the reset button is pressed. All the
memory’s information will be lost!
RADIO OPERATION
1. SWITCHING TO THE RADIO MODE
Press MODE button or in the main menu to
select RADIO mode. The following information
will appear on the display
2. SELECTING THE FREQUENCY BAND
Shortly press BAND button to select desired
band. The reception band will change in the
following order:
ÆFM1ÆFM2 ÆFM3ÆWB ÆAM1ÆAM2
You can selecte Europe orAmerican Band in
RadioArea item of the SETUP menu.
3. Selecting Frequency
During radio mode. Shortly press /
button will activate automatic seek function. It
will search up/down a station automatically.
Press and hold /button for 2 seconds
till “MANUAL” appear on the display. The
manual tuning mode is selected. In this mode
you can turn up/down a step frequency one
by one till searched a station. If both buttons
have not been pressed for 5 seconds, it will
return to seek tuning mode and “AUTO”
appears on the display.
4. Automatic Story & Program Scanning:
- Program scanning
Shortly press AMS button on the remote
control to scan preset station which is stored in
number 1~6 buttons .And it will hold at each
station for about 5 seconds.
- Automatic storing
Press and hold AMS button on the remote
control for 2 seconds. The radio searches from

10
OPERATION
the 87.5 MHz frequency and checks the signal
strength until one cycle search is finished.And
then some strong stations are stored into the
corresponding preset button. In the first cycle it
will in LOCAL mode to receive the stronger
station. If it stored stations is not full the preset
button. It will searching stations in 2nd cycle in
DX mode.
In WEATHER BAND.
1 button(20): 162.550MHz
2 button(21): 162.400MHz
3 button(22): 162.475MHz
4 button(23): 162.425MHz
5 button(24): 162.450MHz
6 button(25): 162.500MHz
The next station is 162.525 MHz.
Press /button to change these
stations.
5. Manually store station and recall
preset station
1) Remote control operation: Received a
station, Press one of the preset button
(1~6) for 2 seconds. The current station
will be stored into the number button.
Shortly press preset button (1~6) you can
listen to the corresponding station.
2) Front panel operation: Received a
station, Press and hold the button till
show SAVE P1 on the display. Press
/to change the preset number then
press button. The current station will
be stored into the number button. Shortly
press button you can listen to the
preset station 1~6. (From preset station 1
to preset station 6).
6. Stereo on/off:
Press ST button on remote control to select
mono or stereo mode. Sometimes when the
signal is not good. If you change it to MONO
mode the noise will be reduced. Also you can
turn it on/off in SEL menu.
7. Local on/off:
Press LOC button on the remote control to
select LOC or DX mode . In LOC mode the unit
will reduce the receiving sensitivity when you
search station. That means you can receive
the station that sound is good. It will ignores
the station that sound is not good. InDXmode
it will increase the receiving sensitivity when
you search the station. That means you can
receive more stations. Also you can turn it
on/off in SEL menu.
USB OPERATION
1) Playing USB
When insert an USB into the USB jack. The
unit will search the MP3/ WMAfiles and start to
play.
2) Pause playback
When playing audio/video content, press the
button to pause the playback, press again to
resume normal playback.
3) Select Chapter/Track
Press the button during playback to
select the last or next chapter/track to
playback.
4) Stop playback
When playing audio/video content, press the
Table des matières
Autres manuels Pyle Récepteur stéréo

Pyle
Pyle PT560AU Manuel utilisateur

Pyle
Pyle PLMP3C1 Manuel utilisateur

Pyle
Pyle PVTA20 Manuel utilisateur

Pyle
Pyle PVTA90 Manuel utilisateur

Pyle
Pyle PT390BTU Manuel utilisateur

Pyle
Pyle PT590AU Manuel utilisateur

Pyle
Pyle PLML50FB Manuel utilisateur

Pyle
Pyle pldnv66b Manuel utilisateur

Pyle
Pyle PLCD43BTM Manuel utilisateur

Pyle
Pyle PT390AU Manuel utilisateur


Manuels Récepteur stéréo populaires d'autres marques


Pioneer
Pioneer SX-1000TA Manuel utilisateur

Yamaha
Yamaha MusicCast TSR-5B3D Manuel utilisateur

Sony
Sony STR-DE335 - Fm Stereo/fm-am Receiver Manuel utilisateur

Sony
Sony STR-DG500 - Multi Channel Av Receiver Manuel utilisateur

Panasonic
Panasonic AJSD955B - DVCPRO50 STUDIO DECK Manuel utilisateur

Pioneer
Pioneer SX-838 Manuel utilisateur