
PUK RING MEGA COB 101407 Manuel utilisateur

ASSEMBLY AND OPERATING INSTRUCTIONS:
Made in Italy
-COD. 101407
-COD. 101408
-COD. 101408RGBW
RING MEGA COB
-Power consumption : 82W
-Voltage : 220-240V 50-60H
-Color Temperature : 3000K - 4000K
-Beam angle : 20°-40°
-Insulation class: II
-IK rating : IK10
-IP protection: IP66
-Gross weight: 8kg
COD. 101407
-replace the damaged protective glass
-In case of replacement of damaged glass, contact the manufacturer of
the fixture for replacement
-getting rid of as urban waste forbidden
-separate collection is mandatory when the product is at the
end of its life
IP66
NB: These assembly ins ruc ions mus be given o end users for correc main enance and so ha hey know how o change he bulb.
The appliance mus no be ampered wi h or ransformed and i mus be ins alled and used as supplied and in compliance wi h he
Na ional Rules on Ins alla ions. Any non-complian ins alla ions will invalida e all forms of guaran ee. The company canno be held
COD. 101408
RING MEGA HP
-Power consumption : 88W
-Voltage : 220-240V 50-60H
-Color Temperature : 3000K - 4000K
-Beam angle : 4°-10°-28°
-Insulation class: II
-IK rating : IK10
-IP protection: IP66
-Gross weight: 8kg
COD. 101408RGBW RING MEGA DMX RGBW
-Power consumption : 56W
-Voltage : 220-240V 50-60H
-Color Temperature : 3000K - 4000K
-Beam angle : 12°-25°-35°
-Insulation class: II
-IK rating : IK10
-IP protection: IP66
-Gross weight: 8kg
The article is suitable for indoor and
outdoor use
-Class II double insulated luminaire (not earthed)
-Recommenda ions
1)The light source contained in this luminaire must only be replaced by the manufacturer or its assistance service or by equally qualified
personnel
2) verify that the equipment used to connect our devices to enjoy all the guarantees required under European law;
3) use the cables, connectors and quality materials for electrical wiring;
4) Products with IP66 degree make the wiring / connections with accessories provide the same degree IP of the selected product
(available in the catalog);
5) In the case of installations outside is not recommended to install the power supplies in the
formwork and / or in the junction box without adequate protection
6) Honey-comb louvre must be installed directly from the manufacturer . Please mention it during the order
7)the terminal block / connector for connecting to the power supply is not included, installation may require qualified personnel
-Choice of ins alla ion loca ion
The unit should be positioned so that when in use is not subject to direct radiation from the sun or other heat sources . High temperatures
reduce the life and efficiency of the components or the LED module .
-No e on corrosion pro ec ion
For installation and maintenance be especially careful not to damage the coating powder . Damage combined action of water could cause
corrosion.
1)In the case of damage to the external flexible cable, it must be replaced by the manufacturer, or its assistance service, or equivalent
qualified personnel in order to avoid dangers
2)In case of replacement of damaged glass, contact the manufacturer of the fixture for replacement
-Pho obiological risk: RG1 (low risk)
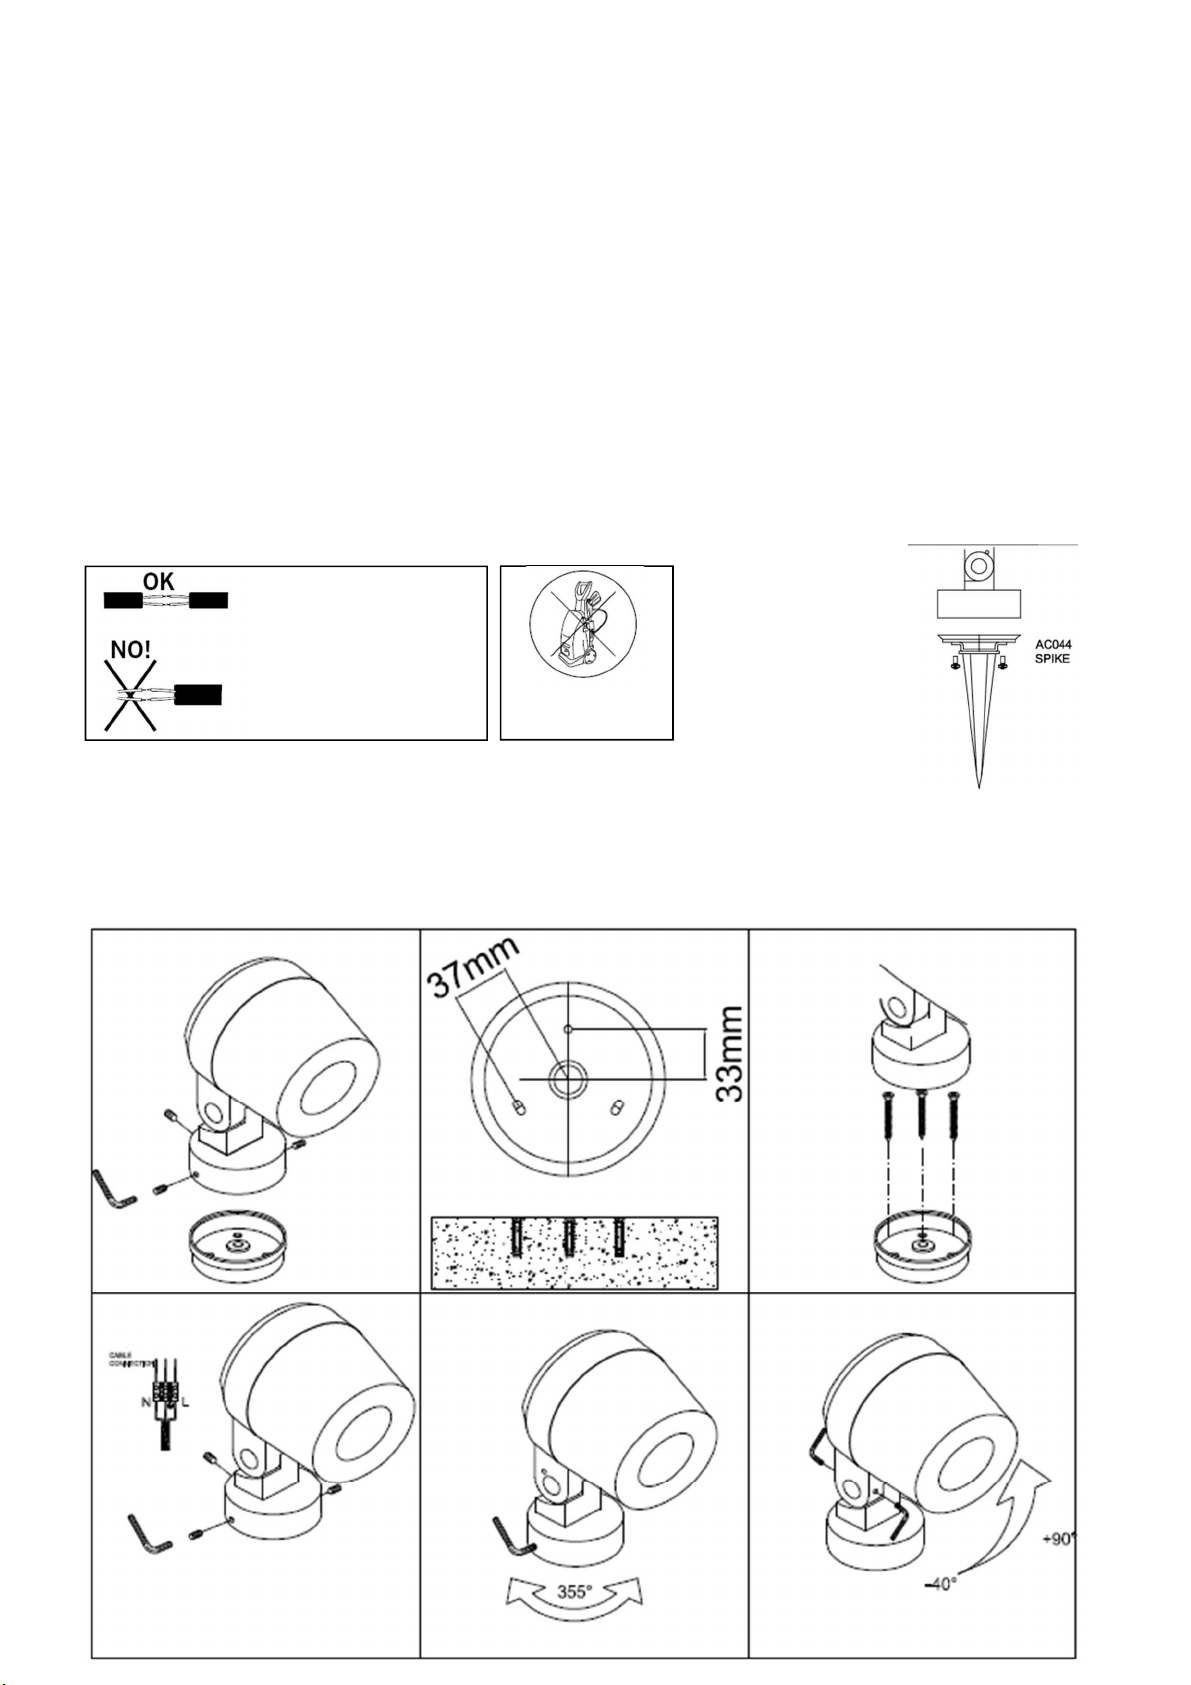
Use only supply cables wi h
double case Do no use wa er high
pressure cleaners
Installation:
1. Loose the three grub-screws in the base and remove the cover pic.1
2. Prepare holes in corrispondance of the feeding point pic. 2
3. Fix the base by tighten the screws of the fischer plugs insert the cable through the cable gland making the
adeguate electrical connection pic3
4. Close the luminaire by tighten the three grub-screws using the tool included in the package pic. 6
5. Make the regulation of the luminaire horizontal and vertical and then fix it by tighten the grub screws pic 5-6
Accessories:

ACCESSORIES
Ins alla ion:
- Prepare holes in the pole in the desired position making two M5 threads and one central hole used to pass through the cables and
connectors(pic. 1)
- Place the pole plate gasket and make the electrical connection following the correct safety electrical rules. (pic. 2)
- Fix the the luminaire to the pole tightening the two fixing screws (pic.3)
- Adjust the desired angle of the luminaire unscrewing and then tightening the two screws and the grub screws of the luminaire joint using
the tools included in the package. (pic.4)
AC085 POLE PLATE VERSION
AC089 TREE-BRANCH BRACKET VERSION
Ins alla ion:
- Prepare holes in the pole in the desired position making two M5 threads and one central hole used to pass through the cables and
connectors(pic. 1)
- Place the pole plate gasket and make the electrical connection following the correct safety electrical rules. (pic. 2)
- Fix the the luminaire to the pole tightening the two fixing screws (pic.3)
- Adjust the desired angle of the luminaire unscrewing and then tightening the two screws and the grub screws of the luminaire joint using
the tools included in the package. (pic.4)

-DMX RGBW Installation:
DMX/RDM is a robust and reliable system for lighting control. However if not implemented correctly problems can arise
such as random flashing of lights erratic operation and delays in responding to commands. This document explains the
best practices in DMX wiring.The DMX controller sends signals over the DMX cable to the drivers. At the last driver the cable
has to be terminated with a 120Ω resistor to prevent reflections of the signal.Important things to consider are: -Always use
cable specifically designed for DMX / RS-485. These cables have an impedance of 120Ω and a low capacitance. For in-
stance: Belden 9841 or 3105a.
DMX must be terminated with a 120Ω resistor to prevent reflections.
-A daisy chain topology should be used.
-After 32 unit loads a repeater/booster should be used.
-Keep cabling below 300 metres between the controller and the last driver.
Wiring diagram for RGBW version:
Belden 984 cable
Directive 2002/96/CE (Waste Electrical and Electronic Equipment - RAEE-WEEE-DEE-AEEA: information for users
The crossed out wheeled bin label that can be found on your product indicates that this product should not be disposed of via the normal household
waste stream. To prevent possible harm to the environment or human health please separate this product from other waste streams to ensure that it
can be recycled in an environmentally sound manner. For more details on available collection facilities please contact your local government office or
the retailer where you purchased this product.
RAEE WEEE
Ce manuel convient aux modèles suivants
2
Autres manuels PUK Équipement d'éclairage

Manuels Équipement d'éclairage populaires d'autres marques


Qazqa
Qazqa Suplux SL 3 Black 103062 Manuel utilisateur

Commercial Electric
Commercial Electric 54568141 Manuel utilisateur

CREE LIGHTING
CREE LIGHTING 304 Series Manuel utilisateur

Goobay
Goobay 49867 Manuel utilisateur

ECOMAN ITALIA
ECOMAN ITALIA LED T8 Manuel utilisateur

Alkalite
Alkalite Krypton KT-81 Manuel utilisateur


