
Proline L3217HD LED Manuel utilisateur
Downloaded from www.vandenborre.be
32'' LED TV
GB
FR
NL
E
I
CZ
SK
INSTRUCTION MANUAL
MANUEL D’UTILISATION
HANDLEIDING
MANUAL DE INSTRUCCIONES
MANUALE DI ISTRUZIONI
NÁVOD K POUŽITÍ
NÁVOD NA POUŽITIE
L3217HD LED

Downloaded from www.vandenborre.be
This TV incorporates High-Denition Multimedia Interface (HDMITM)
technology. HDMI, the HDMI logo and High-Denition Multimedia Interface
are trademarks or registered trademarks of HDMI Licensing LLC.
This sign indicates that this product may not be disposed of with your regular
household waste. The recycling and separate collection of such products
is your responsibility. Please drop off the above-mentioned waste at a
designated place for recycling waste electrical and electronic equipment.
If you do not know where to drop off your waste equipment for recycling,
please contact your local city ofce or household waste collection service.

Downloaded from www.vandenborre.be
ENGLISHENGLISH
1
Warnings and Precautions
ENGLISHENGLISH
1
Warnings and Precautions
Safety Information
Mains Supply
This television is designed to operate from a 100-240 Volts 50/60Hz AC mains supply. Other power sources
may damage it. Check that the rating plate (on the back cover of the television) states 100-
240V AC before you plug it in for the first time.
The manufacturer accepts NO liability for damage or injury caused by using the product with the wrong mains voltage.
Mains Plug
We have fitted this television with a standard mains plug.
If the mains lead is damaged it must be replaced with a mains lead of the same type and rating to avoid a hazard.
If for any reason you cut off the mains plug, please destroy the old plug as it would be dangerous if inserted into a live power outlet.
Carefully follow the wiring instructions supplied with the new plug.
If a fuse is fitted to the plug, remove the fuse before throwing the plug away.
Never use a fused mains plug without the fuse cover.
The mains plug shall be the main disconnect device and should be accessible at all times.
Dangerous voltage constituting a risk This equipment is double insulated and
of electric shock is present inside this an earth connection is not required.
equipment.
This mark is applied to show the
equipment conforms to European safety
and electro-magnetic compatibility
standards.
Safe use and care of your television
We have designed and made this television to meet European Safety Standards, but as with any electronic equipment you must take care
to stay safe and get the best results. Here is some good advice to help you do this.
Read these instructions carefully before you try to use the television.
Protect the mains lead. You must ensure the mains lead cannot be walked on, crushed, chafed, cut or trapped.
Switch off the mains power or pull out the mains plug when you leave the television unattended, unless the function of the television
requires a continuous power supply.
Do not continue to use your television if you have spilt liquids in it, if it is damaged in any way or if it does not work normally. Immediately
unplug the television and get expert advice.
Avoid harsh conditions such as wet or damp places, high humidity, strong vibration, extremely high or low temperatures, strong sunlight and
places that are very dusty.
Never fit makeshift stands or legs to the television.
Never push objects into holes and ventilation slots.
To prevent electric shock do not remove any cover.
Do not touch the LED display as it gets warm when in use, this is normal and is not a fault.
If anything goes wrong do not try to fix it yourself, get a qualified service agent to look at it.
Pull out the mains plug and disconnect the aerial lead during thunder storms.
-2-

Downloaded from www.vandenborre.be
2
Warnings and Precautions
2
Warnings and Precautions
Safety Information(cont)
Cleaning
Disconnect the mains supply and use only a lightly dampened soft cloth. Do not use chemical solvents or strong detergents as these may
damage the cabinet or screen.
Never allow water droplets to remain on the screen as moisture can cause permanent discolouration.
Greasy marks must only be removed with a commercial cleaner specifically recommended for LED screens.
Eye Fatigue
When using this product as a computer monitor, health and safety experts recommend short frequent breaks rather than occasional longer
breaks. For example a 5-10 minute break after an hour of continuous screen work is considered to be better than a 15 min break every 2
hours.
Do not use the monitor against a bright background or where sunlight or other bright light sources will shine directly onto the screen.
Batteries
Remove batteries when the remote control is not to be used for a long time. Batteries left in equipment may cause damage through
deterioration and corrosive leakage, invalidating the guarantee.
To protect the environment use local recycling facilities for battery disposal.
Dispose of used batteries according to the instructions.
CAUTION: Risk of explosion if batteries are replaced by an incorrect type.
DISPOSAL
You must dispose of this product according to local laws and regulations.
Because this product contains electronic components, the product must be
disposed of separately from household waste when the product reaches its end of life.
The product should be taken to your local collection point for recycling.
Some collection points accept products free of charge.
WARNINGS:
•This appliance is intended for domestic household use only and should not be used for any other purpose or on any other
application, such as for non-domestic use or use in a commercial environment.
•If the supply cord is damaged it must be replaced by the manufacturer, its service agent or similarly qualified persons in order to
avoid a hazard.
•This apparatus shall not be exposed to dripping or splashing and that no objects filled with liquids, such as vases shall be placed
on the apparatus.
•No naked flame sources, such as lighted candles should be placed on the apparatus.
•The ventilation should not be impeded by covering the ventilation openings, with items such as newspapers, tablecloths, curtains
etc.
•WARNING: To prevent injury, this apparatus must be securely attached to the floor/wall in accordance with the installation
instructions.

Downloaded from www.vandenborre.be
ENGLISHENGLISH
3
Warnings and Precautions
Outdoor Antenna Safety Instructions
Antenna lead-in wire
Antenna discharge
unit
Grounding conductors
Ground clamps
Power service grounding
Electric service
equipment
EXAMPLE OF OUTDOOR ANTENNA GROUNDING
▪ An outdoor antenna should not be located in any area where it could come in contact with
overhead power lines, or any other electric light or power circuits.
▪ When installing an outdoor antenna system, extreme caution should be taken to prevent
contact with power lines. Direct contact with power lines may be fatal and should be avoided
at all costs.
Outdoor Antenna Safety Instructions
Ground clamps
LISTENING WITH EARPHONES
▪ Listen at moderate Volumes to avoid hearing damage.
▪ If you hear no sound during playback, do not turn the Volume up as the music may suddenly
begin at a high Volume. Excessive sound pressure from earphones and headphones can
cause hearing loss.
▪ To avoid damaging your ears, adjust the Volume to the lowest level before playback, and turn
up to the desired level when playback has started.
If an outdoor antenna is connected, follow the precautions below:

Downloaded from www.vandenborre.be
4
CONTENTS
WARNINGS AND PRECAUTIONS
Important Safety Instructions ....................................................................................... 1
Antenna Safety Instructions ......................................................................................... 3
INTRODUCING THE TV
Key Features ............................................................................................................... 5
Package Contents ....................................................................................................... 6
Setting Your TV ............................................................................................................ 7
Your TV ..................................................................................................................... 10
Your Remote Control ................................................................................................. 13
INSTALLING THE TV
Connecting a TV Cable or an Antenna ...................................................................... 15
Connecting optional AV Equipment
Connecting AV Equipment with an SCART Connector ....................................... 20
Connecting SCART Equipment with an VIDEO Converter cable. ...................... 21
Connecting AV Equipment with an AV Connector ............................................... 22
Connecting AV Equipment with an YPbPr Connector. ........................................ 23
Connecting AV Equipment with an HDMI Connector .......................................... 24
Connecting AV Equipment with an DVI Connector ............................................ 25
Connecting a PC ................................................................................................. 26
Connecting an Audio Receiver ........................................................................... 27
USING THE FEATURES
Using the Programme Guide ...........................................................................28
Customizing the CHANNEL Settings .................................................................29
Customizing the PICTURE Settings ..................................................................31
Customizing the SOUND Settings.....................................................................32
Customizing the TIME Settings.........................................................................33
Customizing the LOCK Settings........................................................................34
Customizing the SETUP Settings......................................................................35
USB multimedia playback format......................................................................37
TROUBLESHOOTING
......................................................................................................................................... 38
SPECIFICATIONS
......................................................................................................................................... 39

Downloaded from www.vandenborre.be
ENGLISH
5
Introducing the TV
Various Audio/Video terminals for external equipment connection
▪ 1 USB Input terminal
▪ 1 VGA terminal
▪ 1 VGA Audio IN terminal
▪ 3 HDMI input terminals
▪ 1 Component Video Input terminal
▪ 1 Composite Video Input terminal
▪ 1 Coaxial Audio output terminal
▪ 1 Headphone terminal
▪ 1 Antenna Input terminal
▪ 1 CI slot
▪ 1 SCART input terminal(Only for B3917FHD LED)
High Definition Multimedia Interface (HDMI)
▪ High Denition Multimedia Interface (HDMI) is a small, user-friendly interconnect that
can carry up to 5 Gbps of combined video and audio in a single cable. This system
eliminates the cost, complexity and confusion of multiple cables used to connect
current A/V systems.
DTV Component Video Inputs
▪ Offers the best video quality for DVD and digital set-top-box connections (480i, 480p,
576i, 576p,720p, 1080i, 1080p).
3D Digital Noise Reduction
▪ This function can digitally reduce image noise to provide better picture quality.
Film-Mode Detection
▪ This function can automatically detect content derived from lm and adjust the
interlacer’s frame matching to provide a more natural-looking, clearer image of the
moving picture.
INTRODUCING THE TV
Key Features
Downloaded from www.vandenborre.be
6
Introducing the TV
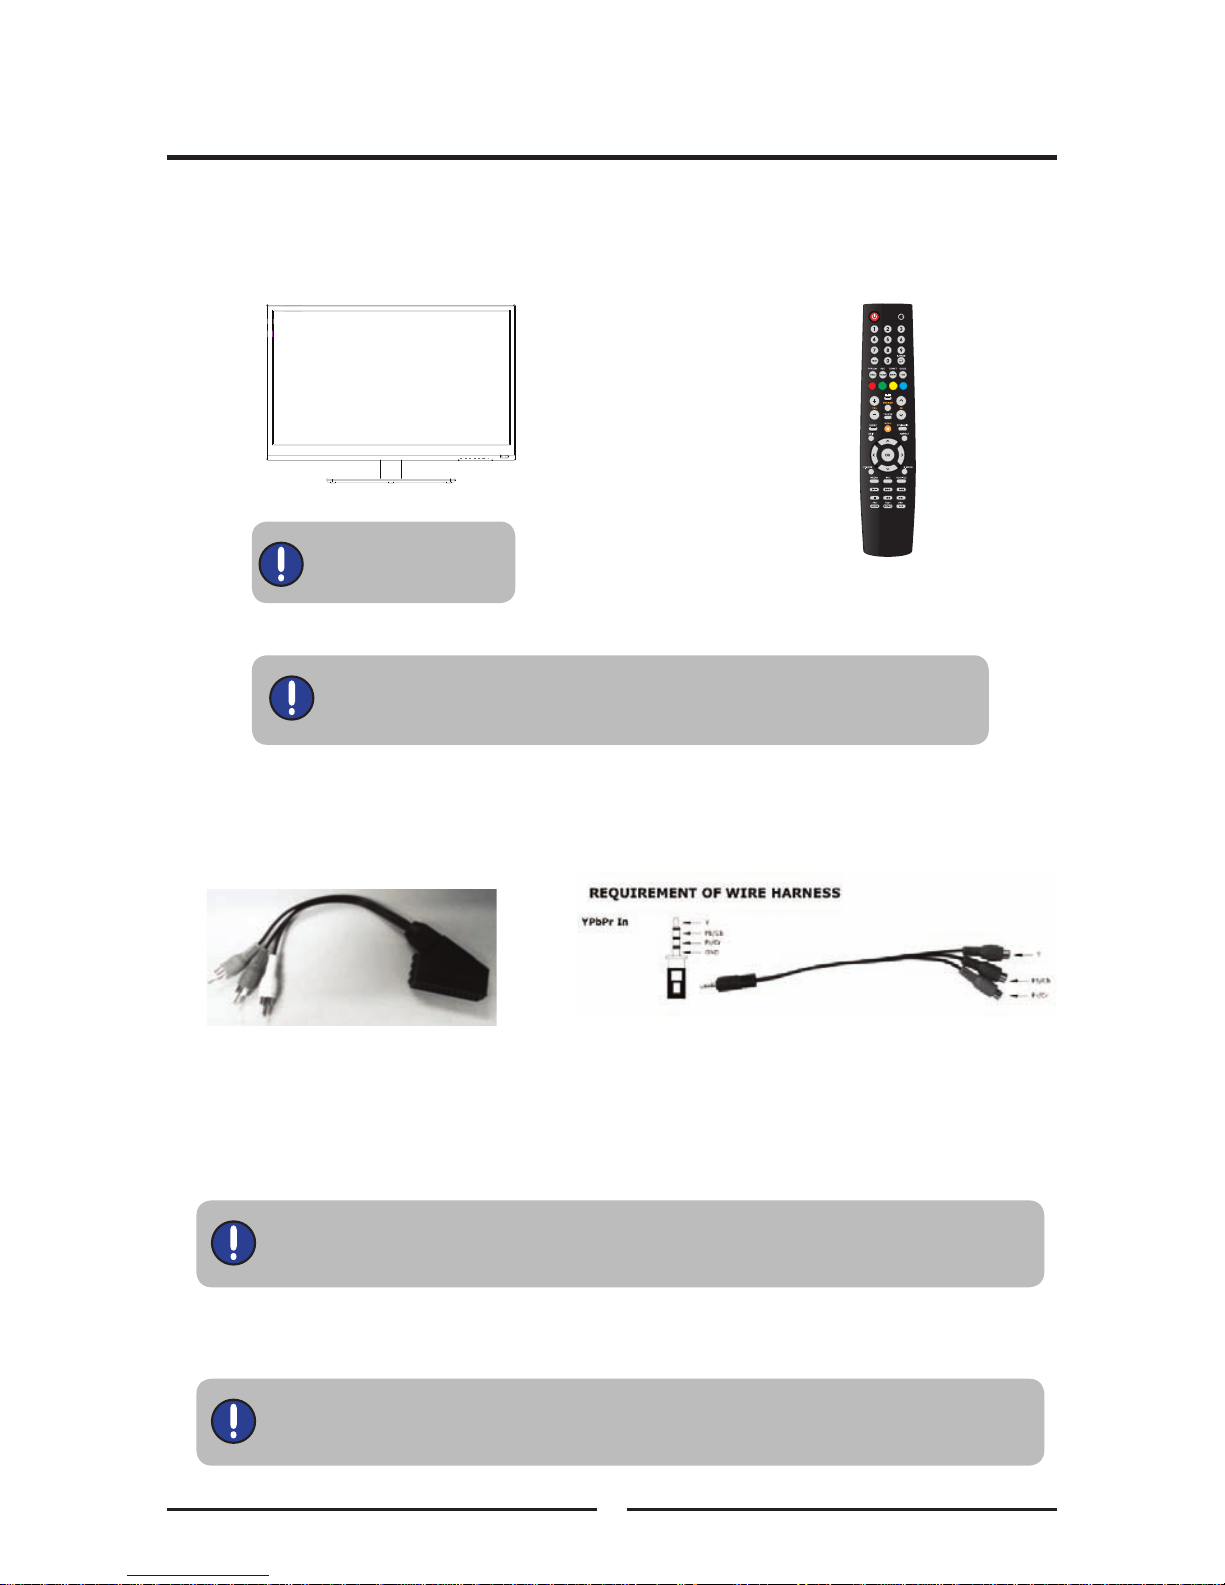
Make sure all of the above contents are included. If you are missing any items, please
return this product to the original place of purchase.
TV
Make sure all of the following contents are included.
These items are all you need to set up and operate the TV in its basic conguration.
Package Contents
Remote Control
User Manual Warranty Card
The photos of the accessories are for reference only, the colour of the remote control,
the type of power cord are variable based on the actual models.
The base might be
different depends on
actual packing
The power cord is included in the TV, and the power cord type may be
different depending on your country’s power type.
YPbPr cable
Video Converter cable
only available for B2917HD LED
/L3217FHD LED
Downloaded from www.vandenborre.be
ENGLISH
7
Introducing the TV
Setting Up Your TV
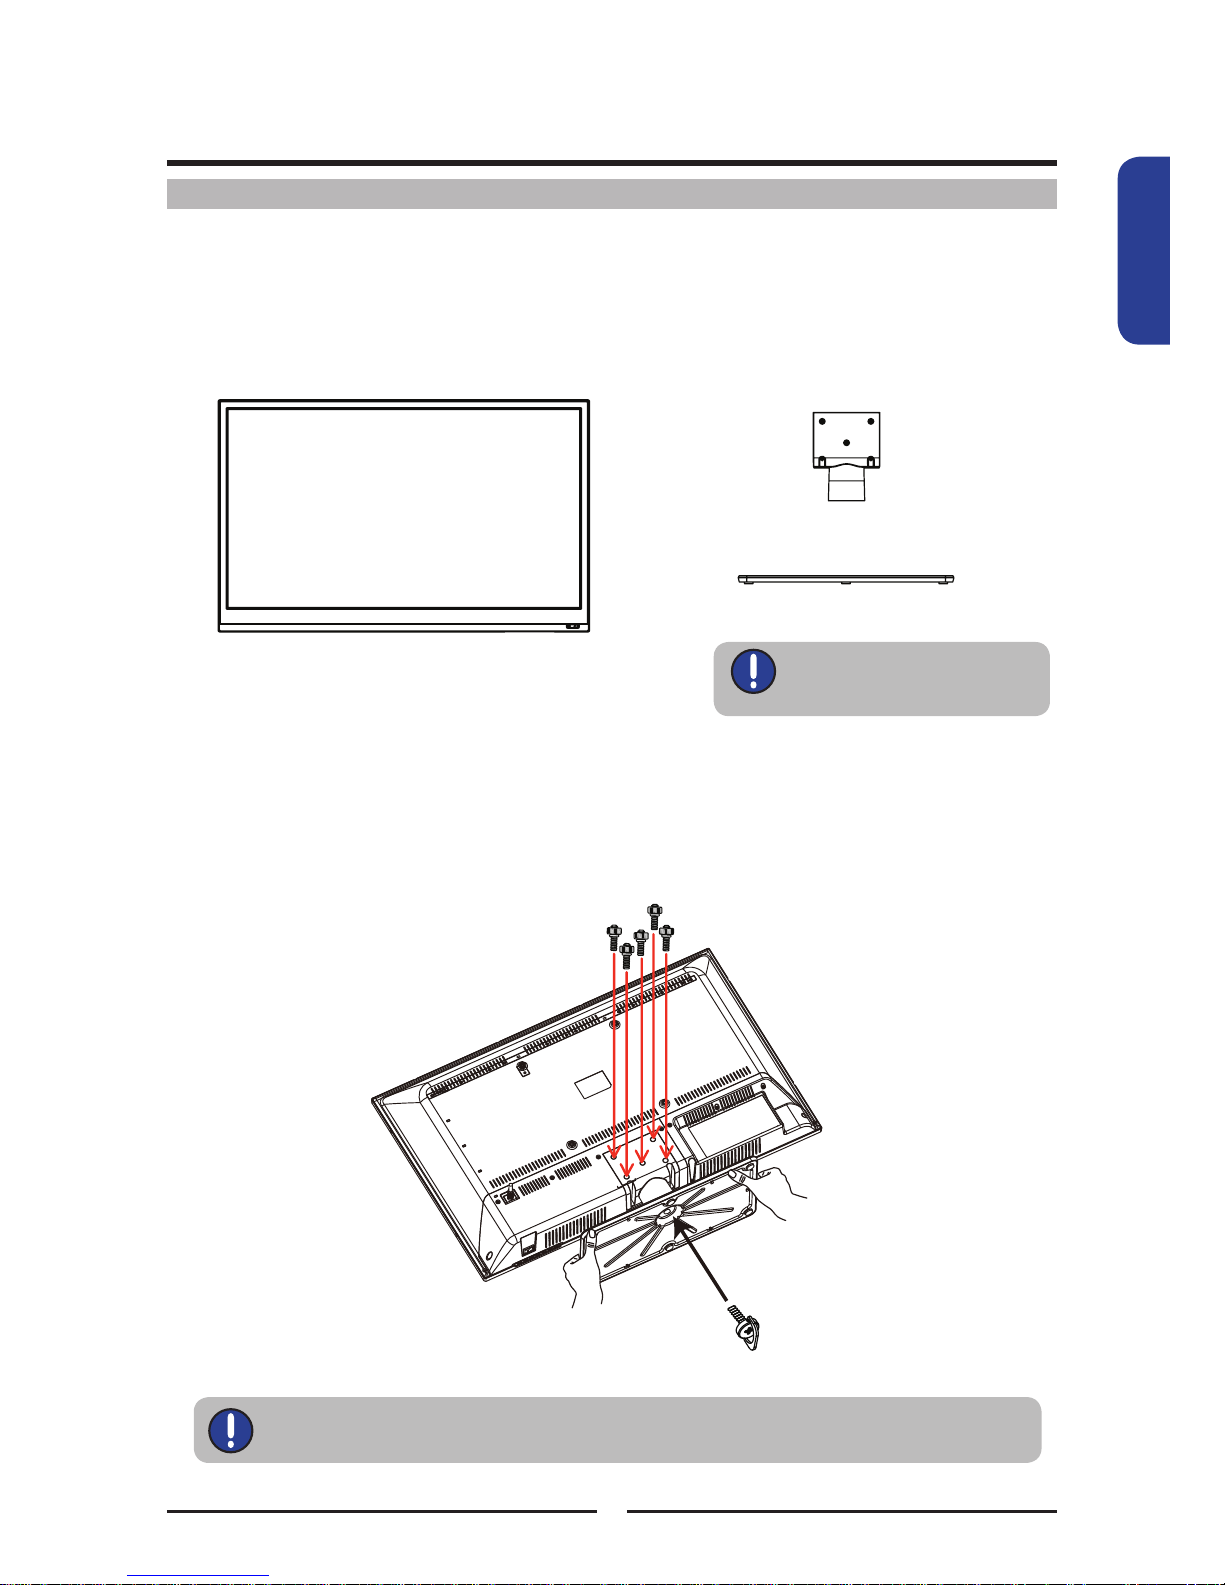
Follow the instructions below to install the TV stand:
Open the box, and make sure all necessary parts are in the box. The package contains:
How to install the TV Stand
Cover an even stable surface with a soft cloth. Place the TV unit face-down on the cloth. Fit
the stand onto the bottom of the TV unit as shown, then use a screwdriver to tighten the
screw on the bottom of the stand until the screw is rmly xed in place and then t the ve
base neck screws to the TV as shown.
TV
Neck
Stand
The base might be different
depends on actual packing.
All the renderings in the user manual are for reference only, please make the
object as the standard.

Downloaded from www.vandenborre.be
8
Introducing the TV
If you prefer to mount your new TV on a wall instead of attaching it to the stand, please refer to the
instructions included in the wall mounting kit (sold separately).
Afx the mount to the back of the TV using the four screws provided in the wall-mount kit.
When install the TV on the wall, allow to leave some space.
How to remove the TV Stand
To prevent damaging the surface of the TV, place the TV on a soft cloth.
Remove the screw of the table stand then the ve base neck screws and detach the
base stand.
When install TV on the wall, allow to leave some space(3 cm at least).
Verify your TV’s model and be sure to use the wall mounting kit specied
for your TV model only. Contact your technician for assistance when
installing the wall mounting kit.
6 cm
3 cm
When install TV on the wall, using the M6
x 10L screws. And the distance between
the screws up/down/left/right around is
200mm.(For 29” TV, using the M4 screws,
and the distance is 200mm/100mm.)
The product does not include brackets. If
need to mount on the wall, it will be
provided by user.
Table des matières
Langues :
Autres manuels Proline Téléviseur LED

Proline
Proline L2436FHD Manuel utilisateur

Proline
Proline L1930HD LED Manuel utilisateur

Proline
Proline L3220HD Manuel utilisateur

Proline
Proline L2420HDL Manuel utilisateur

Proline
Proline L4020FHD Manuel utilisateur

Proline
Proline L2440HD LED Manuel utilisateur

Proline
Proline L2833HD LED Manuel utilisateur

Proline
Proline L3237HD LED Manuel utilisateur

Proline
Proline L1950HD LED Manuel utilisateur

Proline
Proline L5020UHD Manuel utilisateur


