PROEM CDC-2F B Series Manuel utilisateur

CDC-2FxB
User manual: page 03
Manuel utilisateur: page 17
VIDEO PORTIERS

CDC-2FxB
English
- 2-
Introduction
Digital bus
2 wires
4 cameras
32 monitors
Vous venez de faire l’acquisition d’une caméra de vidéo-portier CDC-
2F1B or CDC-2F2B et nous vous en remercions.
- Haute résistance au vandalisme
- Indice de protection IP 64
- Deux relais par caméra
- Jusqu’à 4 caméras et 32 moniteurs
!"
satisfaction et saura répondre aux attentes de votre quotidien.
L’Equipe PROEM
You have just acquired a video door entry system door station CDC-2F1B or
CDC-2F2B and we thank you.
This door station is on Digital 2 wires bus technology and has been design to
provide you a great confort of use :
- Feedback for disable people
- Vandal resistante
- IP rating 64
- Two relay per door station
- Upto 4 door stations and 32 monitors.
It’s robust and waterproof conception will provide you a long term use and
satisfaction for your day to day life.
PROEM team
- 3-
PP
PP
PP
PP PP
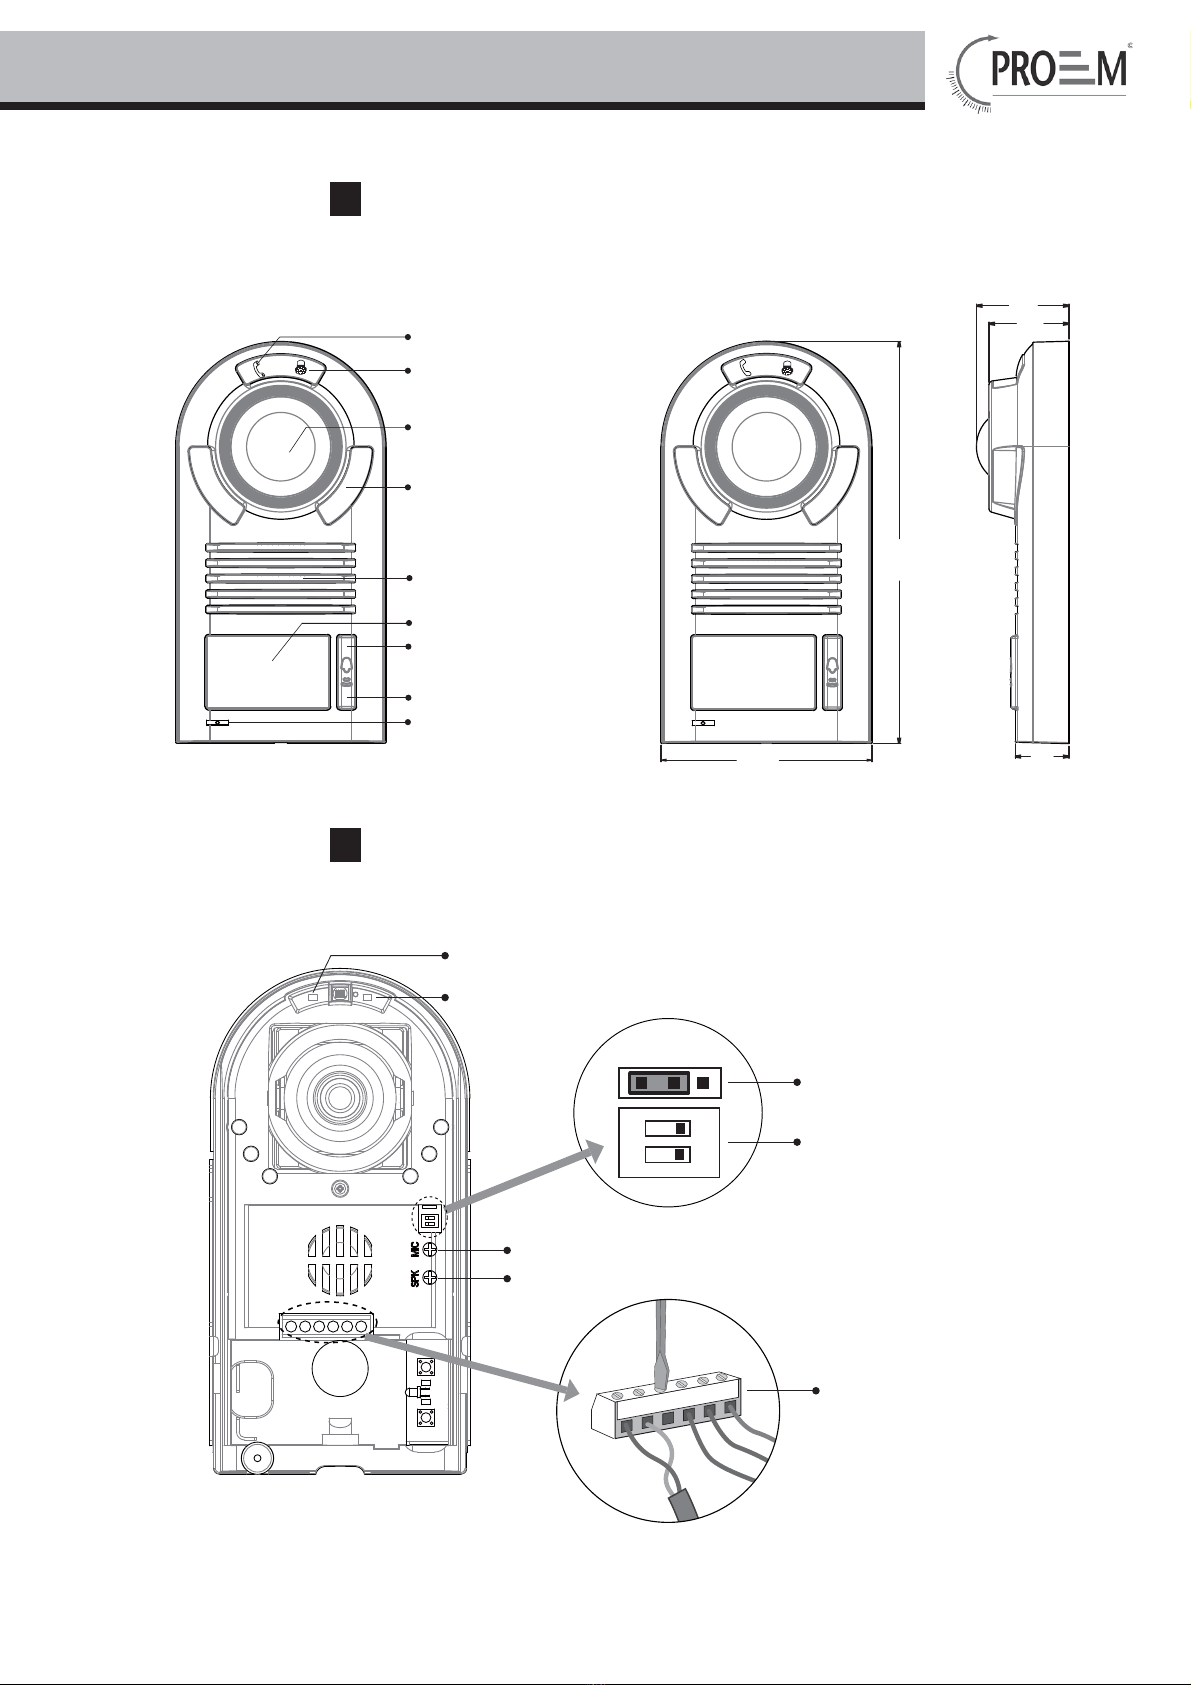
Camera Lens
Unlock LED Indicator
Talk LED Indicator
Night View LED
Speaker
Nameplate
Call Button A
Call Button B
Microphone
BUS
PL
S1+ S2+ S-
12
ON
MIC adjustment
Lock Control Jumper
Doorstation Code DIP
Main Connect Port
1 2 3
SPK adjustment
Unlock LED Indicator
Talk LED Indicator
1. Parts and Functions
2. Terminal Descriptions

CDC-2FxB
English
- 4-
Talk LED Indicator:
off
Unlock LED Indicator:When release the first lock,it will be flashed one time.when release the
Lock Control Jumper: To select the lock type: see 5.2.1 , 5.2.2
Doorstation Code DIP: Total 4 doorstations can be supported,see 6.1
Main Connect Port: To connect the bus line and the electronic locks.
BUS: Connect to the bus line, no polarity.
PL: External lock power input, connect to the power positive(power +).
S1+, S2+: Lock power(+) output, to connect 2 locks.
S-: Lock power(-) output, connect to the power(-) input of locks(only when using the camera to
power the locks, if using the external power supply for the locks, the S- will not be connected).
Lock Power supply: 12Vdc, 300mA(Internal Power)
Power Consumtion: 1W in standby, 12W in working
NO, COM dry contact: Max. 48V dc 1.5A
Unlocking time: 1 to 9 seconds, set by Monitor
Working temperature: -10ºC ~ 45ºC
4.1 How to open the unit
slide down
take off the bracket
3. Specifications
4. Mounting and Settings

- 5-- 5-
4.2 Door station Mounting
4.3 Button Mode Setting
1
2
You can set either single button mode or double button mode on door station .
Note:single button is default in restore setting.
Single Button Mode:that means the door station only has one button,it can only call the monitor
with it's code among 00~15.please refer to 6.2.
Double Button Mode:that means the door station has two buttons,A button can call the adress
00~15 of the monitor,and B button can call the adress 16~31 of the monitor.please refer to 6.2.
How to set the button mode
1. Single Button Setting:set the code of door station on 10(refer to 6.1),press the two buttons at the
same time,and then power on for 3s,the unit will ring "bi...",that means single button is perform.
2. Double Button Setting:set the code of door station on 01(refer to 6.1),press the two buttons at
the same time,and then power on for 3s,the unit will ring "bi...bi...",that means double button is
perform.

CDC-2FxB
English
- 6-
4.5 Adjusting Camera Angle
use one hand to press the camera and
another hand with a screwdriver to loosen
the screw and then adjust the angle of the
4.4 Placing Name Label
Move the plastic cover away to open the transparent name label cover, insert a name paper, then put
the plastic cover back to the panel.
name label
name label
- 7-
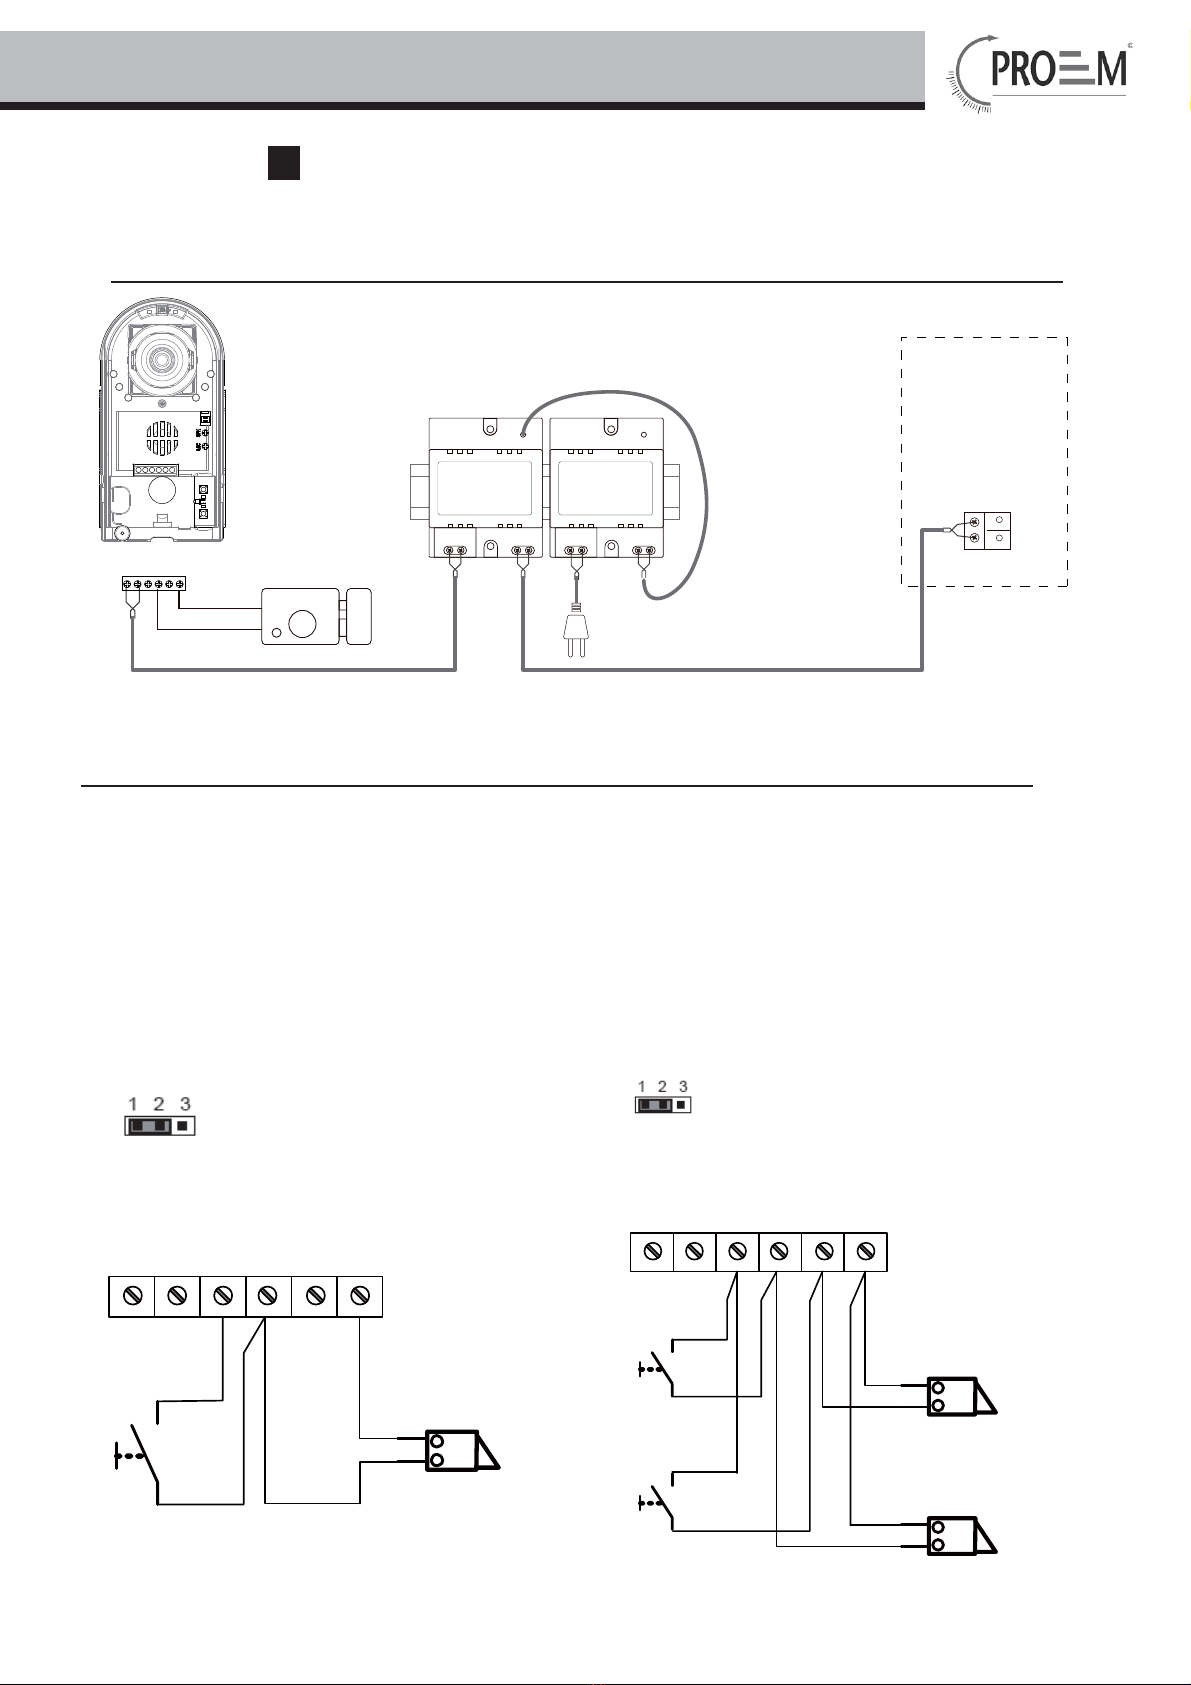
5.1 Basic Connection
-
+
AC~
monitor
MD-DPS PS24-1
L1 L2 PL S1+ S2+ S-
5.2 Electric Lock Connection
Door Lock Controlled with Internal Power
Note:
1. Electronic lock of Power-on-to-unlock type should be used.
2. The door lock is limited to 12V, and holding current must be less than 250mA.
3. The door lock control is not timed from Exit Button(EB).
4. The
Unlock Mode Parameter of Monitor must be set to 0 (by default).
EB
*
LOCK
BUS PL S1+ S2 + S -
LOCK
2nd
1ST
2nd
EB
*1ST
Jumper position in
Connect two locks
1-2
EB
*
LOCK
BUS PL S1
+
S2
+S-
Jumper position in
Connect one lock
1-2
5 . Wiring and Connections

CDC-2FxB
English
- 8-
5.3 Electromagnetic Lock Connection
Door Lock Controlled with Internal Power
Note:
1. Electromagnetic lock of Power-off-to-unlock type should be used.
2. The door lock is limited to 12V, and holding current must be less than 250mA.
3. The door lock control is not timed from Exit Button(EB).
4. The
Unlock Mode Parameter of Monitor must be set to 1 (by default).
5.4 Door Lock Controlled with Dry Contact
Note:
1. The external power supply must be used according to the lock.
2. The inside relay contact is restricted to AC or DC 24V/3A.
3. The jumper must be taken off before connecting.
4. Setup the
Unlock Mode of Monitor for different lock types.
Power-on-to-unlock type:Unlock Mode=0 (by default)
Power-off-to-unlock type:Unlock Mode=1
EB
*
LOCK
BUS PL S1
+
S2
+S-
Jumper position in
Connect one lock
2-3
1 2 3
EB
*
LOCK
BUS PL S1+ S2+ S -
LOCK
2nd
1ST
2nd
EB
*1ST
Jumper position in
Connect two locks
2-3
1 2 3

- 9-
LOCK
BUS PL S1
+
S2
+S-
Take off the Jumper
POWER
SUPPLY
LOCK
BUS PL S1
+
S2
+S-
Take off the Jumper
POWER
SUPPLY
connect one lock connect two locks
5.5 How to setup the unlock parameter in Monitor
monitor
intercom
setup
exit
Outdoor Tone -- 01
Intercom Tone -- 05
Monitor Time -- 1min
Advanced Set...
Auto Record -- OFF
Exit
0
***
Password:
Slave Addr Set -- 0
Guard Unit Set -- 0
Date/Time Set...
Other Settings...
Information...
Exit
Hardware ver 0302
Software ver 0168
Voltage 22.4V
Manufacture 00.0T
Restore to default
Exit
Unlock Time 1
Unlock Mode 0
Exit
1.Press MENU button twice
to enter the MAIN MENU
page,then press setup item.
2.Select Advanced Set...item
and press MENU button to
enter,a password will be
asked.
4.Select Information...item
and press MENU button to
enter next page.
Note:
1.must connect DT599 correctly before setting.
2.the parameter will be saved in DT599 automatically,so you need only set on one monitor.
5.Press UNLOCK button
and hold for 2s.
6.Use / to select the
item, use / to change
the value of the item.select Exit
item,press MENU button to save
the settings automatically.
3.The default password is
2008. press / button to
change the value,Press /
button to select the location,after
finishing,press MENU button to
enter next step.

CDC-2FxB
English
- 10 -
5.6 Multi Doorstations Connection
85~260VAC
MD-DPS
PS24-5
monitors
L1 L2 PL S1+ S2+ S- L1 L2 PL S1+ S2+ S-L1 L2 PL S1+ S2+ S-L1 L2 PL S1+ S2+ S-
12
ON
12
ON
12
ON
12
ON
1# Camera
ID=00
ID=10
ID=01ID=11
2# Camera3# Camera4# Camera
MD
DBC4
A B C D
BUS
Ce manuel convient aux modèles suivants
2
Table des matières
Langues :


