Pro ceed PCD 3 Manuel utilisateur

1
Table of contents
About Compact Disc Digital Audio… ....................................................... 2
Front panel ................................................................................................... 3
Display.......................................................................................................... 6
Remote Control ........................................................................................... 7
Rear panel, PCD 3 ....................................................................................... 8
Rear panel, PDT 3 ...................................................................................... 10
Unpacking ................................................................................................. 12
Set-up and installation .............................................................................. 13
Installing the spikes (optional) ................................................................ 13
Removing the transport screws ............................................................. 14
Location .................................................................................................... 15
A word about cables ..............................................................................15
A word about balanced output ........................................................... 15
Audio connections, PCD 3 ..................................................................... 15
Audio connections, PDT 3 ...................................................................... 16
Power supply connection ...................................................................... 16
master power switch ...............................................................................16
Installing batteries in the Remote Control ............................................ 16
Basic operation ......................................................................................... 17
Loading a CD .......................................................................................... 17
Playing all tracks on a CD ...................................................................... 17
Beginning play with a track other than the first track ......................... 17
Replaying a track .................................................................................... 18
Skipping to another track ....................................................................... 18
Searching for a passage on the CD ..................................................... 18
Beginning play in the middle of a track ............................................... 18
The "pause" function ............................................................................... 19
Repeating all tracks on the CD ............................................................. 19
Stopping play ........................................................................................... 19
Programming ............................................................................................. 20
Entering a program ................................................................................. 20
Replaying a selection in the program .................................................. 20
Skipping to another selection in the program ..................................... 21
Searching for a passage in the program ............................................. 21
The "pause" function ............................................................................... 21
Repeating all tracks in a program......................................................... 21
Stopping play ........................................................................................... 21
Care and maintenance ........................................................................... 22
Cleaning the PCD 3/PDT 3 ..................................................................... 22
Caring for the Remote Control .............................................................. 22
Caring for Compact Discs ...................................................................... 22
Specifications, PCD 3 ................................................................................ 23
Pin assignments, male XLR balanced analog output ......................... 23
Specifications, PDT 3 ................................................................................. 24
Pin assignments, male XLR digital output ............................................. 24
Troubleshooting ......................................................................................... 25
Service ....................................................................................................... 27

2
Direction the disc rotates
T
r
a
c
k
3
T
r
a
c
k
2
T
r
a
c
k
1
Direction the laser
pickup travels
About Compact Disc
Digital Audio…
To most people, a Compact Disc (CD) looks like a small, silver
phonograph record. In fact, there are some important differences
between records and CDs.
The information on a phonograph record is contained within its
grooves. This
analog
information is read by a stylus riding along in the
grooves and transmitted via a cartridge. The
digital
information on a
CD, though arranged in similar grooves, is read by a laser mechanism
(called a
pickup
). A phonograph's stylus
must be in contact with the record,
but a CD player's pickup never
touches the CD. The information
on the CD is transmitted via
complex decoder circuitry.
The CD rotates
counterclockwise, and the laser
pickup reads the underside of the
CD (the side opposite the label)
beginning at the center and
travelling toward the outer edge. As
the pickup moves away from the
center, the speed of rotation gradually
decreases from 500 to 200 revolutions per minute.
Programs on CDs are organized into
tracks
, usually corresponding to
songs or movements. This allows the user to easily and precisely select
a part of a program with virtually no wear and tear on the CD. There
may be as many
as 99 tracks on a
CD.
On some CDs,
tracks are further
broken down into
indexes
. These
"tracks within
tracks" allow even
more precise
selection and programming. A single track may have up to 99
indexes.
Lindsay's First Symphony
01 02 03 04 05 06 94 95 96 97 98 99
Index Numbers from Track 2
(Track 1) (Track 2) (Track 3)
First Movement Second Movement Third Movement

3
Front panel
playstop
prev
pause
next
drawer
standby
prev
index
next
index
progm repeat
error
1
13
11 14
10
127
89
16
6 5
2 43
15
17
TRACK INDEX MIN SEC
1 standby
When the master power switch on the rear panel is in the "|" (on)
position, pressing this button takes the PCD 3/PDT 3 out of
“standby”mode, turns the Display on, and makes the PCD 3/PDT 3
ready to play a CD. Pressing the button again puts the
PCD 3/PDT 3 in standby mode and clears any previously
programmed sequence of selections. (See "Rear panel" and "Set-
up and installation.")
2 play
After a CD is loaded into the drawer, pressing this button begins
play with the first track on the CD (or the first track in a
programmed sequence).
If you press play while the drawer is open, the drawer closes and
play starts beginning with the first track on the CD.
Pressing play while a CD is playing suspends play, returns to the
beginning of the current track, and replays that track.
3 stop
Pressing this button while a CD is playing stops play and clears any
previously programmed sequence of selections.
Pressing play after pressing stop begins play again with the first
track on the CD.

4
4 pause
While a CD is playing, pressing this button suspends play; pressing it
again resumes play at the point where pause was first pressed.
The LED above the pause button lights while play is suspended.
5 next
Pressing this button while a CD is playing suspends play, “skips”to
the next track on the CD (or the next track in a programmed
sequence), and begins playing that track.
Pressing next before play begins skips to the beginning of the next
track; pressing play begins playing that track.
6prev
Like the next button, pressing prev while a CD is playing suspends
play, “skips”to the previous track on the CD (or the previous track
in a programmed sequence), and begins playing that track.
Pressing prev before play begins skips to the beginning of the
previous track; pressing play begins playing that track.
7 progm
Pressing this button after making a selection (using next, prev, next
index, prev index, or the numbered buttons on the Remote
Control) enters it as part of a programmed sequence. (See
"Programming.")
The LED above the progm button will flash while you assemble a
program. This LED will remain lighted after an entry is made and
while a sequence is playing.
8>>
Holding this button down during play moves the laser pickup
toward the end of the CD.
During search, the pickup moves at three different speeds,
increasing in speed the longer you hold down the >> button. At
the first two search speeds, the volume is reduced; at the fastest
search speed, the volume is muted completely.
When you release >>, play resumes.
9<<
This button works in the same way as >>, except that it moves the
laser pickup toward the beginning of the CD.
10 next index
If the CD in play has indexes, pressing this button skips the laser
pickup to the next index on the CD, and the index number on the
Display will increase. (See "Display.")
11 prev index
This button works in the same way as next index, except that it
moves the laser pickup toward the beginning of the CD.

5
12 repeat
Pressing this button before or during play causes all tracks on the
CD (or all selections in a programmed sequence) to repeat
indefinitely. To cancel this function, press repeat again.
The LED above the repeat button lights while the repeat function is
active.
13 drawer
Pressing this button opens the drawer; pressing it again closes the
drawer.
Pressing drawer while a CD is playing stops play, clears any
previously programmed sequence of selections, and opens the
drawer.
NEVER hold onto the drawer while it's in motion (either opening or
closing). If you accidentally prevent the drawer from opening, wait
about three seconds, then press drawer twice to open it. If you
accidentally prevent the drawer from closing, it will open again
after about three seconds. Press drawer again to close it.
14 error
This LED will light when a function is entered incorrectly.
15 Display
This window displays information about track, index, and elapsed
time. (See "Display.")
16 Remote sensor window
This window receives the infrared signals from the Remote Control,
allowing remote operation. Make sure that this window is not
blocked. (See "Remote Control.")
17 Drawer
The drawer contains the tray that holds the CD during play. Its
operation is controlled by the drawer button.
PRECAUTION

6
Display
21 3
TRACK INDEX MIN SEC
1 TRACK
Before play begins, this part of the Display shows the total number
of tracks on the CD.
During play, this part of the Display shows the number of the track
in play.
While play is suspended using pause, it shows the track that was
playing when play was suspended.
2 INDEX
Before play, this part of the Display is blank.
If the CD in play has indexes, this part of the Display shows the
index on the CD beginning with “01”and increasing as the CD
plays.
If the CD in play has no indexes, this part of the Display shows “01”
throughout play.
3 MIN SEC
Before play, this part of the Display shows the total time for all
tracks on the CD.
During play, this part of the Display shows the elapsed time for the
track in play.
After you enter a selection into the memory (as part of a
program), the MIN part of the Display shows "P." (See
"Programming.")
TRACK INDEX

7
Remote Control
NEXT
STOP/CM
PLAYPREV
>> PAUSE<<
231
564
897
0 PROGR
REPEAT
1
2
3
6
9
5
4
7
8
10
11
1 PLAY 6 PROGR
2 STOP/CM (STOP) 7<<
3 PAUSE 8 >>
4 NEXT 9 REPEAT
5 PREV
Each of these buttons (1 –9) performs the same function as its
counterpart on the front panel. (See “Front panel.”)
10 Numbered buttons
These buttons may be used to select tracks when programming a
sequence of tracks.
The numbered buttons may also be used to select a particular
track (instead of using the NEXT or PREV buttons). Pressing a track
number before play, the pressing PLAY, begins play with that track
and continues playing tracks on the CD in order.
Pressing a track number during play, then pressing PLAY,skips to
that track and begins play, then continues playing tracks on the
CD in order.
11 Projection lens
Infrared (IR) commands from the Remote Control to the
PCD 3/PDT 3 are transmitted through this lens.

8
Rear panel, PCD 3
2
master
power
digital
output
balanced
unbalanced
3 3
56
1
MADRIGAL AUDIO LABORATORIES, INC.
PROCEED®
COMPACT DISC PLAYER
MODEL NO:
SERIAL NO:
MANUFACTURED:
50-60 HZ
25 WATTS VOLTS
A, 250V
WARNING:
TO REDUCE THE RISK OF FIRE OR ELECTRIC
SHOCK, DO NOT EXPOSE THIS APPLIANCE TO RAIN OR
MOISTURE.
CAUTION:
TO REDUCE THE RISK OF ELECTRICAL
SHOCK, DO NOT REMOVE COVER. NO USER-
SERVICEABLE PARTS INSIDE. REFER SERVICING TO
QUALIFIED PERSONNEL.
CAUTION:
FOR CONTINUED
PROTECTION AGAINST RISK OF
FIRE, REPLACE ONLY WITH THE
SAME TYPE OF FUSE:
RISK OF ELECTRIC SHOCK
DO NOT OPEN
CAUTION
right-channel output
balanced
unbalanced
left-channel output
4
PROCEED®PCD 3
made in u.s.a.
1 master power
This switch turns the PCD 3 on and off. The switch must be in the "|"
(on) position for the PCD 3 to operate. (See "Set-up and
installation.")
NEVER operate the master power switch without first making sure
that power is turned off to your receiver, integrated amplifier, or
preamplifier/power amplifier.
2 unbalanced outputs
These outputs provide single-ended analog audio (via cables
equipped with RCA-type connectors) to a receiver, integrated
amplifier, or preamplifier equipped with single-ended inputs. Most
components accept this type of output. (See "Set-up and
installation.")
3 balanced outputs
These outputs provide balanced analog audio (via cables
equipped with XLR-type connectors) to a preamplifier, integrated
amplifier, or receiver equipped with balanced inputs. (See "Set-up
and installation.")
4 RCA (SPDIF) digital output
This output provides digital audio (via a cable equipped with RCA-
type connectors) to the digital input of a receiver, integrated
amplifier, preamplifier, or digital processor. (See "Set-up and
installation.")
PRECAUTION

9
5 AC power cord
This cord supplies AC power to the PCD 3. (See "Set-up and
installation.")
6 Fuse
This holder contains the main fuse for the PCD 3. If the fuse ever
needs to be replaced, contact your Proceed dealer.

10
543
6
7
2
MADRIGAL AUDIO LABORATORIES, INC.
PROCEED®COMPACT DISC PLAYER
MODEL NO:
SERIAL NO:
MANUFACTURED:
50-60 HZ
25 WATTS VOLTS
A, 250V
WARNING:
TO REDUCE THE RISK OF FIRE OR ELECTRIC
SHOCK, DO NOT EXPOSE THIS APPLIANCE TO RAIN OR
MOISTURE.
CAUTION:
TO REDUCE THE RISK OF ELECTRICAL
SHOCK, DO NOT REMOVE COVER. NO USER-
SERVICEABLE PARTS INSIDE. REFER SERVICING TO
QUALIFIED PERSONNEL.
CAUTION:
FOR CONTINUED
PROTECTION AGAINST RISK OF
FIRE, REPLACE ONLY WITH THE
SAME TYPE OF FUSE:
RISK OF ELECTRIC SHOCK
DO NOT OPEN
CAUTION
master
power
1
PROCEED®PDT 3
made in u.s.a.
digital
outputs
spdif aes/ebu st eiaj
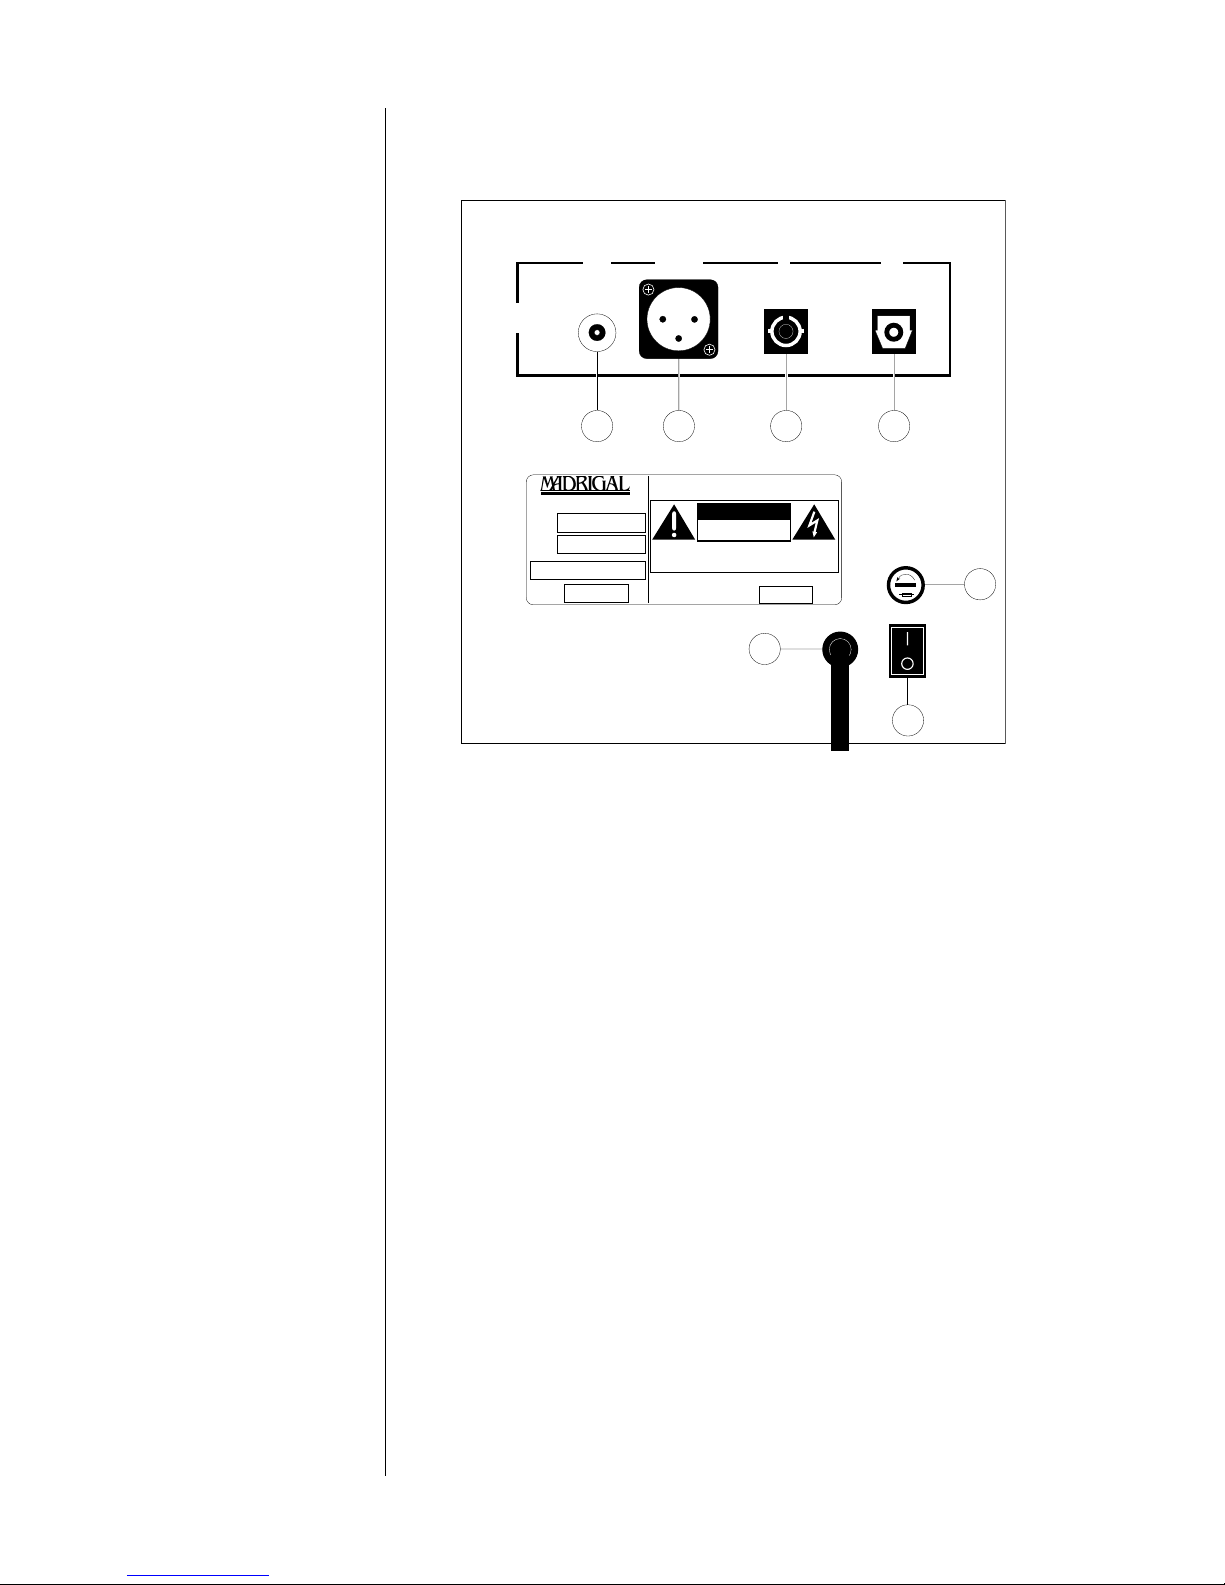
Rear panel, PDT 3
1 master power
This switch turns the PDT 3 on and off. The switch must be in the "|"
(on) position for the PDT 3 to function. (See "Set-up and
installation.")
NEVER operate the master power switch without first making sure
that power is turned off to your receiver, integrated amplifier, or
preamplifier/power amplifier.
2 spdif (RCA) digital output
This output provides digital audio (via a cable equipped with RCA-
type connectors) to the digital input of a receiver, integrated
amplifier, preamplifier, or digital processor. (See "Set-up and
installation.")
3 aes/ebu (XLR) digital output
This output provides digital audio (via a cable equipped with XLR-
type connectors) to the digital input of a receiver, integrated
amplifier, preamplifier, or digital processor. (See "Set-up and
installation.")
4 st (AT&T) digital output
This output provides digital audio (via an optical cable equipped
with ST-type connectors) to the optical digital input of a receiver,
integrated amplifier, preamplifier, or digital processor. (See "Set-up
and installation.")
PRECAUTION
Ce manuel convient aux modèles suivants
1
Table des matières
Autres manuels Pro ceed Lecteur CD