Polaroid DRM-2001G Manuel utilisateur

DVD Recorder with 80GB Hard Drive
DRM-2001G
20060425
User’s Manual

Safety Instructions
WARNING:
To prevent fire or electric shock, do not expose the unit to rain or moisture. Never attempt to open
the cabinet; dangerous high voltages are presented in the unit. Refer servicing to qualified service
personnel when necessary.
MAINTENANCE NOTICE:
Do not put the unit: near strong magnetic fields, somewhere exposed direct sunlight or near heat
radiation equipment (such as a heater), on top of other heat radiation objects, in a place with
bad ventilation and dirt, somewhere subject to vibration and instability, or somewhere exposed to
moisture or rain. The unit should be installed in a smooth and dry place with good ventilation.
When the unit is moved from a cold place to a warm one, the laser head may get dewed and
the unit may not work normally. In this case, keep the power on for an hour or two (with no disc
loaded) before playing normally.
Clean the surface of the unit with neutral detergent. Do not use organic solvents such as alcohol
or gasoline. Never polish the unit with sand paper.
If the unit is not to be used for a long time, disconnect the power plug from the wall outlet.
For optimum performance, do not place heavy objects on the unit.
CAUTION:
The unit employs a laser system. To prevent direct exposure to the laser radiation, do not attempt
to open the cabinet. Visible laser may radiate when the cabinet is opened or the interlocks are
defeated.
Do not stare at laser beams.
To ensure the proper use of the unit, read this manual carefully.
Keep this manual for future reference. If the unit requires servicing, please contact the seller or
service center.
•
•
•
•
•
•
•
•
•
Danger symbol: The lightening flash with arrowhead symbol within an equilateral triangle is
intended to alert the user to the presence of dangerous voltage in the unit.
Warning symbol: The exclamation point within an equilateral triangle is intended to alert the
user to the presence of important operation and maintenance (servicing) instructions.

Table of Contents
Identification of Controls 4
Remote Control 5
System Connections 7
System Setup 10
TVGuardian® Feature 19
Recording Mode 20
Creating a YesDVD™ 23
Timer Recording 24
Play Mode 26
Hard Disc Drive Play Mode 33
Disc Operation 37
Hard Disc Drive Editing 39
Title Editing 42
Chapter Editing 43
Troubleshooting 45
Specifications 46
Glossary of Terms 47

Identification of Controls
4
FRONT PANEL
REAR PANEL
1. Power button
2. Standby LED
3. IR (Remote Sensor)
4. DVD Door
5. Display
6. Open/Close button
7. Source button
8. Play button
9. Stop button
10.Record button
11.Digital video input
12.Audio input (front left)
13.Audio input (front right)
14.Composite video input (front)
1. RF signal input
2. RF signal output
3. Composite video input (rear)
4. S-video input
5. Audio input (rear left/right)
6. 5.1Ch audio output
7. Composite video output
8. S-video output (rear)
9. Digital audio-optical output
10.Digital audio-coaxial output
11.Component videos input
12.Component videos output (Y, Pr/Cr, Pb/Cb)

Remote Control
5
1. EJECT button
2. DV button
3. HDD button
4. NUMBERS (0-9) buttons
5. SETUP/EXIT button
6. LEFT DIRECTION/REPLAY button
RIGHT DIRECTION/SKIP button
(UP/DOWN/LEFT/RIGHT)
7. OK button
8. TIMER button
9. TIME SHIFT button
10. REC/OTR button (RECORD/ONE-TOUCH
RECORD)
11. PLAY button
12. STOP button
13. REVERSE button
14. PREVIOUS button
15. FWD button
16. NEXT button
17. AUDIO button
18. MENU button
19. SUBTITLE button
20. ZOOM button
21. POWER button
22. INPUT button
23. DVD button
24. GOTO button
25. ADD/CLEAR button
26. NAVIGATION button
27. RETURN button
28. REC TO button
29. SLOW/SORT button
30. PAUSE/STEP button
31. CHANNEL+ button
32. VOLUME+ button
33. CHANNEL- button
34. VOLUME- button
35. PS/IS (PROGRESSIVE/ INTERLACE SCAN)
36. REPEAT button
37. DISPLAY button
38. MUTE button

Remote Control
6
To install batteries and use remote control:
Notes:
Do not drop the remote control or leave it in places with high humidity.
Do not leave the IR remote sensor exposed to direct sunlight or bright light.
Do not mix old and new batteries should they need replacing.
Do not use rechargeable batteries.
Remote range = 16 feet.
•
•
•
•
•

System Connections
7
CONNECT TO ATV
Before connecting the system, be sure to turn off the power source of this unit and other devices.
There are three kinds of video outputs in this unit: component video, S-video, and composite video. You can select
one of the available video inputs of the TV and make the connection.
In terms of picture quality, the component video is the best, followed by S-video, then composite video.
When connecting the audio output of the unit to the TV, connect the left and right audio outputs to the TV audio inputs
of the same group as the connected video inputs.
Component video and S-video cables not included.
•
•
•
•

System Connections
8
CONNECTING TO 5.1 CHANNEL AMPLIFIER
CONNECTING TO AN AMPLIFIER WITH DIGITAL DECODER
In audio setup, set the “Digital Output Mode” to “LPCM Output” (For details, see “System Setup: Digital Audio Output”
section.)
When using a digital signal output (coaxial or optical), the Analog Output cable is not needed for connection.
•
•
System Connections
9
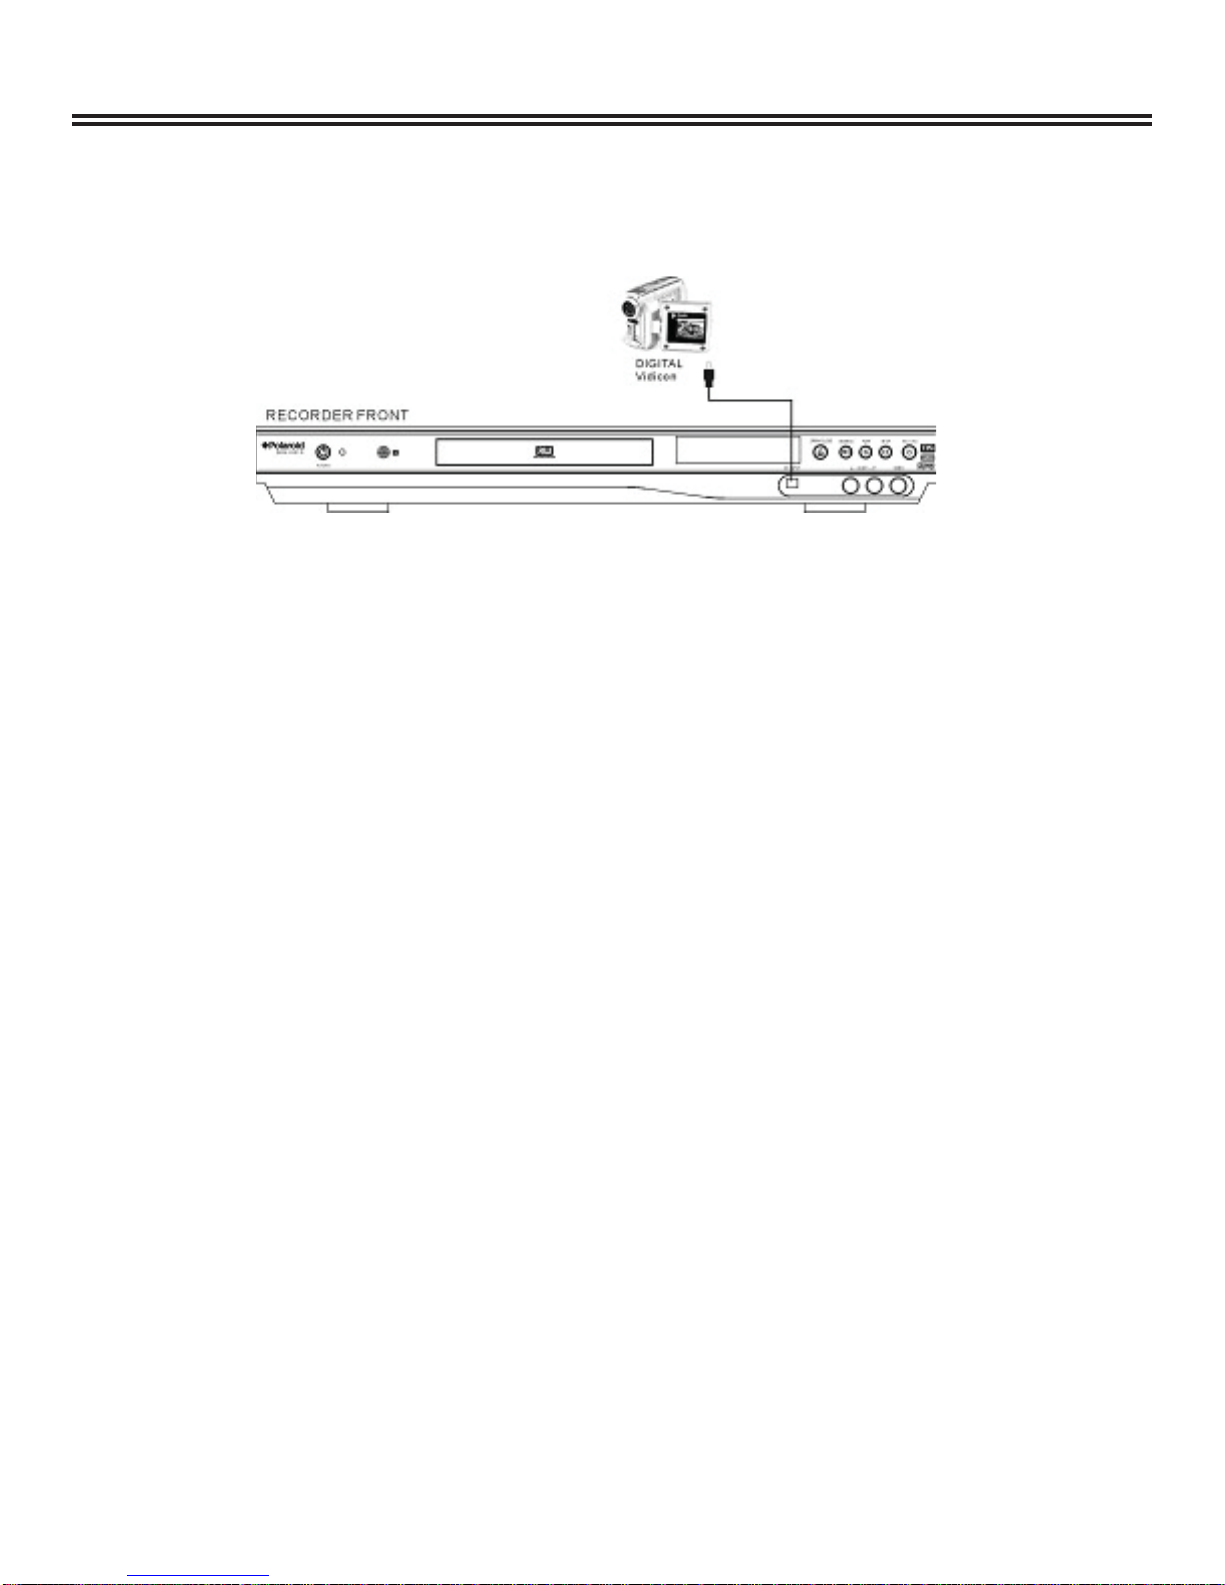
CONNECTION FOR RECORDING EXTERNAL SIGNALS (FRONT PANEL SIGNAL)
Before connecting with external signals be sure to turn off the power source of this unit and other devices.
Notes:
Refer to your user’s manual when connecting the unit.
Turn off the power and unplug both units before setting up any connections.
•
•
CONNECTION FOR RECORDING EXTERNAL SIGNALS (REAR PANEL SIGNAL)
From the video input terminals, select one as desired.
In terms of picture quality, composite is good, S-video is better, and component is best.
•
•

System Setup
10
Operation Interface and General Steps
This section will introduce the menu interface of the System Setup and general operation steps.
• Press the “SETUP” button to enter the System Setup mode. The system setup control bar menu will appear on the top
of the OSD, as shown in the following chart.
• Use the ▲or ▼button to make a selection and press the “OK” button to enter the setup menu. In the setup menu of
each item, press the arrow buttons and the “OK” button to operate the control units. The corresponding settings will be
done.
• Press the “RETURN” button to return to the upper level menu. Press the “SETUP” button to exit the system setup
mode.
NOTES:
• The steps above are general and typical operations. Some settings might not need a certain step or require more
steps.
• Please set up the system in the Eject Disc mode or No Disc mode, otherwise some settings cannot be done.
Auto Chapter Marker
1. In the Recording Settings menu, use arrow buttons to select “Automatic Chapter Marker” and press the “OK” button to
drop down a menu.
2. Use the ▲or ▼button to select a proper value ( 5min, 10min, 20min, 30min or off), and press the ”OK” button to
confirm.
3. Press the “RETURN” button to return to the upper level menu and set up other items.
• Use different time options to insert chapter markers at x-minute intervals during recording.
Table des matières
Autres manuels Polaroid Enregistreur DVD


