point POWF42 Manuel utilisateur

Electric Wall Fire
With Remote Control
POWF42
User Manual
2
GB
Thank you for purchasing your new POINT SERIES ELECTRIC WALL FIRE.
These operating instructions will help you use it properly and safely. We
recommend that you spend some time reading this instruction manual in
order that you fully understand all the operational features it oers. Read
all the safety instructions carefully before use and keep this instruction
manual for future reference.
NO
Takk for at du kjøpte denne nye POINT SERIES ELEKTRISK VEGGPEIS.
Denne bruksanvisningen hjelper deg med å bruke den ordentlig og sikkert. Vi
anbefaler at du tar deg tid til å lese gjennom hele bruksanvisningen for å bli
fortrolig med alle funksjonene den har. Les alle sikkerhetsanvisningene
nøye før bruk, og oppbevar bruksanvisningen for fremtidig referanse.
FI
Kiitos, kun valitsit uuden POINT SARJAN SÄHKÖTAKKA. Nämä käyttöohjeet
opastavat sinua käyttämään laitetta oikein ja turvallisesti. Suosittelemme,
että vietät hetken tämän käyttöoppaan parissa, jotta ymmärtäisit
täysin kaikki laitteen tarjoamat toiminnalliset ominaisuudet. Lue kaikki
turvallisuusohjeet huolellisesti ennen laitteen käyttöä ja säilytä
käyttöopas myöhempää käyttöä varten.
DK
Tak for købet af din nye Kedel fra EL-PEJS FRA POINT SERIES. Disse
brugsanvisninger hjælper dig med at bruge den korrekt og sikkert. Vi
anbefaler, at du læser denne brugsanvisning, så du får en fuld forståelse
af, hvordan alle funktionerne virker. Læs alle sikkerhedsinstruktioner nøje
før brug, og behold denne brugsanvisning til senere reference.
SE
Tack för att du har köpt ditt nya ELKAMIN FRÅN POINT-SERIEN. Denna
bruksanvisning hjälper dig att använda den på ett säkert och korrekt
sätt. Vi rekommenderar att du tar dig tid att läsa igenom denna
bruksanvisning för att till fullo förstå alla driftfunktioner som den
erbjuder. Läs noga igenom alla säkerhetsinstruktioner före användning
och spara bruksanvisningen för framtida bruk.

3
GBNOFIDKSE
Instrucation Manual – English ................................... page 4 - 26
Bruksanvisning – Norsk ............................................. side 28 -50
Käyttöopas – Suomi ................................................... sivu 52 -74
Brugervejledning – Dansk .......................................... side 76 -98
Bruksanvisning – Svenska ......................................... side 100 -122

4
IMPORTANT: THESE INSTRUCTIONS SHOULD BE READ
CAREFULLY AND RETAINED FOR FUTURE REFERENCE
When using electrical appliances, basic precautions should be followed
to reduce the risk of fire, electric shock, and jnjury to persons, including
the following:
If the appliance is damaged, check immediately with the supplier
before installation and operation.
Do not use this appliance in the immediate surroundings of a bath,
shower or swimming pool.
Do not use outdoors.
This appliance must not be located immediately above or below a fixed
mains power outlet or connection box.
The appliance carries the Warning Symbol indicating that it must
not be covered or has a Do not cover label. Do not cover or obstruct
in any way the heat outlet grille located underneath the appliance
Overheating will result if the appliance is accidentally covered. Do
not place material or garments on the appliance, or obstruct the air
circulation around the appliance, for instance by curtains or furniture,
as this could cause overheating and a fire risk.
In the event of a fault unplug the heater. Unplug the appliance when
not required for long periods.The mains power cable must be placed on
the right hand side of the heater away from the heat outlet underneath
the appliance.
This appliance can be used by children aged form 8 years and above
and persons with reduced physical, sensory or mental capabilities or
lack of experinence and knowledge if they have been given supervision
or instruction concerning use of the appliance in a safe way and
understand the hazards involved. Children shall not play with the
appliance. Cleaning and user maintaince shall not be made by Children
without supervision.
SAFETY WARNING

5
Children of less than 3 years should be kept away unless continuously
supervised. Children aged from 3 years and less than 8 years shall
only switch on/off the appliance provided that it has been placed or
installed in its intended normal operating position and they have been
given supervision or instruction concerning use of the appliance in a
safe way and understanding the hazards involved. Children aged from
3 years and less than 8 years shall not plug in, regulate and clean the
appliance or perform user maintaince.
The appliance must be positioned so that the plug is accessible.
If the mains power cable is damaged it must be replaced by the
manufacturer or service to avoid a hazard.
CAUTION: In order to avoid a hazard due to inadvertent resetting of
the thermal cut-out, this appliance must not be supplied through an
external switching device, such as a timer, or connected to a circuit that
is regularly switched on and off by the utility.
CAUTION: Some parts of this product can become very hot and cause
burns. Particular attention has to be given where children and
vulnerable people are present.
General
Unpack the heater carefully and retain the packaging for possible future
use, in the event of moving or returning the heater to your supplier.
Loose coals and pebbles are packed separately within the carton. When
the heater is assembled the coals or pebbles are placed on top of the
fuel bed up to a maximum weight of 6kg.
The heater incorporates a flame effect, which can be used with or
without heating, so that the comforting effect may be enjoyed at any
time of the year. Using the flame effect on its own requires very little
electricity.
These models are designed to be free standing and are normally
positioned against a wall.
Before connecting the heater check that the supply voltage is the same
as that stated on the heater.
GB

6
NOTE: To avoid injury from unexpected starting or electrical
shock, do not plug the mains power cable into a source of power
during unpacking and assembly. The mains power cable must
remain unplugged whenever you are adjusting/assembling the
fireplace.
If any part is missing or damaged, do not attempt to use or plug
in the mains power cable until the missing or damaged part
is correctly replaced. To avoid electric shock, use only identical
replacement parts when servicing double-insulated tools.
NOTE:
SAVE THESE
INSTRUCTIONS
Electrical connection
WARNING – THIS APPLIANCE MUST BE EARTHED.
This heater must be used on an AC ~ supply only and the voltage
marked on the heater must correspond to the supply voltage.
Before switching on, read the safety warnings and operating
Instructions.
The product complies with the European Safety Standards EN60335-2-30 and the European
Standard Electromagnetic Compatibility (EMC)
EN55014, EN60555-2 and EN60555-3. These cover the essential requirements of EEC
Directives 2006/95/EC and 2004/108/EC
Note: Used in an environment where background noise is very low, it
may be possible to hear a sound which is related to the operation of
the flame effect. This is normal and should not be a cause for concern.

7
PRODUCT OVERVIEW
Part Description Quantity
A Mounting Bracket-bottom 1
B Mounting Bracket-top 1
C Fireplace 1
D Front Frame 1
E Remote Control 1
F Screw Set Varies
GB

8
ASSEMBLY INSTRUCTIONS
AA BB CC
Part Description Part Number Quantity
AA Anchor Screw 180000010600 5
BB Wall Anchor 300000190100 5
CC Screw 4mm x 8mm 180000010100 1
NOTE: Hardware not shown to actual size.
PLANNING ASSEMBLY
Before beginning assembly of product, make sure all parts are present.
Compare parts with Hardware Included and Package Contents lists.
If any part is missing or damaged, do not attempt to assemble, install or
operate the product. Contact customer service for replacement parts.
Estimated Assembly Time: 30 Minutes
Tools Required for Assembly (not included):
Phillips Screwdriver Drill Level Hammer
PRODUCT SPECIFICATIONS
Voltage 220-240 VAC, 50 Hz
Amps 10 Amps
Watts 1500-1800 Watts
HARDWARE INCLUDED

9
ASSEMBLY INSTRUCTIONS
Hanging on a wall
Your new electric fireplace may be installed virtually somewhere in your home.
However, when choosing a location be sure to follow the general instructions
included. For best results install out of direct sunlight. Power supply service
must be either completed or placed within the electric fireplace prior to
finishing to avoid reconstruction.
WARNING: Keep drapery and other furnishings at least 3 ft / 1 m
from the front and sides of the electric fireplace.
Clearance to combustibles
Sides 2 in. / 5 cm
Floo 2 in. / 5 cm
Top 24 in. / 60 cm
Bottom 2 in. / 5 cm
Back 0 in. / 0 cm
GB
10
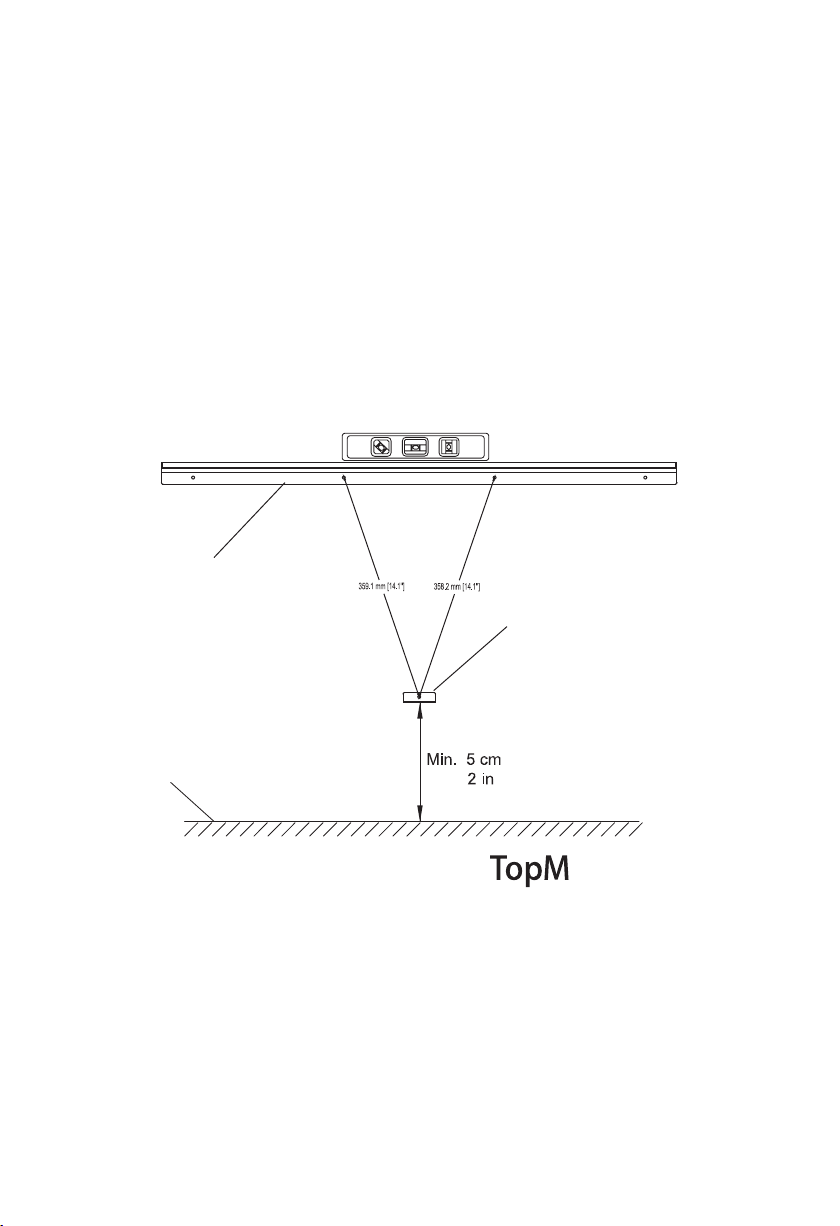
Installation - Wall Mounting
1 Choosing a Wall Location
2 Drilling the Holes
● Choose a wall location to attach the Mounting Bracket (B). Position the
Mounting Bracket (B) in the desired location.
● Use a level to align the bracket and mark the four holes with a pencil.
● Use the two marked center holes of the Top Mounting Bracket (B) to
measure and locate the hole for the Bottom.
Bracket (A). Follow the dimensions in the drawing. Mark the Bottom
Bracket (A) hole with a pencil.
● Drill five 7/25 in. (7 mm) holes in the wall.
● Insert the Wall Anchors (BB) into the holes using a hammer.
B
A
Floor
Table des matières
Langues :
Autres manuels point Cheminée intérieure


