Pixelink 20" Rack Mount Series Display Manuel utilisateur

Operating Instructions
Multi-Scan Color TFT LCD Monitor
20” Rack Mount Series Display
Read these Operating Instructions completely before operating this display.
Users Guide (MAN-00013) Rev.C
3/6/08

CAUTION!!
RISK OF ELECTRIC SHOCK
DO NOT OPEN
To reduce the risk of electric shock, do not remove cover (or back).
While this device employs fuses as a protection system against electric shock, a
failed fuse is an indication of a more serious failure of circuit components, and as
such are not user replaceable.
No user serviceable parts inside.
Refer servicing to qualified personnel.
WARNING!!
TO PREVENT FIRE OR SHOCK HAZARD, DO NOT EXPOSE THIS MONITOR TO
RAIN OR MOISTURE.
HIGH VOLTAGE EXISTS ON THE BACK LIGHT CIRCUIT OF THIS DISPLAY
DEVICE. BEFORE SERVICING, DETERMIN THE PRESENCE OF HIGH VOLTAGE
BY CONNECTING THE H.V. METER BETWEEN THE BACK LIGHT POWER
LEAD AND THE CHASSIS ONLY.
Definitions of Symbols Used on the LCD Display and in this Manual
General Caution – See Manual for additional safety instructions
WARNING – Risk of electric shock
For the definition of MENU button Symbols, see the OSD Menu Options section of this
guide.
Disclaimer
This LCD display device was designed and manufactured solely for use as a 19” rack
mount display device in a business or industrial environment. It is not intended for home
or office use, nor is it recommended as a desk top display.
2
Users Guide (MAN-00013) Rev.C
3/6/08

3
Installation and Set Up
The display will fit industry standard 19” rack mount systems, with an available 9U
(15.75”) vertical opening.
Attach to the racking system with the four (4) 1/4x20 screws provided, or use equivalent
screws to secure the display.
Attach power and video cables as needed, and ensure cables are not pinched or pulled
tight by other devices mounted below the display.
Ensure that the air space behind the display is adequately ventilated.
Reference
Read the reference section completely, before attempting to use this display device.
On Screen Display (OSD) Controls
All adjustments to this display device are made via the 8 buttons centrally located on the
front of the display.
POWER Briefly pressing and releasing the POWER button will turn the display on
or off.
MENU Pressing the MENU button will activate the on screen menu system. When
a menu is displayed, pressing MENU will remove the on screen display
(OSD) and save changes.
SELECT Press SELECT to select a sub menu or to activate the Auto Adjust* when
no menu is displayed.
Users Guide (MAN-00013) Rev.C
3/6/08

4
DOWN
When a menu item has more than one option, pressing DOWN selects the
next available option within the currently displayed menu
UP
When a menu item has more than one option, pressing UP selects the
next available option within the currently displayed menu
RIGHT Pressing the RIGHT key will adjust the value of a selected menu item to
the next higher setting. Holding the RIGHT key down will rapidly increment
the selected item.
LEFT Pressing the LEFT key will adjust the value of a selected menu item to the
next lower setting. Holding the LEFT key down will rapidly decrement the
selected item.
INPUT Pressing the INPUT key will change the displayed image to the next input
source. Select between RGB, DVI, VIDEO and S-VIDEO. If no video
signal is detected, a message will be displayed.
LED The LED will provide status information under the following conditions:
Green: Normal operation. A valid video mode has been detected and is
being displayed from the currently selected video source.
Red: Off mode. No valid video signal can be detected from the currently
selected video source.
Amber: DPMS mode. A power saving mode, triggered by a signal from the
video source device.
Auto Set Up
* Auto adjust is activated when no OSD menu is displayed and the SELECT button is
pressed.
Users Guide (MAN-00013) Rev.C
3/6/08
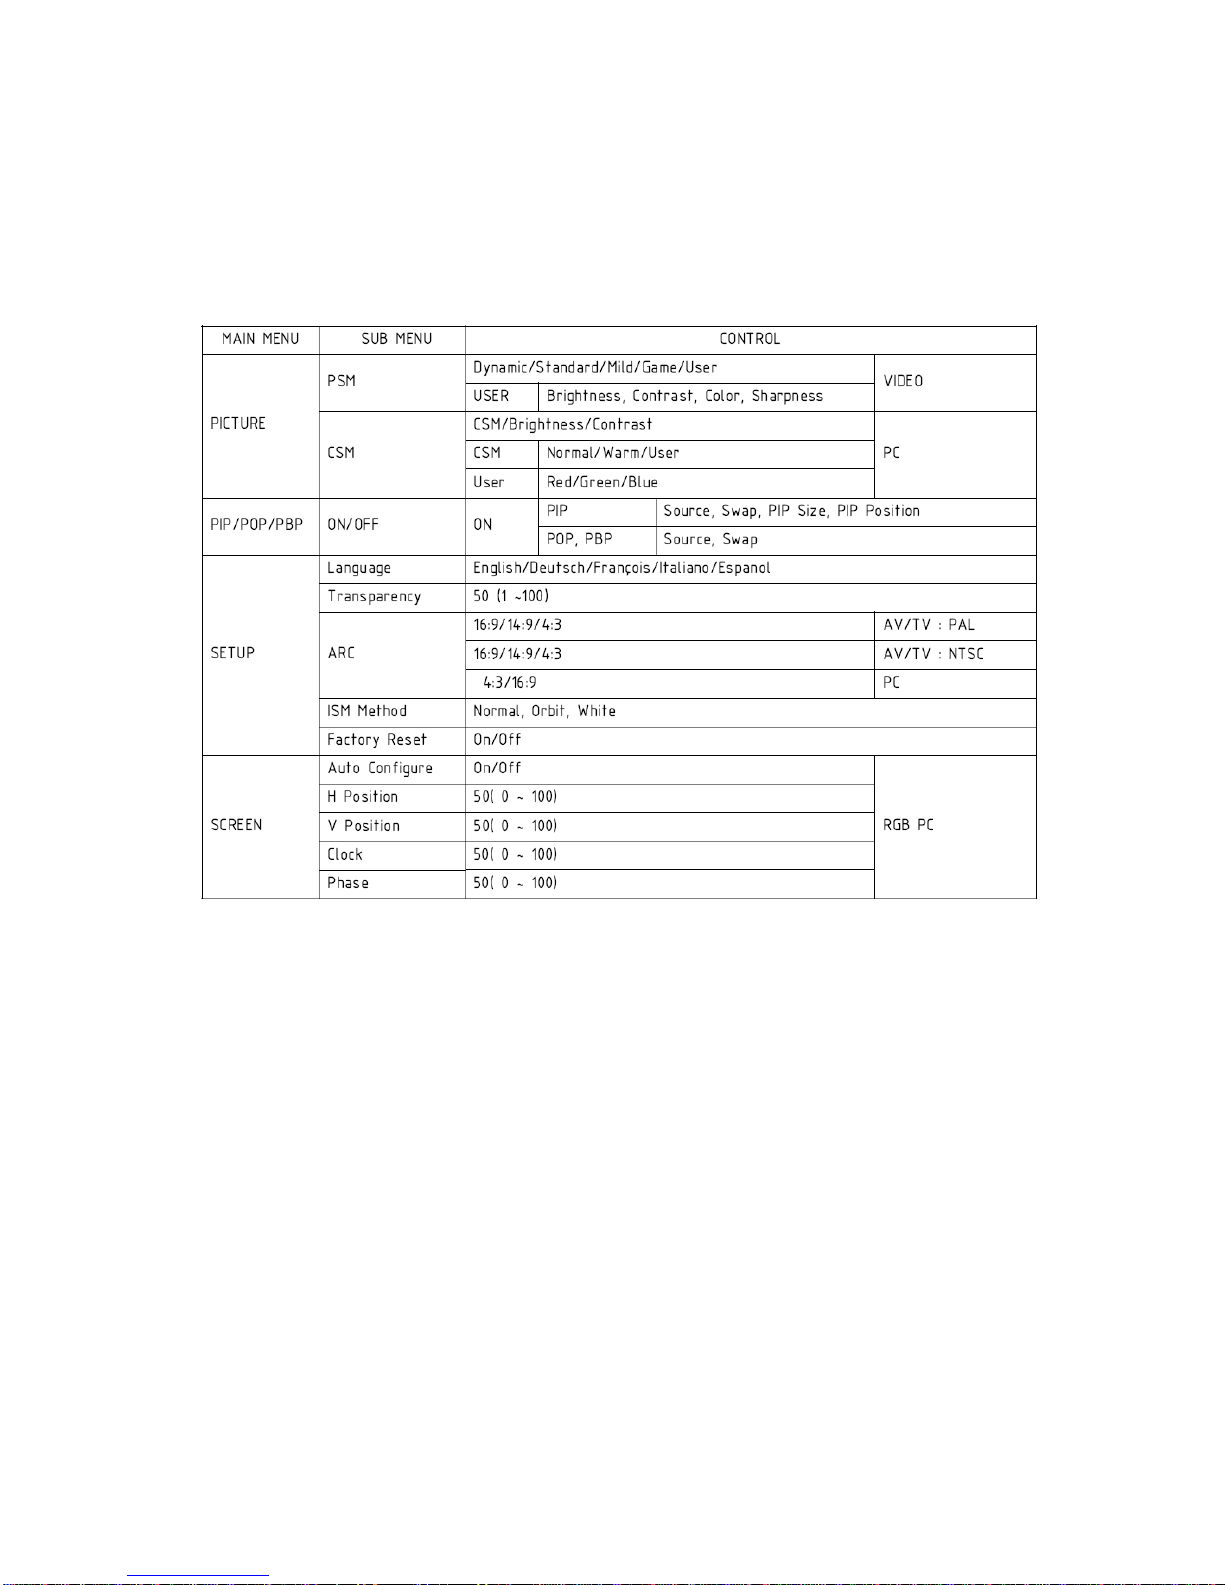
OSD Menu Options
Below is a summary of controls available on this display, and the menu options necessary
to access a particular option. To adjust any specific control option, first select the main
menu option, then the corresponding sub menu.
Press the MENU OSD button to activate the OSD menu system.
The initial main menu option PICTURE will vary slightly, depending on the type of
video input in use at the time the menu is activated.
•For PC video modes on the RGB and DVI inputs, the options CSM, Brightness
and Contrast will be available.
•For full motion (DVD/VCR) video (AV) on the “S”-Video and Composite inputs,
PSM, Brightness, Contrast, Color, Sharpness and Tint will be available.
See the two sample menus pictured below:
5
Users Guide (MAN-00013) Rev.C
3/6/08

6
Press the LEFT or RIGHT OSD buttons to navigate between the four top level menu
options, PICTURE, PIP, SETUP and SCREEN.
To exit from any sub menu, or to exit the menu system without waiting for the
programmed timeout, press the MENU button.
PC Video PICTURE submenus
Press SELECT to open the sub menu options to the right.
The CSM menu allows the user to select the overall warmth of the colors used on screen.
Options available are Cool, Normal, Warm and User. When CSM is set to User, RED
GREEN and BLUE can be adjusted directly.
To adjust an image option, press the UP or DOWN OSD button to select the desired
option, then press the LEFT or RIGHT OSD button to incrementally adjust the value
from 0 to 100.
Press the MENU button to exit from this menu.
Users Guide (MAN-00013) Rev.C
3/6/08

7
Motion (Action) Video PICTURE submenus
Press SELECT to open the sub menu options to the right.
The PSM menu allows the user to select how motion video is interpreted by the display.
Options available are Dynamic, Standard, Mild, Game and User. When PSM is set to
USER, Color Sharpness and Tint can be adjusted directly.
To adjust an image option, press the UP or DOWN buttons to select the desired option,
then press the LEFT or RIGHT button to incrementally adjust the value from 0 to 100.
Press the MENU button to exit from this menu.
Tint
Press the LEFT or RIGHT buttons to incrementally set the Tint from RED (R50) to
GREEN 50 (G50).
Press the MENU button to exit from this menu.
Users Guide (MAN-00013) Rev.C
3/6/08

PIP / POP / PBP
Picture in Picture (PIP) / Picture outside Picture (POP) / Picture by Picture (PBP)
More than one video source can be displayed onscreen at the same time, with one source
as a primary, and another source as a secondary usually in a small window over the top of
the primary.
Picture in picture options include Off, PIP, POP, PBP1 and PBP2.
PIP Places a small secondary image over a full screen primary source image.
POP The secondary image is a small window to the right of the primary image.
PBP1 Places the primary and secondary images as small windows side by side.
BPB2 Same as PBP1 except both images are stretched vertically to fill the screen.
8
Users Guide (MAN-00013) Rev.C
3/6/08

9
Pressing the LEFT or RIGHT buttons, will switch between the available video sources.
Pressing the LEFT or RIGHT buttons will swap the PIP image with the primary image.
Pressing the LEFT or RIGHT buttons will set PIP image size between small and large.
Users Guide (MAN-00013) Rev.C
3/6/08

10
Pressing the LEFT or RIGHT buttons will select the corner for the PIP image. The
choices are upper left, upper right, lower right and lower left.
SETUP submenus
The Setup menu allows user customization of several settings used globally throughout
the OSD menu system.
Users Guide (MAN-00013) Rev.C
3/6/08
Ce manuel convient aux modèles suivants
2
Table des matières


