Pioneering RANGEMINDER Manuel utilisateur

!
!
!
!
!
!
!
Installation Guide
IMPORTANT!
READ ALL INSTRUCTIONS INCLUDING THE “CARE AND USE MANUAL”
BEFORE INSTALLATION
KEEP THIS GUIDE FOR FUTURE REFERENCE
NEVER LEAVE COOKING UNATTENDED
Another innovative product from
Pioneering Technology Corporation
pioneeringtech.com

!
!
Page 1
CONTENTS
WHAT IS IN THE BOX? ……..………………………...……………………………2
COMPATIBILITY: WILL RangeMinder™WORK ON MY STOVE? …….………3
See also “Setting the ‘Default Mode’” ……………..………………….…13
Quick Compatibility Check ……………….……………………………3
Pre-Installation Check ………………………….…………………………5
Magnetized Sensor Ring Check …………………………….5
Shaft Adaptor Check …………………………………………….5
INSTALLATION …………………………………………………………….………6
Preparing The Stove …………………………………………….………6
Installing the Rings and Adaptors …………………………………….7
The Base Unit …………………………………………………….…....…8
Location …………………………………………………….………8
The “Learn Button” …………………………………….………8
The Dial Rings …………………………………………………………….9
Dial Selection …………………………………………………….9
Calibrating the Dials ……………………………………….…..10
Default Mode ……………………………………………………….…..12
Special Cooking Circumstances …………………………...12
Dual Burner Electric Stoves …………………………………...12
Setting the “Default Mode” …………………………………...13
Base Unit Message Charts ………………………………………..….13
Weak Signals …………………………………………………...13
Calibration Signals………………………………………………...…14

!
!
Page 2
CONTENTS: WHAT IS IN THE BOX?
•Four (4) replacement dials
•Four (4) magnetized sensor rings
•Eight (8) labeled dial rings
(Note: Four rings have been factory installed on the dials.)
•A sheet of dial adaptors
•One (1) Base Unit
•Four (4) Lithium coin batteries (Type: CR2450)
•Owner’s Manuals (Instruction Guide & Care and Use Manual)

!
Page 3
COMPATIBILITY: WILL RANGEMINDER™WORK ON MY STOVE?
RangeMinder™has been engineered and designed to work on most of
the major stove/range brands sold in North America. Many international
brand models are also supported. If you haven’t already done so please
visit us at preventcookingfires.com to confirm that your stove is in our
Compatibility Database. You can also perform your own compatibility
check.
Quick Compatibility Check
By following these simple steps you can quickly determine if your stove is
compatible with RangeMinder™.
Step 1
Pull off one of the existing knobs (Picture 1) and measure the length of the
shaft from the face of the stove panel to the end of the shaft (Picture 2). If
the shaft is longer than ¾inches (19 mm) then unfortunately your stove is not
compatible with RangeMinder™.
Picture 1
!
!
Picture 2

!
Page 4
Step 2
With the knob still removed, check to see if the shaft opening (hole)
normally hidden by the knob is more than 1 inch (25 mm) in diameter. If
the shaft opening (hole) is greater than 1 inch (25 mm) in diameter then
unfortunately your stove is not compatible with RangeMinder™.
!
!!
!
Step 3
Again, with the knob still removed, check if the stove panel has a ridge or
gasket around the shaft opening (hole). If there is a ridge or gasket
present then unfortunately your stove is not compatible with
RangeMinder™.
Note: Any screws on the stove panel around the shaft opening (hole) are
unlikely to present any installation problems as RangeMinder™has been
designed to accommodate these types of stoves.
!
! !

!
Page 5
Pre-Installation Check
Assuming that before your purchase of RangeMinder™you visited our
Compatibility Data Base at preventcookingfires.com or performed the
Quick Compatibility Check referenced above, you are now ready to
proceed with the pre-installation check. With one of the magnetized rings
and the sheet of adaptors from your RangeMinder™box, please follow
these two quick steps.
Note: We encourage you to review the Installation Reference Video for
RangeMinder™, which is also available at: preventcookingfires.com
Step 1 – Magnetized Sensor Ring Check
Pull a knob off your existing stove and without removing the paper
backing on the magnetized sensor ring slide it over the exposed shaft
ensuring that the arrow is pointing up. Check that the magnetized ring is
centered on the shaft and that it sits flat against the stove face. The
centre of each magnetized sensor ring has been designed with “cut-outs”
to fit around most screws or washers that may be around the shaft
opening (hole).
Important: Proceed to Step 2 before installing any of the magnetized
sensor rings.
Step 2 – Shaft Adaptor Check
Ten (10) sets of four (4) dial shaft adaptors have been included with your
RangeMinder™. Ensure that one (1) of the sets fits the shaft on your stove
properly. Select the shaft adaptor that fits snugly on the shaft and has the
square flange sitting approximately 3 mm or 1/8” from the stove face.
!
Page 6
Right Wrong
In some cases more than one type of adaptor will seem to fit but only one
type will have the proper distance between the flange and the stove
face. Having the correct distance is important to ensure that each
RangeMinder™dial will function properly with each magnetized sensor
ring.
Right Wrong
INSTALLATION
Preparing the Stove
Now that you have completed the pre-installation check, it is time to
prepare the stove. Remove all remaining stove knobs and clean any dirt
or grease from the stove face, particularly around the dial shaft.

!
Page 7
Installing the Rings and Adaptors
Once the stove face is dry, it is time to attach each magnetized sensor
ring onto the stove. Carefully remove the paper backing from the
magnetized senor ring.
Ensuring that the arrow on the magnetized sensor ring is pointing up, slide
the magnetized sensor ring over the dial shaft and press firmly.
Repeat this process with the other three magnetized sensor rings.
With the magnetized sensor rings installed, push all four adaptors onto the
dial shafts of your stove.

!
Page 8
The Base Unit
Location
For best results, plug the Base Unit into a wall outlet that is within 15 to 20
feet (5-7 meters) from the stove/range. This helps to ensure a strong
wireless connection between the Base Unit and the RangeMinder™dials.
The “Learn Button”
With the Base Unit plugged into a wall outlet, touch the “Learn Button” to
prepare the RangeMinder™for its wireless connection with the new
RangeMinder™dials. The flashing red light on the Base Unit means that
RangeMinder™is ON and ready to connect with the new dials.
The Base Unit will remain in Learn Mode for 30 minutes. If for any reason
the set-up takes longer or has been interrupted simply restart this mode by
touching the “Learn Button” again. You will know the Base Unit is in Learn
Mode if the red light is flashing.
Note: Dials that have been calibrated within the 30-minute Learn Mode
need not be calibrated again when the Base Unit exits the Learn Mode.

!
Page 9
The Dial Rings
Dial Selection
Two sets of dial rings have been included in your RangeMinder™box. The
set of rings installed at the factory is compatible with most electric stoves.
The extra set of rings is for use with gas stoves. Each set of rings has two
options. The factory-installed default uses the blank dial ring option. Since
most electric stoves have the dial readings (e.g. high, medium and low)
printed on the stove panel, this blank option is likely right if you have an
electric stove. However, if your electric stove model has the temperature
indicators printed directly on the knob you can easily select the second
option on the factory-installed ring by removing the ring from the
RangeMinder™dial and turning it around (revealing the HI, OFF, LO and
MED indicators).
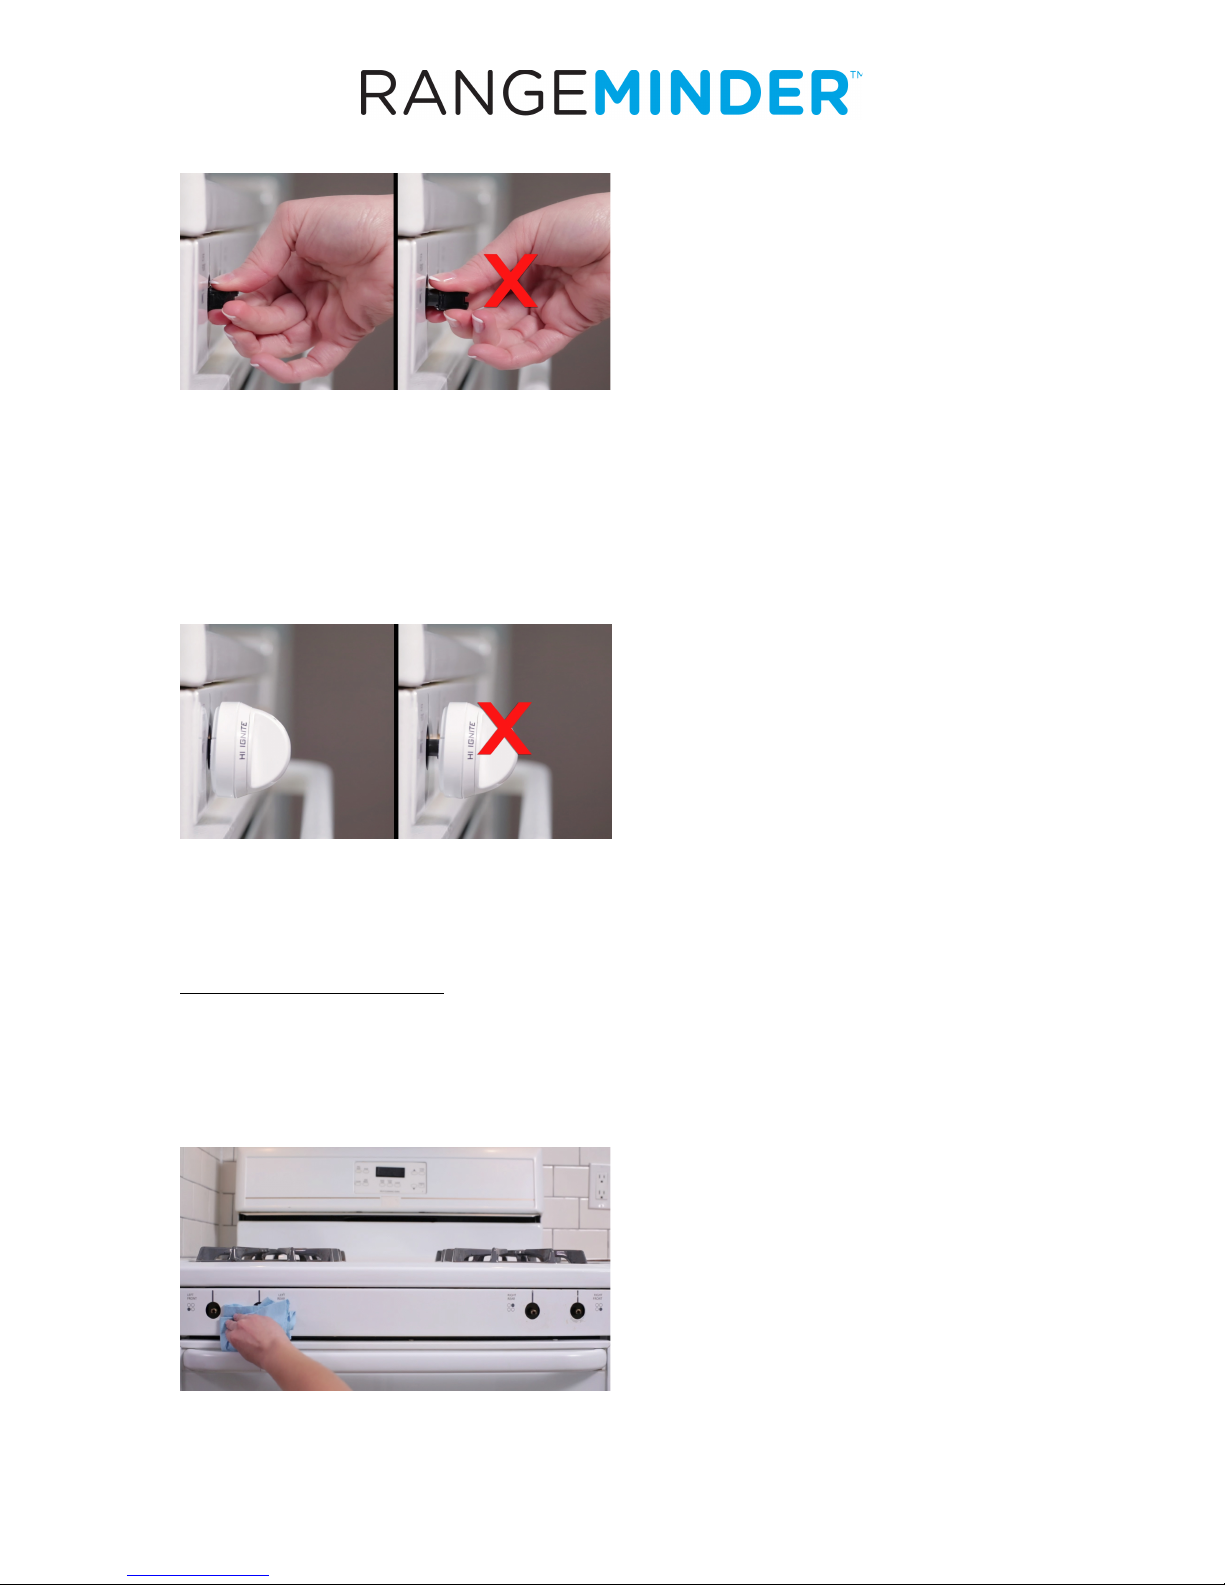
To select the alternate print side (Picture 1) or to use the extra set of rings
simply slide off the pre-installed ring by squeezing the tabs and separating
the two halves and attach the new ring (Picture 2). Repeat for the
remaining dials.
Note: When installing the rings onto the RangeMinder™dial be sure that
the two plastic tabs on the dial ring line up with the corresponding indents
on the dial itself. Always keep OFF in the top position.
Picture 1
Picture 2
Table des matières


