
PEC MACC Manuel utilisateur


- 2 -
PEC MACC DC Power Supply
Index
Section and Title Page
1. INTRODUCTION .................................................................................................................... 4
1.1 Scope............................................................................................................................................4
1.2 General Description of the MACC ..............................................................................................4
1.2.1 Power Conversion System...................................................................................................4
1.2.2 Cooling System ...................................................................................................................4
1.2.3 Control System ....................................................................................................................4
2. INSTALLATION ...................................................................................................................... 5
2.1 Inspection and Storage.................................................................................................................5
2.2 Handling the MACC ....................................................................................................................6
2.3 Cabinet Size, Weight, and Input KVA.........................................................................................6
2.4 Location ........................................................................................................................................6
2.4.1 Air-Cooled Converter..........................................................................................................8
2.5 Electrical ......................................................................................................................................8
2.5.1 A.C. Input Connection.........................................................................................................8
2.5.2 DC Output Connections ......................................................................................................9
2.5.3 Connections for Remote Control Converter........................................................................9
3. OPERATION ...........................................................................................................................11
3.1 Component Operation ...............................................................................................................11
3.1.1 Magnetic Starter ................................................................................................................11
3.1.2 Line Current Transformers ................................................................................................11
3.1.3 Silicon Controlled Rectifier...............................................................................................12
3.1.4 Main Transformer..............................................................................................................13
3.1.5 Diode Assembly ................................................................................................................14
3.1.6 Control Transformer..........................................................................................................14
3.1.7 Protective Devices .............................................................................................................14
3.2 Cooling System..........................................................................................................................15
3.2.1 Control Operation..............................................................................................................15
3.2.2 Control Function................................................................................................................15
3.3 Converter Operation...................................................................................................................17
3.3.1 Turn-On Procedure............................................................................................................17
3.3.2 Automatic Voltage with Current Limit Operation Adjustment Procedure .......................17
3.3.3 Automatic Average Current Density Control with Current Limit Adjustment Procedure18
3.3.4 Automatic Current Control with Voltage Limit Adjustment Procedure ...........................19
3.3.5 Conversion to Current Mode of Control ...........................................................................19
3.3.6 Turn-Off Procedure ...........................................................................................................19

Section and Title
P
age
4. MAINTENANCE 20
4.1 Cabinet 20
4.2 Connections. 20
4.3 Control Connections 20
4.4 Control Checkpoints . 20
4.5 Cooling. 21
4.5.1 Power Components 21
4.5.2 Replacement of Diodes and Thyristors (SCR's) 21
4.6 AC1 Electronic Control Board (McTrigger). 23
4.7 Troubleshooting . 23
5. REPLACEMENT PARTS 25
5.1 Parts List 25
It must be understood that these instructions cannot cover all details or variations on equipment,
nor provide for every possible contingency in connection with installation operation or
maintenance. When the rectifier is installed, it will require little attention.
Should further information be desired or particular problems arise which are not covered herein,
please contact:
Process Electronics Corporation.
100 Brickyard Road
Mount Holly, North Carolina 28120
704-827-9019
- 3 -

- 4 -
1. INTRODUCTION
1.1 Scope
This manual describes the PEC Solid State Converter, MACC and provides information for its
installation, operation and maintenance.
1.2 General Description of the MACC
The PEC MACC is an air cooled, DC power supply designed to give a specified output voltage and
current to cover a wide range of applications. Its overall size and weight saves valuable floor space.
1.2.1 Power Conversion System
The power conversion section of the PEC MACC is completely solid state employing silicon
controlled rectifiers (SCR’s) as the voltage and current controlling elements and parallel sets of
silicon diodes as the rectifying elements. See Figure 1. The primary of the main transformer is
connected in a solid delta with the SCR’s connected in inverse parallel sets in the line. The
secondary connection is a six phase, single way.
1.2.2 Cooling System
The Udylite MACC utilizes air cooling to maintain proper operating temperature. See Figure 2.
Water connections are not required.
1.2.3 Control System
Input power is applied to the PEC MACC through power contacts, usually a magnetic starter, and
the output power is controlled by a completely solid state control board to maintain the output at a
preset value. A unique peak limit circuit offers overload protection within a half cycle of fault
current for either external or internal faults. See Figure 3.
Figure 1 Power Conversion System Block Diagram

- 5 -
2. INSTALLATION
2.1 Inspection and Storage
As all units are shipped F.O.B., our plant,
it is suggested that the shipping containers
be removed and the converter inspected for
possible damage during shipment. If any
damage is found, the purchaser must
handle the claim, and the carrier contacted
immediately. the udylite service
department should be notified if the nature
of the damage is such that operation of the
converter has been impaired.
Inspection of the interior of the converter
and the control panel can be done by
removing the front and rear. The panels
can be taken off by loosening and
removing the retaining screws and lifting
the panels, swinging the lower portion over
the bottom retainer.
All connections between the magnetic
starter, fuses, SCR assembly, main
transformer, diodes and DC bus should be
checked in case excessive vibration during
shipment resulted in loosening them.
If it is necessary to store the unit for a period of time before it is installed, be sure to place the
converter in a clean, dry area. To prevent excessive dust from accumulating on the unit, it is
advisable to protect the converter by placing it in the original shipping container.
Figure 2 Cooling System
Figure 3 Control System Block Diagram

- 6 -
2.2 Handling the MACC
The MACC unit must be handled at all times with the same care that would be given any piece of
precision electrical equipment.
Care must be exercised in lifting the converter. Weight distribution varies depending on the size of
the cabinet. Cabinets can be lifted by means of a fork-lift truck of the proper size.
2.3 Cabinet Size, Weight, and Input KVA
2.4 Location
Proper location of the MACC unit will extend its operating life. Normal precautions should be
taken to protect the unit from corrosive conditions and improper ventilation. Sufficient clearance
(12" minimum) must be allowed at the front, rear and sides for maintenance and air flow.
Output Amp/Volt Cabinet Size Weight in Lbs. (Approximate) Input KVA
500/6
See Figure 4-A
635 5
96857
12 705 8.5
18 745 12
24 795 15.5
750/6
See Figure 4-A
695 7.5
9 720 10.5
12 755 12.5
18 845 18
24 945 23.5
1000/6
See Figure 4-A
720 10
978514
12 820 17
18 955 24
24 1095 31
1500/6
See Figure 4-B
850 13.5
995019
12 1030 24
18 1220 36
24 1500 47
Table 1 Cabinet Size and Weight Comparison to Input

- 7 -
Figure 4-A Cabinet Size for 500 to 1000 Volt Output Model
Figure 4-B Cabinet Size for 1500 Volt Output Model

- 8 -
2.4.1 Air Cooled Converter
Convection or forced air is used to cool the power components of the converter. Ambient
temperature should not be allowed to exceed 105 ° F (40 ° C). In general, do not locate the
converter:
a) Close to heat generating equipment such as heaters or boilers.
b) Where subject to splashing or dripping.
c) Next to a wall or area preventing full air intake or exhaust.
d) In areas where intake suction may pull in excessive dust, moisture or corrosive fumes.
e) Where a combustible atmosphere exists.
Air intake is at the bottom, front and rear of the converter and air exhaust is at the top.
2.5 Electrical
Check the converter data plate to be sure that the rated input voltage and frequency match the
available power supply. If the supply voltage or frequency differ from the rated input voltage or
frequency, the PEC office should be contacted to advise the necessary changes before the unit can
be operated. The converter should not be connected under any circumstances to a source which
does not match the data plate rating without the approval of Udylite.
CAUTION
The input wiring and installation should
conform to the National Electrical Code,
and or local codes as required.
2.5.1 A.C. Input Connection
The primary input connections can be made
through the top of the unit. Connections for
the control wiring can also be made through
the top of the unit at the terminal strip located
on the starter control panel.
Connect properly sized wire cable to the
magnetic starter located on the starter control
panel as shown in Figure 5.
NOTE: A grounding lug is
provided. Proper grounding
is required for control opera-
tion. Figure 5 Cabinet Input Connection

- 9 -
2.5.2 DC Output Connections
The DC terminal assembly is 1/4-inch x 4-
inch copper bus bar, punched with a standard
four hole pattern. See Figure 6.
Additional bus required for the tank
connection may be aluminum or copper. If
aluminum, the bus should be plated at the
connection ends to decrease contact resistance.
A joint compound should be used before
bolting the bus bars together. Belleville
washers should be used at the bolted
connections of aluminum bus to prevent
loosening of the bus connections due to
terminal cycling. See Figure 7.
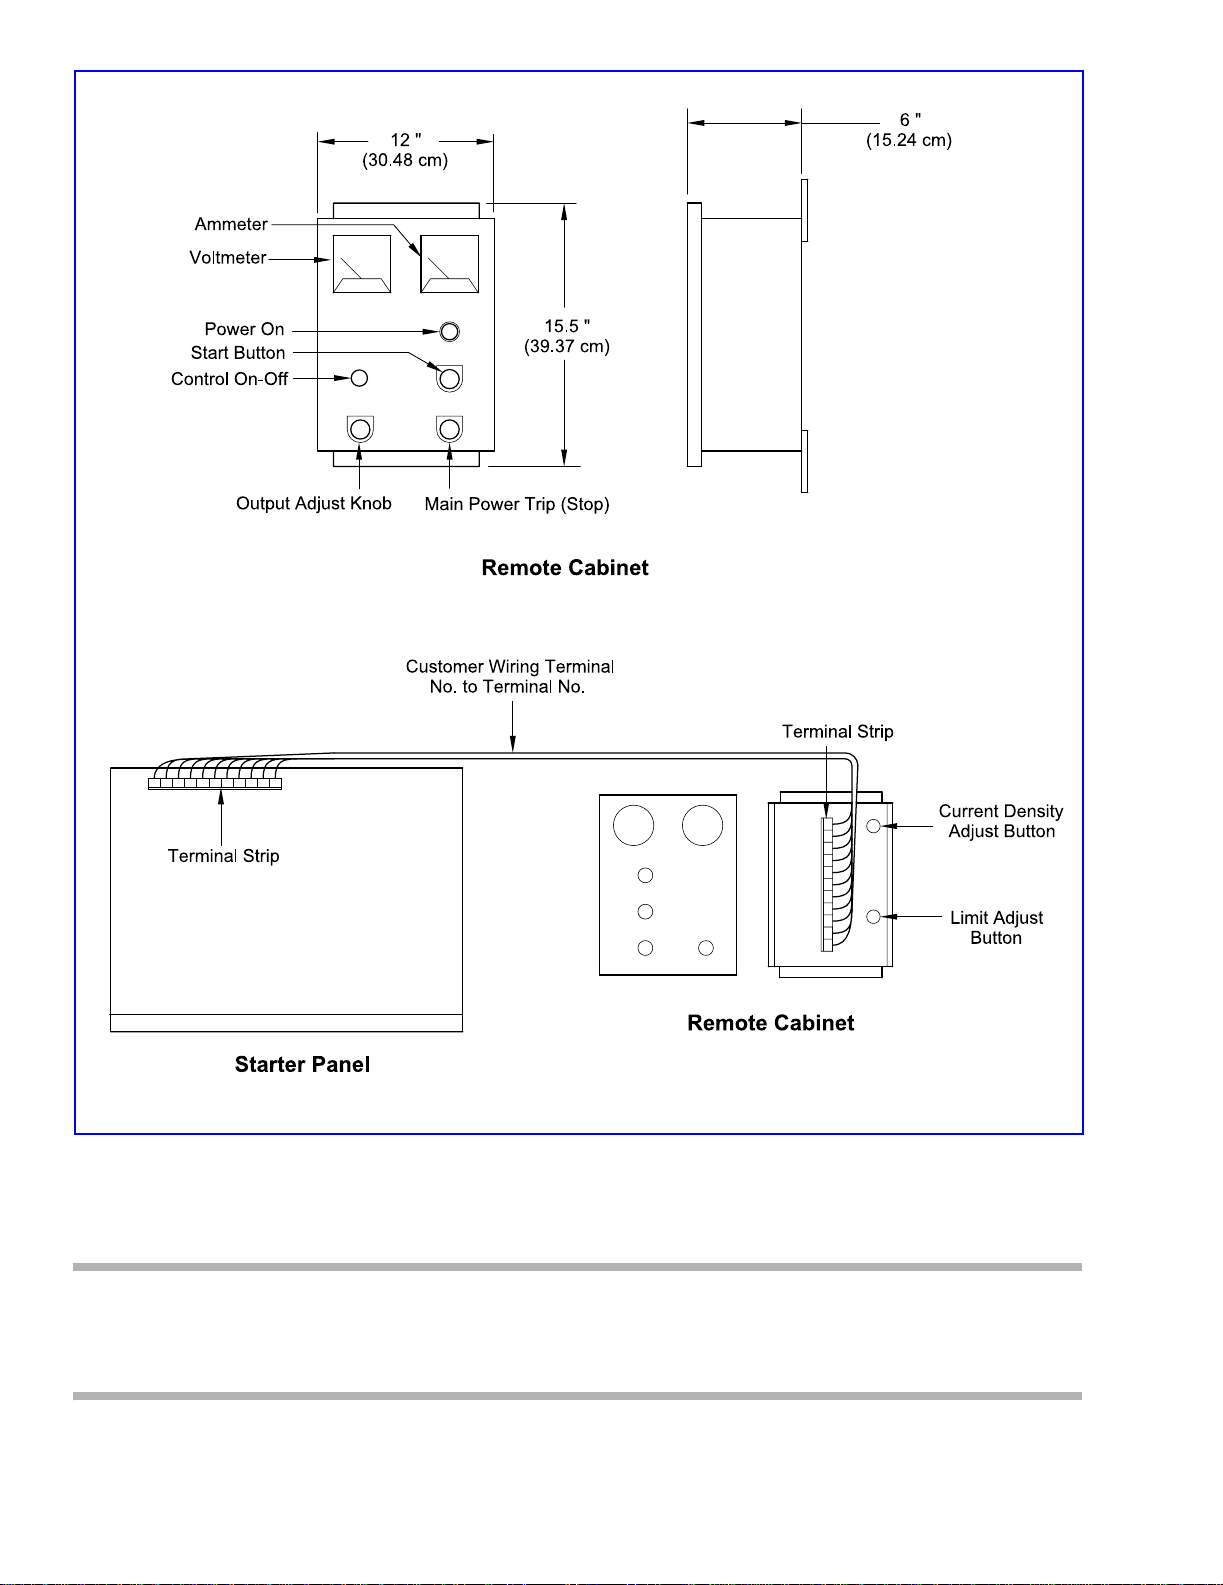
2.5.3 Connections for Remote Control Converter
The indicating and controlling elements for the
remote controlled units are mounted in a Nema
12 enclosure. The enclosure should be
mounted close to the operator's normal
position.
Connections from the converter are made to a
terminal strip mounted on sub-panel inside the
enclosure. See Figure 8. The wiring diagram
included with each converter shows the
number of wires required to connect the
converter and control unit together.
It is good practice to include a spare wire or
two for future requirements.
The ammeter leads should be sized according
to Table 2.
NOTE: A grounding lug is provided. Proper grounding is required for control
operation.
Wire Size
Length of Lead Run
Feet Meters
No. 14 0 - 15 0 - 4.5
No. 12 16 - 25 4.8 - 7.5
No. 10 26 - 40 7.2 - 12
No. 8 41 - 60 12.3 - 18.2
No. 6 61 - 100 18.5 - 30.5
Table 2 Ammeter Lead Lengths Comparison to Wire Size
Figure 6 DC Terminal Assembly
Figure 7 Customer Bus Connection
- 10 -
CAUTION
The input wiring and installation should conform to the National Electrical Code, and or
local codes as required.
Figure 8 Remote Control Converter Interconnection
Table des matières


