Party Robotics Bartendro B007V2 Manuel utilisateur

www.partyrobocs.com
Geng Started Guide
Model Number:
B007V2
Please read this guide before
operang your BartendroTM Cocktail Bot
v 1.0
BartendroTM B7

Important Precauons
• Do not use Bartendro or its components for medical or life-crical
applicaons.
• Avoid touching electronics when possible. The electronics in Bartendro
may be damaged by stac electricity, the sort your hands can pick up
from shuing your feet across the carpet. If you need to touch them,
make sure to rst discharge yourself by touching something metal
connected to ground like a faucet or metal appliance.
• Plugging and unplugging dispensers while the system is powered may
cause permanent damage to your Bartendro.
• Powering the Router board without the Raspberry Pi and dispensers
plugged in may cause permanent damage.
• Plug networking devices into the port available on the back of your
Bartendro. Plugging them into any other RJ45 connector on the Router
Board will cause damage.
• It is not recommended to keep clear tubing immersed in liquid for
extended periods of me. Doing so may cause discoloraon, or cause mold
to form.
• If storing Bartendro for more than several weeks without use, we
recommend removing the beige tubing from the dispensers to extend tube
life.
• Please drink and use responsibly.
You will need
Phillips screwdriver
Device with web browser (phone, tablet, laptop, etc.)
Wired Networking Router (for soware updates)
Computer (for soware updates)
Congratulaons!
You are one of the rst owners of the latest in cocktail dispensing technology.
BartendroTM Cocktail Bots and Dispensers pour a variety of liquids precisely,
and you can control them from phones or tablets. Whether you set up
your bot to host a party, or use it for mixing avored syrups into sno-cones,
it will be sure to liven things up. What applicaons will you come up with?
Please share your projects at:
hp://partyrobocs.com/forums/forum/sharing/
BartendroTM B7
-2-

BartendroTM B7 Contents
BartendroTM B7
What’s Included
A Le Side of Frame
B Right Side of Frame
C Frame Back
D Frame Foot
E Frame Front
F Housing
G 24V, 200W Power Supply with AC Power Cord
H Alcohol Pad
I Wire Clips (4)
J Dispenser Compression Nuts (14)
K Hole Plugs (4)
L Screws (4)
M Chopsck (tubing replacement tool)
N Level Sensor Tubing Adapters (7)
O Level Sensor Tubing Keepers (7)
P Bole Topper Caps (7)
Q Various Bole Toppers (7)
R Tubing (7 Input, 7 Output, 7 Sensor)
-3-
B
A
D
E
F
J
KL
I
C
H
M
N
P
G
O
QR

BartendroTM B7
-4-
Step 1
Assemble Frame
Place the right side of the frame (B) against a solid surface which will
not scratch the metal.
Press the frame foot (D), back (C) and front (E) pieces into the ngs
on the right side (B). Note the locaon and orientaon of each piece
seen below. If the pieces do not slide all the way down onto the ngs
you may tap them in with a rubber mallet.
Press the le side of the frame (A) onto the pieces (C, D and E) unl
there are no gaps in the joints. Clean up any plasc shavings that are
created.
Assembly Instrucons
B
A
D
C
E

BartendroTM B7
-5-
Step 2
Aach Housing to Frame
Place the completed frame upside-down onto a smooth, at surface
and place the housing in-between the frame as seen below.
Line up the 4 holes in the frame with the holes in the housing.
Aach the frame to the housing (F) using the screws (L) and a Phillips
screwdriver.
Once the screws are ghtened rmly, use the plugs (K) to cover the
open holes.
F
K
L
BartendroTM B7
-6-
Step 3
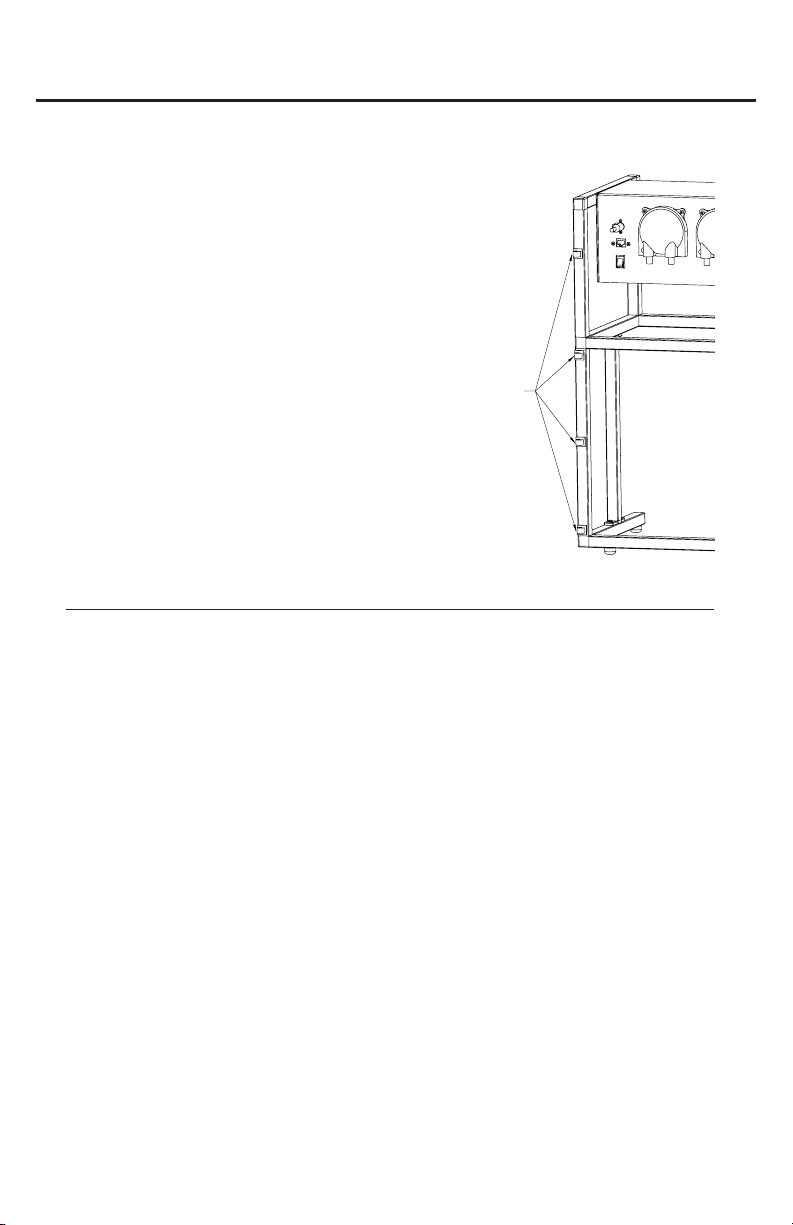
Aach Wire Clips (oponal)
We’ve included some adhesive wire
clips (I) to keep the power supply cable
neatly tucked behind the frame.
Use the alcohol pad to clean the
surface before you apply the clips so
that they sck well.
Remove the backing, and aach where
desired. You may use as many or as few
as you like.
I
Step 4
Plug in and Power On
Important: Before plugging the power supply into your bot, make sure
the power switch is o. Plug the 4 pin connector into the bot rst,
then plug the AC power cord into a wall outlet. Turn the switch on and
Bartendro will take approximately 1 minute to boot up.
Note: If the power supply experiences a fault while plugged in, its green light will
turn o. Reset by unplugging it from the wall and plugging back in.
Bartendro is ready when the dispenser’s lights begin to fade in and
out, changing color.
The status light on the right side of the bot will also turn green. This
light will also serve to nofy you when ingredients are low or out when
the liquid sensors are enabled.

Step 5
Install Input Tubing
Find the bags labeled “Input Tubing for
Front Row” and “Input Tubing for Back
Row.”
Feed the at ends of these tubes through
7 compression nuts (K). Make sure the end
of each tube scks out of the nut by about
1/4” on the side of the nut that says “>PP<”
on it.
If it’s hard to feed the tubing through the
opening, try using the chopsck to widen it.
Turn each tube with compression nut
onto the right (input) port of each
dispenser unl it is nger ght. You
should only see one or two threads
remaining.
BartendroTM B7
-7-
Input
Output
K
Note: Tablet Mounng (oponal)
There are two holes on the right side of
the frame designed to t RAM-B-309-1
from www.rammount.com. This part is not
included, and if you use it, you will also need
to get an arm and specic cradle for your
device.

BartendroTM B7
-8-
1
32
4
567
Step 7
Install Output Tubing
Each piece of ouput
tubing is a unique length
with a numered label.
Match that number with
the corresponding hole
shown in this gure.
Push each tube up
through the spout bracket
with its label towards the
lower end. When installed
correctly, the labels will
be hidden by the spout.
Step 6
Remove Spout
Remove the spout by pulling
straight down on it. Take care
to not move it sideways before
reaching the boom of the
tubing separator or you may
cause damage.

1
2
3
4
Front View
Back View
BartendroTM B7
-9-
567
Step 8
Route Output Tubing
Repeat step 5 with the output
tubing. This me install the
tubes onto the le (output)
port of each of dispenser.
When you load ingredients
into the soware interface
at a later step, these are the
dispenser numbers that will be
referred to.
Step 9
Spout Fine Tuning
Adjust the tubes near the the spout
by pulling up or down so that they
protrude by about 1/4” from the
boom of the tubing separator.
Return the spout by pushing it
straight up into the bracket. Tighten
or loosen the grip on the spout by
adjusng the two screws.
Adjustment
Screws

BartendroTM B7
-10-
Step 10
Install Sensor Tubing (oponal)
Find the tubing labeled “Sensor Tubing for
Front Row” and “Sensor Tubing for Back
Row ”.
Install the clear tubing into the barbed
ng of each Level Sensor Tubing Adapter
(N).
Install the open end of the adapter (N) to
the le sensor port of each dispenser.
Liquid sensors can be enabled/disabled in
the Admin Menu.
Step 11
Aach Bole Toppers and Sensor Tubing
Keepers (oponal)
Bole Toppers (Q) and their Caps (P) are meant to
keep fruit ies and dust out of your boles.
The Bole Topper Caps (P) have cutouts so that
you can pass tubing through them. One for the
input tube and one for the sensor tube.
Pass the tubing through (P) and (Q) rst, then you
can pass them through the Tubing Keepers (O).
Space the tubing keeper about 1 inch from the
boom of the tubes.
N
Q
P
O
Table des matières
Autres manuels Party Robotics Robotique


Manuels Robotique populaires d'autres marques

STEMCenter USA
STEMCenter USA Pi-Bot v2.00 Manuel utilisateur

SunFounder
SunFounder PiDog Manuel utilisateur

Universal Robots
Universal Robots UR5 Manuel utilisateur

Universal Robots
Universal Robots E Series Manuel utilisateur

YASKAWA
YASKAWA MOTOMAN-MPL80 II Manuel utilisateur

EFORT
EFORT ECR5 Manuel d'instructions


