Palsonic AOS Manuel utilisateur

SPLIT AIR-CONDITIONER
OWNER'S MANUAL
Thank you for selecting super quality Air Conditioner. To ensure satisfactory
operation for many years to come, this Owner's Manual should be read carefully
be fore using your air conditioner. After reading. store it in a Safe place. Please refer
to the manual for questions on use or in the event that any irregularities occur.
This Air Conditioner should be used for household use.
AIRMASTER
1 JOYNTON AVENUE
WATERLOO NSW 2017 AUSTRALIA
TEL: (02) 9313 7111
FAX: (02) 9313 7555
www.palsonic.com.au
AIRMASTER CUSTOMER SERVICE
TELEPHONE
AUSTRALIA: 1300 657 888

CONTENTS
Preparation before use
Before using the air conditioner, be sure to check and preset the following.
Remote Controller presetting
The remote controller is NOT presetting as Cooling Only Air Conditioner or Heat Pump by manufacturer.
Each time after the remote controller replaces batteries or is energised, the arrowhead will flashes on the
Front of "Heat" or "Cool" on LCD of the remote controller.
User can preset the remote controller type depending on the air conditioner type you have purchased as
follows:
Press any button when the arrowhead flashes and pointing to "Heat, then Heat Pump is set
Press any button when the arrowhead flashes and pointing to "Cool", then Cooling Only is set.
If you don't press any button within 10 seconds, the remote controller is preset as Heat Pump automatically.
Note:
if the air conditioner you purchased is a Cooling only one, but you preset the remote controller as Heat Pump,
it doesn't bring any matter. But if the air conditioner you purchased is a Heat Pump one, and you preset the
emote controller as Cooling Only, then you CAN NOT preset the Heating operation with the remote controller.
Auto-restart Presetting:
The appliance is preset as no auto-restart function by manufacture. If Auto-restart function is needed, follow the
step below to activate this function:
1) Make sure the Air-con's power is off:
2) Press down and hold the Emergency button (ON/OFF )on the indoor unit then electrify.
3) Keep pressing the Emergency button for over 10 seconds until three short beeps are heard.
The Auto-restart function is then activated. To cancel the Auto-restart function, repeat above procedure until four
short beeps are heard.
Safety Precautions ....................................................................................................................
Identification of Parts .................................................................................................................
Remote Controller .....................................................................................................................
Operation Instructions ...............................................................................................................
Maintenance ..............................................................................................................................
Protection ..................................................................................................................................
Troubleshooting .........................................................................................................................
Installation Instructions ..............................................................................................................
1
2
4
6
8
9
10
11

1
Safety precautions
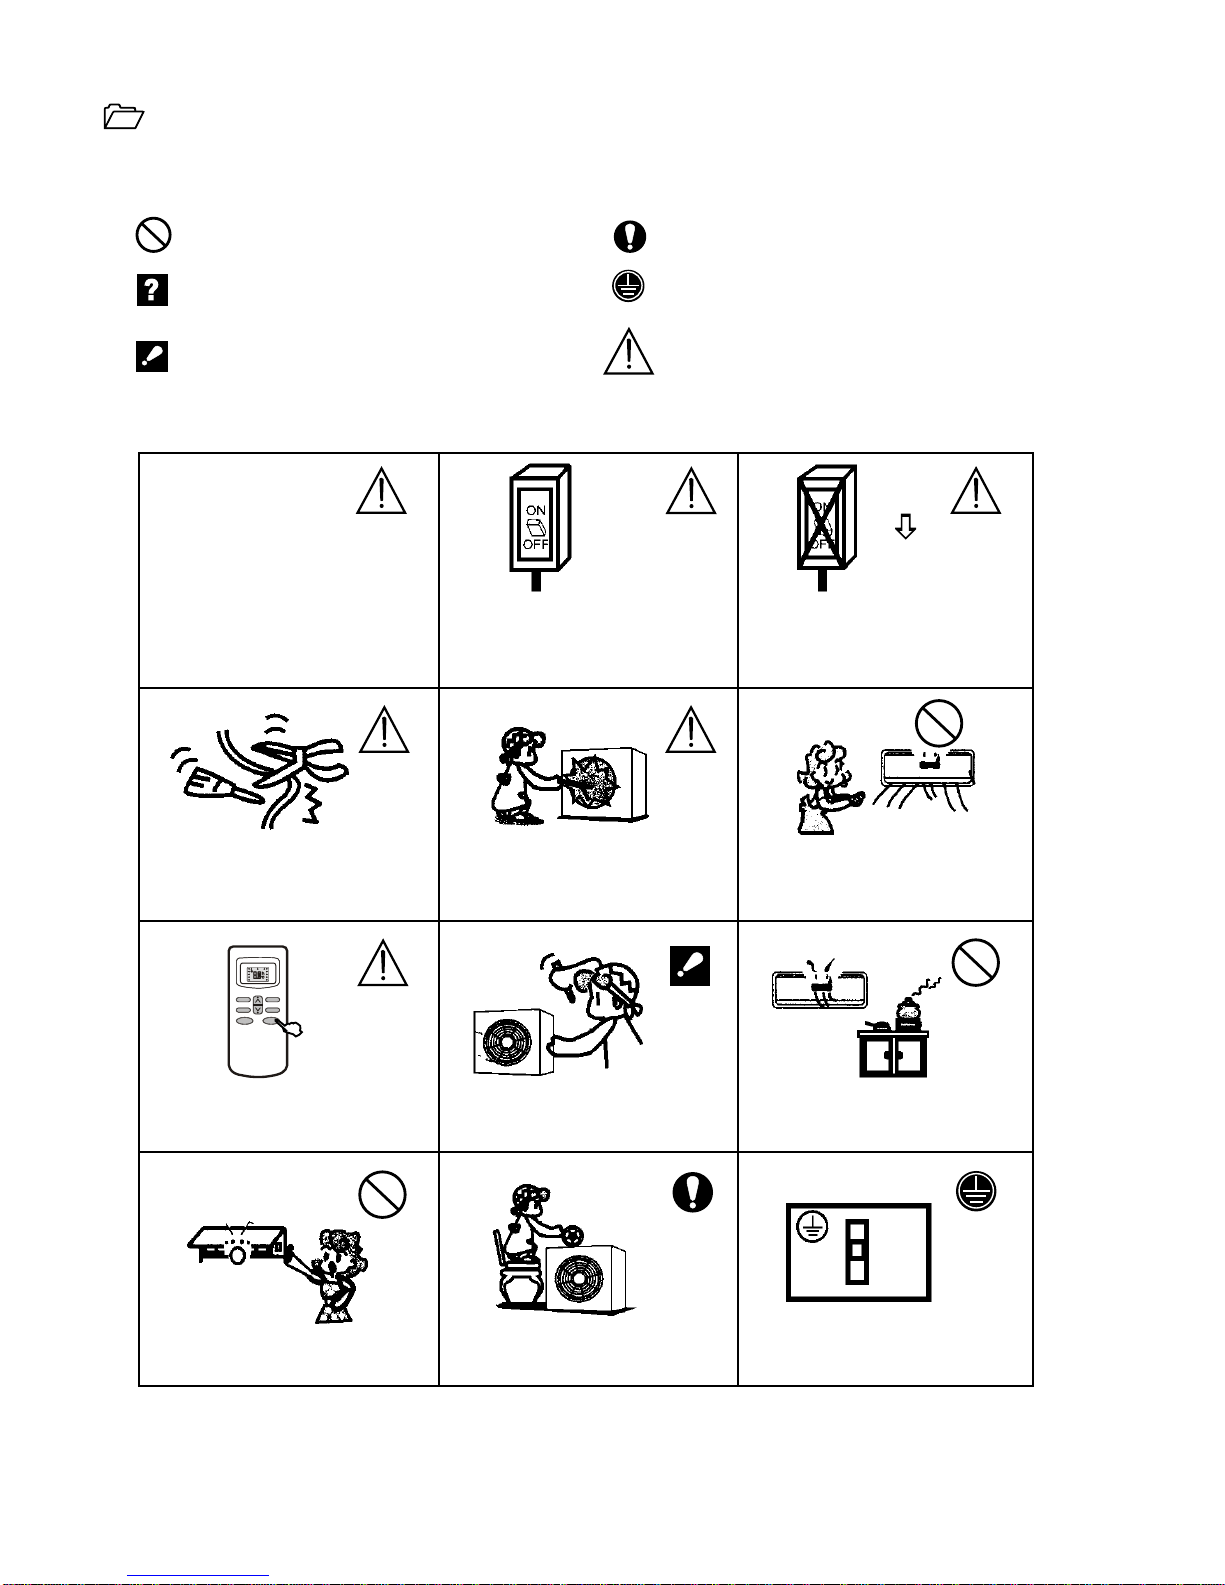
Symbols in this Use and Care Manual are interpreted as shown below.
Be sure not to do.
The feature of the appliance,
instead of a fault.
Pay attention to such a situation.
Be sure to follow this instruction.
Grounding is essential.
Warning: Incorrect handling could
cause a serious hazard, such as death,
serious injury, etc.
Use correct power supply in accordance
with the rating plate requirement
Otherwise, serious faults or hazard may.
occur or a tie maybe break out.
If the supply cord is damaged, it must
be replaced by the manufacturer, its
service agent or similarly qualified
persons in order to avoid a hazard.
Keep the power supply circuit breaker
or plug away from dirt. Connect the power
supply cord to it firmly and correctly,
lest an electric shock or a fire break out
due to insufficient contact may occur.
Do not use the power supply circuit
breaker or pull off the plug to turn it off
during operation. This may cause a
fire due to a spark, etc.
Do not tangle, pull or press the power
supply cord, as this cold will be
damaged
and an electric shock or fire is probably
caused by a broken power supply cord.
It is
harmful
to
your health if the
cool
air
reaches you for a long period. It
is
advisable
to allow the air flow to circulate to all the
whole room.
Never insert a stick or simile obstacle
to the unit. When the fan rotates at high
speed, this may cause an injury.
Firstly turn off the appliance by remote
controller before cutting off power supply
if malfunction occurs.
Do not repair the appliance by yourself.
If this is done incorrectly, It may cause an
electric shock etc. Prevent the air
flow from reaching gas
burners and stoves.
It is
the user's responsibility to ground
the appliance according to local codes
or ordinances by a licensed technician.
Do not touch the operation buttons
when your hands are wet.
Do not put any objects on the outdoor
unit.
Notes: For the purpose of innovation and improvement, above products are subject to change without prior notice.
The air conditioner is not a toy, please keep away from children!
SLEEP FAN
TIMER SWING
ON/OFF
MODE
MID
SWING
AUTO
DRY
FAN
HEAT
COOL
FEEL
SLEEP TIMERON
HIGH
LOW
TIMEROFF

2
Identification of parts
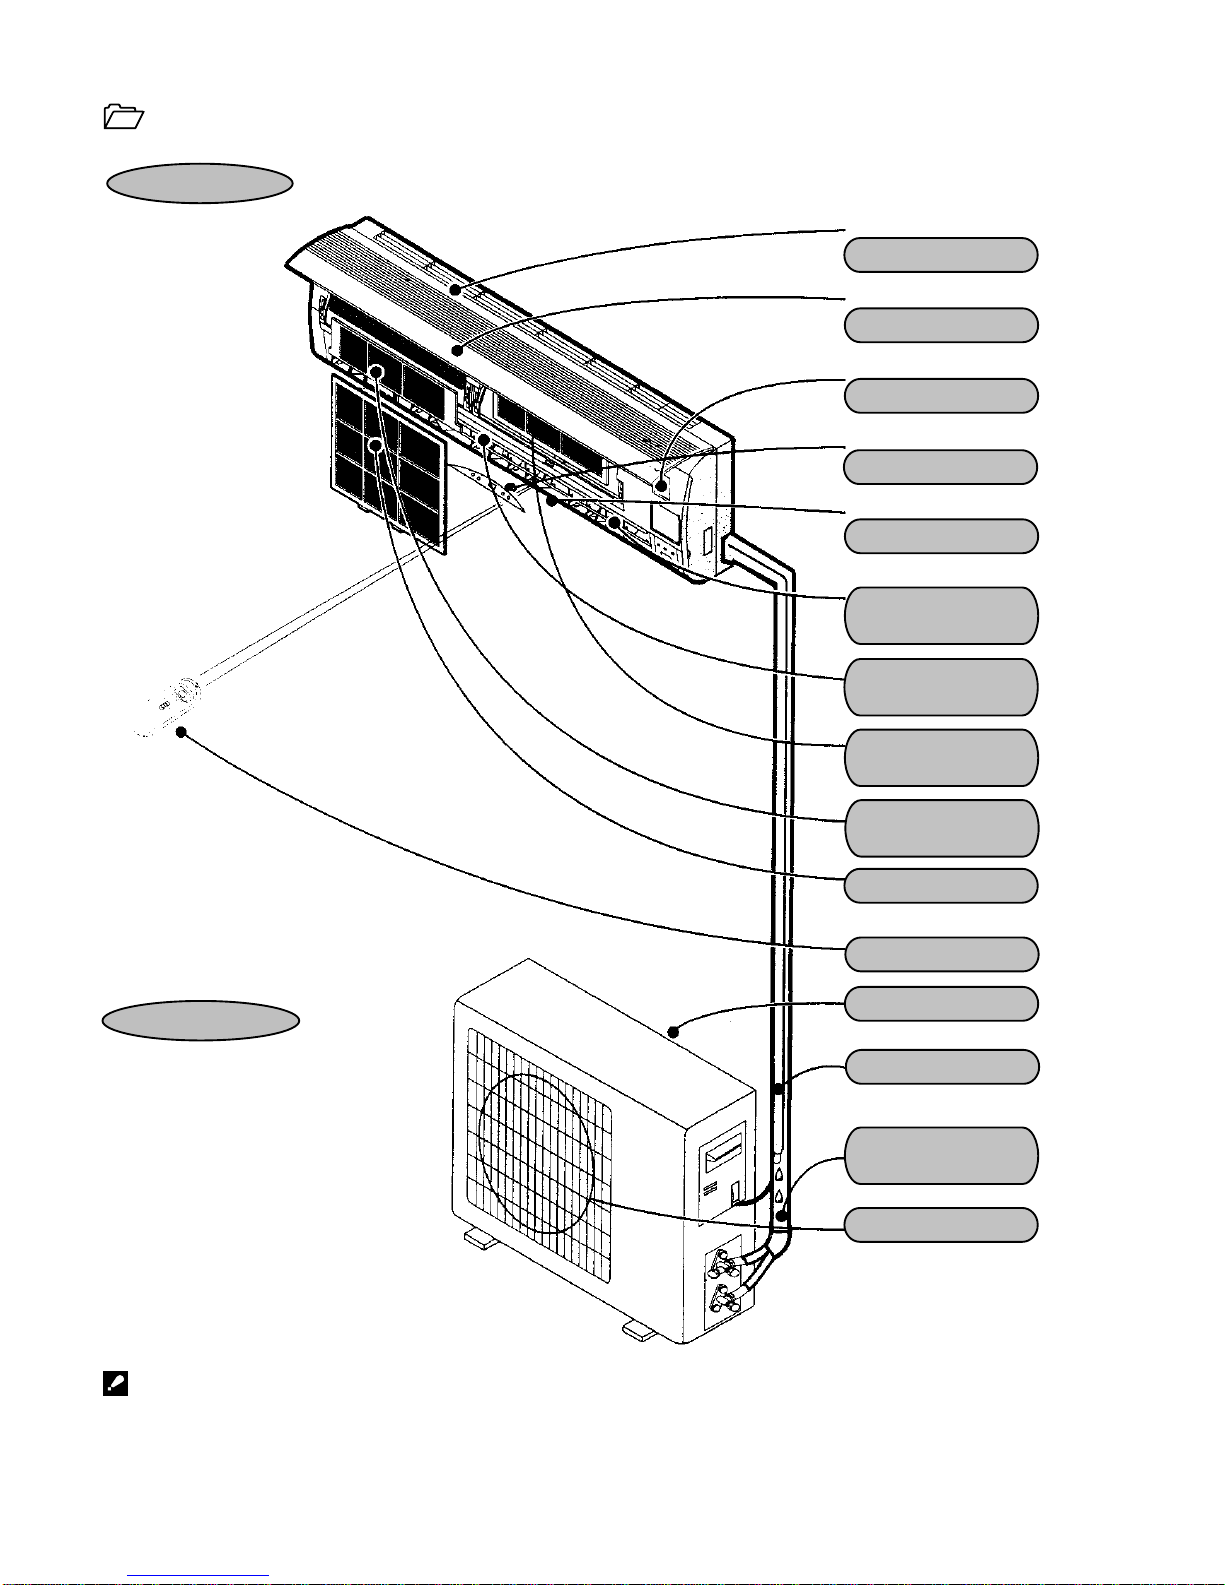
Indoor unit
Outdoor unit
Note: Condensate water drains
at COOLING or DRY operation
The figures in this manual are based on the external view of a standard model
Consequently, the shape may differ from that of the air conditioner you have selected..
Air intake
Front Panel
Emergency Panel
Display Panel
Air Outlet
Drain Hose
Air Intake
Air Filter
Remote Controller
Air Outlet
Vertical Adjustment
Louvre
Horizontal Adjustment
Louvre
Charcoal Filter
(optional)
Electrostatic Filter
(optional)
Pipes and Power
Connection Cord

ON/OFF
3
Identification of parts
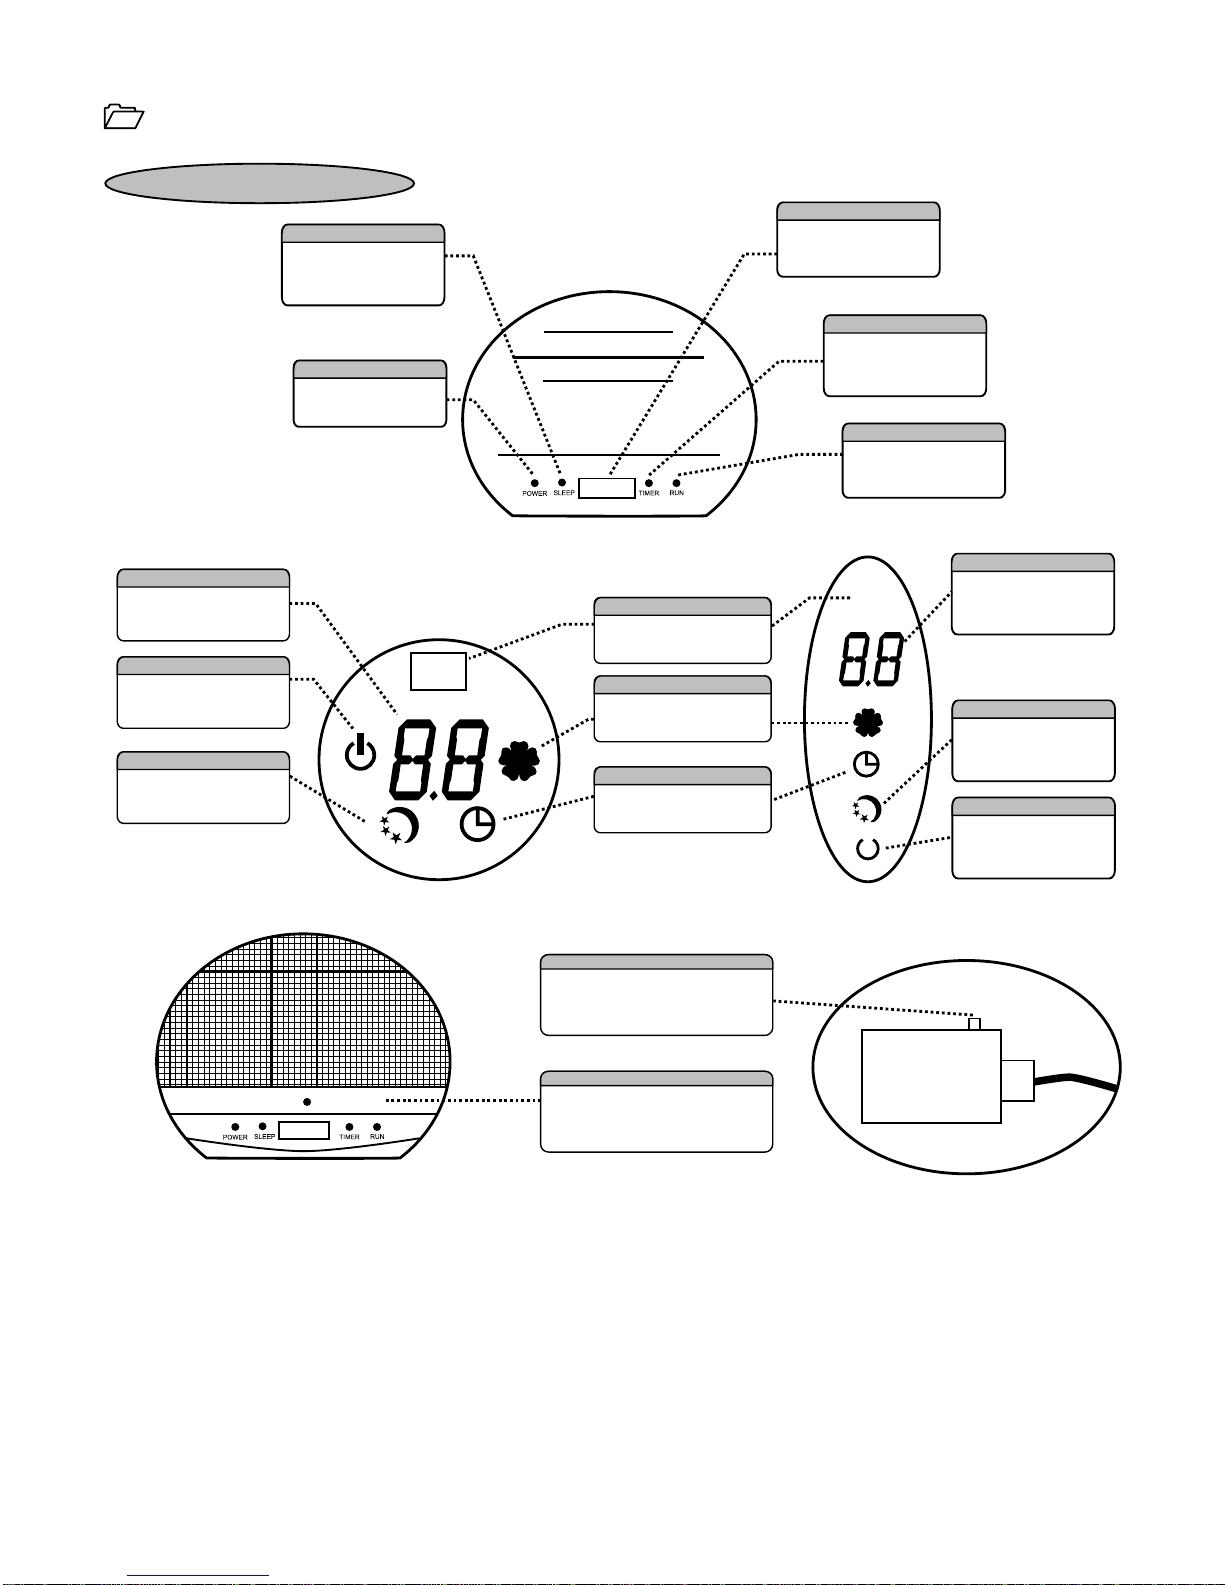
Receive signal from the
remote controller.
It lights up during the
set time.
It lights up when
power supply is on.
It is on during operation.
It lights up during the
set sleep function.
Switch display of
environmental temperature
and setting temperature Receive signal from the
remote controller.
It lights up when
power supply is on. It is on during operation.
It lights up during the
set sleep function. It lights up during the
set time.
Select display of
environmental temperature
and setting temperature
It lights up during the
set sleep function.
It lights up when
power supply is on.
Used to control the unit when the
remote controller H out of work.
This operation way is suitable for N.
R. L. M. 0 series.
Used to control the unit when the
remote controller is out of work
This operation way is suitable for E.
F. G. H. J. K series.
Operating and Display
The above operating sketch map is suitable for E, F, G, H, J, K, M, N series.
The above operating sketch map is suitable for L, R series. The above operating sketch map is suitable for Q series.
Remarks: When remote controller is out of work, open the panel and you can see emergency button there, see the
above picture. The emergency button for 50, 70, 90 series is at the top right, see " ON/OFF " button there.
Auto-restart set:
the appliance is preset as no auto-restart function by manufacturer. If Auto-restart function is needed, follow the
below step to activate this function:
1) Make sure the Air-con's power is off .
2) Press down and hold the Emergency button (ON/OFF )on the indoor unit then electrify .
3) Keep pressing the Emergency button for over 10 seconds until three short beeps are heard, then Auto-restart
function is activated. To cancel the Auto-restart function, repeat above procedure until four short beeps are heard.
The shape and position of the switches and indicators may vary from different models, but their function are similar.
If there is some difference between the sketch map and the substantiality, please subject to the substantiality
Emergency button
Emergency button
ON/OFF
Run Indicator
Timer Indicator
Signal Receives
Sleep Indicator
Power Indicator
Sleep Indicator
Power Indicator
Temperature Display
Signal Receives
Run Indicator
Timer Indicator
Power Indicator
Sleep Timer
Temperature Display

4
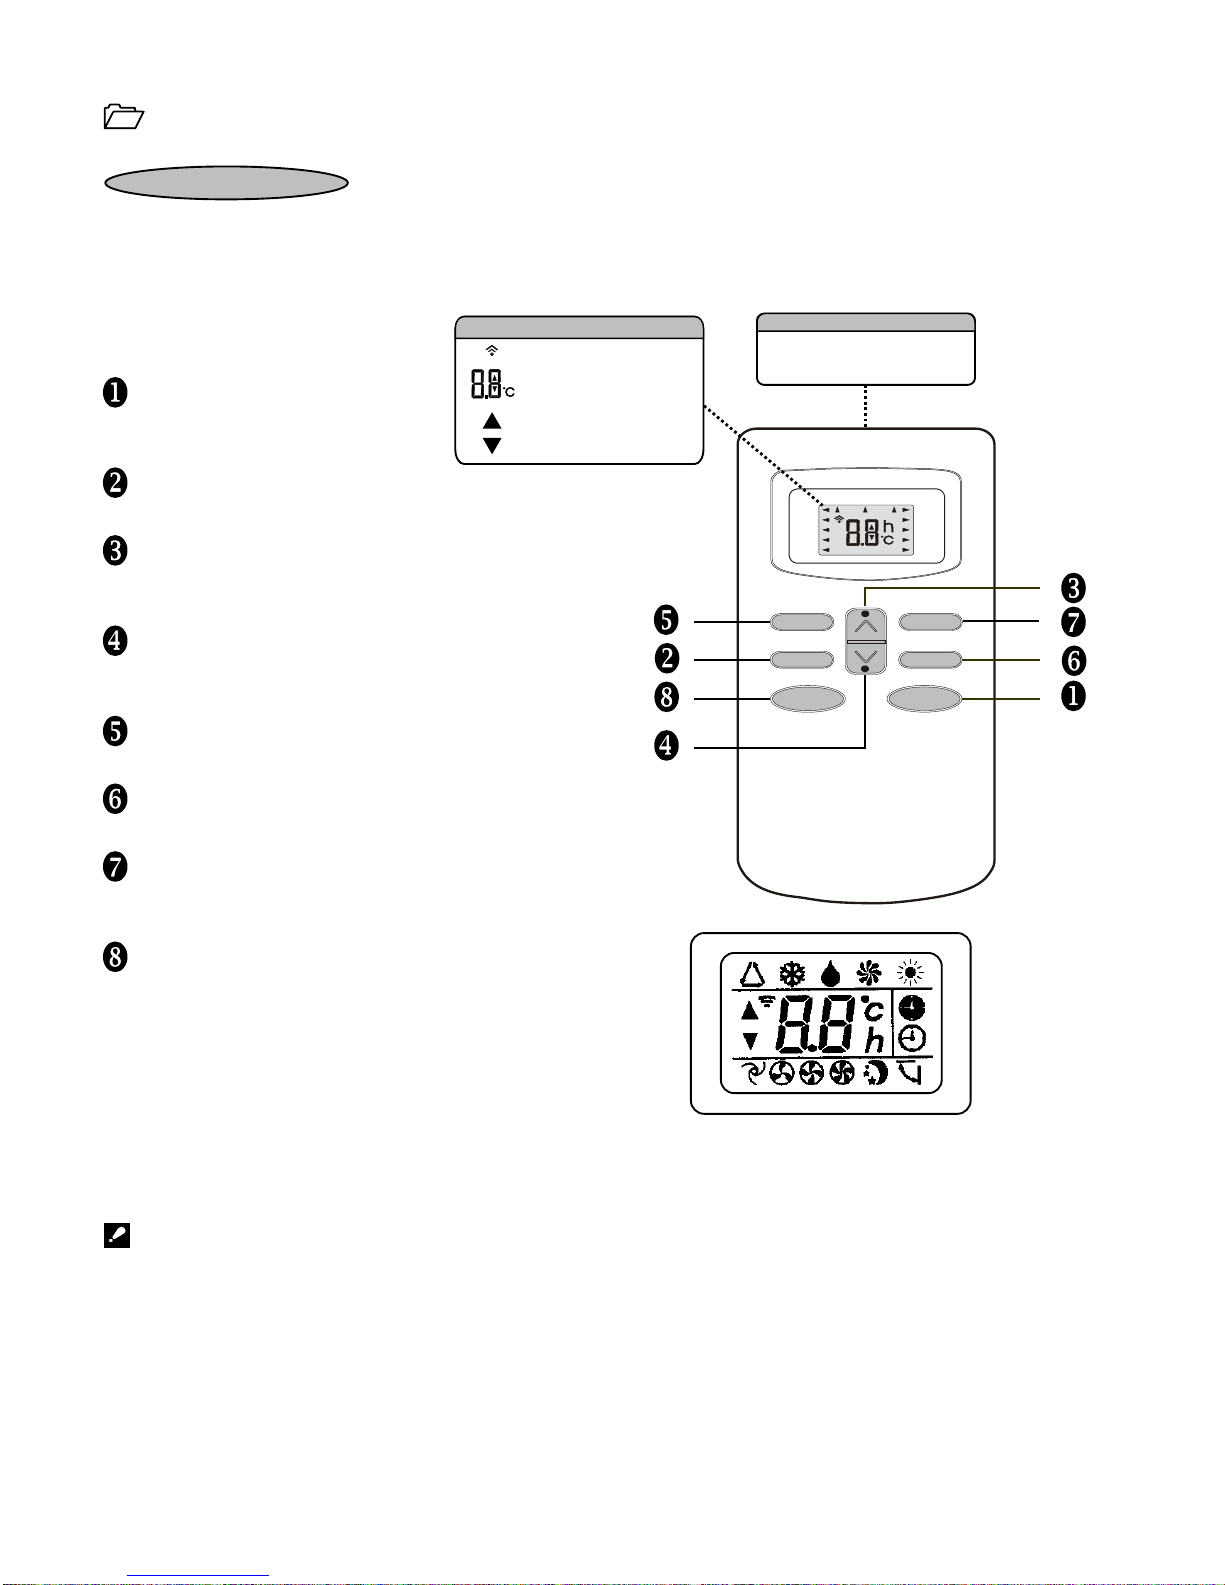
Remote controller
Remote controller
transmitting display
time setting display
temperature setting display
The remote controller transmits signals to the system.
ON/OFF button
Used to start and stop operation
when pressed.
TIMER button
Used to select TIMER operation.
UP button (TOO COOL button)
Used to increase the set room temperature.
and time.
DOWN button (TOO WARM button)
Used to decrease the set room temperature
and time.
SLEEP button
Used to set or cancel sleep mode operation.
SWING control button
Used to adjust airflow direction.
FAN SPEED control button
Used to select the indoor fan motor speed
Auto, High, Mid and Low.
MODE button
Used to select the type of operation mode: Feel,
Cooling, Dry, Fan and Heating (Only for Heat Pump).
Feel mode can select the operation mode such as
COOL, DRY, FAN, HEAT automatically depending
on the room temperature, and the feel mode is
default setting at starting.
some remote controller's display is like he above
Note: The above remote controller is only for reference, please subject to the substantiality.
When the batteries are inserted into the remote controller, all the signals will display on the screen and keep
2 seconds, then the COOLING and HEATING signals will flash respectively. For cooling only air con, please
press any button when the cooling signal is flashing, then the remote controller has been set as cooling only.
For cooling and heating air con, please press any button when the heating signal is flashing, then the remote
controller has been set as cooling and heating. If none of the button is pressed within 10 seconds, the remote
controller will be set as cooling and heating automatically. Cooling only air con can use the remote controller
which has cooling and heating function, but do not have the function of heating.
Although the air con is not running, remote controller still have some display (Only for Cooling and Heat model).
Note: Each model and relevant functions will be further specified in following pages
SLEEP FAN
TIMER SWING
ON/OFF
MODE
MID
SWING
AUTO
DRY
FAN
HEAT
COOL
FEEL
SLEEP TIMER ON
HIGH
LOW
TIMER OFF
Signal Transmitting Window
Transmits signals to the system
Setting Display
setting temperature
adjustment display
(During feel mode)

5
Remote controller
Remote controller
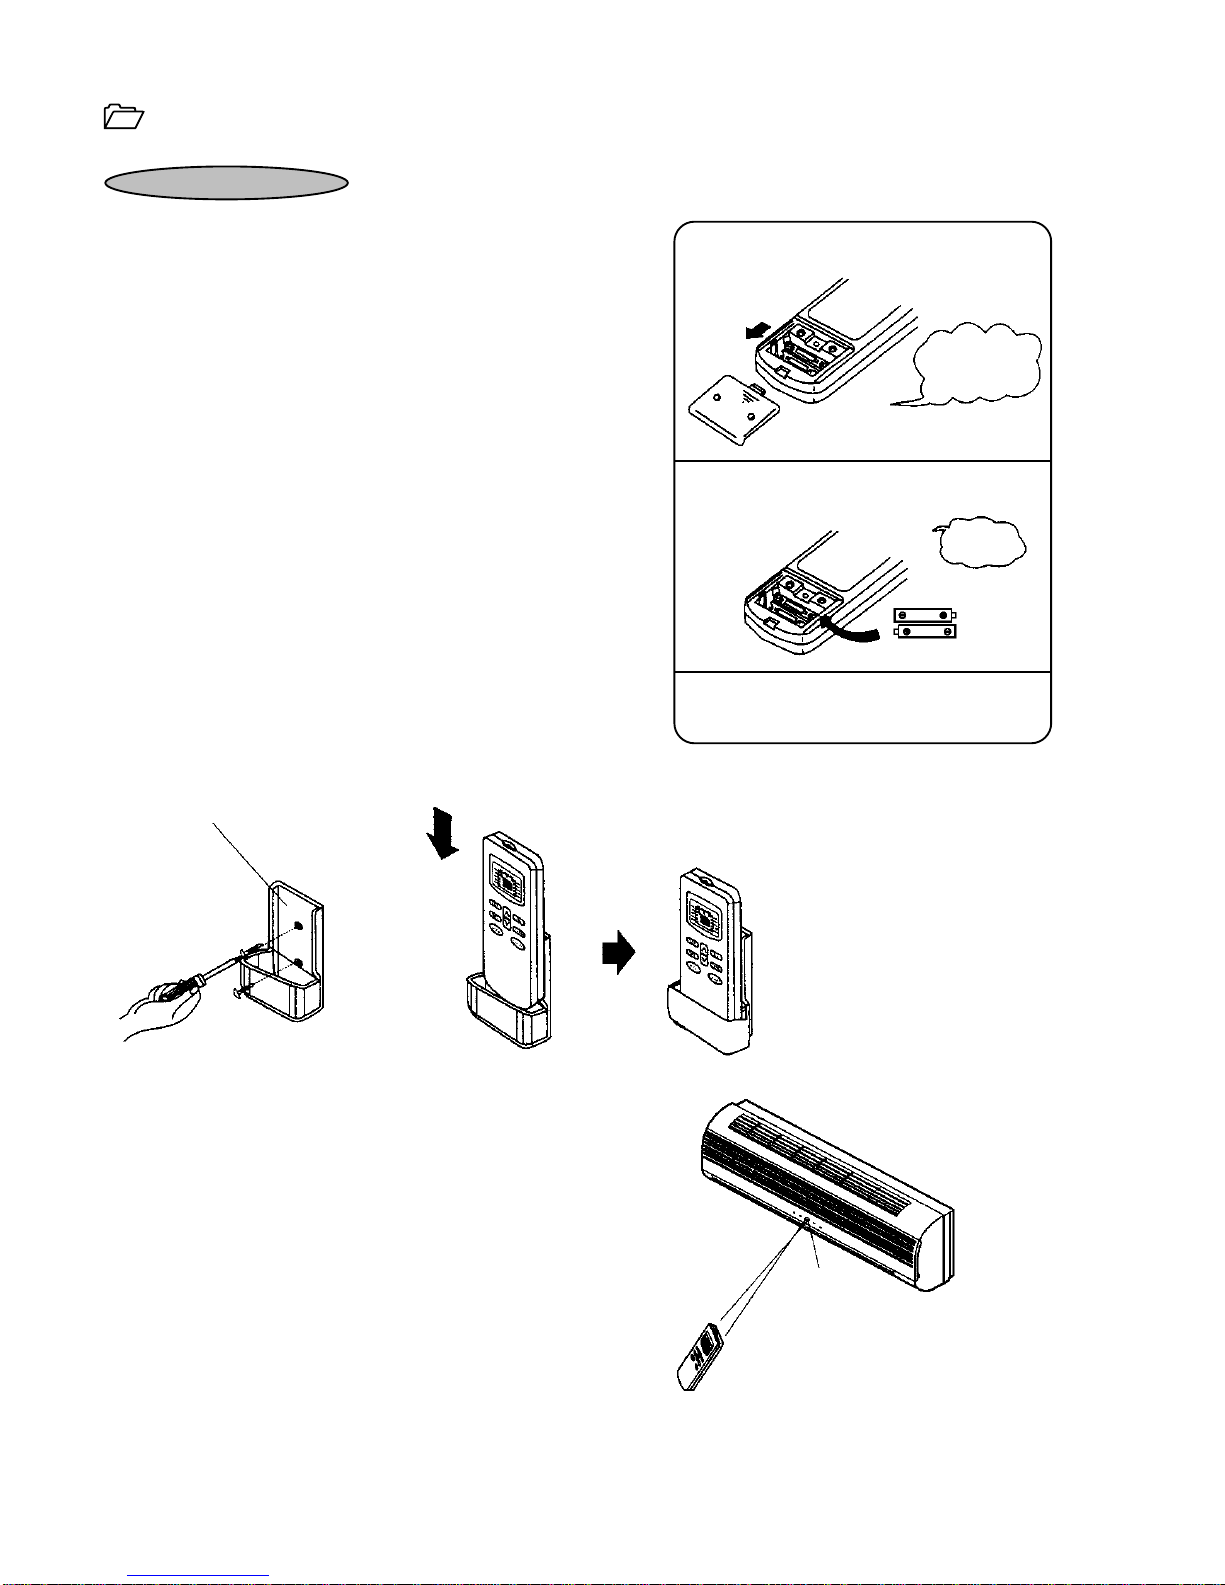
IPlease slide and remove the cover.
2Exchange the batteries.
3Install the cover.
Signal receptor
How to Insert the Batteries
Remove the battery cover according to the arrow direction.
Insert new batteries making sure that the (+) and (-) of
battery are matched correctly.
Reattach the cover by sliding it back into position.
Note:
Use 2 LR03 AAA (1.5 volt) batteries. Do not use rechargeable batteries.
Replace batteries with new ones of the same type when the display
becomes dim.
Storage and Tips for Using the Remote Controller
The remote controller may be stored mounted on a wall with
a holder.
Note: The remote controller holder Is an optional part.
Remote controller holder
How to Use
To operate the room air conditioner, aim
the remote controller to the signal receptor.
The remote controller will operate the air
conditioner at a distance of up to 7m when
pointing at signal receptor of indoor unit.
Slide the cover
upwardly in the
direction of the
arrow
Attention to
the - and +
marks

6
Operation instructions
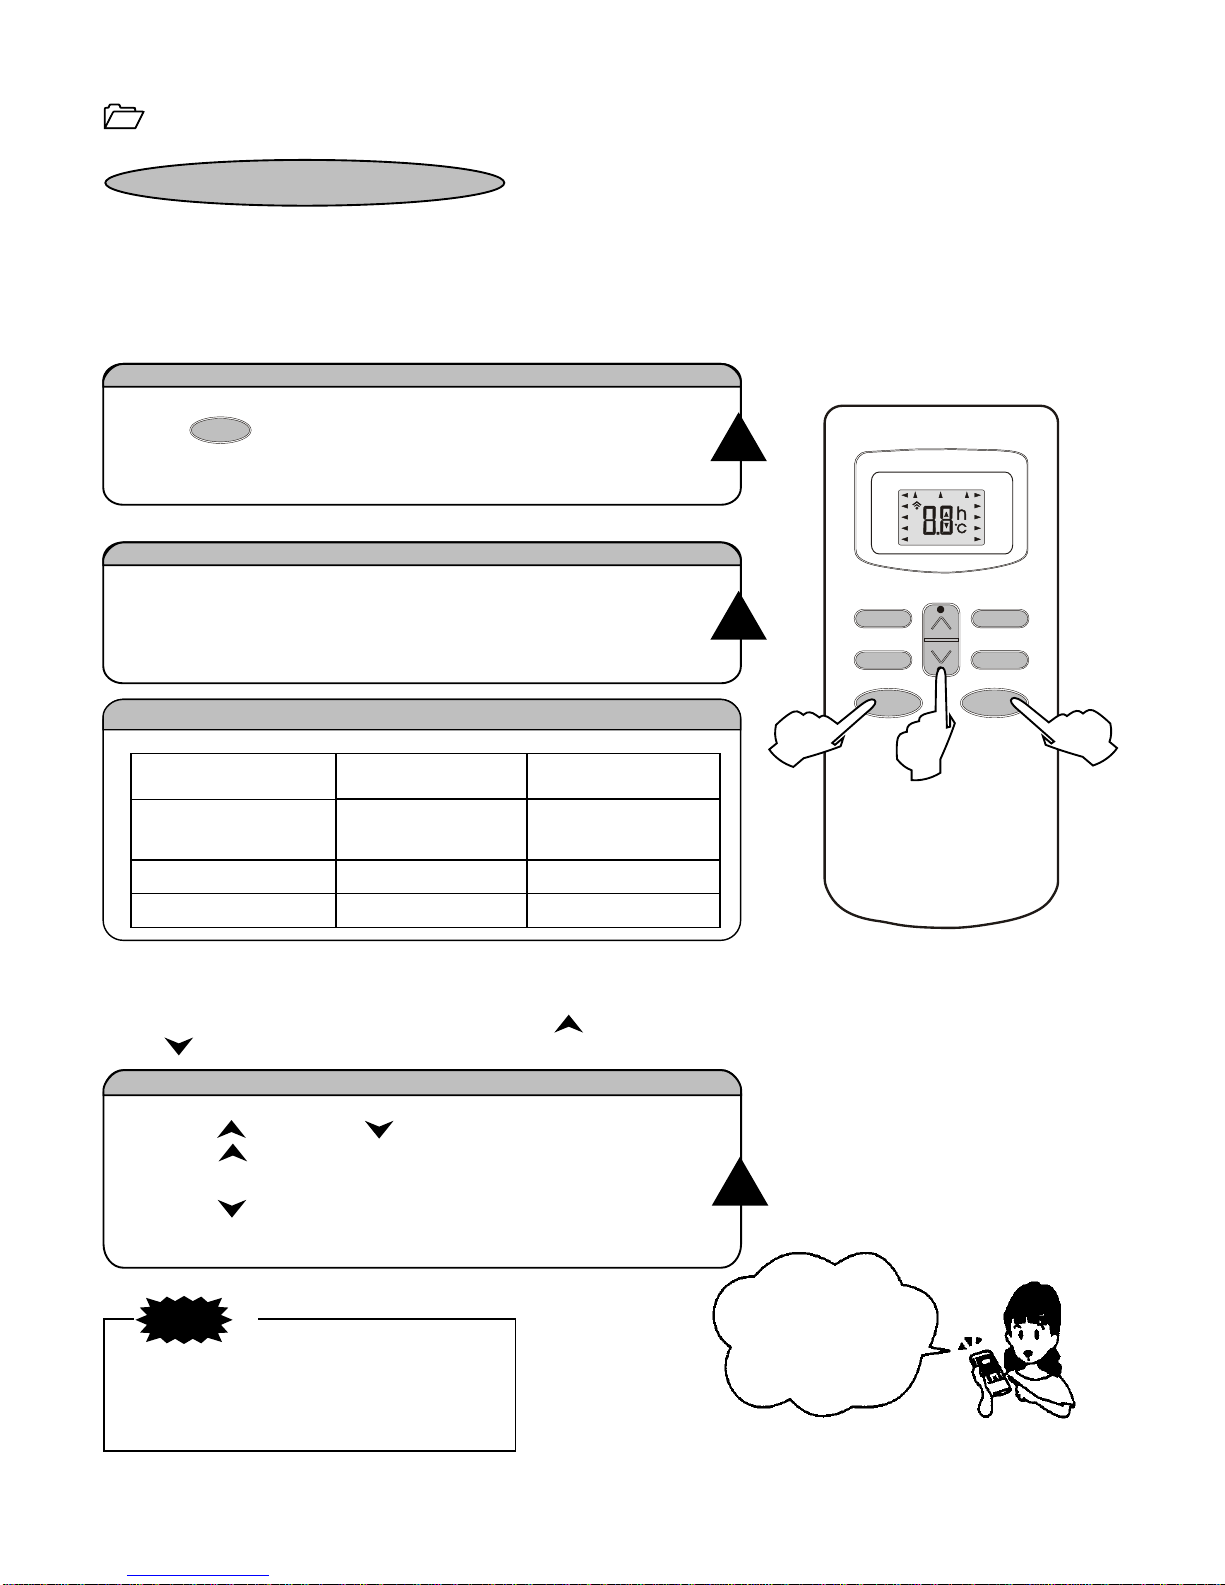
Operates by selecting automatically the operation mode ( HEAT, DRY, FAN , COOL ) depending on the
room temperature during starting.
With the remote controller pointing towards the air conditioner.
Press button, when the appliance receives the
signal, the RUN indicator of the indoor unit lights up.
When the unit is not at FEEL mode.
Press the MODE select button.
Move the MODE to the FEEL position.
Indoor temperature Operation mode Target temperature
Less than 200CHEATING (FOR HEAT PUMP TYPE)
FAN (FOR COOL ONLY TYPE) 230C
20C~260CDRY 180C
Over 260CCOOLING 230C
Air temperature adjustment is possible even during FEEL operation.
There are 6 levels of adjustment possible with the button or
the button.
There will be a delay when changing mode
is made during the operation.
As there might not be air blown out. If you don't like the content of FEEL mode operation,
change to HEATING, DRY or COOLING than FEEL.
Press the button or the button.
When the button is pushed, the temperature will increase 10C.
After temperature will increase 20C, the indicator will not change
When the button is pushed, the temperature will reduce 10C.
After temperature reduce 20C, indicator will not change.
Operation mode and temperature are determined by indoor temperature
Setting temperature
Selecting FEEL mode
2
Turning on
1
3
NOTE
SLEEP FAN
TIMER SWING
ON/OFF
MODE
MID
SWING
AUTO
DRY
FAN
HEAT
COOL
FEEL
SLEEP TIMER ON
HIGH
LOW
TIMER OFF
231
FEEL mode operation procedure
ON/OFF
The operation of the AUTO
mode can be performed by
only pressing the ON/OFF
button from the next time.

7
Operation instructions
SLEEP FAN
TIMER SWING
ON/OFF
MODE
MID
SWING
AUTO
DRY
FAN
HEAT
COOL
FEEL
SLEEP TIMER ON
HIGH
LOW
TIMER OFF
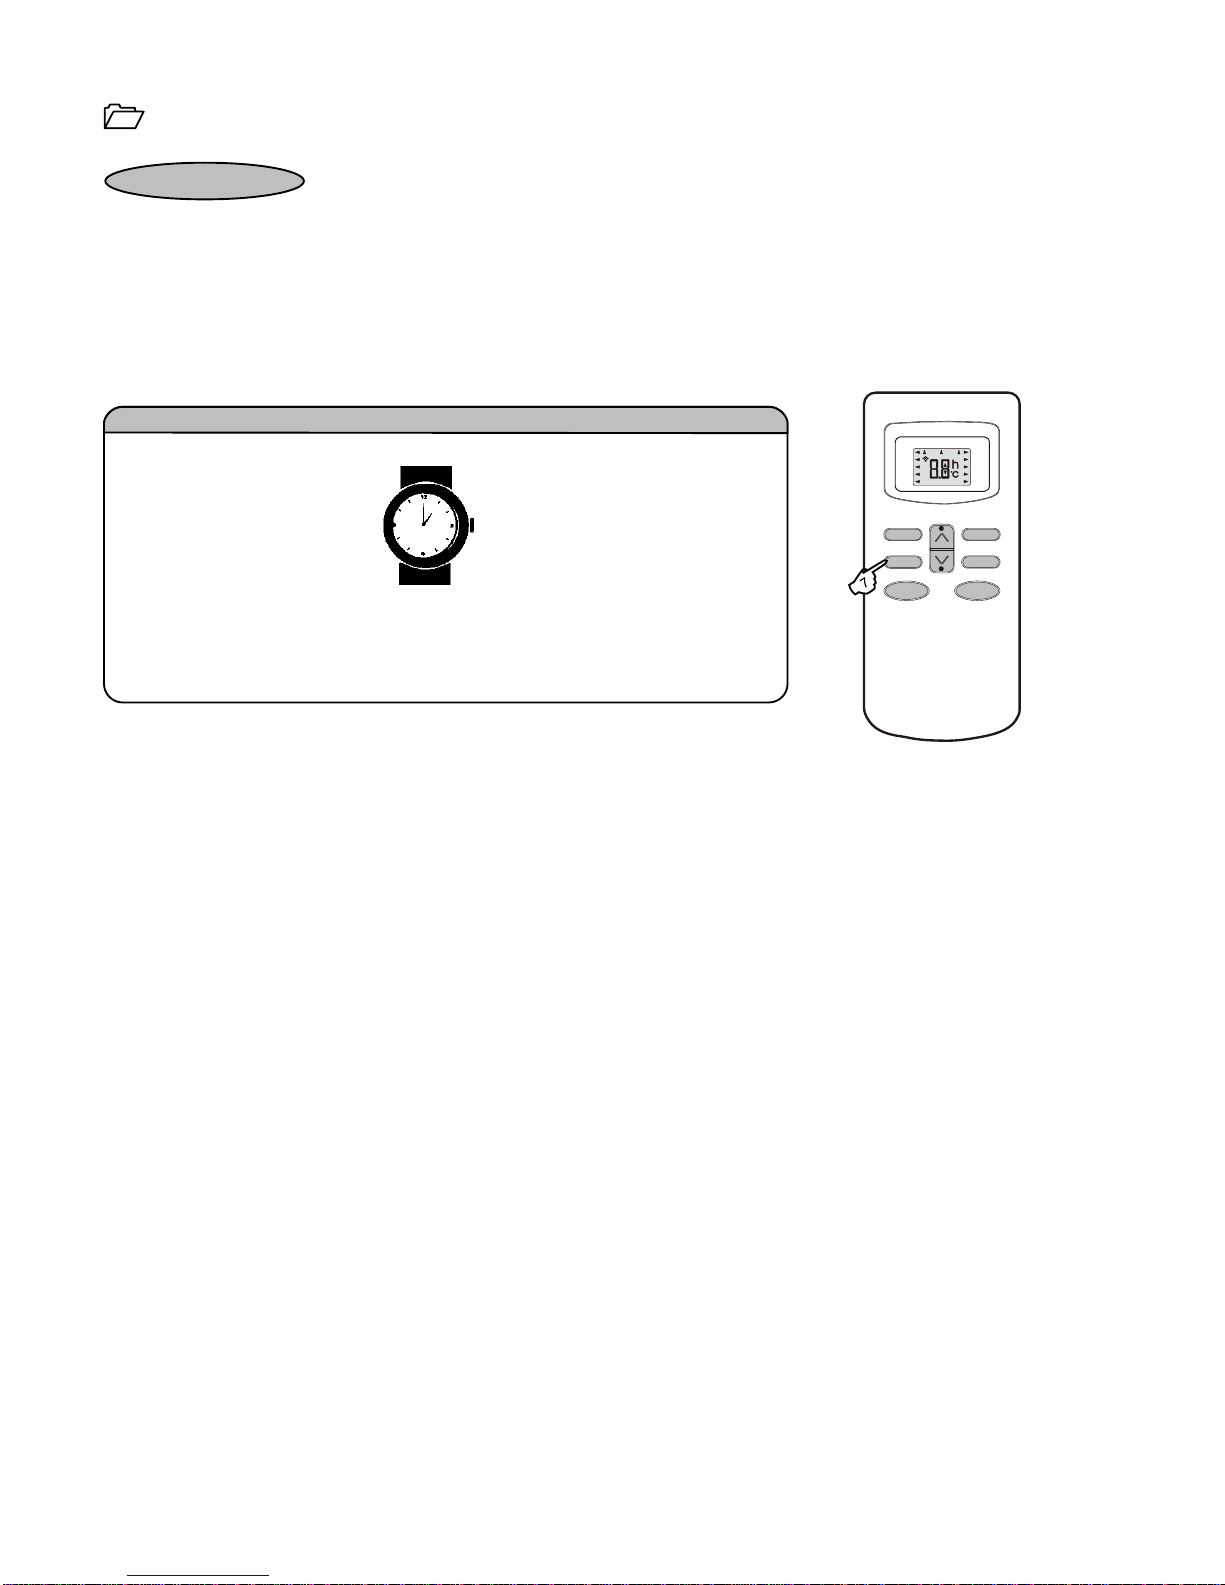
It is convenient to set the timer on with the TIMER button when you go out in the morning
to achieve a comfortable room temperature when you get home. You can also set
timer off at night to enjoy a good sleep.
Press UP and DOWN button to set time.
Time setting is 30-minutes.
Note: After setting the timer, check that TIMER INDICATOR lamp of the indoor
unit lights.
TIMER mode
When the remote controller
is on, press the TIMER
button to set a switch-off timer,
press again again, the setting
will be cancelled.
When the remote controller
is off, press the TIMER
button to set a switch-on timer,
press again, the setting will be
cancelled.
Timer Setting

8
Maintenance
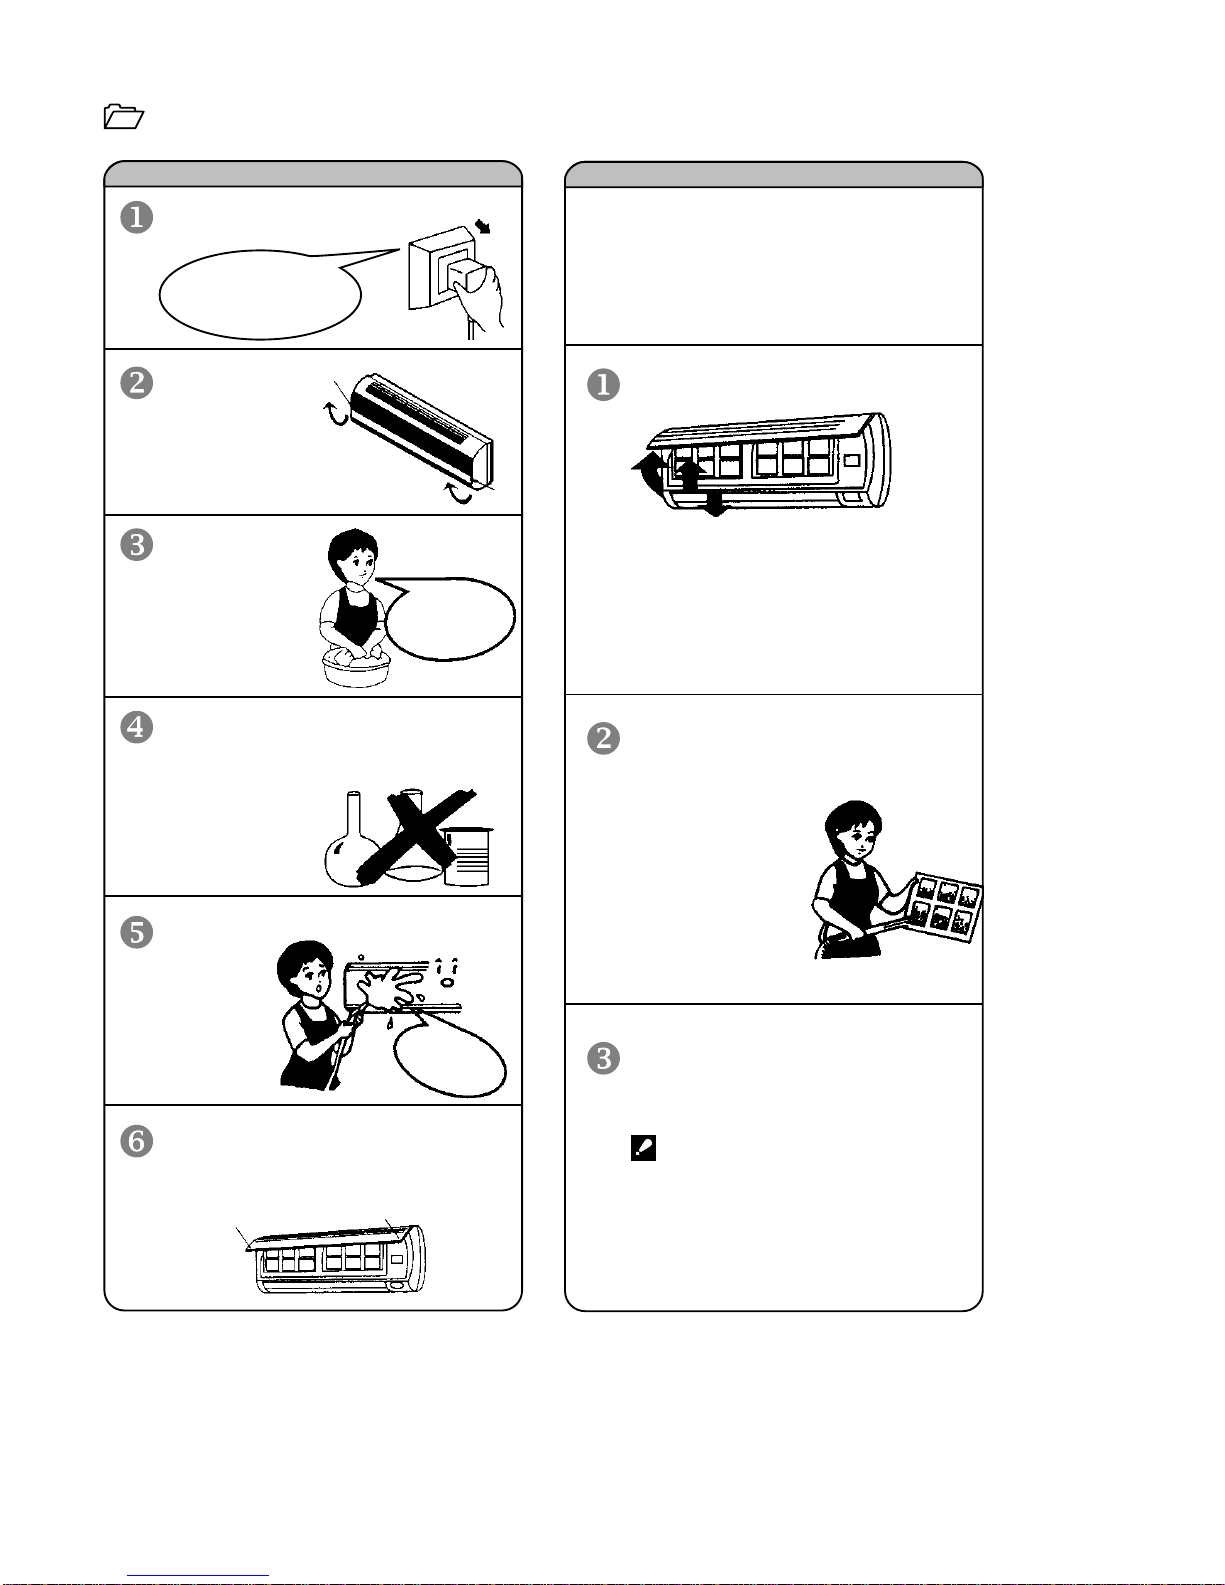
Cut off the power supply
Grasp position "a" an
pull outward to remove the
front panel. a
Wipe with a soft
and dry cloth.
Use lukewarm water
(below 400C) to clean
if the appliance
is very dirty.
Use a dry and
soft cloth to
clean it.
Never use volatile substance
such as gasoline or polishing
powder to clean the appliance.
Never sprinkle water onto the
indoor unit
Reinstall and shut the front panel.
Reinstall and shut the front panel by
pressing position "b" downward.
1. Open the front panel.
2. Press the handle of the filter gently
from the front.
3. Grasp the handle and slide out the filter.
It is necessary to clean the air filter
after using it for about 100 hours.
Clean it as follows:
Stop the appliance and remove
the air filter.
Clean and reinstall the air filter.
If the dirt is conspicuous,
wash it with a solution of
detergent in lukewarm water.
After cleaning, dry well in
shade.
Close the front panel again.
Clean the air filter every two weeks
if the air conditioner operates in an
extremely dusty environment.
Air filter maintenance
Front panel maintenance
1
23
Turn off the appliance
first before disconnecting
from power supply
a
Dangerous!
Electric
shock!
b
b
Table des matières
Autres manuels Palsonic Climatiseur