pagertec TRACKSTAFF V3 Manuel utilisateur

TRACKSTAFF V3 PAGING SYSTEM
USER GUIDE
1

Thank you for choosing Pagertec
Thank you for choosing Pagertec as your provider for your wireless paging
requirements. We greatly appreciate your confidence in our products. At Pagertec our greatest
commitment is providing you with total customer satisfaction. Please take a few minutes to
review this manual prior to installing and operating your system. The manual will provide you
with installation instructions, and offer suggestions to ensure you receive all of the many
benefits your system can provide. Additionally, this manual will assist you with problem
determination and offer helpful advice when seeking customer service. We are confident
Pagertec has the most responsive customer service available within the industry. Please do
not hesitate to contact our Customer Care, if you have any questions. We look forward to a
long and mutually rewarding partnership.
2

Track Staff V3
PAGING SYSTEM
3

TrackStaff V3
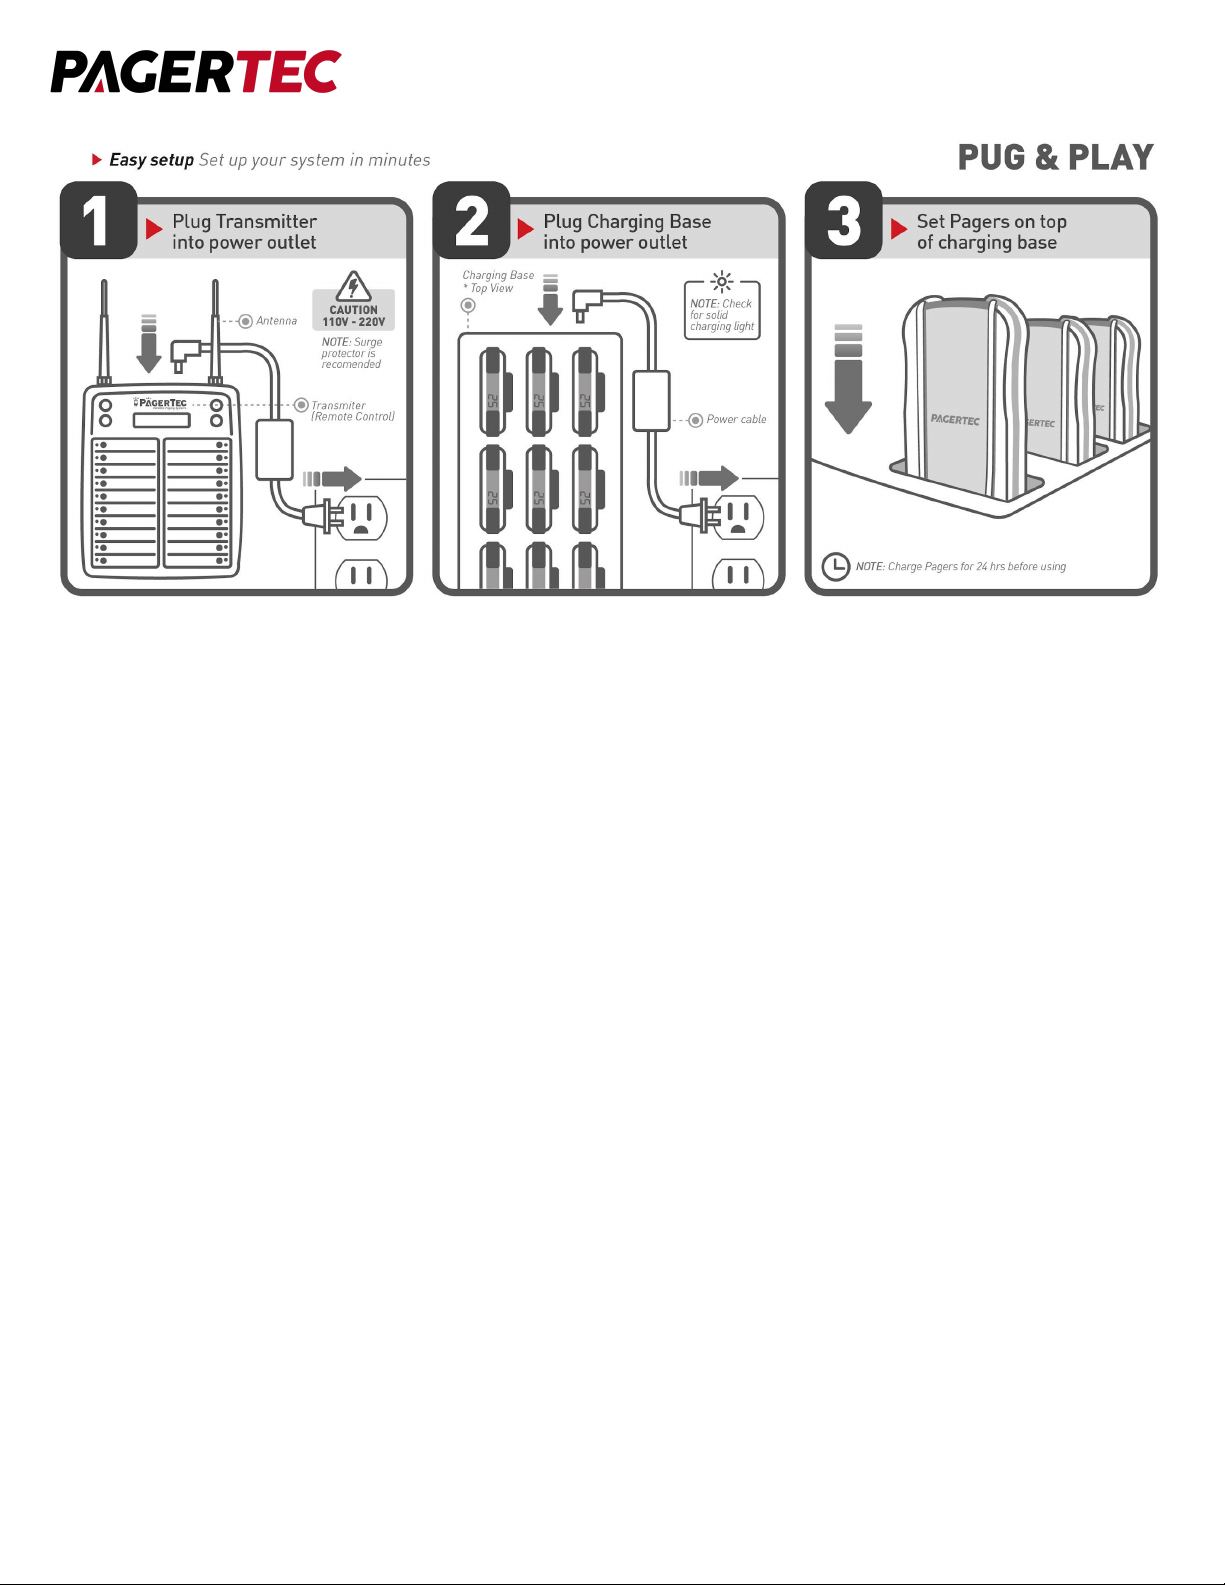
Installing the Transmitter
The first consideration in the placement of the transmitter is convenience. It should be readily
accessible in a central location within the paging area. Pay close attention to nearby
obstructions such as walls, pipes, ducts, mirrored glass, or other similar barriers that may
weaken or misdirect transmitted signals. Certain materials and construction, especially metal,
have the potential to partially or completely block the paging signal.
The next consideration involves safety. Ensure the unit is securely mounted and away from
liquids, extreme heat and possible physical damage. Also remember that the transmitting unit
requires a 110V AC power outlet. Be sure an antenna is attached prior to applying power to
avoid damage to the transmitter.
For best results, the transmitter antenna must be vertical. Ideally the transmitter should be
centrally located within the area where paging is to occur. Since this is not always possible,
range testing at different locations may be required to obtain the desired performance.
Once the Desktop Transmitter and antenna have been installed, plug in the power adapter.
Once powered the transmitter will display “Enter Pager’’ indicating it is ready to send a page.
We recommend some type of surge suppressor on the power supply for protection. Power
surges are not covered under system warranty.
4
GENERAL INFORMATION
The TrackStaff V3 Pagers are used in conjunction with the Pagertec transmitters. The staff
pagers are used as an on-premise paging system to increase efficiency by alerting staff
members to return to the kitchen usually to expedite food. who are waiting, usually for services
or goods.
CHARGING BASE INSTALLATION
1. Install the charging base.
2. Charge pagers for 24 hours prior to first use.
Note: Keep rechargeable pagers on charge even during extremely long periods of inactivity.
WARNING: Do not connect more than 3 charger base plates to a single power supply. Only
use the power supply that came with your charger. Damage caused from improper electrical
connection including but not limited to the incorrect power supply is not covered under the
standard warranty. If you’re uncertain about which power supply to use, contact our customer
support department.
5

OPERATION
1. Remove a pager from the charging station. Pagers will light up to signal they have power.
2. Record the name of the staff member next to the pager number. (Use dry erase marker)
3. Press the number on the transmitter of the pager you wish to activate
4. Pager will Vibrate, Flash, and or Beep depending on the alert mode.
5. To silence the pager you can press the sde button or set the pager back on the charger.
BATTERY INSTALLATION
The rechargeable nickel metal hydride (NiMH) batteries will typically last from one to three
years depending on usage. To replace the batteries , first remove the back lid screw using a
small Phillips head screwdriver. Lift the back lid from the front of the pager. Place the front
housing of the pager in a safe place for closure after changing the rechargeable batteries.
Next, carefully remove the old batteries. Place in the new replacement batteries (2 AAA NiMH
batteries) caution make sure to put the batteries in the correct direction following the (+ and -)
instructions on the pager. Replace the front housing and re-secure it back in place using the
Phillips head set screw.
6

CLIP REPLACEMENT
Polycarbonate Belt Clip:
To replace a damaged clip from a pager, first you must separate all parts. To do this first
remove the pin holding the clip on to the pager with a small screwdriver. Once removed,
replace the old leaf spring and attach the new belt clip to it. After everything is attached, put
the pin back in place and slide in until it locks. Replace clip with an appropriate replacement
part available for purchase as an accessory from Pagertec.
Metal Clip:
To do this first remove the screw holding the clip on to the pager with a small screwdriver. Once
removed, replace the damaged part and attach the new belt clip to it. After everything is
attached, put the screw back in place. Replace clip with an appropriate replacement part
available for purchase as an accessory from Pagertec.
7

CLEANING
Pagertec pagers are made from industrial-strength, polycarbonate material. However, this
material is susceptible to hairline cracking if non-approved cleaners are used. When cleaning
Pagertec pagers, you should only use ETHYL ALCOHOL (ethanol) or ISOPROPYL
ALCOHOL-BASED CLEANERS.
We have done extensive testing with available cleaning materials and have not found any
issues with either ethyl alcohol (ethanol) or isopropyl alcohol (IPA). ALL other cleaners are not
recommended for use on any of our pagers. To clean the equipment:
1. Take a clean cloth and an isopropyl-alcohol based cleaner
2. Wet the clean cloth with the isopropyl alcohol cleaner
3. Wipe down the pagers or equipment
4. When dry, place rechargeable pagers back on charge
SYSTEM PROGRAMMING
To enter programming mode, press the “SETUP” button on the transmitter and enter
the password “4545” followed by “enter”. If the password is accepted, the display will show the
list of menu items. (Use the “↑”& ”↓” key to scroll through the different menu
options or press “CANCEL” to exit the system programming menu.)
1. REPEAT TIME
With this feature you have the option to set your transmitter to repeat pages. You can use
this option if you would like the transmitter to remind the staff member by repaging them. If
the staff member arrives early they will need to go to the transmitter and shut off their call by
pressing their number again. When the transmitter is in the repeat stage the green light will
blink. If you wish to not repeat any page please keep setting at 0.
Selectable Options: 0-9 repeat times
Note: There is an optional cancel panel that can allow staff to shut off the call from a
different area if needed.
8

2. REPEAT INTERVAL
With this feature you have the option to choose how much time between each repeat call.
3. CALL MANAGER
If your system came with a Manager Pager, this feature allows you to alert the manager and
let them know which server has not come back to the pick area. If this feature is turned on,
staff will always need to return and shut off their call to avoid paging manager pager.
4. RANGE TEST
This feature allows you to do a range test with your transmitter to determine what distance your
transmitter will cover.
● To activate this feature just press “Enter” on the Range Test Option.
● Take a pager you would like to test the range with.
● Every 5 seconds a beep will go off on the pager to signal the page was received.
Once you stop hearing the beeps you will know you are out of range. To exit the testing
feature press “Cancel”. If you need more range Pagertec provides signal repeaters to increase
range.
5. SET ALERT MODE
With this feature you can have the option of changing your pagers alert type.
To change the alert type of your pagers follow the below instructions:
1. At the “Set Alert mode” menu press the “ENTER” key
Select one of 1~6 Alert modes then press “ENTER” key.
1. LED
2. LED / Vibe
3. LED / Beep
4. LED / Vibe / Beep
5. Vibe
6. Beep
9

Use the “▲”“▼” key to scroll through these 6 alert modes.
Pagers that have successfully received the change alert mode message will blink all LED
lights. At this point, all of the pagers in your system should alert with the alert mode that
you selected.
Press “Cancel” key to exit, and return to the main menu.
6. SET ALERT TIME
With this feature, you can set the alert time how long the pager alerts when the pager has
received the signal from the transmitter:
To change the Alert time of your pagers, follow these instructions:
1. At the “Set Alert Time” menu press “Enter”
2. Use the “▲”“▼” key to scroll through the different times
3. Select one of 9 Alert times as below then press “Enter”
1. 2 SEC
2. 5 SEC
3. 10 SEC
4. 15 SEC
5. 30 SEC
6. 60 SEC
7. 90 SEC
8. 120 SEC
9. Continued Alert (Will shut off when returned to the charger or silenced by silence button)
• The pagers will now respond with your new selected alert time mode.
Press “Cancel” key to exit, and return to the main menu.
10
Autres manuels pour TRACKSTAFF V3
2
Table des matières
Autres manuels pagertec Téléavertisseur

pagertec
pagertec Wear and Go Manuel utilisateur

pagertec
pagertec Matrix Stand Alone Manuel utilisateur

pagertec
pagertec TRACKSTAFF V3 Manuel utilisateur

pagertec
pagertec Simple Alert Manuel utilisateur

pagertec
pagertec FORESTAFF WATCH PAGING SYSTEM Manuel utilisateur

pagertec
pagertec Smart Stack EVO Manuel utilisateur


