PaceMaster Gold XRC Manuel utilisateur


2
TABLE OF CONTENTS
INTRODUCTION 3
IMPORTANT SAFETY INSTRUCTIONS 4
ASSEMBLY INSTRUCTIONS 5-18
Installation Requirements 5
Unpacking Your Recumbent 5
ToolsRequiredforAssembly 5
BoxContents 6
Hardware Package Contents 7
Assembling Your Recumbent 8-18
THE PACEMASTER GOLD XRC BIKE CONTROL PANEL 19
OPERATING INSTRUCTIONS 19-33
Gold XRC Control Panel 19
Button Functions 20
Monitoring Heart Rate 21
QuickStart 22
Manual Operation 22
CustomProgram 23
IntervalProgram 26
HillClimbProgram 27
Target HeartRate Program 28
Constant Effort Program 29
FitnessTestProgram 31
Hear Rate Recovery Program 32
BMI Index Program 32
Gold XRC Exploded Parts Diagram 34
PACEMASTER TECHNICAL SPECIFICATIONS 35

INTRODUCTION
Congratulations and thank you for choosing PaceMaster – your partner in achieving your fitness goals and
mastering your well-being. PaceMaster’s advanced digital technology allows your equipment to process
information instantly, anticipating and adjusting to meet your needs. Think of it as your own personal trainer.
PaceMaster’s superior components and US design ensure we produce equipment of the highest quality while
also offering excellent value for your dollar. PaceMaster products have consistently received praise from a
wide range of nationally recognized publications.
To get the most from your PaceMaster, please read this owner’s manual carefully before starting to use this
piece of exercise equipment. The manual contains important information about the assembly, operation and
maintenance of the machine.
Please ensure you read and fully understand all safety information. DANGER, CAUTION, or
WARNING indicates important safety warnings throughout the manual. Failure to read and understand
these warnings may result in personal injury or damage to your Recumbent.
Tip indicates a useful suggestion when installing, assembling or using your Recumbent.
Please take the time to familiarize yourself with the range of functions available. This will help you work with
your PaceMaster Recumbent for maximum efficiency to achieve your fitness goals and master your
well-being.
We wish you an enjoyable and rewarding partnership with your PaceMaster Recumbent.
The PaceMaster Gold XRC Bike is designed for home use only.
3

IMPORTANT SAFETY INSTRUCTIONS
Read these instructions before using your Recumbent
CAUTION: Before starting any exercise program, contact your personal physician and have a complete physical. This is
highly recommended if you have not been on a regular exercise program within the last year, or are over 35 years of age, or are
overweight.
CAUTION: If at any time during your exercise program you find the exercise abnormally difficult or you encounter dizziness,
feel faint, experience chest pains, feel as if your heart may be skipping beats, you experience forced heavy breathing after minimal
exercise or severe pain in your legs, ankles, knees, etc. STOP EXERCISING and consult your physician.
WARNING: To reduce the risk of burns, fire, electrical shock or injury:
•Your PaceMaster Recumbent is not designed for use by children under the age of 18 without strict parental supervision.
•Close supervision is necessary when the Recumbent is used by or near children, disabled persons or pets.
•Use your PaceMaster Recumbent only for its intended use as described in this manual. Do not use accessories or attachments
not recommended byAerobics, Inc.
•Never operate your PaceMaster Recumbent if it has a damaged cord or plug, if it is not operating properly, if it has been dropped
or damaged or if it has been immersed in water. Should any of these occur, contact your authorized PaceMaster retailer or
service center for examination or repair.
•Keep the cord away from heated surfaces.
•Never drop or insert any object into any opening on the Recumbent.
•Do not use outdoors.
•Always unplug your PaceMaster Recumbent during an electrical storm or during extended periods of non-use.
•Do not operate where aerosol (spray) products are being used or where oxygen is being administered.
•Position the Recumbent with a minimum of 2 feet of clearance on all sides between the bike and any wall or obstruction.
•Do not allow anyone to reach under or be too near your PaceMaster while it is in use.
•Never allow more than one person on your PaceMaster Recumbent at any time.
•Never move the Recumbent while it is plugged into the electrical outlet.
•Wear appropriate shoes and attire while exercising
4

ASSEMBLY INSTRUCTIONS
Installation Requirements
Your PaceMaster should be installed indoors on a flat, level surface near a 120Volt/ Grounded outlet. You must have
a minimum of 2 feet of clearance on all sides between the bike and any wall or obstruction.
TIP: If you are installing your PaceMaster on a carpeted surface, use a equipment mat or a scrap piece of carpet
underneath the Recumbent to avoid soiling of the carpet. Deep pile carpet is not recommended.
Unpacking Your Recumbent Exercise Bike
On the next page is a listing of all the parts included in the box. Open the box and confirm that you have received all
of the parts indicated on page 6. If you are missing parts please contact yourAuthorized PaceMaster Dealer where
you purchased your piece of equipment.
Tools Required for Assembly (included)
•Phillips head screwdriver
•13 mm Wrench
•15 mm Wrench
•4 mmAllen Wrench
•6 mmAllen Wrench
5

1. Box Contents
Seat(102)
Handle bar (59)
Backrest (103)
Rear Stabilizer
(
74
)
Front Stabilizer
(66)
Left Pedal (119)
Right Pedal (120)
Right Rear Cover (49)
Left Rear Cover (48)
AC-AC Adaptor (127)
Knob (80)
Plastic Cushion (90)
Knob (101)
Computer (97)
Handrail (96)
Se seat Ba
(82)
Main Frame (1)
6

Hardware Package Contents
(151) 6mm Allen Wrench (80x80)--1PCS
(109) Bolt M8х56—4PCS
(110) M8 Acorn Nut—4PCS 4PCS(112) Spring Washer M8х2.0t—
(113) Washer 20х9х2.0t—4PCS
(91) Allen Bolt M6х35--2PCS
(41) Self Tapping Screw ST4.0x25--4PCS
(117) Open Spanner --1PCS(116) 4mm Allen Wrench --1PCS
(118) 6mm Allen Wrench (65x25)--1PCS
(152) Allen Bolt M10х15—2PCS
(150) Washer 20х10.2х3.0t—2PCS
(153) Spring Washer M10x3.0t—2PCS
(108) Allen Bolt M8х15—12PCS
(5) Washer 18х9х2.0t—12PCS
7
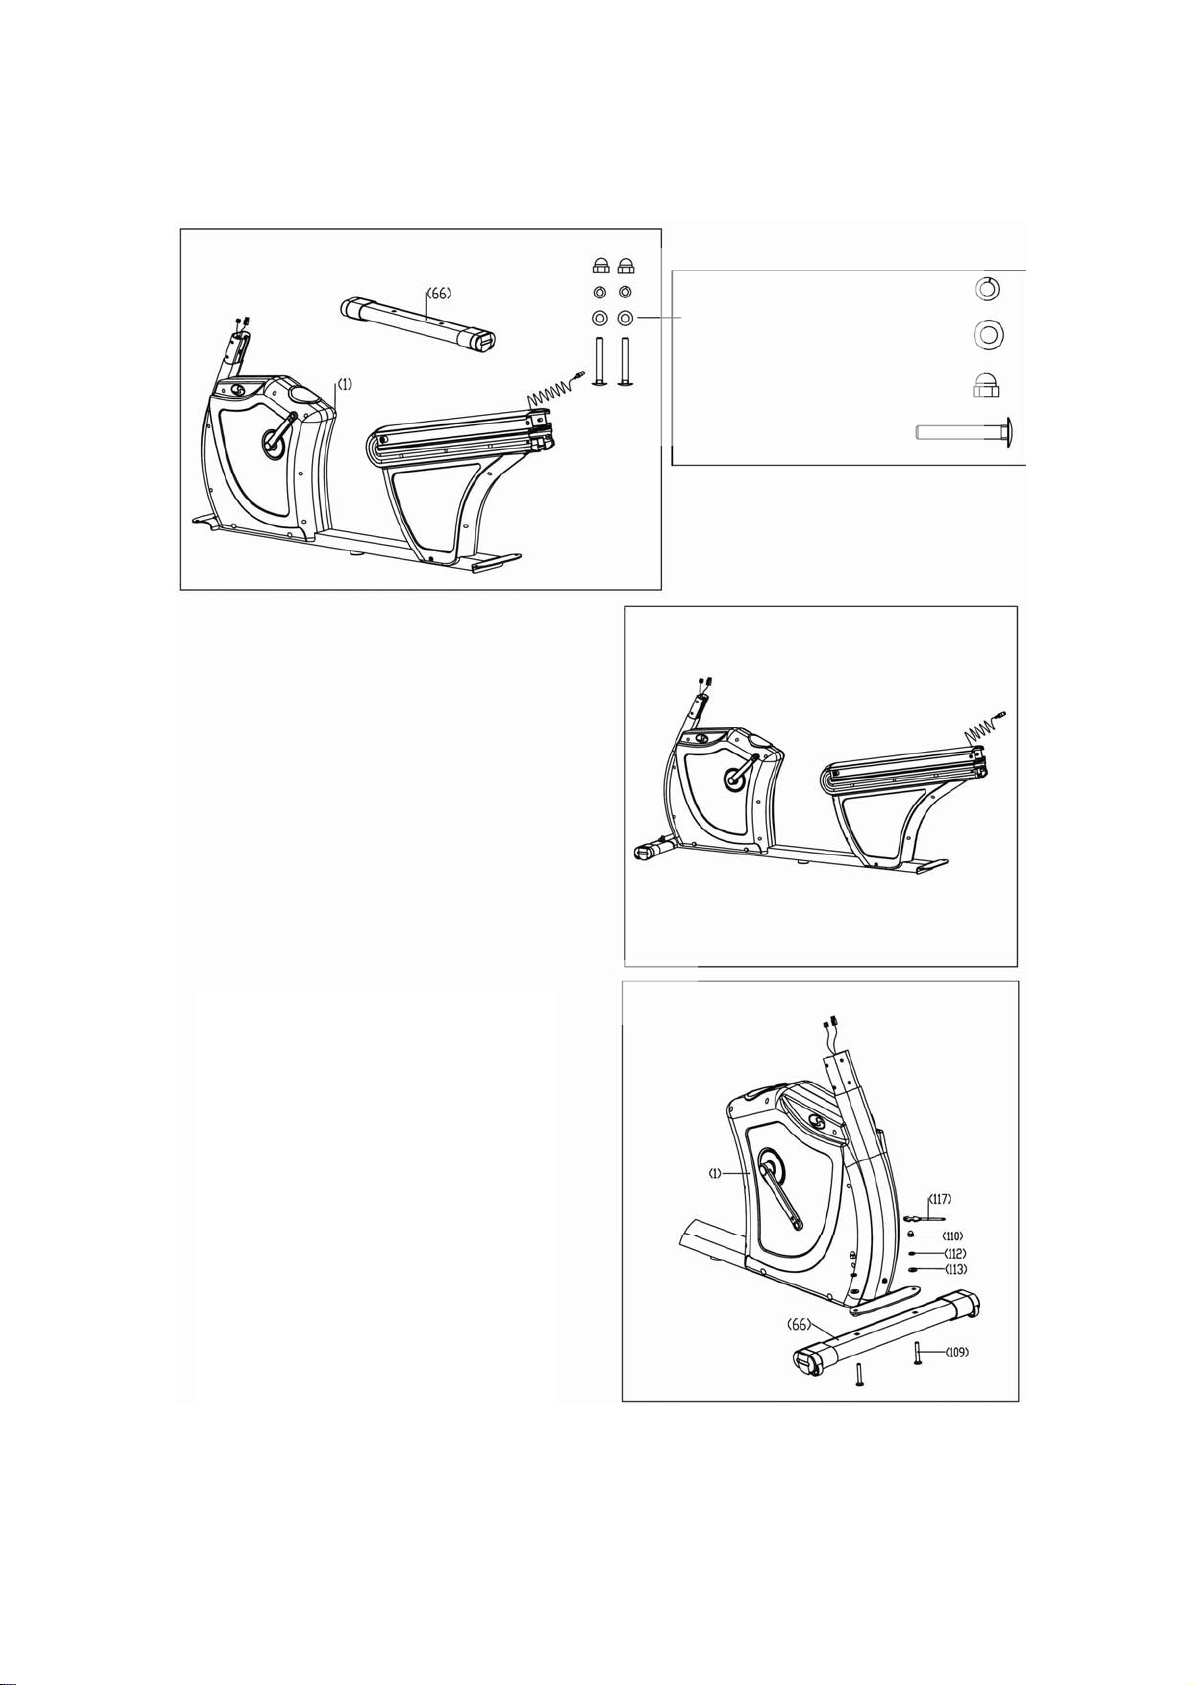
2. To assemble the Front Stabilizer
A
Step 2A:
As shown to the Right, attach the
Front Stabilizer (66) to the Frame (1)
with Bolts (109), Washers (113) (112)
andAcorn Nuts (110), then tighten
the nut with the included wrench
(117) or a 13mm wrench or socket.
Note: The front Stabilizer (66) is
the one that has the wheels on it,
AND the wheels must be towards
the front.
Spring Washer M8х2.0t—2PCS(112)
Washer 20х9х2.0t—2PCS(113)
M8 Acorn Nut—2PCS(110)
Bolt M8х56—2PCS
(
109
)
8
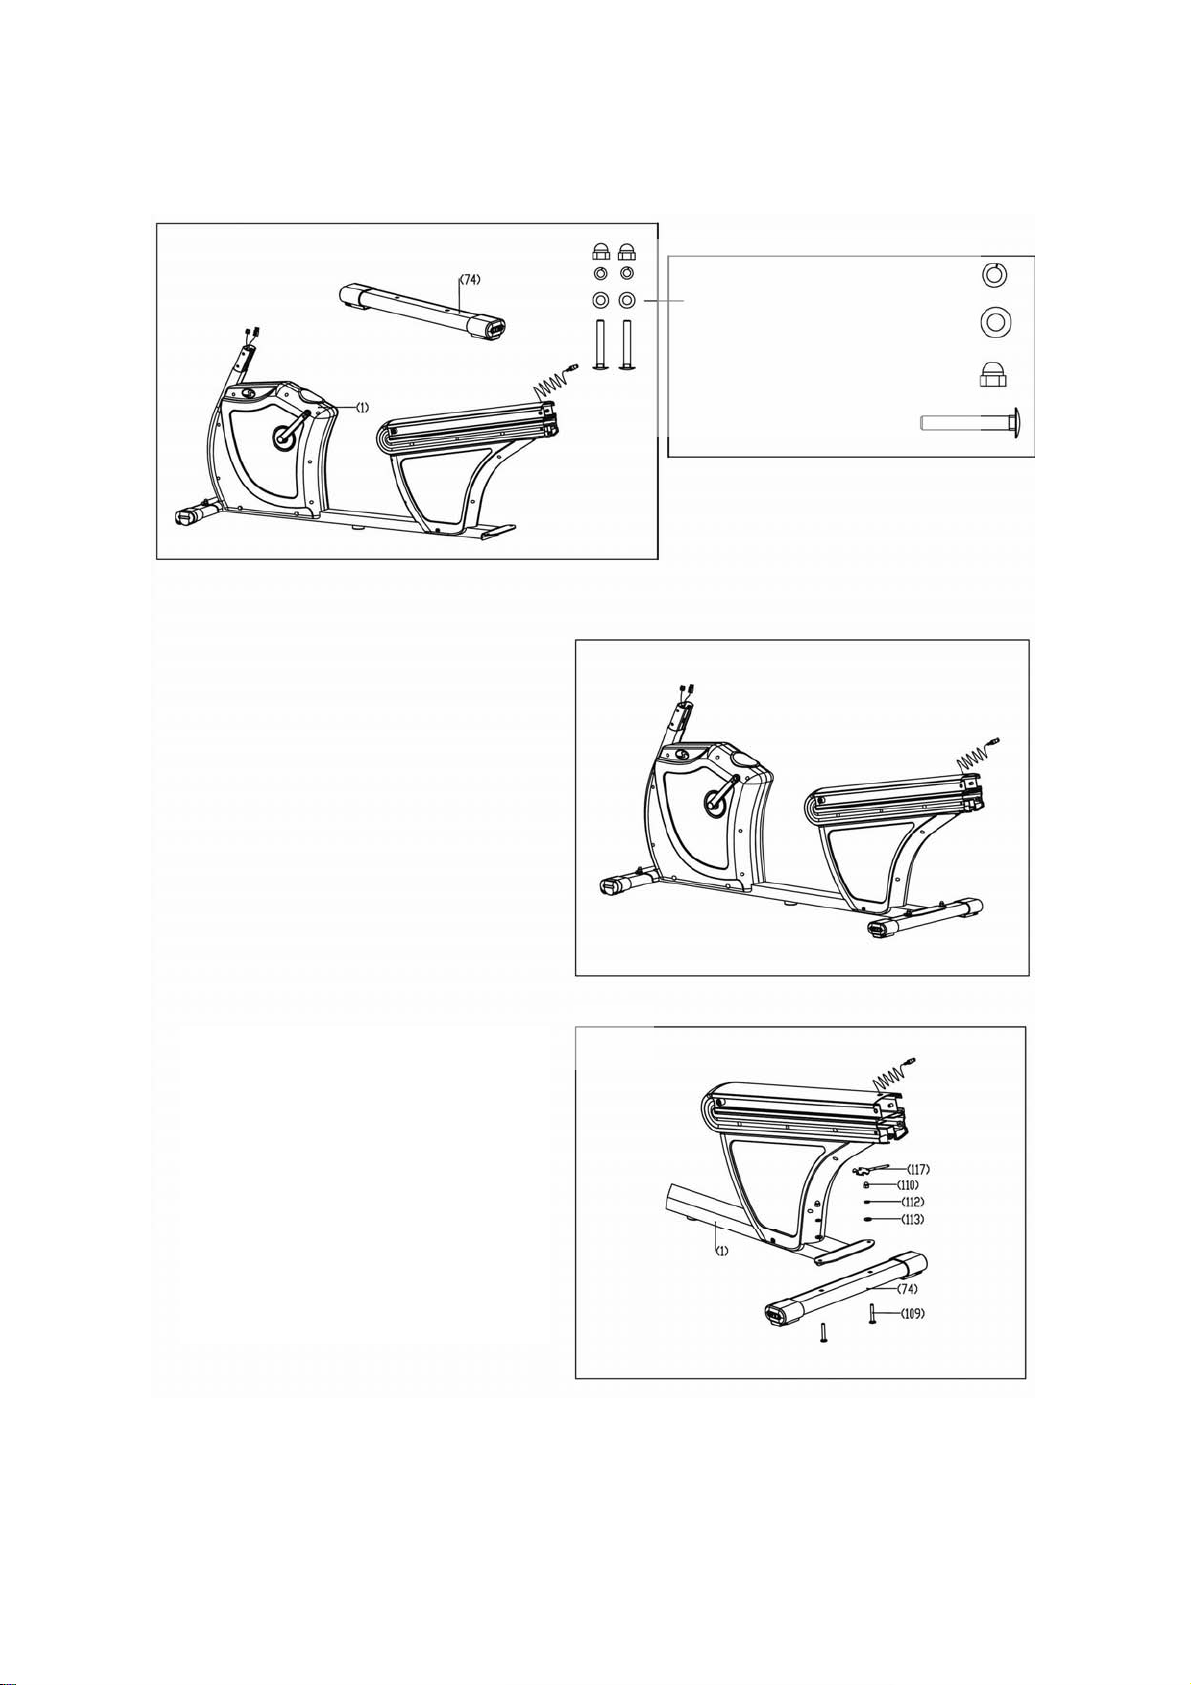
3. To assemble the Rear Stabilizer
A
Step 3A:
As shown to the Right, attach the Rear
Stabilizer (74) to the Frame (1) with
Bolts (109), Washers (113) (112) and
Acorn Nuts (110), then tighten with the
included wrench (117) or a 13mm
wrench or socket.
Spring Washer M8х2.0t—2PCS(112)
Washer 20х9х2.0t—2PCS(113)
M8 Acorn Nut—2PCS(110)
Bolt M8х56—2PCS
(
109
)
9

4. To assemble the Upright
A
Step 4A:
1. Connect the Contact Heart Rate
Wires (17) & (83) then connect Wires
(105)(122).
2. Slide the Upright (80) on to the main
Frame (1), then secure the Upright to
the Frame using 6 Bolts (108), 6
Washers (5) using a 6mmAllen wrench
(151).
Washer 18х9 х2.0t—6PCS(5)
Allen Bolt M8х15—6PCS(108)
10
Table des matières
Autres manuels PaceMaster vélo d'appartement


Manuels vélo d'appartement populaires d'autres marques


Stamina
Stamina 1310 Manuel utilisateur

American Fitness
American Fitness SPR-BK1072A Manuel utilisateur
 Manuel utilisateur")
Cateye
Cateye CS-1000 (CYCLO SIMULATOR) Manuel utilisateur

BH FITNESS
BH FITNESS H9158H Manuel de l'opérateur

Body Sculpture
Body Sculpture BC-7220G Manuel utilisateur

Cateye
Cateye EC-2300 Manuel utilisateur


