Out-Front GameCycle Manuel utilisateur

GameCycle User’s Guide 2005
Three Rivers Page 1-1
GameCycle User’s Guide
2005
Three Rivers Holdings, LLC
1826 W. Broadway Rd Ste 43
Mesa, Arizona 85202

GameCycle User’s Guide 2005
Three Rivers Page 1-2
TABLE OF CONTENTS
1SUPPORT--------------------------------------------------------------------------------------------------------1-1
2COMPONENTS ------------------------------------------------------------------------------------------------2-2
3SYSTEM SETUP -----------------------------------------------------------------------------------------------3-3
4GAMECYCLE CONTROLS ----------------------------------------------------------------------------------4-7
4.1 TYPES OF CONTROLS ON THE GAMECYCLE:----------------------------------------------------------------4-7
4.2 GAMECYCLE BUTTONS AND GAMECUBE CONTROLLER ----------------------------------------------------4-8
4.3 SETTING THE CONTROL TYPE-------------------------------------------------------------------------------4-9
4.4 SETTING THE CRANK DIRECTION ---------------------------------------------------------------------------4-9
4.5 NAVIGATION OF GAMECUBE MENU SCREENS------------------------------------------------------------- 4-10
4.6 GETTING STARTED WITH DIFFERENT GAMECUBE GAMES----------------------------------------------- 4-10
4.7 CONTROL OF AN OBJECT (E.G.A CAR)DURING GAME PLAY --------------------------------------------- 4-11
5GAMECYCLE RESISTANCE ----------------------------------------------------------------------------- 5-12
6GAMECYCLE CALIBRATION --------------------------------------------------------------------------- 6-13
7TROUBLESHOOTING ------------------------------------------------------------------------------------- 7-14
8SAFTEY INFORMATION --------------------------------------------------------------------------------- 8-15

GameCycle User’s Guide 2005
Three Rivers Page 1-1
1SUPPORT
Three Rivers is dedicated to providing friendly and comprehensive support for this and all our products.
The objective of this User’s Guide is to include all of the necessary information for the successful start up
and operation of your GameCycle. If you have any suggestions on how we might improve this document
or if you have any problems or questions, please contact us at the number below.
Three Rivers Holdings LLC
1826 W. Broadway Rd.
Suite 43
Mesa AZ, 85202
CUSTOMER SUPPORT: (480) 833-1834
Fax: (480) 833-1837
Web Site: www.3rivers.com
Email: [email protected]

GameCycle User’s Guide 2005
Three Rivers Page 2-2
2COMPONENTS
Equipment included with your GameCycle:
1 – 17” LCD TV
1 – GameCube console
1 – Nintendo GameCube AV Cable
1 – Nintendo GameCube AC Adapter (already mounted to GameCycle)
1 – GameCube videogame
1 – GameCube Memory Card
1 – GameCube Extension Cable
6 – Security screws
1 – Screwdriver
1 – Security screw bit
1 – GameCycle AC Adapter

GameCycle User’s Guide 2005
Three Rivers Page 3-3
3SYSTEM SETUP
Thank you for your GameCycle purchase! This section of the user’s manual will help you get your
GameCycle up and running quickly.
Equipment you will need:
917” LCD TV
9GameCube console
9Nintendo GameCube AV Cable
9Nintendo GameCube AC Adapter (already mounted to GameCycle)
9GameCube videogame
96 – Security screws
9Security screw bit
9GameCycle
9GameCycle AC Adapter
93 or more outlet power-outlet bar
9Extension cord (if wall socket is a distance away)
1. Mount the LCD TV to the stand using 4 of the security screws and screw driver bit located in the GameCube box.
The TV will mount to the stand using the outer most holes on the stand’s mounting plate (Figure 3.1).
Figure 3.1: Mounting the LCD TV to the GameCycle.

GameCycle User’s Guide 2005
Three Rivers Page 3-4
2. Connect the LCD TV power by inserting the power jack protruding out of the hole in the top of the stand into the
outlet on the bottom of the LCD TV (Figure 3.2a) and by inserting the 3-prong jack protruding out of the bottom
of the stand into the power outlet bar(Figure 3.2b).
Figure 3.2: a) LCD TV power and b) the back of the GameCycle.
3. Mount the GameCube to the stand using the remaining 2 security screws and screw driver bit located in the
GameCube box (Figure 3.3).
Figure 3.3: Mounting the GameCube to the
GameCycle stand.
4. Connect the GameCube power (Figure 3.4) by inserting the GameCube DC jack protruding out of the top of the
stand into the DC input connector (DC 12V IN) on back of the GameCube and by inserting the 2-prong jack
attached to the bottom of the stand into the power outlet bar.
Figure 3.4: GameCube power.

GameCycle User’s Guide 2005
Three Rivers Page 3-5
5. Connect the GameCube to the LCD TV using the Nintendo GameCube AV Cable found in the GameCube box
(Figure 3.5). The red, white and yellow connectors plug-in to the “AV1 IN” connectors on the LCD TV while the
other side plugs in to the “ANALOG AV OUT” connector on the back of the GameCube console.
Figure 3.5: Connecting the GameCube to the LCD TV.
6. Connect the GameCycle power by using the GameCycle AC Adapter found in the GameCube box by inserting
small round plug of the adapter into the connector on the end of the right support arm of the GameCycle (Figure
3.6). and plugging the 2-prong outlet on the adapter into the power outlet bar (Figure 3.2b). .
Figure 3.6: GameCycle power.

GameCycle User’s Guide 2005
Three Rivers Page 3-6
7. Connect the GameCycle to the GameCube by inserting the GameCycle controller plug protruding out of the hole
at the top of the stand into the Controller Socket on the front of the GameCube console (Figure 3.7).
Note: Make sure the GameCycle controller cable leaving the back of the right support arm is connected to the
GameCube extension cable found at the bottom of the stand (Figure 3.2b).
Figure 3.7: Connecting the GameCycle
to the GameCube.
8. Once all the above connections have been made, you are free to turn on the power outlet bar, GameCube, and
LCD TV. If the GameCycle LCD screen is blank, follow the instructions in the “Troubleshooting” section.
Note: The LCD TV and GameCube turn on separately.
Note: Make sure the TV is in “AV1” mode. If nothing shows on the TV at startup, push the “Source” button on
top of the TV until it is in the “AV1” mode.
GameCycle User’s Guide 2005
Three Rivers Page 4-7
4GAMECYCLE CONTROLS
4.1 Types of controls on the GameCycle:
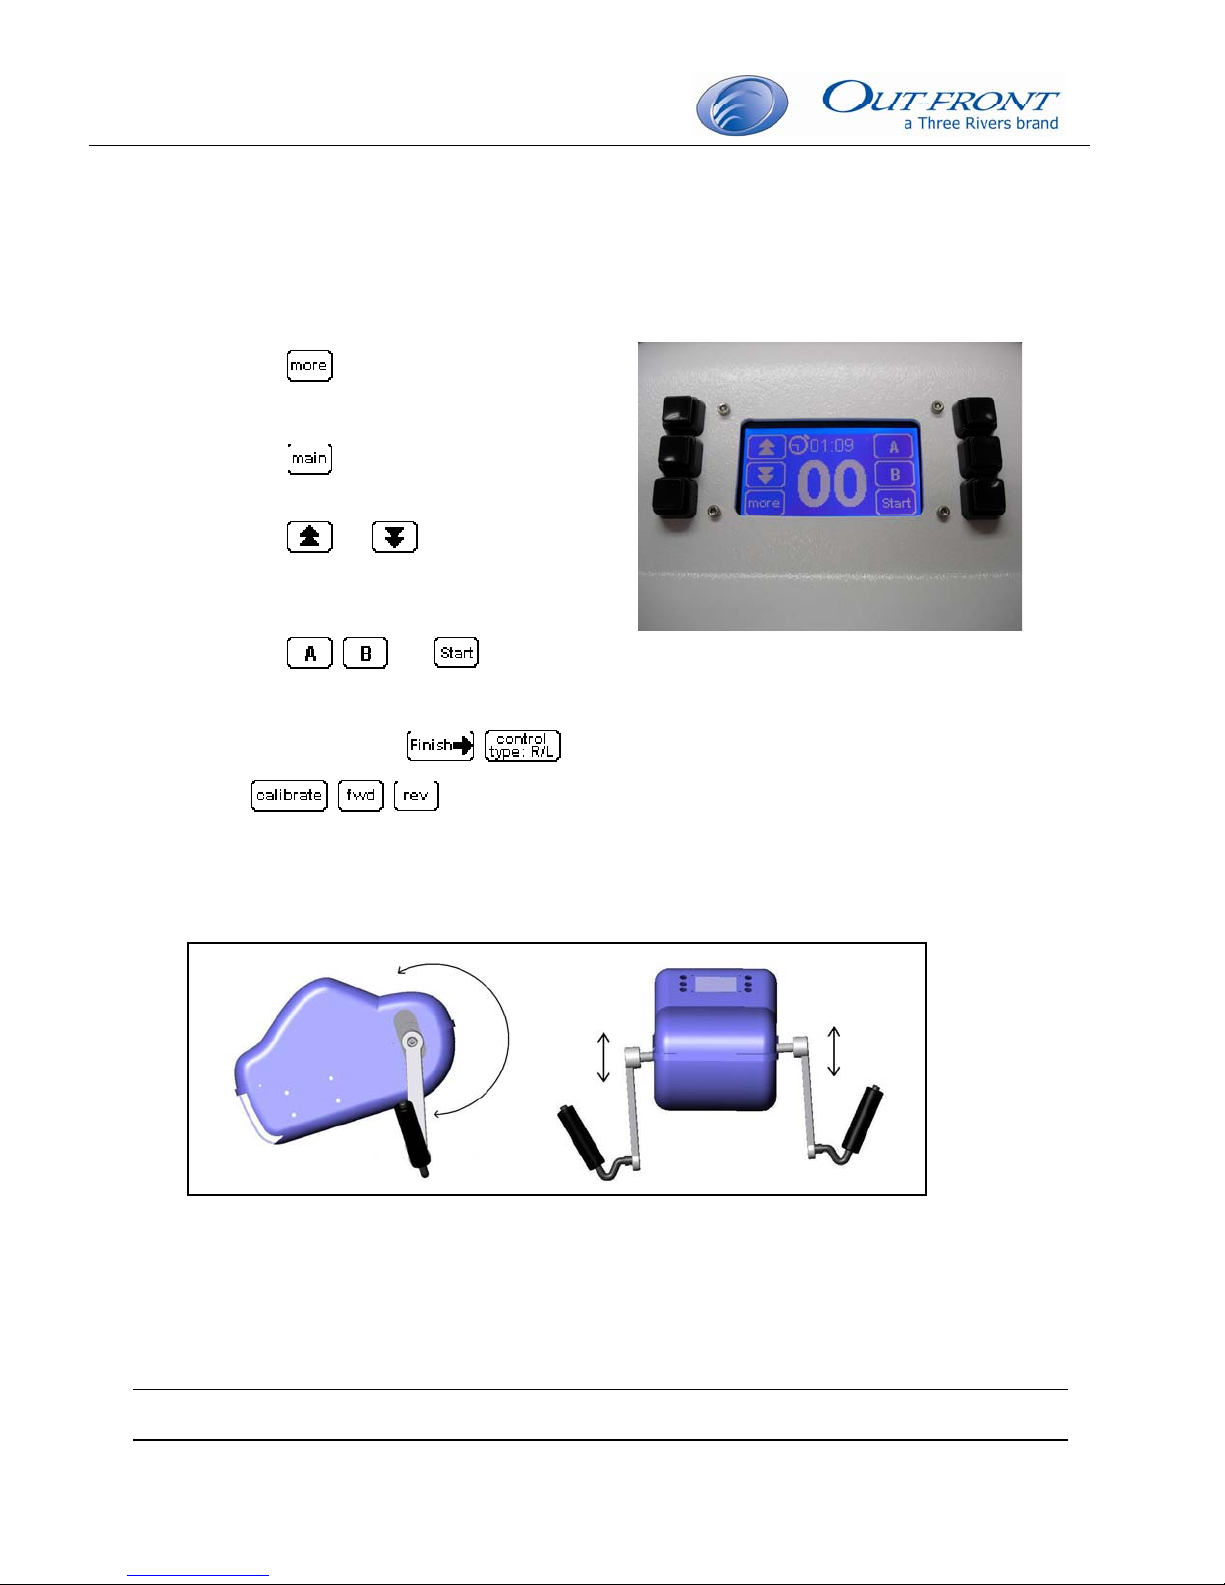
1. To use the buttons to the left and right of the small blue screen on the GameCycle, press firmly.
2. The label for each button appears on the blue screen.
Figure 4.1: The main GameCycle Screen.
a. The button on the main GameCycle
screen (Figure 4.1) will give you access to an
additional 3 screens of buttons.
b. The button will take you back to the
main GameCycle screen.
c. The and arrows on the main
screen control the tension of the GameCycle
crank arms when cranking forward or
backward.
d. The , , and buttons are
commonly used select menu items, go back a
screen, and pause the game.
e. The other buttons ( , ,
, , ) will be explained in subsequent sections of the User’s Guide.
4. To steer, tilt the arm cranks of the GameCycle to the left or right (a tilting motion as seen in Figure 4.2b).
3. To control speed, rotate the crank arms of the GameCycle forward or backward (Figure 4.2a).
Figure 4.2: a) Moving forward or backward with the GameCycle b) moving left or right using the GameCycle
a. b.

GameCycle User’s Guide 2005
Three Rivers Page 4-8
4.2 GameCycle Buttons and GameCube Controller
The GameCycle buttons that control the GameCube correspond to the buttons on the GameCube
controller (e.g. pushing the button on the GameCycle is the same as pushing the “A” button on the
GameCube controller or pushing the button on the GameCycle is the same as pushing the up on
the +Control Pad of the GameCube Controller).
Figure 4.3: The GameCube Controller and GameCycle screens.
Autres manuels pour GameCycle
1
Ce manuel convient aux modèles suivants
1
Table des matières
Manuels Jeu populaires d'autres marques


Fundex Games
Fundex Games Timber Tumble Manuel utilisateur

Go! Gater
Go! Gater 1-1-16453-TP02 Manuel utilisateur

Smoby
Smoby BBF Challenger Manuel utilisateur

Hathaway
Hathaway BG2019SK Manuel utilisateur

Roberto Sport
Roberto Sport INGLESE Manuel utilisateur

Beleduc
Beleduc XXL Witches' Kitchen Manuel utilisateur

Koala Technologies
Koala Technologies KoalaWare Spider Eater Manuel utilisateur

Tomy
Tomy The Magic Oven Manuel utilisateur

Sega
Sega GAME SHOW Manuel utilisateur

Tiger Electronics
Tiger Electronics Last Out 7-584-0 Manuel utilisateur

Fisher-Price
Fisher-Price RollOverRover Manuel utilisateur

Mattel
Mattel World Championship Football Manuel utilisateur