Oricom AM20 Manuel utilisateur

User Manual
AM20
PLEASE READ THIS USER GUIDE BEFORE INITIAL USE.
Keep this user guide for future reference. Always retain your proof of purchase in case of warranty
service and register your product on line at AUSTRALIA: www.oricom.com.au
Please visit www.oricom.com.au for the latest copy of the user manual.
Oricom Customer Support: 1300 889 785 or (02) 4574 8888
Doorbell and Phone Ring Alerting system
2
Description
Description
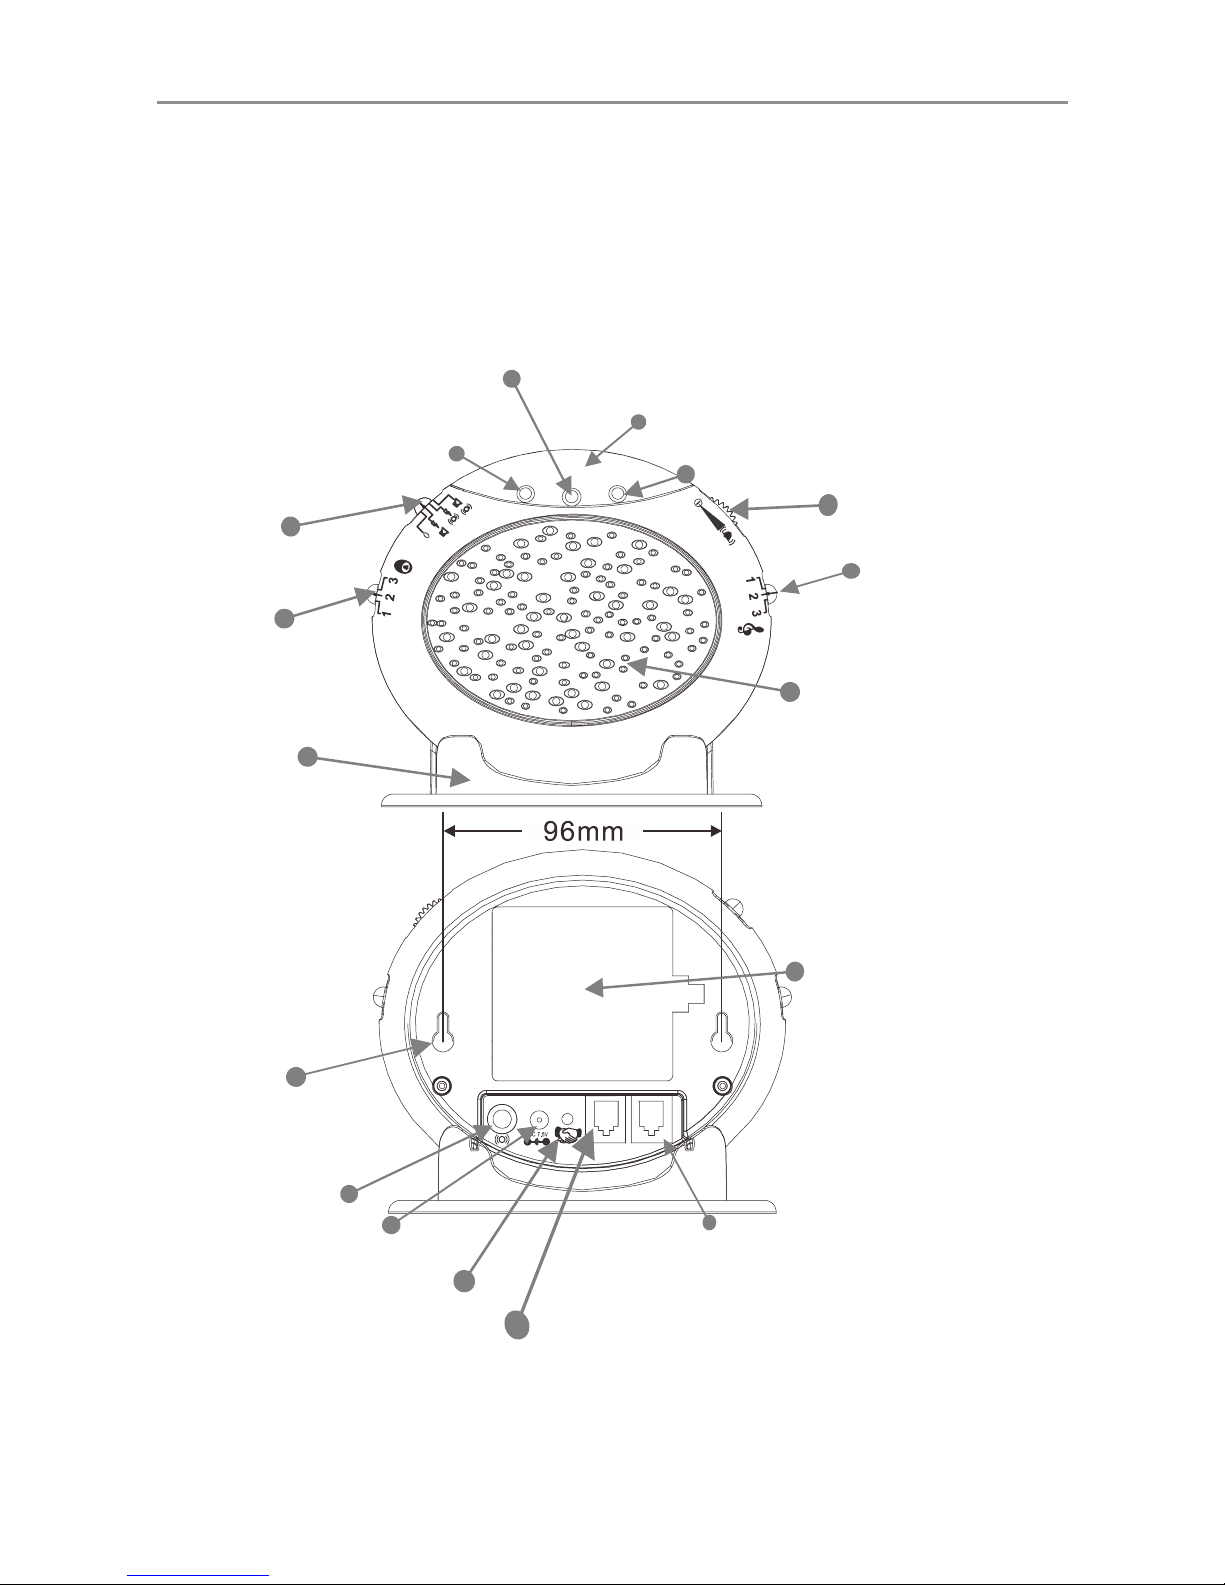
AM20 Main unit
Red LED
Doorbell tone
control
OrangeLED
Strobe flasher
Volume control
Tone control
Speaker
Alarm mode
switch
Low battery indicator
(Green LED)
Desk stand
AC adaptor jack
Wall mounting
screw holes
Shaker jack
Socket for Telephone
line connection
Socket for Telephone
connection or to connect to a
second AM20 (not Supplied)
battery
compartment
(4 X AA Alkaline-
Batteries not supplied)
FRONT
REAR
Pairing/Test button
LINE PHONE

Installation
3
This Pack Contains
One AM20 Main Unit
One Wireless doorbell
One Desk Stand
One Energy efcient MEPS AC Adaptor
One Telephone Line cord
Four screws and raw plugs for wall mounting
Warning
The product is designed for indoor use only.
Do not install the product in areas where there is the risk
of an explosion, or exposure to smoke, dust, vibrations,
chemicals, moisture and heat.
It is very important that you read the User Guide
carefully as it contains detailed information on setup and
operational issues which you will need to be aware of to
ensure this product operates properly. Following is a list
of some of the important issues and important warnings
which you need to be aware of.
• Donotusethisproductduringathunderstormasitis
possible to get a shock.

Installation
4
• Thisproducthasbeendesignedforindividualswho
are hard of hearing and has volume which is louder
than a standard product.
• Donotconnectthisproducttoanextensionofa
Digital Telephone system (PBX). Damage to this
product or the phone system may occur.
Notes for operation in New Zealand
The grant of a Telepermit for any item of terminal
equipment indicates only that Telecom has accepted
that the item complies with minimum conditions for
connection to its network. It indicates no endorsement
of the product by Telecom, nor does it provide any sort
of warranty. Above all, it provides no assurance that any
item will work correctly in all respects with another item
of Telepermitted equipment of a different make or model,
nor does it imply that any product is compatible with all
of Telecom’s network services.Telepermitted equipment
only may be connected to the auxiliary telephone port.
The auxiliary telephone port is not specically designed
for 3-wire-connected equipment, 3-wire-connected
equipment might not respond to incoming ringing when
attached to this port.

Installation
5
REN (RN for New Zealand)
The REN (Ringer Equivalence Number) or (RN) is of
significance only if you wish to connect more than 1
telephone to your telephone line. A standard telephone
line has a maximum REN capacity of 5 (RN of 5). It is
possible to connect 5 devices with a REN of 1 (RN of
1) with no degradation to the product’s performance.
Exceeding this limit may cause the volume of the ringer
in any phone to decrease or not ring at all.

Installation
6
How To connect:
Wireless doorbell
AC adaptor
Power socket
Option: VIB100 Shaker
(not supplied)
Telephone
Socket
LINE PHONE
1) Insert 4 AA Alkaline batteries (not supplied) into the
battery compartment
2) Connect one end of the telephone line cord to the
AM20 and the other end to the wall socket.
3) Connect the telephone cable between the AM20 and
your telephone.
4) Plug the power cable into the power AC adaptor jack
of the AM20. Plug the AC adaptor into the mains
power point.
Installation
7
Setting up doorbell
1. The doorbell can be xed on a wall or a door frame.
Drill two holes horizontally, 15mm apart and place the
supplied anchors into the two holes.
2. Hang the doorbell onto the two anchors and then
insert and tighten the screws. Stick the white name
plate over the two holes.
3. The doorbell can be stuck onto a door or window
using the supplied strong adhesive tape. Remove the
protective paper from the adhesive tape on the back of
the doorbell and stick to the required door or window.
Wall Mounting the ringer
1. Drill two holes horizontally, 96mm apart, and leave
the screws protruding 5mm from the wall.
2. Hang the base onto the two screws (supplied) and
pull the base down to lock it on.
Table Mounting
If you want to mount the AM20 on a table, simply clip it
into the base stand and place on a table.

Installation
8
Setting the Alarm Mode
Choose which alarm mode you want by moving the
alarm mode switch to one of the following positions:
0:no alarm
:both strobe asher and sound alarm activated
:both strobe flasher and shaker (if connected)
activated
:both sound alarm and shaker (if connected)
activated
Volume Control Slide Switch
Use the slider control to adjust the volume of the doorbell
ring, phone ring or to turn power off.
Tone Control Switch (3 Positions)
Set the tone of the alarm sound.
DoorBell Tone Control
The three position switch allows you to set a different
tone when the doorbell rings.
Fitting Batteries in the AM20
For battery back up in case of power failure or for
portable use when no mains power is available the main
unit requires 4×AA Alkaline batteries (not supplied).

Installation
9
1. Open the battery compartment door.
2. Insert 4 x AA Alkaline batteries into the battery compartment.
3. Snap the battery compartment door back into place.
IMPORTANT:
When the red LED indicator ashes, it is time to replace
the batteries.
Before tting or replacing the batteries, disconnect the
main unit from power and remove the telephone line
cord from the main unit .
Adding a second AM20
If required a second AM20 can be added to the system
contact Oricom 1300 889 785 for details.
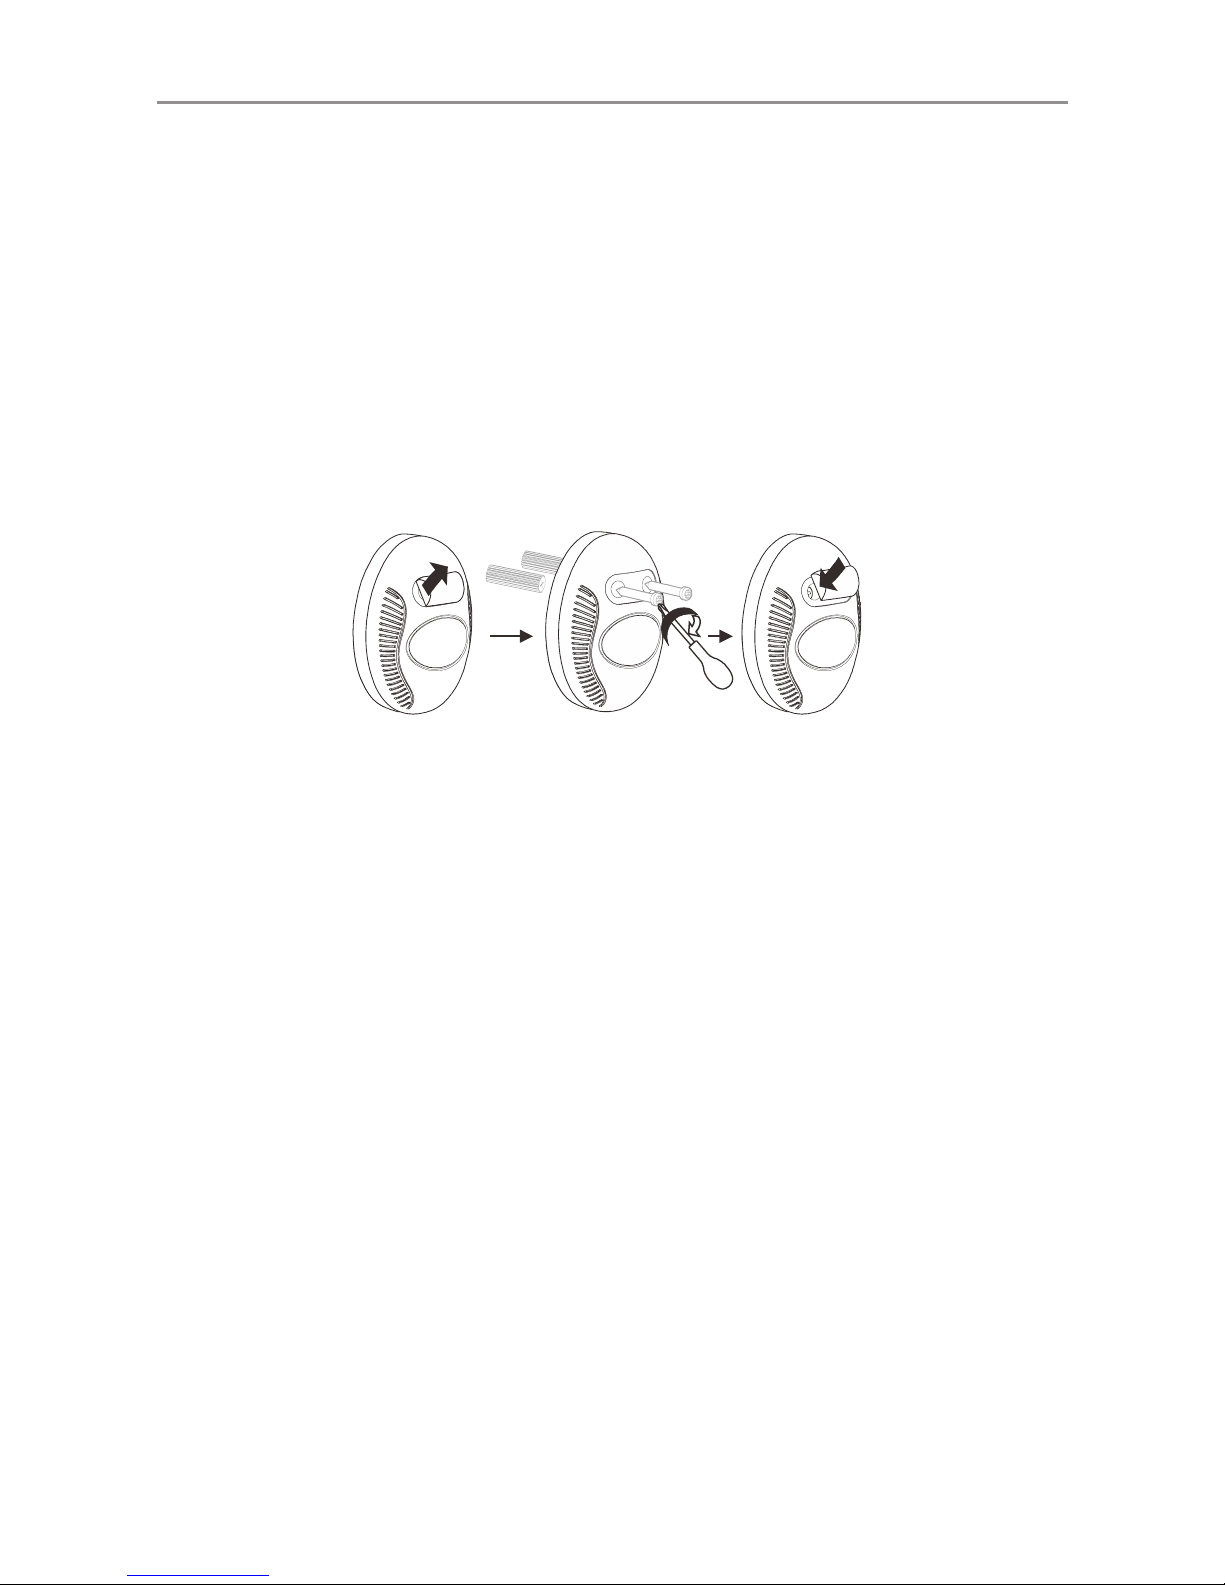
Change the Battery in the Doorbell
The doorbell is supplied with a type 23A 12V battery
installed and is ready to use, it is not necessary to open
the doorBell when you rst set up the AM20.
If the red light on the doorbell is not ashing when it is
pressed it is time to replace the battery in the doorbell.
To replace the battery, unscrew the it from the wall,
unscrew the ve screws located on the base and open
the box to get access to the battery compartment.
Replace the battery, replace back and remount.

Installation
10
Note:
Do not use a rechargeable battery. Dispose of batteries
according to local regulations, never in your household
rubbish.
The Pairing Procedure
1. Press and hold the Pairing/Test button until the AM20 makes
a beep sound, then release the Pairing/Test button. The
1st LED lights to indicate that the pairing mode has been
entered.
2. Press and hold the Pairing/Test button again until the
1st LED flashes, then press and hold the remote button
at the same time until the strobe flasher flashes. The
AM20 makes a beep sound to conrm pairing has been
successful.
3. If the user wants to pair a 2nd and 3rd remote, when the
1st LED lights, press the Pairing/Test button once, the
1st LED goes off and then the 2nd LED lights. The user
is then able to pair the 2nd remote. Repeat the same
procedure for the 3rd remote.
Table des matières
Manuels Système de sécurité populaires d'autres marques


EDM
EDM Solution 6+6 Wireless-AE Manuel utilisateur

Highway Safety Group
Highway Safety Group EA401 Manuel utilisateur

Siren
Siren LED GSM Manuel utilisateur

Detection Systems
Detection Systems 7090i Instructions de montage

Se-Kure Controls
Se-Kure Controls MicroMini SK-4841 Manuel utilisateur

Siemens
Siemens FDM273 Manuel utilisateur